Table of Contents >> Show >> Hide
- Why Tissue Paper Pom-Poms Are the MVP of Party Decor
- What You’ll Need (No Craft Degree Required)
- The 4-Step Method: Fluffy DIY Tissue Paper Pom-Poms Fast
- Pom-Pom Math: Size, Fullness, and Color Combos That Actually Work
- Common Mistakes (and How to Fix Them Without Starting Over)
- Ways to Use Tissue Paper Pom-Poms (Beyond “Hang From Ceiling, Done”)
- Kid-Friendly Option (Because Little Hands Love Fluffing)
- How to Store and Reuse Pom-Poms
- Conclusion: Your 4-Step Shortcut to Fluffy, Fabulous Decor
- Real-Life Pom-Pom Experiences ( of Lessons, Laughs, and Light Regret)
Tissue paper pom-poms are the party decoration equivalent of showing up to a potluck with homemade brownies: they look impressive, they cost almost nothing, and people assume you have your life together. (You do. At least in the tissue paper aisle, you do.)
In this guide, you’ll learn the classic, fluffy, round DIY tissue paper pom-pom method in four simple stepsplus pro tips on sizing, color combos, hanging, and saving a pom-pom that looks more like a crumpled napkin with dreams.
Why Tissue Paper Pom-Poms Are the MVP of Party Decor
A good decoration does three things: it fills space, it adds color, and it makes the room feel “done” without requiring you to own a ladder taller than your confidence. Tissue paper pom-poms check all three boxes.
- Budget-friendly: A few sheets of tissue paper create a big visual impact.
- Lightweight: Easy to hang from ceilings, doorways, arches, and photo backdrops.
- Customizable: Make them in any color palette (and mix shades for an ombré look).
- Scalable: Tiny pom-poms for gift toppers, giant ones for weddings and showers.
- Beginner-proof: You don’t need a craft roomjust a flat surface and mild determination.
Use them as DIY party decorations for birthdays, baby showers, bridal showers, graduations, school events, and any gathering where you want people to say, “Wow,” instead of, “Oh… you live here.”
What You’ll Need (No Craft Degree Required)
Materials
- Tissue paper: 8–12 sheets per pom-pom (more sheets = fuller pom-pom).
- Floral wire, pipe cleaner, or strong string: To cinch the center.
- Scissors: Sharp is kind. Dull scissors make tissue paper cry.
- Ribbon, fishing line, or twine (optional): For hanging or garlands.
Optional (But Honestly Nice to Have)
- Ruler: Helps keep accordion folds consistent.
- Bone folder or the edge of a credit card: For crisp creases without ripping.
- Binder clips (or clothespins): To hold the stack steady while folding.
- Dry hands + patience: The secret ingredients no one sells in stores.
Quick note on tissue size: Large tissue sheets (often around 20×30 inches) make big, dramatic pom-poms. Standard gift tissue also worksyou’ll just get a slightly smaller bloom unless you stack extra sheets.
The 4-Step Method: Fluffy DIY Tissue Paper Pom-Poms Fast
Here’s the classic party pom-pom: round, airy, and suspiciously expensive-looking. We’ll do it in four steps: stack, fold, tie & trim, then fluff.
Step 1: Stack & Square Up the Tissue
Stack 8 to 12 sheets of tissue paper neatly. The cleaner your stack, the more symmetrical your pom-pom will be. If your edges are misaligned, your finished pom-pom may look like it’s leaning into a strong breeze. (Not necessarily bad. Just… expressive.)
Pro tip: If your tissue sheets are huge and you want medium pom-poms, cut the stack in half before folding. Cutting first is easier than trying to wrestle a giant pom-pom into “not too big for my apartment” territory later.
Want a multicolor pom-pom? Layer shades intentionally: light colors on the outside create a soft, airy look; bold colors outside make a brighter, more graphic “flower” edge.
Step 2: Accordion-Fold Like You’re Making a Paper Fan
Starting on the short edge, fold the entire stack back and forth into accordion pleats. Aim for pleats about 1 to 2 inches wide. Smaller pleats create a tighter, more “carnation” look; wider pleats create a looser, puffier bloom.
- Fold forward ~1–2 inches, crease gently.
- Flip the stack over, fold the same amount back.
- Repeat until the whole stack is a tidy “fan.”
Don’t over-crease: Tissue paper is delicate. Press firmly enough to hold the fold, but not so hard that you tear the layers. If you do tear it, don’t panictears disappear once you fluff.
Step 3: Tie the Center & Trim the Ends
Find the center of your folded stack (measure if you want perfection; eyeball it if you want personality). Wrap floral wire, a pipe cleaner, or strong string around the center and tie it as tight as you can. Tight mattersloose ties lead to droopy pom-poms that look like they’ve had a long week.
If you’re using floral wire, twist it securely and leave extra length to form a hanging loop. If you’re using string, knot it firmly and attach a separate hanging line afterward.
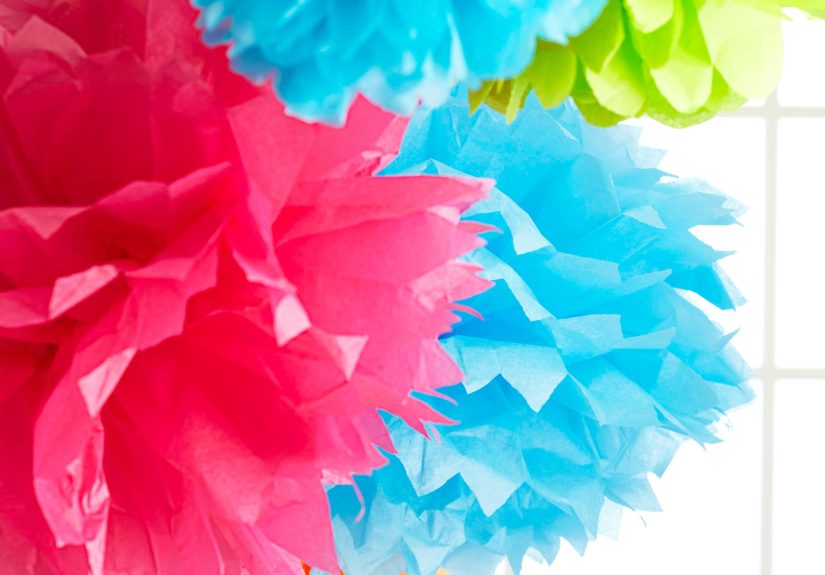
Now choose your edge shape (this changes the whole vibe):
- Rounded ends: Soft “peony” lookclassic and fluffy.
- Pointed ends: Spiky “chrysanthemum” lookmore dramatic texture.
- Scalloped ends: Cloud-like puffcute and whimsical.
- Fringed ends (advanced-ish): Adds extra texture but takes longer.
Trim both ends through all layers at once, keeping your cuts even. You should now have a folded fan, cinched in the middle, with stylish endslike a bow tie for a very fancy accordion.
Step 4: Fluff, Separate, and Shape (a.k.a. The “Magic” Part)
This is where your flat fan turns into a floating paper cloud. Gently separate the tissue layers one at a time, pulling each layer toward the center.
- Fan the stack open slightly so you can access layers.
- Start on one side: lift the top layer toward the center and smooth it lightly.
- Repeat layer-by-layer, then flip and do the other side.
- Once all layers are lifted, fluff and rotate until it looks round and full.
Fluffing tip: Alternate sides every few layers. That keeps the pom-pom balanced and prevents the dreaded “half-pom” situation where one side is gorgeous and the other looks like it’s still loading.
Finished? If you made a wire loop, add ribbon or fishing line and hang it. If you tied with string, knot a hanging line around the center tie.
Pom-Pom Math: Size, Fullness, and Color Combos That Actually Work
Making pom-poms is mostly folding and fluffing, but a tiny bit of strategy turns “cute” into “Pinterest-worthy.”
How many sheets should you use?
- 8 sheets: Light, airy, easier to fluff (great for beginners).
- 10 sheets: The sweet spotfull without being fussy.
- 12+ sheets: Extra full, but takes longer to separate layers (and tears are more likely).
How do you control the size?
The easiest way: change the tissue dimensions. Bigger rectangles = bigger pom-poms. If your tissue is large, cutting it down before folding makes smaller, tighter pom-poms. If your tissue is small, stack a few extra sheets for fullness.
Color recipes (steal these; I insist)
- Ombré: 3 sheets light + 4 medium + 3 dark (blend within one color family).
- Soft pastel: Mix two pastel shades, but keep the lightest on the outside.
- High-contrast: White outside + bold color inside = bright “glow” effect.
- Modern neutral: Ivory + kraft brown + blush (yes, your pom-poms can have a “capsule wardrobe”).
Design rule of thumb: If you’re decorating a busy space (patterned tablecloths, balloons, signage), choose solid pom-poms. If your space is plain, use mixed-color or patterned tissue for extra pop.
Common Mistakes (and How to Fix Them Without Starting Over)
Problem: My pom-pom is droopy
- Cause: Center tie is too loose or tissue is too large for the number of sheets.
- Fix: Rewrap and tighten the center. If needed, add a second tie for reinforcement.
Problem: I keep tearing the tissue while fluffing
- Cause: Pulling too fast, nails catching, or tissue too thin/delicate.
- Fix: Pull slowly near the center fold (not at the outer edge). Small rips are invisible once fluffed.
Problem: It looks lopsided
- Cause: Uneven accordion folds or fluffing one side more than the other.
- Fix: Fluff in alternating layers (a few on side A, then side B). Rotate and “massage” the shape gently.
Problem: The center is showing
- Cause: Not enough sheets or layers not pulled fully toward the center.
- Fix: Pull layers closer to the knot/wire and puff outward. Next time, use 10–12 sheets for fuller coverage.
Problem: Static cling is making everything weird
- Cause: Dry air + tissue paper = surprise science experiment.
- Fix: Lightly rub a dryer sheet on your hands (or the outer layers) before fluffing. You can also mist the air very lightly not the tissuebecause wet pom-poms become… sad pom-poms.
Ways to Use Tissue Paper Pom-Poms (Beyond “Hang From Ceiling, Done”)
Sure, you can hang them and call it a day. But if you want your decor to look intentional (without hiring a professional balloon artist who charges more than your rent), try these ideas:
- Pom-pom garland: String multiple pom-poms along fishing line for a whimsical backdrop.
- Photo booth wall: Cluster pom-poms in different sizes for dimension and depth.
- Centerpieces: Place one big pom-pom in a bowl or on a cake stand (instant height).
- Balloon tails: Tie mini pom-poms to ribbon hanging from balloons for extra flair.
- Chair markers: Attach a small pom-pom to the back of the guest-of-honor chair.
- Gift toppers: Make tiny versions and tape them onto wrapped presents like fluffy bows.
Hanging tips that save ceilings (and relationships)
- Use removable hooks for most ceilings and walls.
- Fishing line “disappears” visually, making pom-poms look like they’re floating.
- For outdoor parties, hang them in protected areaswind turns pom-poms into spirited little kites.
Kid-Friendly Option (Because Little Hands Love Fluffing)
If you’re crafting with kids, keep it simple and safe:
- Use pipe cleaners instead of floral wire (easier to twist, less pokey).
- Pre-cut the tissue stack for them (scissors + excitement = unpredictable geometry).
- Let them do the fluffingthis is the fun part and builds patience (eventually).
Bonus: Kids will treat tissue paper pom-poms like treasured objects until the exact moment they remember they can also be used as “snowballs.” Plan accordingly.
How to Store and Reuse Pom-Poms
Yes, you can reuse themespecially if you’re decorating for multiple events (or you just enjoy owning a tasteful collection of paper clouds).
- Storage: Place pom-poms in large boxes or clean trash bags to protect from dust.
- Don’t crush: Light compression is fine; full squish flattens them into pancake-poms.
- Refresh: When rehanging, re-fluff lightly and rotate the pom-pom to restore roundness.
Conclusion: Your 4-Step Shortcut to Fluffy, Fabulous Decor
DIY tissue paper pom-poms are the perfect craft when you want maximum “wow” with minimal tools. Remember the recipe: stack your tissue, accordion-fold it, tie and trim the ends, then fluff like you’re giving your decor a tiny spa day.
Make a few in different sizes, hang them in a cluster, and watch your space transform from “regular room” to “celebration headquarters.” And if one pom-pom comes out a little weird? Congratulationsyou made art.
Real-Life Pom-Pom Experiences ( of Lessons, Laughs, and Light Regret)
The first time I made tissue paper pom-poms, I was certain I’d discovered a craft loophole: something that looks expensive but isn’t, like finding a designer coat at a thrift storeexcept your “coat” is made of tissue paper and your “runway” is the living room ceiling. I stacked the sheets, folded them into perfect little pleats, tied the middle like I was wrapping the world’s most delicate burrito, and then… I got cocky.
Cocky is when you fluff too fast. Cocky is when you forget tissue paper has the structural integrity of a polite whisper. I yanked a layer like I was starting a lawn mower and immediately tore a chunk out of the middle. For a full five seconds, I stared at it like it had personally betrayed me. Then I did what every experienced crafter eventually learns to do: I kept going and pretended it was intentional. Turns out, once you fluff the rest, tiny tears disappear. The pom-pom doesn’t care. The pom-pom is emotionally mature.
Later, I made a batch for a backyard party. In my head: dreamy floating paper flowers, swaying gently in the breeze. In reality: the breeze took one look at my handiwork and chose violence. Wind turns pom-poms into enthusiastic little tumbleweeds that want to explore the neighborhood. The fix was simplehang them under a patio cover and use a slightly shorter line so they didn’t swing like pendulums. Lesson learned: outdoors is fine, but give your pom-poms a roof and a purpose.
Another time, I tried to speed-run the whole process and used ribbon to tie the center instead of wire. Big mistake. Ribbon looks cute, but it doesn’t “bite” into the center the way wire does. Half my pom-poms came out looking soft and sleepylike they needed a nap and maybe a motivational podcast. Now I stick with floral wire or a pipe cleaner for the center, then add ribbon afterward for hanging. Secure first. Pretty second.
My favorite pom-pom moment, though, was making a multicolor set for a baby shower. I layered two light sheets on the outside, then gradually deepened the color toward the center. When it fluffed open, it looked like a giant pastel bloomsoft, airy, and somehow fancy. Everyone assumed I bought them. That’s the magic: tissue paper pom-poms look like “effort,” even when the real effort was mostly just folding while watching TV.
If you’re new to this craft, here’s my honest advice: make one practice pom-pom, then make the real batch. Your hands will learn the “right” pressure for creasing and fluffing quickly, and your second pom-pom will be twice as fluffy with half the panic. Also, keep them away from pets. Cats, especially, consider pom-poms their ancestral enemyand they will win that feud in under ten seconds.


