Table of Contents >> Show >> Hide
- The “Grandma Method,” Explained in Plain English
- Why This Old-School System Works So Well
- Step-by-Step: How to Set Up Grandma’s Kitchen Storage Method (Without Making It a Whole Personality)
- Step 1: Do a fast pantry reset (15–30 minutes)
- Step 2: Create simple zones based on how you cook
- Step 3: Pick the right containers (not the “most Instagrammable” ones)
- Step 4: Decant strategically (you do NOT have to decant everything)
- Step 5: Label like you live with other humans (or future you)
- Step 6: Add one “containment layer” for small items
- Food Storage Reality Check: Where This Method Helps Most
- Small Kitchen? Here’s How Grandma’s Method Still Fits
- The “Don’t Ruin It” Maintenance Plan
- Common Mistakes That Make Pantry Systems Fall Apart
- Conclusion: A Clutter-Free Kitchen Isn’t About More SpaceIt’s About Better Homes
- Kitchen “Experience” Stories That Prove Grandma Was Right (About Storage, At Least)
If your kitchen currently looks like a snack tornado touched down and left behind a trail of half-open pasta boxes,
mystery bag clips, and a spice jar that expired during the Obama administration… welcome. You’re among friends.
Here’s the plot twist: your grandma already solved this. No apps. No “systems.” No $300 worth of matching bins that
somehow still don’t fit your cereal. Just one timeless, old-school kitchen storage method that quietly keeps chaos in
check: decanting staples into clear, airtight containers (often glass), labeling them, and storing them by
zones.
It’s the reason Grandma could whip up pancakes with one hand, shoo away kids with the other, and still know exactly
how much flour was left without opening a single cabinet like a raccoon on a mission. Let’s break down why this method
works, how to make it modern (without turning your pantry into a museum), and how to keep it going with minimal effort.
The “Grandma Method,” Explained in Plain English
Your grandma’s favorite kitchen storage method usually had three parts:
- Decant: Transfer dry goods from floppy boxes and crinkly bags into sturdy containers.
- Label: Mark what it is (and optionally when you opened it).
- Zone: Store items by how you use them (baking together, breakfast together, snacks together, etc.).
That’s it. No complicated rules. No color-coded spreadsheet (unless you’re into that, in which case… respect).
The magic is that this method attacks clutter at the source: packaging.
Why This Old-School System Works So Well
1) It eliminates “package chaos”
Boxes tear. Bags slump. Labels hide. And the moment you open something, it becomes a shapeshifting obstacle that
refuses to stack neatly ever again. Clear containers create uniform shapes, so your pantry stops looking like it’s
storing supplies for a reality show called Survivor: Cabinet Edition.
2) You can see what you have (and what you don’t)
Visibility is a clutter-killer. When you can spot that you’ve got one cup of rice left, you stop buying your fourth
“backup” bag. Clear canisters turn your pantry into a quick inventory systemno digging required.
3) It supports freshness and fewer pests
Airtight containers help protect dry goods from moisture, odors, and pantry freeloaders. Your kitchen feels cleaner
because it is cleanerespecially when open packages aren’t shedding crumbs like they’re auditioning for a
breadcrumb commercial.
4) It reduces decision fatigue
Clutter isn’t just visual; it’s mental. When your ingredients are grouped by purpose and easy to grab, cooking feels
simpler. Less rummaging. Fewer “where is it?” moments. More “I am a capable adult who can find the cinnamon” energy.
Step-by-Step: How to Set Up Grandma’s Kitchen Storage Method (Without Making It a Whole Personality)
Step 1: Do a fast pantry reset (15–30 minutes)
Pull out what’s easiest first: the obvious duplicates, expired items, and anything that’s turned into a science fair.
You don’t need to remove every single item if that feels overwhelmingstart with one shelf or one cabinet.
Quick rule: if you forgot it existed, you probably won’t miss it. (Yes, even that single lonely taco seasoning packet.)
Step 2: Create simple zones based on how you cook
Instead of organizing by “what sounds nice,” organize by “what you actually do.” A practical set of kitchen zones looks like:
- Baking: flour, sugar, brown sugar, baking powder/soda, chocolate chips, sprinkles (important).
- Breakfast: cereal, oats, pancake mix, coffee/tea, nut butter.
- Snacks: crackers, granola bars, fruit snacks, dried fruit, popcorn.
- Everyday cooking: rice, pasta, beans, lentils, breadcrumbs.
- Canned/jarred: soups, tomatoes, broths, sauces.
- Backstock: duplicates and bulk buys (kept separate so they don’t creep into daily space).
Zoning is where clutter starts to lose the battle. When everything has a home, things stop migrating like they’re
trying to start a new life on Shelf #4.
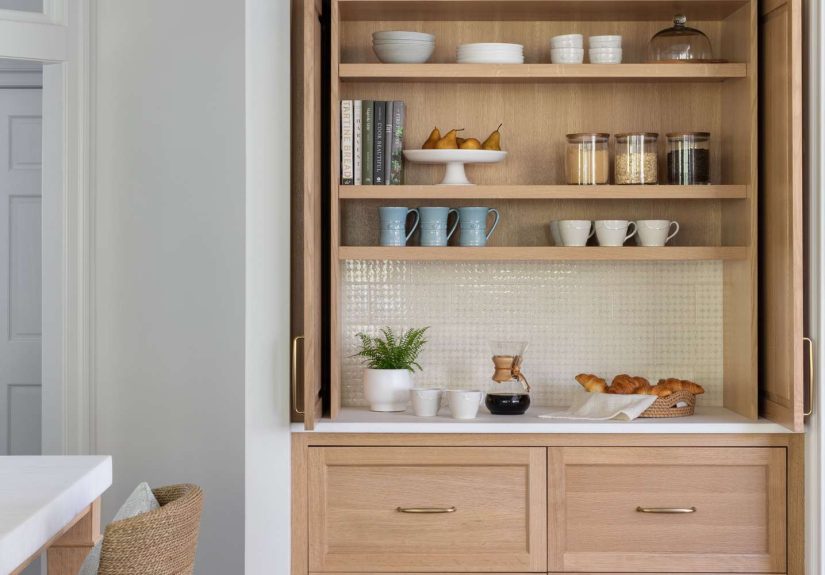
Step 3: Pick the right containers (not the “most Instagrammable” ones)
Grandma used what she had: glass jars, canisters, tins. You can do the same, but focus on function:
- Airtight seal: look for gaskets, locking lids, or tight-fitting tops.
- Stackable shapes: squares/rectangles typically use space better than circles.
- Easy to pour or scoop: especially for flour, sugar, oats, and rice.
- Easy to clean: wide openings and dishwasher-safe parts help.
Glass vs. plastic? Glass looks classic, resists odors, and feels very “grandma-approved.”
Plastic is lighter, less breakable, and often more stackable. Either works. The best choice is the one you’ll actually use.
Step 4: Decant strategically (you do NOT have to decant everything)
The biggest mistake people make is going full “container makeover” and decanting 47 items in one night, then
never wanting to see another lid again.
Decant your high-use, high-mess items first:
- flour, sugar, brown sugar
- rice, pasta, oats
- cereal (especially if it goes stale fast)
- snack staples that come in crinkly bags
Skip decanting things that are already easy:
- cans and jars (they’re basically already in containers)
- items you rarely use
- weirdly shaped packaging that’s actually fine (some boxes stack well!)
Step 5: Label like you live with other humans (or future you)
Labels aren’t about aesthetics. Labels are about making sure someone doesn’t pour powdered sugar into spaghetti sauce
and call it “fusion cuisine.”
Minimum label: what it is. Helpful upgrades:
- Date opened (especially for flour, nuts, and anything that can go off)
- Cooking basics (like “1 cup water : 1 cup rice” on the back of a rice jar)
- Allergen notes if your household needs them
Keep labels simple: “SNACKS” beats “INDIVIDUALLY WRAPPED JOY STICKS.” Broad labels make maintenance easier.
Step 6: Add one “containment layer” for small items
Grandma’s secret weapon wasn’t just jarsit was boundaries. Use bins, baskets, or trays to prevent
mini-items from scattering:
- One bin for spice packets and seasoning mixes
- One basket for snack bars
- A small turntable for oils, vinegars, or baking extracts
This keeps your shelves from turning into a “loose item avalanche” every time you touch one thing.
Food Storage Reality Check: Where This Method Helps Most
Decanting plus zoning is organization, yesbut it also supports smarter food storage habits. A few practical pointers:
Store shelf-stable foods where they stay shelf-stable
Dry goods do best in a cool, clean, dry place, away from heat and damp spots. That means:
not above the stove, not under the sink, not next to the dishwasher steam zone.
Flour, whole grains, and “fancy” flours deserve extra care
Many bakers keep flour in airtight containers to prevent moisture and odors. Whole grain and nut-based flours can spoil
faster because of their oilsso storing them colder (like in the freezer) can extend quality if you don’t use them quickly.
Brown sugar is dramatic (plan accordingly)
Brown sugar hardens when it dries out. Airtight containers help, and many people use a moisture saver (like a terracotta
insert) to keep it soft. Brown sugar is basically the diva of the pantry: treat it right, and it won’t ruin your day.
Small Kitchen? Here’s How Grandma’s Method Still Fits
You don’t need a walk-in pantry to use this. You need a few smart moves:
- Go vertical: shelf risers, stackable containers, and under-shelf baskets create layers.
- Use “prime real estate” wisely: keep daily staples at eye level; stash backstock up high or down low.
- Turn awkward corners into winners: a turntable (Lazy Susan) makes deep cabinets usable.
- Contain the chaos zones: one bin for snacks, one for baking, one for breakfast = faster resets.
The goal isn’t perfection. The goal is grab-and-go functionalitythe same reason Grandma could cook a feast
while casually chatting about neighborhood gossip like it was a competitive sport.
The “Don’t Ruin It” Maintenance Plan
The reason Grandma’s method lasts is that it’s easy to maintain. Try this:
Daily (2 minutes)
- Put items back in their zone.
- Close containers all the way (half-lids are how chaos sneaks back in).
Weekly (10 minutes)
- Wipe crumbs.
- Check what’s running low.
- Move older items forward (a simple “first in, first out” habit).
Seasonally (30 minutes)
- Quick edit: toss expired items, donate unopened extras, reset your zones if your habits changed.
If you can keep up with laundry (even badly), you can keep up with this.
Common Mistakes That Make Pantry Systems Fall Apart
Buying containers before you measure
Containers are only helpful if they fit your shelves and your staples. Measure shelf height and depth first.
Future you will thank you. Your wallet will also thank you, quietly, from inside its small financial cave.
Decanting everything, then resenting your pantry
If putting away groceries turns into an hour-long lid festival, you’ll stop doing it. Decant selectively.
Keep it easy.
Skipping labels because “I’ll remember”
Will you, though? White powders are sneaky. Labels prevent “Is this flour or powdered sugar?” panic at 9 p.m.
Mixing new and old without a plan
If you pour new rice on top of old rice forever, the bottom becomes a time capsule. When refilling, consider emptying
the container, adding the newer product first, then topping with the older so you use it sooneror simply finish one batch
before refilling.
Conclusion: A Clutter-Free Kitchen Isn’t About More SpaceIt’s About Better Homes
The secret isn’t a bigger pantry. It’s the method: decant staples into clear, airtight containers, label them, and store by zones.
That’s your grandma’s kitchen storage method in a nutshelland it still works because it’s practical, visual, and easy to maintain.
Start small: one cabinet, three containers, one snack bin. Once you feel how much calmer your kitchen becomes,
you’ll wonder why you ever trusted a half-torn cereal bag to behave like a responsible citizen.
Kitchen “Experience” Stories That Prove Grandma Was Right (About Storage, At Least)
To make this method feel real (and not like a tidy dream you’ll forget by Thursday), here are common, true-to-life kitchen
moments where Grandma’s favorite kitchen storage method quietly saves the day. No capes. Just canisters.
1) The “I’m Baking Right Now” Panic
You’re mid-recipe. The butter is soft. The oven is preheating. And then you discover you have approximately three tablespoons
of flour leftburied in a wrinkled bag that looks like it survived a backpacking trip. With clear, labeled containers, this
doesn’t happen. You can see flour levels instantly, and you restock before you’re standing there holding a whisk like it’s a
microphone, asking the kitchen why it hates you. The baking zone also means your baking powder, soda, and sugar aren’t hiding
in five different cabinets like they’re playing a competitive round of hide-and-seek.
2) The “Snack Stampede” After School
If kids (or hungry teens, or hungry adults who act like teens) live in your home, snacks disappear like magic. The problem
isn’t that they eat; it’s that snacks migrate. A box of granola bars ends up behind the slow cooker. Crackers get shoved next
to the canned pumpkin. Someone opens a new bag because they didn’t see the old one. A labeled snack bin solves this. Everyone
knows where snacks live. And when snacks live in one place, your kitchen feels calmereven if the snacking itself still sounds
like a small herd of animals.
3) The “Grocery Haul Tetris” Game
You come home with groceries and try to put everything away. Suddenly you’re stacking boxes on boxes, and one wrong move turns
into a cardboard avalanche. Uniform containers fix that. Pasta goes into a tall canister. Rice into a square jar. Oats into a
wide-mouth container you can scoop. Instead of playing pantry Jenga, you’re sliding neat shapes into neat spaces. Bonus:
you stop buying duplicates because you can actually tell what you already ownno more discovering “backup rice” behind “backup
rice,” behind “backup rice,” like a grain-based Russian nesting doll situation.
4) The “Holiday Hosting” Pressure Cooker
When you’re hosting, the kitchen becomes mission control. You need ingredients quickly, and you don’t have time to open ten
half-used packages to find a single cup of sugar. Grandma’s method shines here: your baking zone has everything, and the labels
keep helpers from grabbing the wrong thing. Someone can refill the snack tray without asking you seventeen questions. Someone can
find the extra pasta without unpacking your entire cabinet. It’s not just tidyit’s operational. Your kitchen starts acting like
it’s on your team, instead of secretly rooting for you to lose.
5) The “I’m Trying to Eat Better” Reset
A cluttered pantry makes “healthy choices” harder than it should be. When better options are hidden behind clutter, you grab
what’s easiest. With clear containers and zones, you can set up a “quick wins” section: nuts, oats, whole grains, and go-to
staples that support your routine. This doesn’t require a dramatic diet overhaulit’s just visibility. When you can see what you
have, you use what you have. And when your pantry isn’t chaotic, you’re less likely to order takeout just because finding the
rice feels like a quest line in a fantasy game.
These moments are why Grandma’s method endures. It doesn’t rely on motivation. It relies on designing your space so the
easiest option is the tidy option. That’s the real secret to a clutter-free kitchen: fewer barriers, better habits, and a
pantry that behaves like it’s been raised with manners.


