Table of Contents >> Show >> Hide
- Before You Start: Rewrap, Restore, or Replace?
- Tools and Materials You’ll Want on the Table
- Safety First: The Airbag Isn’t a “Maybe”
- Method A (Recommended): Install a Hand-Sewn Leather Steering Wheel Cover Kit
- Method B (Advanced): Full Leather Replacement (Steering Wheel Reupholstery)
- Step 1: Remove the airbag module (if applicable)
- Step 2: Mark the wheel position and remove the steering wheel
- Step 3: Strip the old leather and remove adhesive
- Step 4: Repair foam or shape issues
- Step 5: Make a pattern (don’t skip this)
- Step 6: Cut new leather thoughtfully
- Step 7: Glue in stages (contact adhesive rules)
- Step 8: Stitch the seam and manage tension
- Step 9: Reinstall and verify
- Common Mistakes (and How to Avoid Them)
- Cost, Time, and When to Hire a Pro
- Make It Last: Caring for Your New Leather Wheel
- Real-World Experience: What I Wish Someone Told Me (Extra )
- Conclusion
Your steering wheel is the only part of your car you hold hands with every dayso when the leather gets shiny, cracked, or starts shedding like a stressed-out housecat, the whole cabin feels tired. The good news: replacing the leather on a steering wheel is absolutely doable at home, and the payoff is huge. You’ll upgrade comfort, grip, and that “wow, this car is actually nice” vibe every time you turn into a parking spot like a responsible adult.
This guide covers two smart paths: a hand-sewn leather wrap kit (best for most DIYers) and a full leather replacement (more advanced, but very satisfying if you enjoy projects that require patience and snacks). We’ll keep it practical, safety-first, and just funny enough to keep you from rage-quitting midway through stitching.
Before You Start: Rewrap, Restore, or Replace?
“Replace the leather” can mean a few different things, and choosing the right one saves time, money, and emotional stability.
Option 1: Restore (dye/repair) if the leather is mostly intact
If the leather is just glossy, slightly worn, or has minor scuffs, you may not need replacement. Cleaning, light sanding, filler, and recoloring can bring it back. This is great when seams are still solid and the wheel isn’t misshapen.
Option 2: Rewrap with a stitch-on leather cover (most popular DIY)
A stitch-on cover kit is the “new leather” solution for most people. It wraps directly over the existing wheel, pulls tight, and is hand-laced for a snug, custom look. Ideal if your wheel is worn but structurally fine.
Option 3: Full replacement (advanced) if the original leather is torn, loose, or the foam is damaged
If leather is separating from the foam, chunks are missing, or the wheel feels lumpy, full replacement may be the right call. This usually means removing the wheel, stripping old material, repairing foam, and building a new leather skin. It’s more workbut also the closest to factory-level steering wheel reupholstery.
Tools and Materials You’ll Want on the Table
Having the right supplies prevents that classic DIY moment where you stare at your wheel holding a butter knife like it’s a plan.
Leather and wrap options
- Automotive-grade leather (often chrome-tanned): durable, designed for heat and sweat.
- Perforated leather: better breathability, sportier look.
- Alcantara/suede-style: grippy, but needs more maintenance.
- Stitch-on wrap kit: pre-cut, pre-punched holes, includes lacing and needles (common DIY choice).
Thread, needles, and stitching helpers
- Waxed thread or high-strength polyester thread (strong, consistent tension).
- Harness needles (usually two, blunt-tip) for hand stitching.
- Awl or stitching pick for aligning holes and guiding thread.
- Thimble or finger guards (your fingertips will thank you).
Adhesives and prep supplies (for full replacement or spot bonding)
- Contact-style trim adhesive (automotive interior rated) for bonding leather to the wheel surface.
- Leather-safe contact cement (commonly used in leatherwork) for edge bonding and seam control.
- Isopropyl alcohol or interior-safe degreaser
- Plastic trim tools
- Painter’s tape, marker, measuring tape
- Sharp scissors or a rotary cutter
- Sandpaper (fine grit) for smoothing old glue or rough spots
Safety First: The Airbag Isn’t a “Maybe”
Many steering wheels house the driver airbag. If you’re removing the wheel or airbag module, treat it like it can deploybecause it can. If that makes you nervous: good. That means you’ll be careful.
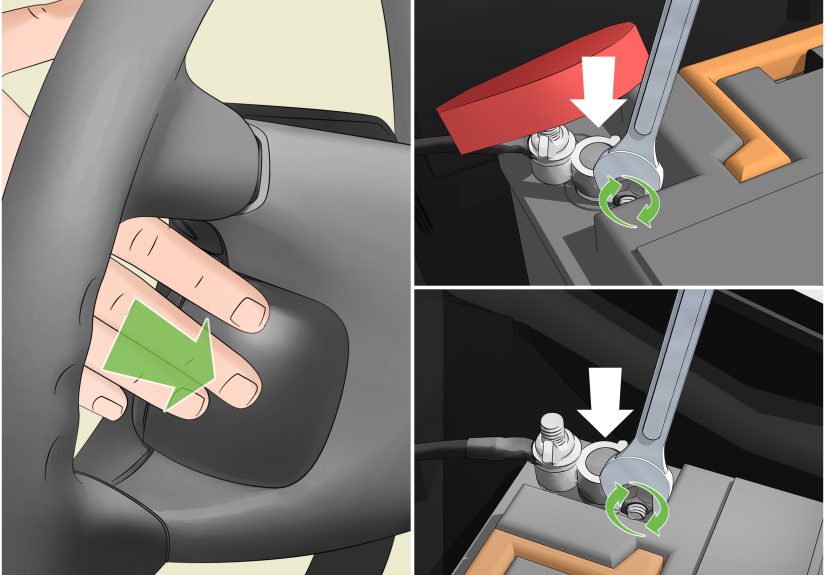
- Disconnect battery power before working around the airbag system. Many service procedures recommend disconnecting the negative battery cable and waiting for the system reserve capacitor to discharge.
- Wait time matters: some guides recommend waiting several minutes after disconnecting the battery so capacitors can fully discharge.
- Handle the airbag correctly: store it with the cover facing up, away from your body, and don’t place objects on it.
- Don’t rotate the clockspring (steering angle sensor/clock spring assembly) with the wheel removed. It can break and cause warning lights.
If you’re only installing a stitch-on cover without removing anything, you can skip airbag removal entirely. That’s one reason the wrap-kit route is so popular.
Method A (Recommended): Install a Hand-Sewn Leather Steering Wheel Cover Kit
This is the “big result, manageable effort” path. You’ll get a fresh leather feel and a tailored look without dismantling half your dashboard. Expect about 60–120 minutes depending on your stitch choice and how often you pause to admire your work.
Step 1: Measure your steering wheel correctly
Most kits size by outside diameter and grip circumference. Measure the wheel’s outer diameter across the center, then measure around the thickest part of the grip (like measuring a belt around your handhold). If your wheel has a thicker “sport” grip, heating elements, or unusual shapes, double-check sizing.
Step 2: Clean the wheel like you mean it
Oils from hands act like anti-glue and anti-friction. Clean thoroughly with an interior-safe cleaner or diluted isopropyl alcohol. Get into the seams. If the wheel is shiny, it’s basically marinated in hand lotion and French fries.
Step 3: Dry-fit and align the cover
Slide the cover on and align the seam at the bottom (common factory placement). Center it over the top of the wheel and make sure the spokes line up. Take five minutes hereevery minute you spend aligning saves ten minutes of “why does it look crooked?” later.
Step 4: Pick your stitch style (and your personality)
- Baseball stitch: classic crisscross “X” look, great for most wheels.
- Cross stitch: similar vibe, sometimes slightly tighter appearance.
- Spiral/ladder stitch: clean and modern, can be easier to keep consistent.
Step 5: Start stitching (without turning the thread into modern art)
- Anchor your starting point at the bottom seam so any knot is hidden.
- Work in short sections (3–6 inches). Pull snug, then move on.
- Keep tension even: tight enough to close gaps, not so tight you wrinkle the leather.
- Use an awl to re-open holes if they shift while you tighten.
- Check alignment often: the cover can drift if you pull aggressively on one side.
Pro tip: as you pull each stitch tight, keep the pull direction consistent. Random tug angles are how you get that “my wheel looks like it’s winking” effect.
Step 6: Finish cleanly
When you reach your starting point, tie off securely under the seam area. Trim the tail, then tuck it beneath the edge. If you’re using synthetic thread, you can carefully melt the end to prevent frayingjust don’t torch your brand-new leather like it insulted your cooking.
Step 7: Final feel test
Run your hands around the wheel. Look for high spots, loose sections, or areas where the seam isn’t centered. If something feels off now, it will feel off foreverfix it while your tools are still out.
Method B (Advanced): Full Leather Replacement (Steering Wheel Reupholstery)
This method is for wheels that are truly done: torn leather, loose skin, degraded foam, or a previous cover job that belongs in a museum titled “Regrets.” It can look factory-fresh, but it demands precision. Plan a few hours and take photos as you disassemble.
Step 1: Remove the airbag module (if applicable)
Procedures vary by car. Many wheels use rear access holes or spring clips to release the airbag module. Always disconnect battery power first and follow your vehicle’s service guidance. Once released, disconnect connectors carefully and avoid yanking wires.
Step 2: Mark the wheel position and remove the steering wheel
Mark the steering wheel’s relationship to the shaft (a paint marker line works). This helps you reinstall it straight. Remove the center nut/bolt and use the proper method to pull the wheel free. Avoid hammering on the column.
Step 3: Strip the old leather and remove adhesive
Peel old leather back slowly. If it’s glued, use gentle heat (like a hair dryer) to soften adhesive. Scrape residue with plastic tools, then lightly sand any stubborn glue bumps. The goal is a smooth base so the new leather sits flush.
Step 4: Repair foam or shape issues
If the wheel foam is gouged, cracked, or uneven, fix it now. Minor imperfections become obvious once wrapped. Smooth transitions matter more than perfectionthink “nice tailored suit,” not “wrinkled bedsheet.”
Step 5: Make a pattern (don’t skip this)
The easiest pattern is the old leather itselfif it came off in one piece. If it didn’t, you can wrap the wheel with painter’s tape, mark seam lines, then cut the tape off and flatten it into a template. Add a small seam allowance so you’re not trying to stitch leather that’s too tight.
Step 6: Cut new leather thoughtfully
Cut with sharp tools. Keep the grain direction consistent. If using perforated leather, align perforation rows so they look intentional (not like an accident). Punch stitching holes evenly if your leather isn’t pre-punchedspacing consistency is what makes the final result look pro.
Step 7: Glue in stages (contact adhesive rules)
For full replacement, you’ll typically bond leather to the wheel so it doesn’t shift while stitching. Apply adhesive carefully, following the product instructions. Many contact-style adhesives require application to both surfaces and a brief tack time before pressing together. Work in sections so you don’t end up with a sticky wheel that attracts every speck of dust in your garage.
Step 8: Stitch the seam and manage tension
The saddle stitch is a gold standard in leatherwork because it’s strong and doesn’t unravel easily if one stitch fails. Use two needles, keep tension balanced, and tighten gradually. Tap stitches lightly at the end if needed to settle them and reduce abrasion.
Step 9: Reinstall and verify
Reinstall the wheel aligned to your marks. Reconnect airbag connectors properly and make sure the airbag module seats fully. Reconnect the battery and verify there are no warning lights. If an airbag light appears, stop and diagnose correctlydon’t just “hope it goes away.”
Common Mistakes (and How to Avoid Them)
- Uneven stitching tension: causes waves and gaps. Fix by tightening section-by-section rather than yanking one mega-pull.
- Wrong size cover: too big will bunch; too small will fight you. Measure twice, order once.
- Skipping cleaning: oils prevent adhesion and make the cover shift. Degrease thoroughly.
- Overusing adhesive: bleed-through can stain leather and create hard spots. Use thin, even coats.
- Ignoring foam damage: lumps under leather never disappear. Repair the base first.
- Airbag shortcuts: if you’re removing components, follow safety procedures and wait times.
Cost, Time, and When to Hire a Pro
A stitch-on leather steering wheel cover kit is usually the best ROI: affordable, low risk, and a major feel upgrade. Full replacement costs more in materials and time, but it’s the right move if the underlying structure is damaged or you want a truly OEM-style finish.
- Wrap kit: typically 1–2 hours DIY; minimal tools; strong visual impact.
- Full replacement: several hours DIY; patterning + adhesive + stitching; higher skill ceiling.
- Professional upholstery: best for complex wheels, heated wheels, unusual shapes, or if you want perfection without learning new curse words.
Make It Last: Caring for Your New Leather Wheel
Leather steering wheels live a hard life: sun exposure, heat cycles, sweat, hand sanitizer, and whatever was on that drive-thru burger wrapper. A little maintenance keeps it from turning shiny and slippery again.
- Wipe down weekly with a lightly damp microfiber cloth.
- Clean monthly with a leather-safe cleaner (avoid harsh solvents).
- Condition occasionally (lightly)over-conditioning can make the wheel slick.
- Use a windshield sunshade to reduce UV damage.
- If you use hand sanitizer often, wipe the wheel after long drives (alcohol accelerates drying).
Real-World Experience: What I Wish Someone Told Me (Extra )
Let’s talk about the part most tutorials skip: the “human factors.” The tools matter, the steps matterbut your mood, your patience, and your willingness to redo a section also matter. A steering wheel rewrap is basically a tiny upholstery project that you hold in your hands while your inner perfectionist whispers, “This stitch is 0.4 millimeters off and everyone will know.”
First lesson: your first 10 minutes set the tone. If you start stitching while the cover is slightly off-center, you won’t “correct it later.” Later you will be tired, the leather will be tighter, and you’ll be bargaining with the universe: “If I can just finish this side, I promise I’ll stop buying snacks at gas stations.” So take the extra time to center the cover, line up the spokes, and check the seam placement. A perfect start feels boring; a sloppy start feels exciting for about 30 seconds and then becomes a life choice.
Second lesson: even tension beats maximum tension. Many people pull stitching as tight as possible thinking it looks cleaner. It canuntil it doesn’t. Over-tightening can wrinkle the leather, distort hole spacing, and make the seam look like it’s trying to escape. Instead, tighten gradually and consistently. Think “firm handshake,” not “arm wrestling match.”
Third lesson: your hands will get tired. This isn’t a character flaw; it’s anatomy. If you find yourself pulling harder and getting sloppier, take a break. The wheel isn’t going anywhere. Stretch your fingers, drink water, and return with calmer energy. The stitch quality you produce when you’re relaxed is noticeably better than the stitch quality you produce when you’re hungry and muttering at upholstery.
Fourth lesson: temperature matters more than you expect. Cold leather is stubborn leather. If you’re working in a chilly garage, the cover won’t stretch as nicely and your fingers will hate you. Warming the cover slightly (room temperature is enough) makes it more pliable, easier to form, and easier to tension evenly. Also, warm hands are simply better at everything.
Fifth lesson: the “last inch” is the hardest. When you approach the end of the seam, everything gets tight. The cover resists, holes don’t line up as easily, and you start imagining you purchased the wrong size even though you measured correctly. This is normal. Use an awl to align holes, work in smaller bites, and resist the urge to force the thread through at weird angles. Slow down and you’ll finish clean. Rush and you’ll end with a lopsided knot that haunts you at every red light.
Final lesson: it’s worth it. A fresh leather steering wheel changes how the whole car feelsmore secure grip, better comfort, and a cabin that looks cared for. It’s one of the rare DIY jobs where you get immediate, daily value. Every drive becomes a tiny reward. And if anyone asks where you got it done, you can casually say, “Oh, I rewrapped it,” and pretend you didn’t spend 20 minutes redoing one stitch because it looked at you funny.
Conclusion
Replacing leather on a steering wheel is one of the most satisfying interior upgrades you can do. For most drivers, a hand-sewn leather wrap kit delivers a dramatic transformation with minimal risk. If your wheel is severely damaged, a full leather replacement can restore it to near-factory quality as long as you prep the base properly, manage tension, and respect airbag safety procedures.
Choose the method that matches your wheel condition and your patience level, work clean, stitch evenly, and you’ll end up with a wheel that feels like it belongs in a newer carwithout the newer-car payment.


