Table of Contents >> Show >> Hide
- Quick Decision: Which Simple Garden Path Should You Build?
- Plan It First (So You Don’t “Path” Yourself Into a Corner)
- Tools and Materials You’ll Actually Use
- DIY Method 1: How to Build a Simple Gravel Garden Path
- DIY Method 2: A Simple Stepping-Stone Path (Minimal Fuss)
- DIY Method 3: A Simple Paver Path (The “Real Sidewalk” Energy)
- Common Mistakes (and How to Avoid Them)
- Maintenance: Keep Your Path Looking “New,” Not “Neglected”
- Real-World Experiences: What DIYers Learn After Building a Simple Garden Path
- 1) The layout stage saves more time than it costs
- 2) Curves are beautiful… and they expose sloppy edges
- 3) Gravel is easyuntil you forget containment and cleanup
- 4) Compaction is the difference between “weekend win” and “springtime redo”
- 5) The “nice extras” actually get used
- 6) A path changes how you use your yard
- Conclusion: Build It Simple, Build It Solid
A garden path is basically your yard’s way of saying, “Please stop trampling my plants like a confused buffalo.”
The good news: you don’t need a landscape architect, a mini-excavator, or a mysterious cousin who “knows concrete.”
You just need a plan, a weekend, and the ability to stop digging right before you hit the “oops, that’s a cable” layer.
In this guide, you’ll learn how to build a simple DIY garden path using three beginner-friendly methods:
gravel (fast and forgiving), stepping stones (classic and charming), and pavers (clean and durable).
I’ll also show you how to pick the right path for your yard, prep the base like a pro, and avoid the common mistakes that turn “cute walkway”
into “wobbly ankle trap.”
Quick Decision: Which Simple Garden Path Should You Build?
Option A: Gravel Path (Best for beginners)
- Look: casual, cottage, modern (depending on edging)
- Best for: flat-ish areas and light-to-medium foot traffic
- Pros: budget-friendly, great drainage, easy to repair
- Cons: needs edging to stay put, occasional raking/top-ups
Option B: Stepping Stones (Fast and flexible)
- Look: playful, natural, “wander this way” vibes
- Best for: crossing lawn or beds without committing to a full walkway
- Pros: minimal digging, easy layout changes
- Cons: can shift if base isn’t solid; mowing around them can be… a relationship test
Option C: Paver Path (Most finished, most work)
- Look: crisp lines, tidy patterns, instant curb appeal
- Best for: high-traffic routes (gate to patio, driveway to door)
- Pros: stable, long-lasting, easy to sweep
- Cons: more digging and base prep; heavier materials
Plan It First (So You Don’t “Path” Yourself Into a Corner)
1) Choose a purpose, not just a shape
Ask: Where do people actually walk? Follow the “desire line”the worn grass or muddy shortcut that already exists.
If you build a gorgeous path nobody uses, congratulations: you’ve made an expensive garden decoration.
2) Pick a comfortable width
For a simple garden path, aim for 30–36 inches if two people might pass, or 24–30 inches for a single-person route.
If you’ll wheel a cart, add a few extra inches so you’re not shaving your knuckles on edging.
3) Sketch and measure (quick math, no crying)
Measure length and average width. Example: a path that’s 30 feet long and 3 feet wide is
90 square feet (30 × 3). This number makes buying materials way easierand helps prevent the classic DIY move:
“I’m just going to buy some gravel and vibe.”
4) Check drainage and slope
Paths shouldn’t become tiny canals. Avoid low spots that collect water, and plan for a gentle slope away from buildings when possible.
If your yard is soggy, gravel and permeable joints are your friends.
5) Safety first: Call 811 before you dig
In the U.S., you should contact 811 a few business days before digging so underground utilities can be marked.
This is not the fun part of DIY, but it is the part that keeps your weekend from turning into a high-budget disaster movie.
Tools and Materials You’ll Actually Use
Common tools (all path types)
- Measuring tape
- Garden hose or spray paint (layout)
- String line + stakes (for straighter edges)
- Shovel and/or spade
- Rake
- Hand tamper or plate compactor (rentable)
- Level (a 2–4 foot level is handy)
- Wheelbarrow + gloves (your back will thank you)
Materials (choose based on method)
- Edging: steel edging, paver restraints, bricks, stone, or pressure-treated timbers
- Base: crushed stone/stone pack/paver base (for gravel and pavers)
- Underlayment: landscape fabric (especially under gravel)
- Surface: gravel, stepping stones, or pavers
- Joint filler: polymeric sand (pavers) or gravel fines (gravel path edges)
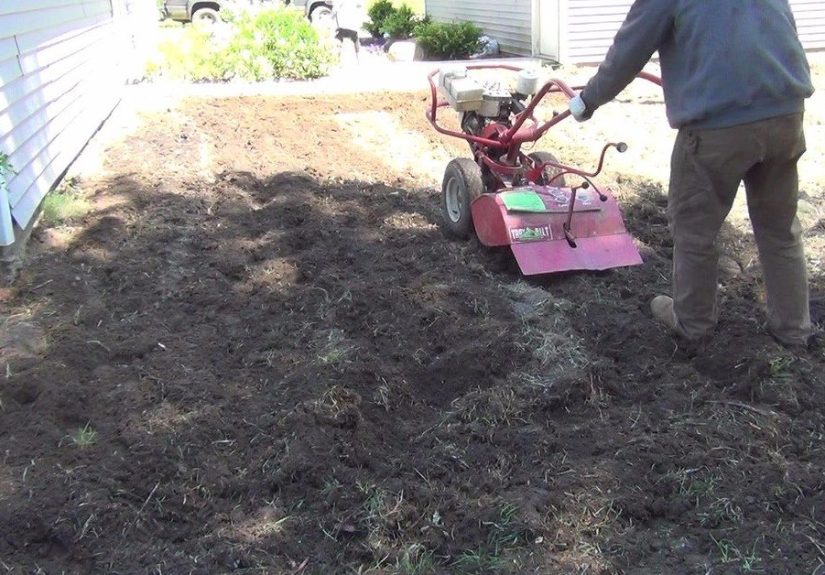
DIY Method 1: How to Build a Simple Gravel Garden Path
Gravel is the easiest “real” path to build because it drains well, hides minor mistakes, and doesn’t demand perfect geometry.
The secret is containing it with edging and giving it a stable base so it won’t vanish into the soil over time.
Materials checklist
- Edging material (steel edging or paver restraints are beginner-friendly)
- Crushed stone/stone pack (for the base)
- Landscape fabric (permeable)
- Top gravel (angular gravel is better underfoot than smooth pebbles)
Step-by-step gravel path build
-
Lay out the path. Use a garden hose to draw curves or stakes/string for straight lines.
Mark both edges clearly. -
Dig a shallow trench. Remove sod and soil to create a uniform “bed.”
For many simple gravel paths, you’re digging enough to fit your base + gravel while keeping the finished surface near ground level. -
Compact the soil. Rake the trench smooth, lightly dampen if dusty, and tamp it.
This step is boring, which is exactly why it matters. -
Add and compact the base. Spread a layer of crushed stone/stone pack, rake level, dampen, and tamp until firm.
Work in thin lifts if needed so it compacts evenly. -
Install edging. Set edging along both sides to hold gravel in place.
Anchor it welledging is what keeps your gravel from migrating into your lawn like it’s seeking a new life. -
Roll out landscape fabric. Lay fabric over the compacted base.
Overlap seams, and cut neatly around curves. This helps separate soil from gravel and reduces weeds. -
Add the top gravel. Spread gravel evenly and rake smooth.
Keep the layer modest; multiple thin additions compact and settle better than one dramatic dump. -
Finish and test-walk. Walk the path. Look for soft spots, low pockets, or edges that flex.
Add gravel where needed and tamp lightly (especially near edges).
Gravel path pro tips
- Use angular gravel for better “lock-in” underfoot.
- Contain it with edgingskipping this is the #1 gravel regret.
- Expect maintenance: rake occasionally and top up once or twice a year depending on traffic and weather.
DIY Method 2: A Simple Stepping-Stone Path (Minimal Fuss)
Stepping stones are perfect when you want a path without building a full-on “walkway system.”
They’re also great for lawnsless excavation, fewer materials, more instant gratification.
Pick your stone style
- Natural stone: organic and irregular (great in cottage gardens)
- Concrete stepping stones: consistent and easy to space
- Large pavers: a clean, modern “floating” look when spaced over gravel or groundcover
Step-by-step stepping-stone install (the “set-it-and-forget-it” version)
-
Plan spacing. A comfortable stride varies by person, but a good starting point is placing stones so you can walk naturally without stutter-stepping.
Do a quick “pretend walk” on the lawn to find your rhythm. - Outline each stone. Place a stone, trace around it, and remove it.
-
Dig a recess. Excavate within the outline so the stone will sit flush (or slightly proud) of the surrounding surface.
A flush finish is mower-friendly. -
Add a sand bed. Pour a couple inches of sand into the recess, level it, and lightly tamp.
The sand lets you fine-tune height and reduces wobble. -
Set the stone. Place the stone, press it in, and check level front-to-back and side-to-side.
Adjust with more sand as needed. - Backfill edges. Pack soil around the stone edges or use gravel for a crisp look.
Make it look intentional (not like you dropped rocks)
- Use a repeating shape or size for a clean visual line.
- Curve the route gentlystraight lines can look harsh unless you’re going formal.
- Consider groundcover between stones (thyme, moss, or hardy low-growers) if your climate supports it.
DIY Method 3: A Simple Paver Path (The “Real Sidewalk” Energy)
If you want a path you can sweep clean, roll a cart over, and admire every time you look out the window, pavers are the move.
The trick is the base: pavers don’t fail because pavers are weak. They fail because the base is lazy.
Materials checklist
- Pavers (buy ~5–10% extra for cuts and oops moments)
- Paver base (compacted gravel base)
- Bedding sand
- Edge restraints/spikes
- Joint sand (often polymeric for cleaner joints)
Step-by-step paver path build
-
Mark the layout. Stake and string your path lines.
Make sure the planned finish height makes sense near patios, gates, or steps. -
Excavate to the right depth. You’ll remove soil so you can fit:
compacted paver base + sand bed + paver thickness, while keeping the finished surface at your desired grade. -
Build the base (slowly, on purpose). Add paver base in lifts, wet lightly if needed, and compact thoroughly.
This is where stability is born. -
Add bedding sand. Spread sand evenly and screed it level.
Don’t walk all over it like it owes you moneystep lightly and fix any footprints. -
Lay pavers. Start from a straight edge and work outward.
Check alignment often. A small drift early becomes a “why is my path shaped like a banana?” later. - Install edge restraints. This prevents lateral movement over time (especially on curves).
-
Fill joints. Sweep joint sand in, then compact to settle pavers and joints.
Top off joints again if needed. - Final check. Look for rocking paverslift and re-level the bed under them now, not after your first barbecue.
Simple patterns that look expensive
- Running bond: brick-like staggered rows (easy, forgiving, classic)
- Basket weave: tidy and charming (great for cottage yards)
- Large-format grid: modern and clean (best with consistent paver sizes)
Common Mistakes (and How to Avoid Them)
Skipping edging on gravel
Without edging, gravel doesn’t “stay.” It travels. It spreads. It becomes part of your lawn’s personality.
Install edging from day one.
Not compacting the base
Whether you’re doing gravel or pavers, compaction is what keeps your path from sinking, shifting, and developing surprise potholes.
Tamp thoroughlyyes, even if you’re tired.
Using the wrong gravel
Smooth, round pebbles look cute in a vase. Underfoot, they can roll and feel unstable.
Angular gravel tends to lock together better for walkways.
Ignoring drainage
If water funnels down your path, it can wash out joints, erode base material, and create low spots.
A gentle grade and good base prep go a long way.
Maintenance: Keep Your Path Looking “New,” Not “Neglected”
- Gravel paths: rake occasionally, pull weeds early, top up thin spots, re-edge as needed.
- Stepping stones: check for wobble seasonally; re-level with sand if a stone settles.
- Pavers: sweep debris, refill joints when needed, and keep edges restrained.
Real-World Experiences: What DIYers Learn After Building a Simple Garden Path
After people build their first simple DIY garden path, they almost always say some version of: “That wasn’t so bad,”
followed by: “I should’ve taken base prep more seriously.” If you’re trying to get this right the first time, here are the
most common lessons DIYers share once the dust (and gravel) settles.
1) The layout stage saves more time than it costs
Many DIYers start with a vague ideathen end up moving the route halfway through because the path feels awkward.
The smartest builds start with a garden hose laid on the ground for a day or two. People “test walk” it on the way to the grill,
the shed, or the mailbox. If the hose route gets naturally used, that’s your winner. If everyone keeps cutting across the grass,
your path is about to become a very pretty unused ribbon.
2) Curves are beautiful… and they expose sloppy edges
A gentle curve makes a yard feel larger and more inviting, but curves also highlight uneven edging.
DIYers who love curvy paths end up appreciating flexible edging (like steel) because it can hold a clean line.
The biggest “aha” moment is realizing the edge is what your eye reads firstbefore the gravel, before the stones, before
any fancy plants. If your budget is tight, people often upgrade the edging before they upgrade anything else, because it has
outsized visual impact.
3) Gravel is easyuntil you forget containment and cleanup
A common experience is thinking, “Gravel is the simplest option,” then discovering gravel can be an enthusiastic traveler.
DIYers who skip edging find gravel wandering into mulch beds, lawns, and occasionally into the house (where it makes a sound
that can only be described as “tiny betrayal” under bare feet). The fix is straightforward: solid edging and a quick rake habit.
People who love their gravel paths long-term usually keep a stiff broom or metal rake nearby and do a 2-minute tidy once a week.
4) Compaction is the difference between “weekend win” and “springtime redo”
The most consistent real-world feedback: hand tamping seems fine until the first heavy rain or freeze-thaw cycle.
DIYers who compact in thin layers (instead of dumping base material all at once) end up with paths that stay level longer.
Those who rush the base often see dips or shifting within a seasonespecially where people pivot, turn, or step off the path.
The good news is that fixing a path is usually easier than building it: pull back surface material, level and re-compact, and
put everything back. The better news is you can avoid that by compacting well the first time.
5) The “nice extras” actually get used
DIYers are often surprised by which upgrades matter most day-to-day. Solar path lights make the route feel safer at night.
A wider section near a gate prevents shoulder bumps when carrying bags or tools. A small “pause spot” (like a wider paver
landing) becomes the place where people stop to talk, check plants, or set down a watering can. These are tiny choices that
make a path feel intentionally designedwithout making the project complicated.
6) A path changes how you use your yard
One of the best shared experiences is realizing a simple path improves the whole yard’s flow. People walk more. Kids run routes.
Garden chores feel less annoying because you’re not tiptoeing through muddy grass. And once the main route is finished,
DIYers often get the itch to add a second small connectionlike a short stepping-stone spur to a compost bin or a gravel pad
near a seating area. A path doesn’t just organize movement; it quietly organizes your outdoor life.
Conclusion: Build It Simple, Build It Solid
If you want the easiest win, build a gravel path with edging. If you want charm with minimal digging, choose
stepping stones. If you want the most polished look, commit to pavers and take the base seriously.
No matter which route you choose, the formula is the same: plan the layout, prep a stable base, contain the edges, and keep drainage in mind.
Your garden will look more intentionaland your shoes will stop collecting half your yard on every walk.


