Table of Contents >> Show >> Hide
- Why Use a Table in Microsoft Word?
- How to Insert a Table in Microsoft Word on Desktop
- How to Insert a Table in Microsoft Word on Mobile
- How to Format a Table in Word Without Making It Weird
- Common Problems When Inserting a Table in Microsoft Word
- Desktop vs. Mobile: Which One Is Better for Word Tables?
- Bonus Tip: When to Use Word and When to Use Excel
- Real-World Experiences: What People Usually Learn After Fighting With Word Tables
- Final Thoughts
If Microsoft Word had a love language, it would probably be “organized chaos.” And nothing organizes chaos faster than a good table. Whether you are building a class schedule, a price list, a comparison chart, a content calendar, or a glorified grocery list that makes you feel wildly productive, learning how to insert a table in Microsoft Word is one of those small skills that pays rent every single week.
The good news? Adding a table in Word is not complicated. The slightly less good news? There is more than one way to do it, and Word loves giving you options like a waiter who keeps saying, “Would you like to hear the specials?” On desktop, you can use the grid, the Insert Table box, Draw Table, Quick Tables, or even convert plain text into a table. On mobile, the process is simpler, but still handy once you know where the buttons are hiding.
In this guide, you will learn exactly how to insert a table in Microsoft Word on desktop and mobile, how to format it without losing your patience, and how to avoid the classic table disasters that make people whisper, “Maybe I should have used Excel.”
Why Use a Table in Microsoft Word?
A table helps you arrange information into rows and columns so it is easier to read, scan, and compare. In plain English, it stops your document from looking like a wall of text that forgot to breathe.
Tables in Word work especially well for:
- Schedules and timelines
- Price lists and service menus
- Simple reports and summaries
- Contact lists
- Comparison charts
- Forms, checklists, and worksheets
If your content needs structure, a Word table is often the easiest fix. It is faster than drawing lines manually, cleaner than spacing everything with the keyboard, and much less likely to turn into a formatting horror show.
How to Insert a Table in Microsoft Word on Desktop
If you are using Word on a desktop or laptop, whether that is Windows or Mac, you have the most table tools available. The exact appearance may vary slightly by version, but the general process stays very similar.
Method 1: Use the Table Grid for a Quick Table
This is the fastest method when you already know roughly how many rows and columns you need.
- Open your Word document.
- Place your cursor where you want the table to appear.
- Click the Insert tab on the ribbon.
- Click Table.
- Move your mouse over the grid.
- Highlight the number of rows and columns you want.
- Click to insert the table.
That is it. Word drops the table into your document instantly, ready for text, numbers, or whatever tiny empire of data you are building.
This method is perfect for basic layouts like a 3-by-4 comparison chart or a quick two-column contact list. It is fast, visual, and does not ask too many questions.
Method 2: Use Insert Table for More Control
If you need a larger table or want more control over sizing, skip the grid and use the dialog box instead.
- Click where you want the table.
- Go to Insert > Table.
- Select Insert Table or Choose rows and columns, depending on your version.
- Enter the number of columns.
- Enter the number of rows.
- Choose an AutoFit option if available.
- Click OK.
This option is especially useful when you know the exact structure you need, like 8 columns for a monthly planner or 10 rows for a project tracker. It also helps when the grid feels too small for your big ambitions.
Method 3: Draw a Table by Hand
Sometimes your table is not neat and symmetrical. Maybe one row needs wider cells, or one section needs a different layout. That is when Draw Table becomes useful.
- Place the cursor where you want the table.
- Go to Insert > Table > Draw Table.
- Your cursor changes into a pencil tool.
- Draw the outside border of the table first.
- Then draw vertical and horizontal lines inside it to create cells.
This method is great when you want a custom layout, but it is not the one I would recommend for sleepy late-night editing. It can be precise, but it can also become a tiny architectural project.
Method 4: Convert Text to a Table
If you already typed your information and separated each item with tabs, commas, or paragraph breaks, Word can turn that text into a table for you.
- Select the text you want to convert.
- Click Insert > Table.
- Choose Convert Text to Table.
- Select how the text is separated, such as tabs or commas.
- Click OK.
This feature feels a little magical the first time you use it. It is also a massive time-saver when you are working with lists, copied data, or rough notes that need to look respectable fast.
Method 5: Use Quick Tables
If you want a prebuilt format, Word also includes Quick Tables. These are ready-made table templates for things like calendars, lists, and matrix layouts.
- Click in your document.
- Go to Insert > Table.
- Select Quick Tables.
- Choose a built-in style or template.
Quick Tables are helpful when you want a polished look without starting from scratch. Think of them as the “I need this to look good in 15 seconds” option.
How to Insert a Table in Microsoft Word on Mobile
If you are using Word on an iPhone, iPad, or Android device, you can still add tables, although the menus are more compact and sometimes a little sneaky. Mobile Word is great for quick edits, simple layouts, and on-the-go fixes when your laptop is nowhere nearby and your document suddenly needs structure immediately.
On iPhone and iPad
To insert a table in Word on iPhone or iPad:
- Open the document in the Word app.
- Tap where you want the table to appear.
- If needed, tap the Edit icon first.
- Open the menu bar and go to Insert.
- Tap Table.
- Select the number of rows and columns if your app version shows that option.
- Insert the table.
After the table appears, tap inside it to reveal table tools. From there, you can usually add rows, add columns, or delete parts of the table.
On Android Phones and Tablets
The Android process is similar, though phone layouts may tuck options under an extra menu.
- Open your Word document.
- Tap the location where you want the table.
- Tap the editing controls if the document is not already in edit mode.
- Go to Home or the menu ribbon, then switch to Insert.
- Tap Table.
- Choose your rows and columns if prompted.
- Insert the table.
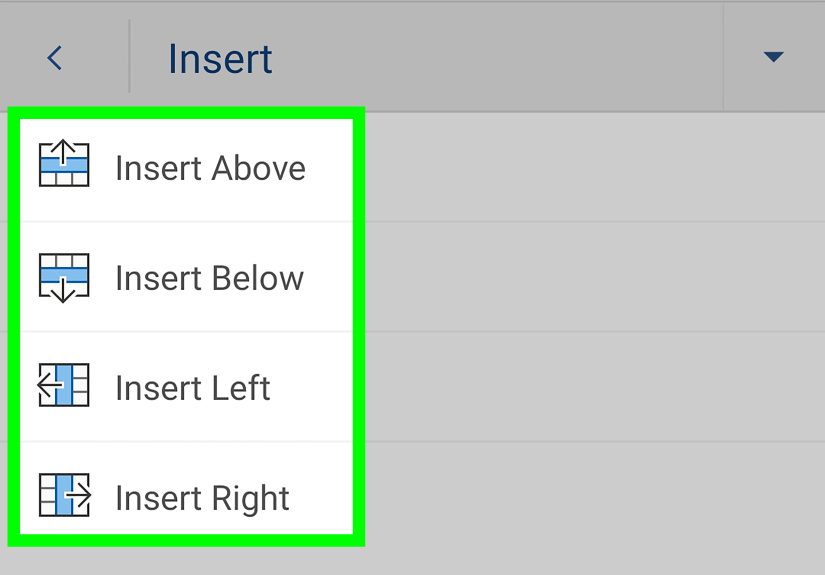
Once the table is in place, tap inside it to bring up the table options. You can then insert rows above or below, add columns to the left or right, or delete table sections.
If Your Mobile Menus Look Different
This is normal. Word on mobile changes its layout based on the device, screen size, and app version. If you do not immediately see the table button, look for:
- An Edit pencil icon
- A More menu
- A tab menu currently set to Home
- An Insert option hidden in the ribbon selector
Mobile apps love making you tap one extra time, as if they are testing your commitment. Stay calm and keep poking around the Insert menu.
How to Format a Table in Word Without Making It Weird
Inserting the table is only step one. Step two is making it look like it belongs in your document instead of crashing into it like an uninvited folding chair.
Resize Columns and Rows
Click and drag the borders of columns and rows on desktop. On mobile, tap the table and look for layout or sizing controls. If the content feels cramped, widening columns usually helps immediately.
Use Table Styles
When you click inside a table on desktop, Word displays table design options. You can apply built-in table styles to add borders, shading, and header formatting. This is the easiest way to make a plain table look cleaner and more professional.
Add or Delete Rows and Columns
Need to expand the table later? No problem.
- On desktop, right-click in a cell and choose insert options, or use the table layout tools.
- On mobile, tap inside the table and use the Insert or Delete controls under the table tab.
On desktop, pressing the Tab key in the last cell also adds a new row. It is one of those small tricks that makes you feel like you know secret Word wizardry.
Merge or Split Cells
If you want one header cell to stretch across multiple columns, use Merge Cells. If one cell needs to become two, use Split Cells. These tools are excellent for more customized layouts, especially in forms, schedules, and comparison tables.
AutoFit the Table
If your table is too wide or too cramped, use AutoFit options on desktop to adjust it to the contents or the window. This can instantly fix awkward spacing without manual dragging.
Common Problems When Inserting a Table in Microsoft Word
The Table Is Too Wide
If the table runs off the page, reduce the number of columns, shorten the text inside cells, or use AutoFit. Landscape page orientation can also help for wider layouts.
The Text Looks Squished
This usually means the columns are too narrow or the cell margins are too tight. Widen the columns, reduce font size slightly, or simplify the content inside the cells.
The Table Breaks Across Pages Badly
Large tables often split across pages in awkward ways. On desktop, table properties can help you manage row breaks and repeating header rows. If the table is long, it is often worth setting a header row so readers do not lose the plot on page two.
The Formatting Looks Inconsistent
This happens a lot when content is pasted from websites, emails, or spreadsheets. Clear unwanted formatting first, then reapply a clean table style in Word.
Desktop vs. Mobile: Which One Is Better for Word Tables?
If all you need is a quick table, mobile Word is surprisingly capable. You can insert a table, add or remove rows and columns, and make basic edits without drama.
But if you need advanced control, desktop Word wins by a comfortable margin. Desktop is better for:
- Custom layouts
- Drawing tables
- Converting text to tables
- Using Quick Tables
- Fine-tuned formatting and page layout
- Managing large or complex tables
So, mobile is perfect for convenience, while desktop is where you go when the table actually matters.
Bonus Tip: When to Use Word and When to Use Excel
Word tables are great for presenting information inside a document. Excel is better for calculations, formulas, and heavy-duty data work. If your table needs math, sorting, filtering, or a level of complexity that makes your forehead wrinkle, Excel is probably the better tool.
But if your goal is simple structure inside a report, assignment, letter, proposal, or article draft, Word is often exactly the right choice.
Real-World Experiences: What People Usually Learn After Fighting With Word Tables
Here is the truth nobody tells you the first time you try to insert a table in Microsoft Word: the table itself is rarely the problem. The real challenge is usually everything around it. It is the page margins, the unexpected line spacing, the column that suddenly looks tiny for no reason, or the one cell that refuses to cooperate like it has its own legal representation.
A lot of people start with the simplest possible goal. They just want to make a neat chart for a school project, a client proposal, a church bulletin, a recipe sheet, or a family event plan. Five minutes later, they are deep in a formatting side quest, wondering why the table moved when they changed one word. This is a perfectly normal Word experience. You are not cursed. You are just using a very powerful tool that occasionally behaves like it drank too much coffee.
One common experience is realizing that the quick grid method is ideal when you already know the shape of the table. If you need three columns and five rows, great. Done. But when your content starts changing, people often discover they should have planned the structure first. Adding more rows is easy. Rebuilding a messy table because the columns no longer make sense is less fun. That is why even a 20-second pause before inserting the table can save a lot of editing later.
Another lesson people learn quickly is that mobile Word is fine for light work, but desktop Word is still the better place for serious table formatting. On a phone, it feels wonderful to insert a quick table while riding the train, waiting in the lobby, or pretending to be very productive in a coffee shop. But once you need polished spacing, custom widths, merged cells, or a design that looks presentation-ready, desktop suddenly feels like a luxury spa for your document.
Many users also discover that copying data from another source can be both a blessing and a trap. It saves time, yes, but it may drag in ugly formatting like mismatched fonts, odd spacing, and borders that look like they were borrowed from 2007. The smart move is often to paste carefully, then reformat the table inside Word instead of trying to preserve every detail from the original source.
And perhaps the biggest practical experience of all is this: tables work best when they stay simple. The more crowded the content becomes, the harder the table is to read. Clean labels, short text, consistent spacing, and logical columns almost always beat decorative complexity. In other words, your table does not need to become a Broadway production. It just needs to do its job well.
Once you get comfortable with the basics, Word tables become one of those features you use constantly. You stop seeing them as intimidating little boxes and start using them as reliable tools. And that is when the magic happens. Suddenly, your documents look more organized, your information is easier to scan, and your readers do not have to decode a text jungle with a machete.
Final Thoughts
If you have been wondering how to insert a table in Microsoft Word, the short answer is this: on desktop, go to Insert > Table and choose the method that fits your project; on mobile, open the editing tools, head to Insert, and tap Table. From there, you can build, format, and adjust your table to suit almost any document.
Start simple. Use the table grid for fast results, the Insert Table dialog for control, and mobile tools for quick edits on the go. Once you learn the basics, tables stop being annoying little rectangles and start becoming one of the most useful formatting tools in Word.


