Table of Contents >> Show >> Hide
- The Big Picture: Make Your Holiday House Tour Feel Like You
- Our Christmas Tree: The Star of the Show
- Room-by-Room Holiday House Tour
- How to Make Your House Tour Look Amazing in Photos
- Holiday Decorating Safety + Sanity Checklist
- After the Tour: Keep the Magic Going (Without the Mess)
- of Real-Life Holiday House Tour Experiences
- Final Thoughts
Welcome! Wipe your feet (or don’tthis is a judgment-free holiday zone), hang your coat on the chair we pretend is a “coat rack,”
and come on in. The hot cocoa is imaginary, the Christmas playlist is very real, and our Christmas tree is doing the absolute mostin
the best way.
A holiday house tour isn’t about perfection. It’s about that cozy, twinkly feeling that makes your living room look like it’s auditioning
for a snow-globe. It’s the glow. The scent. The little details you notice when you slow downlike the one ornament that’s been in the
family forever, or the ribbon that somehow makes everything feel “fancy” even if you decorated while wearing sweatpants.
The Big Picture: Make Your Holiday House Tour Feel Like You
Start with a vibe, not a shopping spree
Before you add a single ornament, decide what you want guests (or your camera roll) to feel. Classic and nostalgic? Warm and rustic?
Modern and minimal? Whimsical and colorful? Pick one main mood and let it guide every roombecause nothing says “confused” like a candy-cane
kitchen leading into a gothic winter-wonderland living room (unless that’s your brand, in which case… respect).
Choose a simple palette that repeats around the house
A strong holiday look usually comes from repetition: two to three main colors plus one “metal” (gold, silver, brass, or bronze). You can
still use sentimental ornamentsjust let the palette do the heavy lifting so everything feels intentional.
- Cozy classic: red + green + gold
- Winter calm: white + evergreen + silver
- Modern warmth: champagne + cream + wood tones
- Playful nostalgia: multicolor lights + vintage ornaments + velvet ribbon
Our Christmas Tree: The Star of the Show
Real vs. artificial: choose your adventure
Real trees bring the scent and the “we just came back from a tree lot” magic. Artificial trees bring convenience and fewer needles in your
socks. Either one can look stunning. The secret is not the treeit’s the layering: lights, ribbon/garland, ornaments, and a topper that
makes your tree look like it got promoted.
If you have a fresh-cut tree, keep it happy (and safer) with smart care
A real tree stays nicer longer when it’s treated like what it is: a very large cut plant that drinks a surprising amount of water.
Use a sturdy stand with a good-size reservoir, add water every day, and keep the tree away from heat sources like fireplaces, vents,
space heaters, and direct sun. That dryness you feel in winter air? Your tree feels it too.
- Freshness test: gently run your hand along a branchfresh needles should feel flexible and stay put.
- Placement: give the tree space from heat and keep pathways and exits clear (holiday joy should not block emergency routes).
- Hydration rhythm: check the water level dailyespecially the first few days, when a tree may drink more.
Lights first: because nobody wants “ornament excavation” later
Whether you wrap lights horizontally (the classic method) or use a more vertical, branch-focused approach for depth, the goal is the same:
create an even glow from the inside out. Start at the bottom and work upward. Pause occasionally, turn the lights on, and step back.
This is your chance to catch the “one blinding hotspot” before it becomes a full-time lighthouse.
Layering the tree: the “professional” look in three passes
The easiest way to get that styled holiday-house-tour tree is to decorate in layers, like you’re building a tiny wearable outfit for a very
fashionable evergreen.
Pass 1: Ribbon or garland (the base layer)
Ribbon works best when it goes on early. Tuck it in and out of branches so it looks airy and dimensional. If you use garland,
keep spacing consistent and let it drape naturallyno strangling the tree like it owes you money.
Pass 2: Big ornaments first (deep and low), then smaller ones (higher and outward)
Start with larger ornaments deeper in the branches to create “inner sparkle,” then add medium and small ornaments closer to the tips.
This makes the tree look full and layered, not like everything is stuck on the outer edges.
Pass 3: Picks, special pieces, and the topper
Add stems, faux florals, or textured picks where the tree needs shape. Then top it offstar, bow, finial, or something sentimental.
A topper is like punctuation: it finishes the sentence.
The base matters: tree skirt, collar, and gift styling
The “under-tree zone” is prime real estate in a holiday house tour. A woven collar feels modern, a classic skirt feels cozy. Add wrapped gifts
(real or decorative boxes), a basket for blankets, or a little lantern moment nearby. Just remember: if you have pets, anything furry and
dangling is basically an invitation to chaos.
Room-by-Room Holiday House Tour
1) Entryway: set the tone in 10 seconds
Your entry is the trailer for the movie. A simple wreath, a bowl for keys, and one “sparkly moment” (a small tabletop tree, a string of lights,
or a garland on a mirror) instantly says: “Yes, we are festive. Yes, you are safe here.”
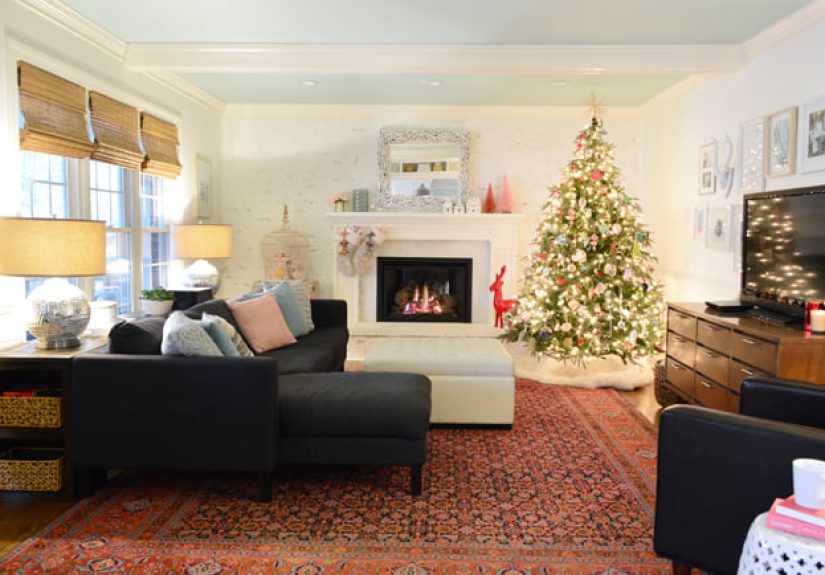
2) Living room: the tree’s supporting cast
Let the Christmas tree shine, then echo its colors in two or three nearby spots: pillow covers, a throw blanket, or a few ornaments styled in a
bowl. Keep surfaces mostly clear so the sparkle reads. If every table is crowded, the eye has nowhere to restand holiday décor starts to feel
like a glittery obstacle course.
3) Mantel (or shelf): use height and layers
A great mantel is all about layers: greenery first, then candles or candlesticks, then a few meaningful objects (stockings, vintage bells,
framed holiday printables). Mix heights for drama. Keep anything flame-related smart and safebattery candles are a holiday miracle.
4) Kitchen: sprinkle, don’t smother
Kitchens already have “stuff” on every surface, so keep holiday touches minimal: a wreath on a pantry door, a festive hand towel, a small vase of
evergreen clippings. If you can still chop onions without relocating a nutcracker army, you’ve nailed it.
5) Dining area: a centerpiece that doesn’t block eye contact
Keep tablescapes low enough that people can actually see each other. A garland runner with a few ornaments, pinecones, or berries works
beautifully. Add one statement elementlike tapered candles (real or battery) or a simple vase arrangementand stop there.
How to Make Your House Tour Look Amazing in Photos
Use your existing lights like a pro
Turn off harsh overhead lighting and lean into warm lamps plus your tree lights. Shoot at dusk or after dark for peak glow.
Clean your camera lens (seriouslyone smudge can turn your twinkle into a fog machine).
Do a “clutter sweep” that takes five minutes
- Hide cords with a basket or cord covers where possible.
- Clear countertops except for one styled vignette.
- Move random items (mail, backpacks, the mysterious lone shoe) out of frame.
Holiday Decorating Safety + Sanity Checklist
Festive should never mean risky. A few smart habits keep your holiday house tour cozy, bright, and calmer than a toddler on sugar cookies.
- Inspect light strings: don’t use strands with frayed wires or damaged sockets.
- Don’t overload outlets: follow manufacturer guidance and use extension cords rated for the job.
- Turn lights off when sleeping or leaving: consider a timer for convenience.
- Keep real trees hydrated: a well-watered tree is fresher and less likely to become dangerously dry.
- Keep distance from heat: place the tree away from fireplaces, vents, and heaters.
- Be smart with candles: keep flames away from anything that can burn (or go flameless).
- Kid/pet-proofing: place breakables higher, anchor the tree if it’s wobbly, and avoid edible-looking décor at pet level.
After the Tour: Keep the Magic Going (Without the Mess)
Daily “tree check” routine
If you have a real tree, a quick daily check keeps it looking good: water level, needle drop, lights functioning normally (no hot plugs, no odd
smells), and a quick straighten of any ribbon that got “mysteriously” rearranged.
Plan for a graceful goodbye
When a real tree starts drying out or shedding heavily, it’s time to take it down. Many communities offer tree recycling programs, and some people
repurpose branches as winter mulch or garden protection. The goal: end the season with good memories, not a January needle apocalypse.
of Real-Life Holiday House Tour Experiences
Every holiday house tour has a highlight reeland ours is basically a sitcom with extra string lights. The first “experience” that always comes
back around is the moment the tree goes up. There’s the optimistic stage, where we swear we’ll do a “simple tree this year,” and the
second stage, where a box labeled “ORNAMENTS: DO NOT OPEN UNTIL DECEMBER” somehow bursts open like it’s been training for this moment. The third
stage is negotiation: one person wants perfectly spaced ornaments, another insists that every sentimental ornament must be front-and-center, and
someone (usually the cat) believes the tree skirt is a brand-new, luxury nap destination.
Then there’s the lighting phase, which is equal parts art and mild electrical engineering. One year we tried to eyeball it and ended up with a
bright spot so intense it could’ve guided ships into port. Now we do the “step back and judge” method: add lights, turn them on, stare at the
tree like we’re museum curators, and adjust until it looks like a gentle glow instead of an interrogation room. The moment the lights finally
look right is oddly emotionallike the house exhales and says, “Okay, we’re doing this.”
Ornaments bring their own drama. The delicate glass ones come out with the seriousness of a heist movie: careful hands, slow movements, and
someone whispering, “Please don’t drop that.” The kid-made ornaments, on the other hand, go up with proud chaos. They don’t match, they’re not
symmetrical, and they are absolutely the heart of the tree. Our rule is simple: the tree can be styled, but it must also be ours. That’s how we
end up with elegant ribbon next to a popsicle-stick snowman who looks like he’s seen things.
The best part of a holiday house tour isn’t the décorit’s what the décor makes possible. The tree becomes the gathering point. People drift
toward it with their mugs. Conversations slow down. Someone always takes a photo “just for the memories,” which becomes a tradition on its own.
Even on busy days, we’ll turn on the tree lights for ten minutes like it’s a reset button. It sounds small, but it changes the mood of the room.
Of course, every season includes one comedic mishap. We’ve had ribbon that looked gorgeousuntil we realized it was wired and had been poking
everyone who walked by like a festive cactus. We’ve had a tree topper that leaned dramatically to one side, giving the star a “tired of this”
attitude. And we’ve definitely had the year when we wrapped gifts early, placed them under the tree for the tour, and then spent a week telling
everyone in the house, “Do not touch the display gifts,” like we were protecting a museum exhibit.
But that’s what makes a holiday house tour feel warm and real. It’s not a showroom; it’s a home dressed up for the season. It’s the sparkle plus
the stories. So if your tree isn’t perfect, congratulationsyou’re doing it correctly. The goal is a house that feels inviting when you walk in,
and a Christmas tree that makes you pause for half a second and think, “Yep. This is the season.”
Final Thoughts
Thanks for stopping by our holiday house tour! If you take one idea with you, let it be this: repeat a simple palette, layer your Christmas tree
thoughtfully, and keep everything safe and cozy so you can actually enjoy it. The best holiday homes aren’t the most expensive or the most
“perfect”they’re the ones that feel like a warm welcome.


