Table of Contents >> Show >> Hide
- Know Your Guitar Before You Attach Anything
- How to Put a Strap On an Electric Guitar
- How to Put a Strap On an Acoustic Guitar with Two Buttons
- How to Put a Strap On an Acoustic Guitar with One Button
- How to Use Strap Locks and Strap Blocks
- How to Adjust Strap Length for Comfort
- Common Mistakes to Avoid
- Should You Install a Second Strap Button on an Acoustic?
- Quick FAQ
- Real-World Experiences: What Players Learn After the Strap Goes On
- Conclusion
Note: This is web-ready HTML body content only, written for direct publishing and cleaned of placeholder citation artifacts.
If you have ever stared at a guitar strap like it was a puzzle invented by a sleep-deprived roadie, relax. You are not failing Guitar 101. Putting a strap on a guitar is easy once you know what kind of instrument you are dealing with. The catch is that acoustic and electric guitars do not always play by the same rules. Some have two strap buttons and practically beg for cooperation. Others give you one lonely button and expect you to improvise like a folk singer in a candlelit coffee shop.
This guide breaks it all down in plain English. You will learn how to put a strap on an electric guitar, how to attach a strap to an acoustic guitar with two buttons, how to deal with an acoustic that has only one button, and when strap locks are worth the tiny burst of effort. We will also cover comfort, fit, common mistakes, and a few real-world lessons that save guitars from meeting the floor the hard way.
Know Your Guitar Before You Attach Anything
Before you wrestle with the strap, take ten seconds to inspect the guitar. Look for the strap buttons, also called strap pins. These are the small posts where the strap connects.
Most electric guitars
Electric guitars almost always have two strap buttons. One is usually on the bottom end of the body. The other is commonly near the upper horn, upper shoulder, or where the neck meets the body. This setup is the easy mode of strap installation. If your guitar is a Strat, Tele, Les Paul, SG, or similar solid-body model, you are usually in good shape.
Acoustic guitars
Acoustic guitars are a mixed bag. Many modern acoustics and acoustic-electrics also have two buttons, but plenty of traditional acoustics come with only one button at the bottom of the body. When that happens, the top end of the strap usually connects around the headstock with a lace, tie, or quick-release adapter. In other words, the guitar is not being difficult. It is just being vintage and dramatic.
Acoustic-electric endpin jacks
Some acoustic-electric guitars use an endpin jack at the bottom instead of a plain strap button. That means the lower strap point also doubles as the output jack. Most regular straps work fine there, but not every locking system does. Always check compatibility before forcing anything. The phrase “it should fit” has launched thousands of bad ideas.
How to Put a Strap On an Electric Guitar
If your electric guitar has two strap buttons, installation is straightforward.
Step 1: Orient the strap correctly
Many straps are not perfectly symmetrical. One end may be thicker, layered, padded, or designed to sit at the bottom of the guitar. Logos and decorative ends often face upward near the neck-side button. If your strap has a sliding buckle or adjustment hardware, make sure it will not dig into your shoulder or scratch the body once the guitar is hanging.
Step 2: Attach the bottom end first
Take one strap hole and push it firmly over the bottom strap button. The leather or synthetic end should fit snugly. You want a solid grip, not a floppy handshake. If it slips on too easily, the strap hole may be stretched out and should be reinforced or replaced.
Step 3: Attach the upper end
Now connect the other strap hole to the upper strap button near the neck side of the body. Push until the button is fully seated through the slit. You should feel a bit of resistance. That is a good thing. Loose strap ends are how guitars audition for gravity.
Step 4: Put the strap over your shoulder
For most right-handed players, the strap goes over the left shoulder. For left-handed players, it goes over the right shoulder. Let the guitar hang naturally against your torso.
Step 5: Adjust the length
Adjust the strap so the guitar sits in a position that feels similar to how you play while sitting. If it hangs too low, your fretting hand may feel stretched and your wrist may complain. If it sits too high, you may feel like the guitar is trying to become a necklace. Start somewhere in the middle, then fine-tune.
How to Put a Strap On an Acoustic Guitar with Two Buttons
If your acoustic guitar has two strap buttons, the process is basically the same as with an electric guitar.
Step 1: Connect the bottom strap end
Attach one end of the strap to the bottom button or endpin at the base of the guitar body.
Step 2: Connect the upper strap end
Attach the other end to the button located on the neck heel or upper bout. Some acoustic makers place that button on the treble side of the neck heel, while others mount it on the body shoulder. Either location works as long as the strap sits securely and the guitar balances well.
Step 3: Adjust for posture
When standing, adjust the strap so the guitar rests in roughly the same playing position you use while sitting. This helps keep your picking and fretting angles consistent. Your hands will thank you, and your chord changes will feel less like a trust fall.
How to Put a Strap On an Acoustic Guitar with One Button
This is where beginners often get confused. If your acoustic guitar has only one button at the bottom of the body, you need a second attachment point at the top. That usually means using a headstock tie, strap adapter, or quick-release system.
Option 1: Use a strap with a built-in lace
Some acoustic straps come with a lace or thong attached to one end. Connect the bottom end of the strap to the body button first. Then take the lace at the top end and thread it under the strings on the headstock, just behind the nut. Tie it securely with a strong double knot.
The key is placement. You want the tie just behind the nut, not wrapped around the tuning pegs like a last-minute craft project. Keep it neat, secure, and clear of anything that interferes with tuning.
Option 2: Use a leather headstock tie or adapter
If your strap does not include a lace, you can add a leather headstock tie or adapter. These are designed specifically for acoustics without a second strap button. One side connects to the strap, and the other loops under the strings around the headstock. It is simple, secure, and avoids drilling new holes in the guitar.
Option 3: Use a quick-release system
Some players prefer a quick-release adapter that connects at the headstock. This makes it faster to remove the strap for storage or transport. It is especially handy if your guitar lives in a snug hard case and the strap tends to bunch up like a rebellious seatbelt.
What not to do
Do not tie the strap around random parts of the headstock, tuning machines, or strings in a sloppy way. If the strap presses awkwardly against hardware, affects tuning stability, or looks like it was assembled during a mild emergency, start over and attach it properly.
How to Use Strap Locks and Strap Blocks
If you play standing up often, especially at rehearsals, gigs, church, school performances, or while enthusiastically pretending your bedroom is Madison Square Garden, strap security matters.
Strap locks
Strap locks replace or work with standard strap buttons and keep the strap from slipping off. Traditional locking systems usually involve hardware mounted to the guitar plus a locking mechanism attached to the strap ends. Once connected, the strap is much less likely to pop off accidentally.
They are especially useful for heavier electric guitars, active performers, and anyone who has already experienced that terrifying half-second when the strap slips and your soul leaves your body.
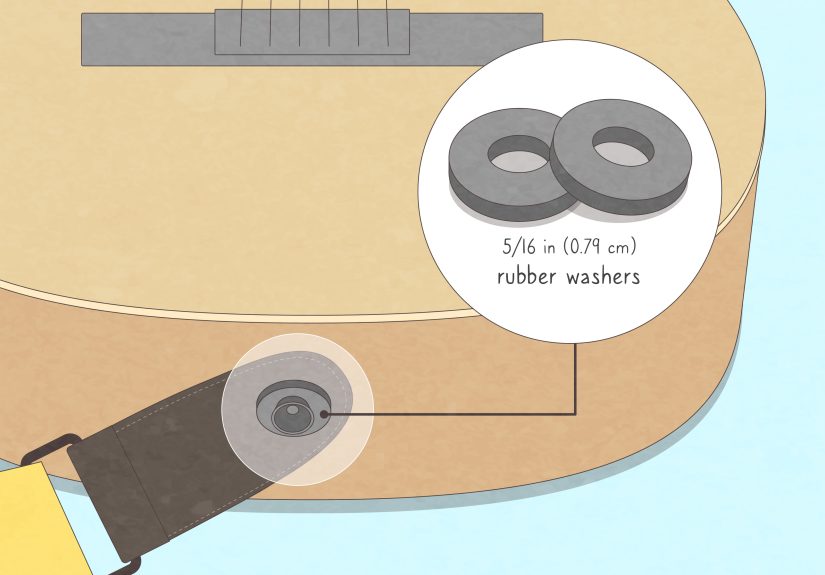
Strap blocks
Strap blocks are the simpler cousin. These small rubber or synthetic pieces fit over the strap after it is attached to the button, helping keep it in place. They are cheap, fast, and require no drilling or hardware swap. For many casual players, that is all the security they need.
Important compatibility note
Not all locking straps or locks work with every acoustic-electric endpin jack. If your guitar has an output jack where the bottom strap point sits, check that the product is made for that style. Some systems are designed for regular strap buttons only.
How to Adjust Strap Length for Comfort
A strap is not just there to stop the guitar from falling. It also affects posture, hand position, and fatigue. The right fit can make you feel more controlled. The wrong fit can make basic chords feel like Olympic qualifiers.
A good starting point
Start with the guitar resting around your waist to upper hip area. That tends to work well for beginners because it balances comfort and control. From there, adjust based on your style.
- Higher position: usually better for beginners, rhythm players, and anyone prioritizing clean fretting.
- Lower position: popular for certain rock looks, but harder on the wrist and less forgiving for precise technique.
- Wider or padded straps: often more comfortable for heavier guitars and longer sessions.
If your guitar feels like it is dragging on your shoulder, choose a wider strap. If it digs in, padding can help. Looking cool is great, but being able to feel your neck and shoulder after the set is also nice.
Common Mistakes to Avoid
1. Not pushing the strap fully onto the button
If the strap hole is only halfway seated, it can slip off when you move. Always push until the button is fully through the hole.
2. Ignoring worn strap holes
Old leather strap ends can stretch. If the slit looks tired, torn, or suspiciously generous, replace it or reinforce it.
3. Using the wrong lock system for an endpin jack
Acoustic-electrics sometimes need specialized adapters. Never assume every lock fits every guitar.
4. Storing the guitar carelessly with the strap attached
Leaving a strap on for short-term handling is usually fine, but for long-term storage it is smarter to remove it. Some strap materials can affect finishes, and a jammed strap can put unnecessary strain on the body, electronics, or endpin inside the case.
5. Drilling without confidence
Installing a second strap button can be safe when done correctly, but this is not the time for blind optimism and a mystery drill bit. If you are unsure, let a qualified guitar tech do it.
Should You Install a Second Strap Button on an Acoustic?
Maybe. If you gig often, move around a lot, or dislike headstock ties, adding a second strap button can make life easier. On many acoustics, a common installation point is the treble side of the neck heel or the back edge of the heel. At the bottom of the guitar, installation should be centered so the screw anchors securely into the internal block.
That said, not every player needs a permanent modification. If your guitar is a treasured heirloom, vintage-style model, or simply a beloved instrument you do not want drilled, a headstock tie or purpose-built adapter is a perfectly reasonable solution.
Quick FAQ
Can I use the same strap on acoustic and electric guitars?
Usually, yes. A standard strap works on both as long as the guitar has compatible attachment points. If the acoustic has only one button, you may need a headstock tie or adapter.
Is it safe to hang an acoustic strap from the headstock?
Yes, when you use a proper headstock tie or adapter and fasten it correctly behind the nut. Many players do this for years without issues.
Do beginners need strap locks?
Not always, but they are a smart upgrade if you play standing up regularly, own a heavy guitar, or tend to move around a lot.
What width strap is best?
A two-inch strap is a solid starting point for many players. Heavier guitars may feel better with something wider or padded.
Real-World Experiences: What Players Learn After the Strap Goes On
The funny thing about guitar straps is that nobody thinks much about them until one changes everything. A beginner usually focuses on strings, picks, chords, and maybe whether the amp can sound “more rock.” The strap seems like a side character. Then the first standing practice happens, and suddenly the strap becomes the difference between “I can play this song” and “Why does my left wrist feel like it is writing a complaint letter?”
Many electric players discover quickly that strap height matters more than style points. A guitar hanging low may look cool in the mirror, but ten minutes later the fretting hand starts stretching harder, bar chords get sloppier, and the neck feels farther away than it did while sitting. Raise the strap a little, and everything gets easier. It is one of those annoying truths, like vegetables or warming up before exercise.
Acoustic players often have a different experience. The first surprise is usually that not every acoustic has two strap buttons. Plenty of people buy a nice strap, get home, flip the guitar around, and realize the instrument has exactly one place to connect it. That leads to the classic moment of holding the strap, the headstock, and your patience all at once. Once a proper headstock tie is added, though, the problem usually disappears. In fact, many players end up liking the feel just fine.
Gigging musicians learn a more dramatic lesson: a secure strap is not optional. The stage is full of distraction. Lights, cables, pedals, other musicians, and the occasional enthusiastic movement all increase the odds of a standard strap slipping at the worst possible time. That is why so many experienced players end up using strap locks or strap blocks. After one close call, guitar security suddenly becomes a personality trait.
There is also the comfort lesson. A cheap narrow strap may seem fine for five minutes, but give it an hour with a heavier electric guitar and your shoulder starts negotiating terms. Wider straps, padded straps, and better materials are not glamorous upgrades, but they absolutely change how long and how happily you can play standing up.
Then there is storage. A lot of players learn the hard way that cramming a guitar into a case with the strap twisted around the body is a recipe for irritation. At best, it is inconvenient. At worst, it stresses the finish or hardware. A neat strap setup, or removing it before long-term storage, saves trouble later.
In the end, putting a strap on a guitar is a tiny skill with a surprisingly big payoff. The guitar feels more stable. Practice becomes more realistic. Performance gets safer. And once it is attached properly, you stop thinking about the strap at all, which is exactly what a good strap setup should do. The best compliment a guitar strap can get is silence. No slipping, no twisting, no shoulder pain, no panic. Just you, the instrument, and the noble pursuit of playing the same riff twenty-seven times until it finally sounds right.
Conclusion
Learning how to put a strap on a guitar is one of those small tasks that pays off every single time you play. On an electric guitar, it is usually a quick two-button job. On an acoustic, the process depends on whether you have two buttons or need a headstock tie. Once the strap is attached correctly and adjusted to the right height, your guitar feels more secure, your posture improves, and playing while standing becomes much more natural.
If you want the safest setup possible, add strap locks or strap blocks. If your acoustic has only one button, use a proper adapter instead of improvising. And if you are thinking about drilling a new strap button into a beloved guitar, do it carefully or hand the job to a pro. Your future self, and your un-dented guitar top, will appreciate the wisdom.


