Table of Contents >> Show >> Hide
- What Is a Zinger Burger?
- Ingredients for Homemade Zinger Burgers
- How to Make Zinger Burgers: 15 Steps
- Step 1: Choose the right chicken cut
- Step 2: Pound the chicken to an even thickness
- Step 3: Make the spicy marinade
- Step 4: Marinate the chicken
- Step 5: Mix the seasoned flour
- Step 6: Make the zinger sauce
- Step 7: Prep your toppings and buns
- Step 8: Dredge the chicken properly
- Step 9: Let the coating rest
- Step 10: Heat the oil
- Step 11: Fry in batches
- Step 12: Check doneness and drain well
- Step 13: Toast the buns
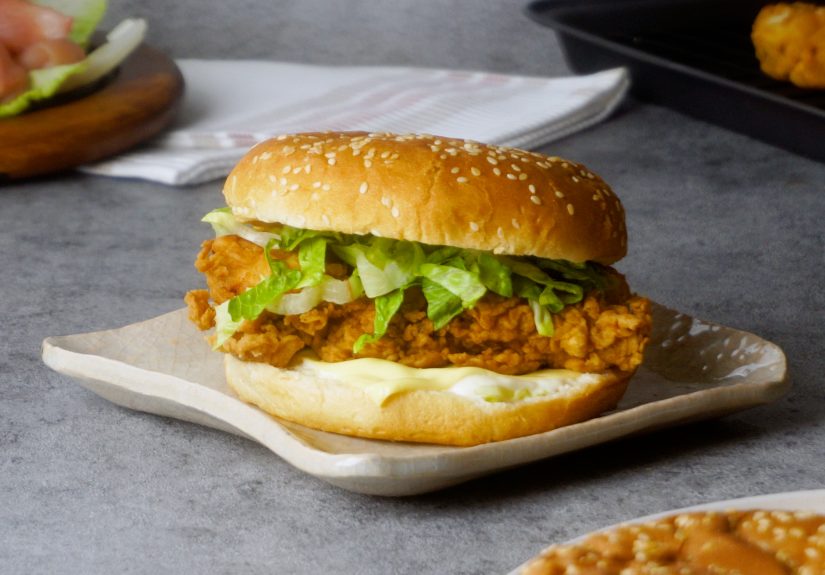
- Step 14: Assemble the burgers
- Step 15: Serve immediately
- Tips for the Best Zinger Burger Every Time
- Common Mistakes to Avoid
- Easy Variations
- What to Serve with Zinger Burgers
- Why Homemade Zinger Burgers Are Worth It
- Extra Experience: What Making Zinger Burgers Feels Like in Real Life
- Conclusion
If a regular chicken burger is the polite friend who says “excuse me,” a zinger burger is the one who kicks down the door, steals a fry off your plate, and somehow gets away with it. Crispy, spicy, juicy, and stacked on a soft bun with sauce and pickles, a great zinger burger is pure comfort food with a little attitude.
The good news? You do not need a fast-food drive-thru or a deep fryer the size of a bathtub to make one at home. You just need smart seasoning, a flavorful marinade, a crunchy coating, and enough self-control not to eat the first chicken fillet straight off the rack. In this guide, you will learn exactly how to make zinger burgers in 15 practical steps, along with tips for texture, heat, sauce, and that satisfying crunch that makes the whole thing unforgettable.
What Is a Zinger Burger?
A zinger burger is essentially a spicy crispy chicken burger made with a well-seasoned chicken fillet, a crunchy outer coating, and classic toppings like mayo-based sauce, lettuce, and pickles on a toasted bun. The best version hits all the right notes at once: juicy chicken inside, audible crunch outside, balanced heat, and enough sauce to keep every bite lively without turning the bun into a soggy little tragedy.
Ingredients for Homemade Zinger Burgers
For the chicken
- 4 boneless, skinless chicken breasts or 6 boneless chicken thighs
- 1 1/2 cups buttermilk
- 2 tablespoons hot sauce
- 1 teaspoon salt
- 1 teaspoon black pepper
- 1 teaspoon paprika
- 1/2 teaspoon cayenne pepper
For the coating
- 2 cups all-purpose flour
- 1/2 cup cornstarch
- 1 tablespoon paprika
- 1 teaspoon garlic powder
- 1 teaspoon onion powder
- 1 teaspoon cayenne pepper
- 1 teaspoon black pepper
- 1 1/2 teaspoons salt
For frying and assembling
- Vegetable or canola oil, for frying
- 4 burger buns
- Lettuce or shredded cabbage
- Pickle slices
- Butter, optional for toasting buns
For the zinger sauce
- 1/2 cup mayonnaise
- 1 tablespoon hot sauce
- 1 teaspoon ketchup
- 1 teaspoon mustard
- 1/2 teaspoon garlic powder
- 1 teaspoon pickle juice
How to Make Zinger Burgers: 15 Steps
Step 1: Choose the right chicken cut
You can make an excellent zinger burger with either chicken breast or chicken thighs. Breasts give you that classic large sandwich fillet look, while thighs bring more natural juiciness and forgiveness. If you are new to frying, thighs are the friendlier option. If you want the dramatic “I made this at home?” reveal when sliced, go with breast cutlets.
Step 2: Pound the chicken to an even thickness
Place the chicken between sheets of parchment or plastic wrap and gently pound it until it is even. This helps the meat cook at the same rate and keeps you from ending up with one side perfect and the other side still considering its life choices. Aim for about 1/2 inch thick for a good burger-size fillet.
Step 3: Make the spicy marinade
In a large bowl, whisk together the buttermilk, hot sauce, salt, black pepper, paprika, and cayenne. This marinade does more than add flavor. It helps tenderize the chicken, gives it a subtle tang, and creates a sticky surface that helps the flour coating cling like it means business.
Step 4: Marinate the chicken
Add the chicken to the marinade and coat each piece well. Cover and refrigerate for at least 2 hours, though 4 to 8 hours is even better. If you marinate overnight, even better still. This is not laziness. This is strategy. Flavor likes time.
Step 5: Mix the seasoned flour
In a shallow dish, combine the flour, cornstarch, paprika, garlic powder, onion powder, cayenne, black pepper, and salt. The flour gives structure, while the cornstarch helps create that light, crisp crackle that makes a fried chicken burger feel special instead of merely acceptable.
Step 6: Make the zinger sauce
Stir together the mayonnaise, hot sauce, ketchup, mustard, garlic powder, and pickle juice. Taste it. Want more heat? Add another splash of hot sauce. Want more tang? Add a little more pickle juice. The sauce should be creamy, sharp, and slightly fiery. It is the peace treaty between the crunchy chicken and the soft bun.
Step 7: Prep your toppings and buns
Wash and dry the lettuce, slice the pickles if needed, and set out your buns. This step matters more than people think. Once the chicken is fried, the clock starts ticking. Great burgers come together quickly, and nobody wants to be chopping lettuce while the chicken sits there losing crunch and judging the room.
Step 8: Dredge the chicken properly
Remove one piece of chicken from the marinade, letting excess drip off, then press it into the seasoned flour. Really press. Flip and coat again. For extra craggy texture, drizzle a spoonful of marinade into the flour before dredging the later pieces. That creates little flour clumps that fry into crunchy ridges. In other words: the crispy gold you came for.
Step 9: Let the coating rest
Place the coated chicken on a rack or tray and let it sit for 10 to 15 minutes before frying. This small pause helps the breading adhere better and reduces the heartbreak of coating sliding off in the oil. Think of it as giving the crust time to bond with the chicken instead of rushing into a messy relationship.
Step 10: Heat the oil
Pour about 1 1/2 to 2 inches of oil into a deep skillet, Dutch oven, or heavy pot. Heat it to around 350 degrees F. Use a thermometer if you have one. Guesswork is charming in karaoke, not so much in frying. If the oil is too cool, the coating absorbs oil and goes greasy. Too hot, and the outside burns before the inside finishes cooking.
Step 11: Fry in batches
Carefully lower the chicken into the hot oil and fry without overcrowding the pan. Fry each piece for about 4 to 6 minutes per side, depending on thickness, until deep golden brown and cooked through. Work in batches so the oil temperature stays steady. Crowding the pan is how crunch goes missing and disappointment arrives early.
Step 12: Check doneness and drain well
Transfer the fried chicken to a wire rack set over a tray instead of paper towels if possible. That keeps the underside crisp. The chicken should reach an internal temperature of 165 degrees F at the thickest part. Let it rest a few minutes. Not only is this safer and juicier, but it also saves your mouth from a lava-level first bite.
Step 13: Toast the buns
Lightly butter the cut sides of the buns and toast them in a skillet or under the broiler until golden. Toasting gives the bun more flavor and helps it stand up to sauce and hot chicken. A soft bun is lovely. A soft bun that collapses instantly under pressure is not the hero of this story.
Step 14: Assemble the burgers
Spread zinger sauce on the bottom bun, add lettuce or cabbage, then place the crispy chicken on top. Add pickles, a little more sauce if you like, and finish with the top bun. Press gently. Admire your work. Consider taking a photo. Then accept that the photo will never be as satisfying as the first bite.
Step 15: Serve immediately
Zinger burgers are best eaten while the chicken is still hot and the coating is at peak crunch. Serve them with fries, coleslaw, onion rings, or even a simple cold drink that knows it has an important cooling job to do. Homemade spicy chicken burgers do not wait around forever, and frankly, they should not have to.
Tips for the Best Zinger Burger Every Time
Season every layer
The secret to a burger that tastes restaurant-worthy is seasoning in stages: the marinade, the flour, the sauce, and even a pinch of salt right after frying if needed. If you only season one part, the final result can taste flat no matter how beautiful it looks.
Use cornstarch for extra crispiness
A little cornstarch in the flour mix helps make the crust lighter and crunchier. It is one of those tiny details that makes people say, “Wait, you made this?” in the best possible tone.
Control the heat level
Not everyone wants a burger that feels like a dare. Keep the cayenne moderate for a balanced spicy chicken burger, or increase it if you want a proper zinger effect. You can also add chili flakes or a spicier hot sauce to the marinade or the sauce.
Do not skip the pickles
Pickles add acidity, crunch, and relief. They cut through the richness of the fried chicken and mayo sauce, and they keep the burger from feeling too heavy. In a great zinger burger, pickles are not decoration. They are support staff with star energy.
Common Mistakes to Avoid
- Skipping the marinade: You lose tenderness and flavor.
- Using oil that is too cold: The crust gets greasy instead of crisp.
- Overcrowding the pan: The oil temperature drops fast.
- Not resting the dredged chicken: The coating may fall off.
- Building on untoasted buns: The burger can go soggy quickly.
Easy Variations
Cheesy zinger burger
Add a slice of American, cheddar, or pepper jack cheese over the hot chicken just after frying.
Slaw-style zinger burger
Swap lettuce for crunchy slaw tossed with a little mayo and vinegar for extra texture and brightness.
Extra spicy zinger burger
Brush the fried chicken lightly with spicy chili oil or add more cayenne to the flour for a burger with serious kick.
Oven-finish method
If your chicken pieces are thick, you can fry until golden, then finish them in the oven. This helps keep the crust crisp while ensuring the center cooks through.
What to Serve with Zinger Burgers
Zinger burgers are rich, crunchy, and boldly flavored, so the best side dishes either double down on comfort or add something cool and fresh. French fries are the classic move, of course. Waffle fries, curly fries, or even potato wedges all work beautifully. Coleslaw is another strong choice because the creamy, slightly tangy crunch pairs naturally with spicy fried chicken.
If you want to lighten things up just a bit, serve the burgers with a cucumber salad, pickled onions, or a simple cabbage slaw with vinegar. And if you are hosting friends, put out extra sauce on the side. People get weirdly competitive around good burger sauce, and honestly, that is understandable.
Why Homemade Zinger Burgers Are Worth It
Making zinger burgers at home is not just about saving money or copying takeout. It is about control. You control the heat, the thickness of the chicken, the quality of the bun, the amount of sauce, the crunch factor, and the toppings. You can make it fiery, mild, extra saucy, extra crispy, or gloriously overbuilt. Store-bought burgers are convenient. Homemade ones can be legendary.
Once you get the method down, it becomes surprisingly repeatable. Marinate, dredge, fry, toast, stack, devour. And that first bite of crunchy chicken with spicy sauce and cool pickles? That is the kind of kitchen success that makes you walk around like you own a small but thriving burger empire.
Extra Experience: What Making Zinger Burgers Feels Like in Real Life
The first time you make zinger burgers from scratch, it feels a little dramatic. There are bowls on the counter, flour on your hands, oil in the pan, and at least one moment when you wonder whether this burger had to be this serious. Then the chicken hits the hot oil and starts sizzling like it has opinions, and suddenly the whole kitchen smells like ambition and excellent decisions.
There is something deeply satisfying about the process. The marinade gives the chicken that seasoned, tangy base. The dredging step feels messy in the most productive way, like the culinary version of building something with power tools. And when the coating turns golden and crisp, you get that small rush of victory that says, yes, dinner is going very, very well.
Homemade zinger burgers also create a strange and wonderful change in household behavior. People who were “not that hungry” start wandering into the kitchen. Someone casually asks how long it will be. Someone else opens the bun bag and pretends they were “just checking.” The moment toasted buns, crisp chicken, and spicy sauce appear together, everyone suddenly becomes extremely invested in timing.
The eating experience is even better. A good zinger burger is loud in the best way. The crust crunches. The pickles snap back. The sauce softens the edges without stealing the spotlight. You get heat, but not just heat for the sake of drama. You get actual flavor. Smoky paprika, peppery bite, tang from the buttermilk, richness from the mayo, and a cool hit from lettuce or slaw. It is a full performance in one bun.
And then there is the confidence factor. After making one solid batch, you stop seeing zinger burgers as restaurant-only food. You start thinking dangerous thoughts like, “I could make this better next time,” or “What if I added pepper jack?” or “Maybe I need a pickle station.” That is how burger hobbies begin.
Over time, the recipe becomes personal. Some people love more heat in the sauce. Some want extra crunch in the coating. Some prefer thighs for maximum juiciness; others want wide chicken breast cutlets that peek dramatically out of the bun like they are trying to make an entrance. The beauty of homemade cooking is that the burger gradually becomes yours. Not generic. Not copied. Yours.
There are also lessons hidden in the process. You learn patience from marinating. You learn discipline from not crowding the pan. You learn that toasted buns are not optional if you care about texture. Most importantly, you learn that a great burger is rarely about one giant trick. It is about several smart little decisions layered together until the final bite tastes bigger than the sum of its parts.
So yes, making zinger burgers takes effort. Your fingers may get floury. Your stovetop may need a quick cleanup. You may stand over a cooling rack with the expression of a scientist who has finally solved something important. But when you bite into that spicy, juicy, crunchy burger and realize you made it in your own kitchen, the whole thing feels absolutely worth it. Messy? A little. Delicious? Very. Repeatable? Without question.
Conclusion
If you want a spicy chicken burger with bold flavor, serious crunch, and total homemade bragging rights, this 15-step zinger burger method gets you there. Start with a flavorful marinade, build a well-seasoned coating, fry at the right temperature, and finish with a toasted bun, tangy sauce, and crisp pickles. It is not complicated once you understand the rhythm. And after one successful batch, your future burgers may have a lot to live up to.


