Table of Contents >> Show >> Hide
- Can You Put a Fresh Rose Directly in Resin?
- Best Roses for Resin Preservation
- Supplies You Need to Preserve a Rose in Resin
- Safety First: Resin Is Pretty, But It Is Still Chemistry
- Step 1: Dry the Rose Completely
- Step 2: Choose the Right Resin Mold
- Step 3: Plan the Rose Placement
- Step 4: Mix the Epoxy Resin
- Step 5: Pour the First Layer
- Step 6: Add the Dried Rose
- Step 7: Pour Resin in Layers
- Step 8: Remove Bubbles Like a Patient Craft Wizard
- Step 9: Cover and Cure
- Step 10: Demold and Finish the Rose Keepsake
- Common Mistakes When Preserving Roses in Resin
- Creative Ideas for Resin Rose Projects
- How Long Does a Rose Last in Resin?
- Real-World Experience: Lessons From Preserving Roses in Resin
- Conclusion
A rose is already dramatic. It shows up wearing velvet petals, smells like a love letter, and somehow makes even a kitchen counter look poetic. But the problem with roses is that they do not stay that way forever. One day they are romantic and radiant; a few days later, they are leaning over the vase like they have just heard bad news.
That is where resin comes in. Learning how to preserve a rose in resin lets you turn a meaningful flower into a lasting keepsake, whether it came from a wedding bouquet, anniversary dinner, memorial arrangement, prom corsage, garden harvest, or a “just because” bouquet that deserves more than a slow fade in the trash can.
This DIY craft tutorial walks you through the full process: choosing the right rose, drying it properly, preparing your mold, mixing epoxy resin, pouring in layers, removing bubbles, curing, demolding, and finishing your piece. The goal is a clear, glossy rose keepsake that looks intentionalnot like a science experiment your craft table regrets.
Can You Put a Fresh Rose Directly in Resin?
Technically, yes. Practically, please do not. A fresh rose contains moisture, and moisture is the sworn enemy of a clean resin project. When a fresh flower is trapped inside epoxy resin, it may turn brown, wilt, rot, create cloudy spots, or form bubbles as the remaining water tries to escape. Resin preserves best when the flower is already fully dry.
Think of resin as a time capsule, not a dehydrator. It locks in what is already there. If your rose is wet, resin locks in moisture. If your rose is moldy, resin locks in regret. If your rose is properly dried, resin locks in shape, color, and sentimental value.
Best Roses for Resin Preservation
Not every rose behaves the same in resin. Tight rosebuds, miniature roses, and partially opened roses are often easier for beginners because they hold their shape better during drying and fit more comfortably into silicone molds. Large, fully opened roses can look stunning, but they need more drying time, a deeper mold, and a little more patience.
Choose a Rose That Is Fresh but Not Wet
The best time to preserve a rose is before it starts drooping. Choose a bloom with firm petals, good color, and no browning edges. If the rose came from a bouquet, start the preservation process as soon as possible. Waiting too long can lead to fragile petals and faded color.
Pick the Right Color
Red, pink, yellow, white, peach, and lavender roses can all be preserved in resin, but some colors shift after drying. Red roses may darken into burgundy. White roses may turn cream or ivory. Pink roses often keep a softer, romantic tone. This color change is normal and can actually make the final piece look vintage and elegant.
Supplies You Need to Preserve a Rose in Resin
Before you begin, gather everything. Resin waits for no one once it is mixed, and scrambling around for a toothpick while wearing sticky gloves is a comedy scene best avoided.
- Fresh rose or dried rose
- Silica gel flower-drying crystals or another drying method
- Airtight container for drying
- Clear two-part epoxy resin
- Silicone mold deep enough for your rose
- Nitrile gloves
- Safety glasses
- Respirator if required by your resin instructions or workspace conditions
- Disposable mixing cups
- Wooden stir sticks or silicone stir tools
- Toothpicks or tweezers
- Small craft torch, heat gun, or lighter for surface bubbles
- Mold release spray, optional
- Dust cover, such as a plastic storage bin turned upside down
- Fine-grit sandpaper or polishing compound, optional
Safety First: Resin Is Pretty, But It Is Still Chemistry
Epoxy resin can create gorgeous keepsakes, but uncured resin and hardener should be handled carefully. Work in a well-ventilated area, protect your skin, and follow the safety instructions on your specific resin brand. Wear nitrile gloves instead of bare hands, use eye protection, and keep food, drinks, children, and pets away from your workspace.
Do not mix resin in your favorite coffee mug. Do not use your everyday measuring spoons. Do not work on the same surface where you plan to roll out cookie dough later. Cover your table with a silicone mat, plastic sheet, or disposable protective layer. Resin is wonderful, but it is not a seasoning.
Step 1: Dry the Rose Completely
The most important step in preserving a rose in resin happens before you ever open the resin bottles. The rose must be dry. Not “it feels kind of dry.” Not “I left it on the windowsill for two days and hoped for the best.” Completely dry.
Best Method: Drying a Rose with Silica Gel
Silica gel is one of the best options for preserving a rose’s shape and color. It removes moisture while supporting the petals, which helps the bloom stay more three-dimensional. To use it, pour a layer of silica gel into an airtight container. Trim the rose stem, leaving about half an inch if needed for positioning. Place the rose upright or face-up, depending on its shape and your container.
Slowly spoon silica gel around the rose, letting the crystals fall between the petals. Be gentle. You are drying a flower, not burying pirate treasure. Cover the rose completely, seal the container, and let it sit for several days to two weeks. Small roses may dry faster; larger roses need longer. When the rose feels papery and no longer cool or soft, it is ready.
Alternative Method: Pressing Rose Petals
If you do not need a full 3D rose, pressing petals is easier and great for jewelry, bookmarks, coasters, and flat ornaments. Place petals between parchment paper and tuck them inside a heavy book. Change the outer paper every couple of days if moisture builds up. Pressed petals dry flat, which makes them easier to arrange in shallow molds.
Alternative Method: Air Drying
Air drying is simple: hang the rose upside down in a dry, dark, well-ventilated space. This method costs almost nothing, but it usually causes more shrinkage and color loss than silica gel. It can still work beautifully if you want a rustic or antique look.
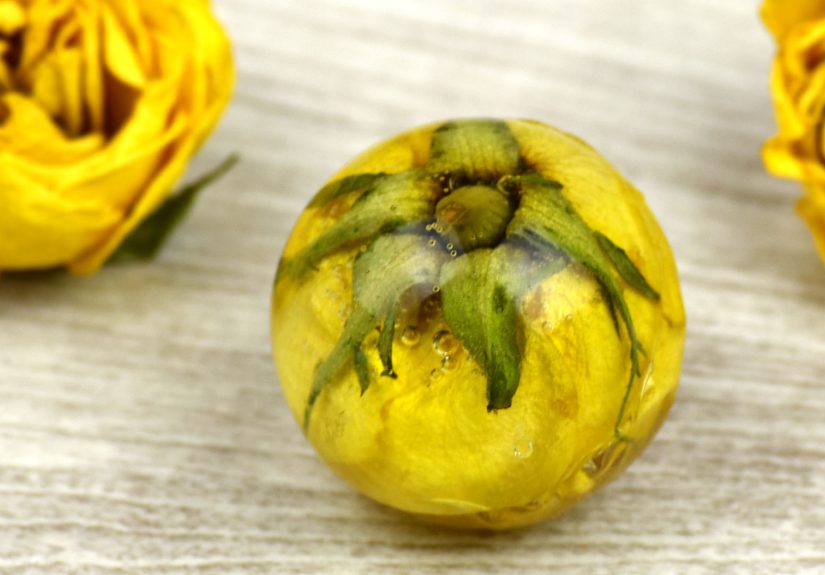
Step 2: Choose the Right Resin Mold
For a full rose, choose a deep silicone mold such as a sphere, cube, pyramid, heart, oval, or block. The mold should be large enough that the flower does not press hard against the sides. If petals touch the mold wall, they may create awkward flat spots or trap bubbles.
For beginners, a cube or rectangular mold is easier than a sphere because it sits flat and gives you more control. Spheres are beautiful, but they can be fussy. They also have a talent for magnifying every bubble like a tiny museum exhibit.
Step 3: Plan the Rose Placement
Before mixing resin, place the dried rose inside the empty mold and look at it from several angles. Decide which side should be the “front.” In many molds, the bottom becomes the top after demolding, so take a moment to understand how your finished piece will display.
If the rose wants to float, do not panic. Dried flowers are lightweight and often rise in resin. The solution is to pour in layers instead of filling the entire mold at once. A first layer acts like an anchor. Later layers build the clear block around the bloom.
Step 4: Mix the Epoxy Resin
Follow your resin manufacturer’s ratio exactly. Many art resins use a 1:1 ratio by volume, but not all formulas are the same. Some deep-pour resins have different ratios and longer cure times. Read the label before mixing. Resin is not the place to freestyle like you are seasoning soup.
Measure resin and hardener carefully in clean cups. Combine them and stir slowly, scraping the sides and bottom of the cup. Stirring too fast can whip in bubbles. Stirring too little can leave sticky, uncured areas. A slow, thorough mix is the sweet spot.
Step 5: Pour the First Layer
Pour a thin layer of resin into the bottom of the mold. This first layer helps create a clear base and gives the rose something to settle into. Let it thicken according to your resin’s working time. You do not usually want it fully cured before adding the flower, but you do want it firm enough to help hold the rose in place.
Use a toothpick to pop visible bubbles. If your resin instructions allow heat, pass a small torch or heat gun quickly over the surface. Keep the heat moving. Too much heat can damage the mold, scorch the flower, or create new problems while trying to fix old ones.
Step 6: Add the Dried Rose
Place the rose carefully into the mold using tweezers or gloved fingers. If you are preserving a full rose, angle it so the most attractive side faces outward. If the flower shifts, use a toothpick to nudge it gently. Do not crush the petals. Dried roses are delicate and can snap if handled like a stubborn jar lid.
You can brush a thin coat of resin over the rose before placing it in the mold. This helps seal tiny air pockets and may reduce bubbles that escape from between the petals later.
Step 7: Pour Resin in Layers
Continue filling the mold in layers. Layering helps control heat, reduce bubbles, and prevent the rose from floating to the top. Depending on the size of the mold, you may need two, three, or more pours. Let each layer partially cure or thicken before adding the next one, following the resin brand’s timing instructions.
Pour slowly along the side of the mold rather than directly onto the rose. This reduces the chance of bending petals or trapping large bubbles. After each pour, inspect the flower from the sides. Use a toothpick to release bubbles hiding between petals.
Step 8: Remove Bubbles Like a Patient Craft Wizard
Bubbles are normal in resin, especially when working with flowers. Some rise to the surface on their own. Others cling between petals like they signed a lease. The best bubble-control strategy is prevention: dry the rose fully, mix slowly, pour slowly, and seal the flower with a thin resin coat.
For surface bubbles, use a torch, heat gun, or lighter only if your resin and mold instructions allow it. Move quickly over the surface and never hold heat in one spot. For deeper bubbles, use a toothpick, skewer, or thin wire to coax them upward before the resin becomes too thick.
Step 9: Cover and Cure
Once the mold is filled, cover it with a dust shield. A clean plastic storage bin works well. Resin attracts dust, lint, pet hair, glitter, and mysterious particles that did not exist five minutes earlier. Covering the project protects your glossy surface while it cures.
Let the resin cure on a level surface. Do not move it too soon. Cure time varies by product, pour depth, temperature, and humidity. Some pieces can be demolded after 24 hours, while deeper pours may need several days. If the resin feels bendy, tacky, or warm, wait longer.
Step 10: Demold and Finish the Rose Keepsake
When the resin is fully cured, gently peel the silicone mold away from the piece. Do not yank the resin out by force. If the mold resists, flex the silicone slowly around the edges until air slips between the mold and the resin.
Inspect the finished piece. If edges are sharp, lightly sand them with fine-grit sandpaper. If the surface looks cloudy from sanding, polish it with resin polish or add a thin clear topcoat, depending on your project type. A well-finished resin rose can become a paperweight, shelf display, memorial keepsake, ring holder accent, ornament, or handmade gift.
Common Mistakes When Preserving Roses in Resin
Using a Fresh Rose
This is the most common beginner mistake. Fresh roses contain moisture, and moisture can ruin clarity, color, and longevity. Always dry the flower first.
Pouring Too Much Resin at Once
Deep pours can generate heat, trap bubbles, and move the flower out of position. Layering gives you better control and a cleaner result.
Mixing Resin Incorrectly
Wrong ratios or incomplete mixing can cause soft, sticky, or cloudy resin. Measure accurately and stir thoroughly.
Skipping Safety Gear
Uncured resin can irritate skin and eyes. Gloves, ventilation, and eye protection are not optional accessories. They are part of the craft.
Expecting Perfect Color Forever
Resin slows change, but natural flowers may still darken over time. Keep the finished piece away from direct sunlight to help reduce yellowing and fading.
Creative Ideas for Resin Rose Projects
Once you know how to preserve a rose in resin, you can customize the project in many ways. Add gold flakes for a romantic keepsake. Include tiny pearls from a wedding bouquet wrap. Add a name, date, or small charm. Use pressed petals in a coaster set. Preserve a single rosebud in a pendant. Create a memorial block with a rose from a funeral arrangement. Turn anniversary roses into matching bookends.
For a modern look, keep the resin crystal clear and let the flower do all the talking. For a dreamy style, add a small amount of translucent pigment near the base. Avoid adding too much color, though. The rose should remain the star of the show, not a background actor lost in a glitter storm.
How Long Does a Rose Last in Resin?
A properly dried rose sealed in quality resin can last for years. The final appearance depends on the flower’s condition, drying method, resin quality, UV exposure, and storage. Keep resin rose keepsakes away from direct sunlight, high heat, and damp areas. A bookshelf, display cabinet, desk, or bedside table is usually a better home than a sunny windowsill.
Real-World Experience: Lessons From Preserving Roses in Resin
The first lesson most resin crafters learn is that the rose has opinions. You may place it perfectly in the mold, step back proudly, and then watch it slowly float upward like a tiny floral submarine. This is why layering matters. A thin base layer gives the flower something to rest on, while later pours secure it in place. When in doubt, pour less at a time. Resin rewards patience and lightly mocks rushing.
Another useful experience is to dry more roses than you think you need. Even with careful silica gel drying, a few petals may bend, darken, or break. Having backup blooms gives you options. If you are preserving a sentimental rose, such as one from a wedding or memorial bouquet, practice first with a grocery-store rose. It is much less stressful to make your first mistakes on a flower that did not carry emotional weight.
Color expectations also deserve a reality check. A bright red rose may become wine-colored. A white rose may turn ivory. A blush rose may dry into a soft antique pink. These shifts are not failures; they are part of working with organic material. In fact, many finished resin roses look more elegant because of the slightly muted color. They feel less plastic and more heirloom.
Dust control is another lesson that sounds boring until you ignore it once. Resin surfaces are magnets for lint, hair, and tiny floating mysteries. Before pouring, wipe the workspace, tie back hair, avoid fuzzy sweaters, and cover the project while it cures. If you have pets, assume their fur has already submitted an application to join the artwork. Deny that application with a dust cover.
Temperature matters too. Resin generally behaves better in a comfortable room, not in a cold garage or blazing-hot patio. Cold resin can be thicker and harder to pour, which may increase bubbles. A very warm environment can shorten working time. Aim for a stable indoor workspace and read the resin label for the recommended temperature range.
Finally, remember that handmade does not mean flawless. A tiny bubble near a petal, a slightly tilted rose, or a soft color shift can make the piece feel human and personal. The goal is not factory perfection. The goal is to preserve a moment: the anniversary dinner, the wedding morning, the garden bloom, the goodbye bouquet, or the flower someone handed you when words were not enough. Resin gives that rose a second life, and with careful drying, safe handling, and patient pouring, that second life can be beautiful.
Conclusion
Preserving a rose in resin is part craft project, part science experiment, and part emotional time machine. The key is preparation. Dry the rose completely, choose the right mold, mix resin carefully, pour in layers, manage bubbles patiently, and give the piece enough time to cure. When done well, a resin rose becomes more than decoration. It becomes a memory you can hold, display, and revisit for years.
Whether you are saving a wedding rose, a memorial flower, a Valentine’s bloom, or a rose from your own garden, this DIY resin tutorial gives you a practical way to turn something temporary into something lasting. And yes, your craft table may get a little messy. That is part of the charm. Just wear gloves.


