Table of Contents >> Show >> Hide
- Before You Fold: Know What Type of Green Screen You Have
- Why Folding a Green Screen Properly Matters
- Tools and Space You Need
- How to Fold a Green Screen: 8 Steps
- Step 1: Clear the Area Around You
- Step 2: Hold Two Opposite Sides Firmly
- Step 3: Bring the Sides Together Into a Taco Shape
- Step 4: Rotate One Hand Over the Other
- Step 5: Let the Frame Form Three Smaller Circles
- Step 6: Stack the Circles Flat
- Step 7: Slide the Folded Screen Into Its Bag
- Step 8: Store It Flat, Dry, and Safe
- Common Mistakes When Folding a Green Screen
- How to Reduce Wrinkles Before and After Folding
- Green Screen Folding and Better Chroma Key Results
- Safety Tips for Folding a Pop-Up Green Screen
- How to Fold Different Green Screen Sizes
- Troubleshooting: What If Your Green Screen Will Not Fold?
- Care and Cleaning Tips After Folding
- Extra Experience: Real-World Lessons From Folding Green Screens
- Conclusion
- SEO Tags
Note: This guide focuses on collapsible pop-up green screens with a flexible spring-steel frame, the kind often used for photography, livestreaming, video calls, YouTube recording, school projects, and small home studios. If you own a retractable green screen in a hard case, lower it with the handle instead of twisting it.
Folding a green screen looks simple until the screen suddenly turns into a rebellious green taco and you begin questioning every life choice that led to this moment. The good news? A collapsible green screen is designed to fold down into a compact circle. The not-so-good news? It usually refuses to explain itself. Once you understand the motion, though, it becomes a quick, repeatable habitlike tying your shoes, except your shoes are five feet wide and spring-loaded.
Learning how to fold a green screen correctly protects the frame, prevents ugly wrinkles, keeps the fabric cleaner, and saves you from wrestling with it on the floor like a low-budget action scene. A smooth, well-stored green screen also gives you better chroma key results because video-editing software loves even color and hates shadows, folds, dust, and mysterious fabric dents. Whether you are using your green screen for streaming, filmmaking, product photography, online classes, or social media videos, proper folding is part of keeping your setup professional.
This guide walks you through eight practical steps for folding a collapsible green screen safely and neatly. We will also cover common mistakes, storage tips, wrinkle prevention, and real-world experience from using portable backdrops in small rooms, bedrooms, classrooms, and home studios where tripods multiply like houseplants.
Before You Fold: Know What Type of Green Screen You Have
Not every green screen folds the same way. The most common portable types include collapsible pop-up green screens, retractable green screens, mounted roll-down screens, muslin or polyester cloth backdrops, and large studio cyclorama setups. This article is mainly about the pop-up collapsible green screenthe oval or rectangular fabric panel with a flexible frame sewn around the edge.
A retractable green screen, such as a screen built into a floor case, should not be twisted. You simply unlock it, guide it down evenly, and store it in its case. A cloth green screen without a spring frame should be folded like fabric or rolled around a tube to reduce creases. A collapsible green screen, however, uses a controlled twist-and-fold motion. That is the one that scares people the first time, because it feels like the screen is trying to perform gymnastics without permission.
Why Folding a Green Screen Properly Matters
A green screen is not just a green piece of fabric. For chroma key editing, the surface should be smooth, evenly colored, and free from heavy shadows. Wrinkles and dents create darker and lighter areas, which make background removal harder in tools like OBS, Premiere Pro, Final Cut Pro, DaVinci Resolve, CapCut, and other editing apps. The cleaner the screen, the cleaner the key.
Proper folding also protects the flexible frame. If you force the frame in the wrong direction, bend it sharply, or shove it into the storage bag while it is still fighting back, you can warp the outline. A warped green screen may not stand flat later, which means more shadows, more frustration, and more time muttering at your camera before recording.
Tools and Space You Need
You do not need much equipment to fold a green screen. You need the green screen, its storage bag, clean hands, and enough open space to move your arms without knocking over a lamp, microphone, water bottle, or sleepy pet. A soft carpeted area is helpful because it protects the fabric if the screen slips. If you are outdoors, avoid folding it on dirt, wet grass, or rough pavement. Green screens love clean floors. They do not love mud, crumbs, or whatever that sticky thing is near your desk.
How to Fold a Green Screen: 8 Steps
Step 1: Clear the Area Around You
Start by clearing a space wider than the green screen. Remove light stands, cables, chairs, tripods, and anything fragile. Collapsible green screens are lightweight, but the spring frame can pop outward if you lose control. You do not need a huge studio, but you do need enough room to rotate the screen without turning your webcam into modern art.
Hold the screen upright in front of you. Keep the fabric facing away from dirty surfaces. If the screen is dusty, gently wipe it with a soft dry cloth before folding. Folding dirt into the fabric can create marks, and marks can show up later when you light the screen.
Step 2: Hold Two Opposite Sides Firmly
Place one hand on the left side of the frame and the other hand on the right side. Some people prefer holding the upper corners; others grip the middle of each long side. The goal is to control the frame, not squeeze the fabric. Keep your fingers around the outer edge where the flexible frame is located.
Stand with your feet shoulder-width apart. This gives you better control and prevents the classic beginner move: stepping backward in panic while the green screen opens again like a dramatic stage curtain. Keep the screen vertical and relaxed.
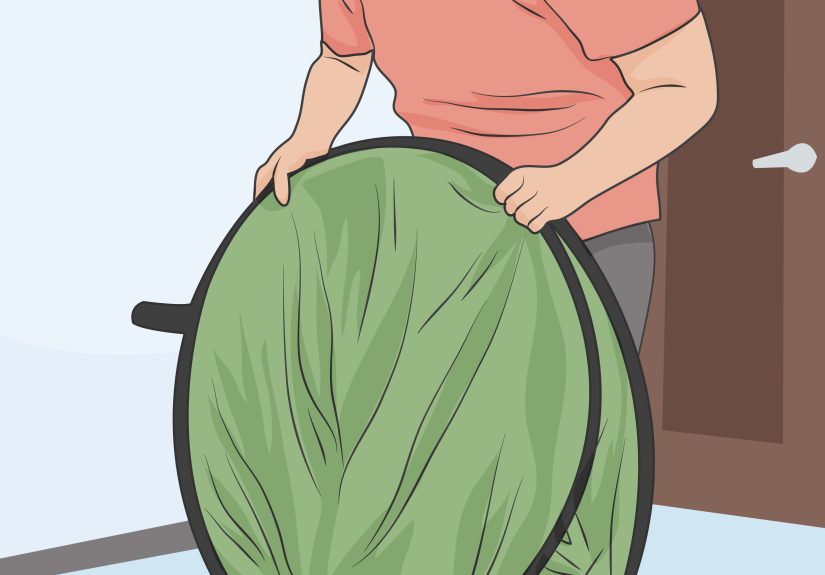
Step 3: Bring the Sides Together Into a Taco Shape
Now gently bring your hands toward each other. The screen should curve inward, forming a large taco shape. Yes, “taco shape” is the most accurate technical term here, and no, it should not be filled with guacamole. Let the flexible frame bend naturally. Do not force a sharp crease through the fabric.
At this stage, the top and bottom edges may sag slightly. That is normal. The weight of the green screen helps guide the frame into position. Keep your movements slow and steady. If the screen resists, pause and adjust your grip instead of pushing harder.
Step 4: Rotate One Hand Over the Other
With the screen curved, begin twisting one hand over the other in a smooth crossing motion. Imagine you are turning a steering wheel while folding a giant fabric pretzel. One side of the frame should begin to loop inward. This is the magic moment when the large oval starts becoming smaller circles.
Keep your wrists relaxed and your elbows slightly bent. The flexible frame wants to collapse into rings; your job is to guide it. If you feel too much resistance, stop and return to the taco shape. Trying again calmly works better than forcing the frame into submission.
Step 5: Let the Frame Form Three Smaller Circles
As you continue the twist, the frame should fold over itself and create three overlapping loops. This is where most beginners either celebrate or panic. Both reactions are acceptable, but celebration is better for your blood pressure.
Guide the loops together so they align neatly. The fabric will gather between the rings. Try not to pinch or trap large bunches of fabric at the edges. Small wrinkles are normal, but big twisted clumps can create creases during storage.
Step 6: Stack the Circles Flat
Once the smaller loops appear, press them gently together into one flat circle. Keep both hands on the frame until it is fully controlled. The screen may try to spring open if the loops are not aligned. That does not mean you failed; it means the frame is doing exactly what spring frames do.
Look around the edge. If one loop sticks out, rotate it inward and flatten it against the others. A well-folded green screen should look like a compact circular bundle, not a lopsided green pancake with attitude.
Step 7: Slide the Folded Screen Into Its Bag
Open the storage bag completely before you try to insert the screen. This sounds obvious, but many people fold the screen perfectly and then lose the battle against a half-zipped bag. Slide the folded screen in slowly, keeping the loops together with one hand while guiding the fabric with the other.
If the screen does not fit, do not jam it. Remove it, check whether the loops are stacked evenly, and try again. A properly folded collapsible green screen should fit into its bag without a wrestling match. If you have to sit on the bag to close it, something went wrong.
Step 8: Store It Flat, Dry, and Safe
Store the folded green screen in a dry place away from direct sunlight, moisture, sharp objects, and heavy items. Do not place textbooks, camera cases, or mystery boxes on top of it. Weight can bend the frame or create pressure marks in the fabric.
Keep the storage bag zipped to protect the screen from dust. If the fabric becomes damp, open it and let it dry fully before storing it again. A green screen should smell like nothing. If it smells like a basement, gym bag, or forgotten sandwich, give it air before packing it away.
Common Mistakes When Folding a Green Screen
Forcing the Frame
The biggest mistake is using brute force. A collapsible green screen should fold with a twist, not a crunch. If you hear popping, scraping, or the tiny imaginary voice of your warranty crying, stop. Return the screen to its open position and restart slowly.
Folding While the Screen Is Dirty
Dust and fingerprints may not seem serious, but they can affect lighting and keying. A clean green screen reflects light more evenly. Before folding, check for lint, pet hair, makeup, food crumbs, or the glitter that somehow appears even when nobody owns glitter.
Skipping the Storage Bag
The bag is not just packaging. It protects the fabric and keeps the frame compressed. Storing a folded green screen without its bag allows it to expand slightly, collect dust, or snag on nearby objects. Use the bag every time.
Leaving the Screen Folded for Months in a Bad Position
Long-term storage is fine, but the screen should be flat and protected. Do not store it bent behind a shelf or squeezed under a pile of gear. If you have not used it for a while, open it a day before an important shoot so the fabric can relax.
How to Reduce Wrinkles Before and After Folding
Wrinkles are the enemy of clean chroma key video. They create uneven shadows and color variations, which make editing software work harder. The easiest way to reduce wrinkles is to fold the green screen properly and store it in the correct bag. When you open it, give the fabric a few minutes to settle before recording.
If the screen has light wrinkles, set it up under soft, even lighting and allow the fabric to hang naturally. Many polyester screens relax after being opened for a while. Avoid ironing unless the manufacturer specifically says it is safe. Some green screen fabrics and coatings can be damaged by heat. When in doubt, be gentle.
Green Screen Folding and Better Chroma Key Results
Folding may seem unrelated to editing, but storage habits affect image quality. A green screen that comes out of its bag smooth and evenly shaped is easier to light. A screen with bent edges, wrinkles, and dusty marks creates shadows and color inconsistencies. Chroma key software removes a specific color range, so the more consistent your green background is, the cleaner your final video will look.
For best results, place your subject a few feet away from the screen when possible. This helps reduce shadows and green color spill on hair, skin, glasses, or clothing. Light the screen separately from the subject if you have enough lights. Soft, diffused light works better than harsh direct light because it creates fewer hotspots.
Safety Tips for Folding a Pop-Up Green Screen
A collapsible green screen is not dangerous when handled properly, but the frame is springy. Keep it away from your face while folding. Do not let children play with it. Fold it slowly, and always keep at least one hand controlling the frame. If it pops open, let it open fully rather than trying to grab it mid-snap.
Also watch your surroundings. The most common “green screen accident” is not dramatic; it is simply knocking over a light stand or smacking a wall because you underestimated the screen’s size. Give yourself space and fold with patience. The screen is not being difficult on purpose. Probably.
How to Fold Different Green Screen Sizes
Small green screens are usually easier to fold because the frame is lighter and easier to control. Large screens require wider arm movement and more patience. The basic method stays the same: hold the sides, create a taco shape, twist one hand over the other, form smaller loops, stack them flat, and store them in the bag.
If your green screen is very large, try folding it with a partner the first few times. One person can guide the top while the other controls the lower frame. After a few practice rounds, you will understand how the frame wants to move and can usually do it alone.
Troubleshooting: What If Your Green Screen Will Not Fold?
It Keeps Popping Open
This usually means the loops are not aligned. Go back to the taco shape and restart the twist. Keep the frame close to your body and guide the loops into the same plane before trying to flatten them.
It Looks Twisted or Uneven
Open the screen completely and check the frame. If it opens flat, it is probably fine. Try folding again more slowly. If the frame stays warped after opening, it may have been forced or stored incorrectly.
It Will Not Fit in the Bag
The folded circle is probably too large because one loop is not tucked in. Hold the folded screen firmly, rotate the loose loop inward, and press the rings together. Never force the zipper around a bulky fold.
The Fabric Is Bunching Up
Shake the screen gently before folding so the fabric sits evenly inside the frame. While folding, guide loose fabric toward the center. Avoid trapping big folds along the edge.
Care and Cleaning Tips After Folding
Most portable green screens can be lightly cleaned with a soft cloth. For small spots, use minimal moisture and avoid harsh chemicals. Strong cleaners can discolor the fabric, and discoloration is bad news for chroma key work. Always let the screen dry completely before storing it.
Keep food and drinks away from the green screen. A coffee stain may add personality, but your editing software will not appreciate the artistic choice. If you use the screen outdoors, brush off dust and pollen before packing it away.
Extra Experience: Real-World Lessons From Folding Green Screens
The first real lesson about folding a green screen is that confidence comes after repetition, not before it. The first attempt often feels awkward because the frame bends in a way your brain does not expect. You may think you are breaking it, even when you are doing the correct motion. That hesitation is normal. The trick is to move slowly enough to feel the frame guide itself. When the screen begins forming smaller loops, do not fight it. Follow the curve.
In small rooms, folding a green screen is less about strength and more about planning. Before you start, move your chair, microphone arm, ring light, backpack, and anything with a cable. Cables are especially sneaky. They wait until you are halfway through the fold and then wrap themselves around your ankle like they have personal goals. A clear floor turns folding from a comedy sketch into a ten-second routine.
Another useful experience is to practice folding when you are not in a hurry. Do not wait until five minutes before a livestream, video call, or class presentation. Practice on a calm day, preferably when nobody is watching. There is something deeply humbling about failing to fold a green screen while another person says, “Just twist it,” from across the room. Yes, thank you, folding coach. Very helpful.
Lighting also changes how you feel about storage. When a green screen is folded carelessly, it often opens with wrinkles, bent edges, or uneven fabric tension. Then you spend extra time adjusting lights, changing camera angles, and fixing your chroma key settings. A careful fold saves time later. It is not just about making the screen fit in the bag; it is about making the next setup easier.
For creators who record often, the best habit is to build a simple teardown routine. Turn off the camera. Move the lights aside. Brush off the screen. Fold it slowly. Bag it. Store it vertically only if the manufacturer allows it, or flat if that is safer for your model. This routine keeps your gear ready and reduces the chance of damage. Future you will be grateful, and future you is already dealing with enough unread emails.
If you share equipment in a classroom, studio, or office, labeling the storage bag helps. Many green screens look similar once folded. Add a small tag with the size, owner, or room name. Also include a short reminder card: “Fold into taco shape, twist, stack loops, bag gently.” It sounds silly, but it prevents the next person from stuffing the screen into a closet like a defeated parachute.
Outdoor use adds another lesson: wind is not your friend. A collapsible green screen can catch air like a sail. Fold it before the wind picks up, and always keep a firm grip on the frame. If the screen gets dusty, clean it before storing. Dirt trapped inside folds can leave marks that show up during close camera shots.
The final experience-based tip is to respect the frame. A good collapsible green screen can last a long time if you let the frame bend naturally. Most folding problems happen when someone gets impatient and tries to overpower it. The frame already knows the shape it wants to become. Your hands are just there to politely suggest the route.
Conclusion
Folding a green screen is easy once you understand the motion: clear space, hold the frame, curve it into a taco shape, twist one side over the other, guide the loops together, flatten the circles, and store it safely. The first try may feel strange, but after a few repetitions, it becomes quick and simple.
A properly folded green screen lasts longer, opens flatter, stores cleaner, and helps you create better videos with less editing frustration. Treat the frame gently, keep the fabric clean, avoid forcing the fold, and always use the storage bag. Your future recordings will look smoother, your chroma key will behave better, and your green screen will stop feeling like a puzzle designed by a mischievous filmmaker.


