Table of Contents >> Show >> Hide
- What Does “Invert Colours” Mean in MS Paint?
- Before You Start: Know Which Paint Version You Have
- How to Invert Colours in MS Paint: 9 Steps
- Step 1: Open Microsoft Paint
- Step 2: Open the Image You Want to Edit
- Step 3: Select the Whole Image
- Step 4: Right-Click the Selected Area
- Step 5: Choose “Invert Color”
- Step 6: Check the Result Carefully
- Step 7: Invert Only Part of an Image If Needed
- Step 8: Save the Inverted Image Correctly
- Step 9: Reopen the File to Confirm the Edit
- How to Invert Black and White in Paint
- Why Can’t I Find “Invert Color” in MS Paint?
- MS Paint Color Inversion vs. Windows Color Filters
- Best Uses for Inverting Colours in MS Paint
- Tips for Better Results When You Invert Colors
- Common Mistakes to Avoid
- Frequently Asked Questions About Inverting Colors in MS Paint
- of Practical Experience: What It Is Really Like to Invert Colours in MS Paint
- Conclusion
Want to flip an image from light to dark, black to white, or “normal photo” to “mysterious album cover from 1998”? Microsoft Paint can help. Inverting colors in MS Paint is one of those wonderfully simple tricks that feels almost too useful for such a basic app. Whether you are making a negative-style image, improving contrast, preparing artwork for printing, testing accessibility, or just having fun with a photo of your cat, Paint gives Windows users a quick way to reverse colors without installing a heavy photo editor.
This guide explains how to invert colors in MS Paint in 9 easy steps. It also covers partial color inversion, common problems, saving tips, accessibility alternatives, and real-world experiences that can help you avoid the classic “oops, I saved over the original” disaster. We have all been there. It hurts. Emotionally and digitally.
What Does “Invert Colours” Mean in MS Paint?
To invert colours means to reverse each color to its opposite on the digital color spectrum. Black becomes white, white becomes black, blue shifts toward yellow, red shifts toward cyan, and green shifts toward magenta. In simple terms, Paint creates a negative version of the selected image area.
This feature is useful for more than just creating a spooky effect. Many people use it to:
- Make text or line art easier to see
- Create a high-contrast version of an image
- Prepare designs for lightboards, stickers, crafts, or printing
- Check how artwork looks with reversed brightness
- Turn black drawings on a white background into white drawings on a black background
- Make quick creative edits without opening Photoshop, GIMP, or another advanced editor
MS Paint is not a professional color-grading suite, and it will not ask you to subscribe to anything, sacrifice a weekend, or learn 47 panels called “workspaces.” It is simple, fast, and already available on most Windows computers.
Before You Start: Know Which Paint Version You Have
Microsoft Paint has changed over the years. Older versions of Paint in Windows 7, Windows 8, and Windows 10 often include an Invert color option when you right-click a selected area. Newer Windows 11 versions of Paint have a cleaner design and more modern tools, but the exact location of features can vary depending on updates.
The safest method is this: open your image, select the whole image or part of it, then right-click the selection and look for Invert color. If the option appears, you are ready. If it does not, you can still use Windows accessibility tools such as Color Filters or Magnifier to invert how colors appear on your screen, though those tools do not permanently change the image file.
How to Invert Colours in MS Paint: 9 Steps
Step 1: Open Microsoft Paint
Click the Start button or press the Windows key on your keyboard. Type Paint, then select the Paint app from the search results. On many Windows PCs, Microsoft Paint is already installed. If it is missing, you can usually reinstall it from the Microsoft Store.
For quick access later, right-click the Paint icon and choose Pin to taskbar. This is especially handy if you use Paint often for screenshots, quick edits, or simple image adjustments.
Step 2: Open the Image You Want to Edit
Inside Paint, select File, then choose Open. Browse your computer and select the image you want to invert. You can also press Ctrl + O as a shortcut. Paint supports common image formats such as PNG, JPG, JPEG, BMP, and GIF.
If you are working with an important image, make a copy before editing. Right-click the file in File Explorer, choose Copy, then paste it in the same folder or another safe location. Rename it something obvious, such as project-image-inverted-copy.png. Future you will appreciate this small act of kindness.
Step 3: Select the Whole Image
To invert the entire image, press Ctrl + A. This selects everything on the canvas. You should see a border around the full image area.
You can also use the Select button in the Paint toolbar and choose Select all. Keyboard shortcuts are faster, but toolbar options are helpful if you prefer clicking through menus.
Step 4: Right-Click the Selected Area
With the image selected, right-click anywhere inside the selected area. A context menu should appear. This menu includes quick actions related to the selection, such as cut, copy, crop, rotate, and, in many Paint versions, Invert color.
Make sure you right-click inside the selected image area, not outside it. If you right-click outside the selection, Paint may show a different menu or no useful option at all. Paint is friendly, but it still expects you to click in the correct neighborhood.
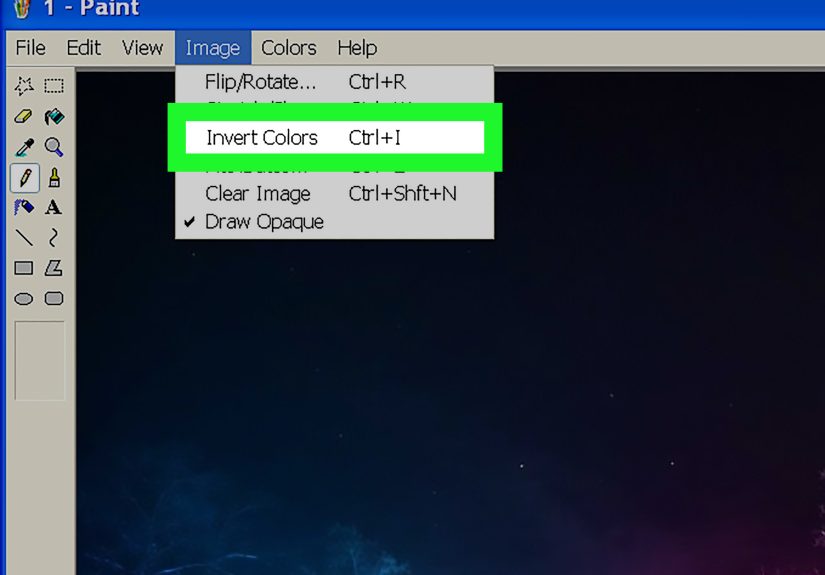
Step 5: Choose “Invert Color”
Click Invert color. Paint will immediately reverse the colors in the selected area. A white background becomes black, black text becomes white, and other colors shift to their opposite tones.
If you selected the whole image, the entire image changes. If you selected only one section, only that section changes. This makes it easy to create dramatic effects, highlight one object, or turn a simple image into something that looks like it escaped from a sci-fi control room.
Step 6: Check the Result Carefully
After inverting the image, zoom in and inspect the details. Inverting colors can make hidden artifacts, compression marks, dust, shadows, or uneven backgrounds more visible. This is normal, especially with JPG images, because JPG compression can create small blocks or color noise.
If the result looks too harsh, consider undoing the change with Ctrl + Z and trying a different approach. For example, you may want to crop the image first, clean up the background, or invert only the part that matters.
Step 7: Invert Only Part of an Image If Needed
You do not have to invert the whole picture. Use the Select tool to draw a rectangle around the area you want to change. Then right-click inside that selected area and choose Invert color.
This is useful when you want to:
- Invert a logo but keep the background unchanged
- Create a spotlight effect on one section
- Reverse black-and-white line art while preserving surrounding notes
- Make a selected object stand out in a tutorial image
For cleaner results, zoom in before selecting. A careful selection makes the edit look intentional instead of “I sneezed while using the mouse.”
Step 8: Save the Inverted Image Correctly
When you are happy with the inverted colors, save your work. Choose File, then Save as. Saving as a new file is usually better than pressing Save, because it protects your original image.
Use PNG if you want clean lines, screenshots, icons, text, or graphics. Use JPG for regular photos where smaller file size matters more than perfect sharpness. BMP is usually large and less practical for everyday web use. GIF can work for simple graphics but is limited in color quality.
A good filename might be:
- inverted-logo.png
- black-background-line-art.png
- photo-negative-effect.jpg
Step 9: Reopen the File to Confirm the Edit
After saving, close and reopen the new file to make sure the inverted colors were saved properly. This final check matters if you plan to upload the image to a website, insert it into a document, print it, or send it to someone else.
If the image looks correct outside Paint, you are done. Congratulations: you have successfully inverted colors in MS Paint without downloading a giant editing program or accidentally joining a graphic design forum at 2 a.m.
How to Invert Black and White in Paint
One of the most common reasons people use the MS Paint invert colors feature is to switch black and white. For example, you may have black text on a white background and want white text on a black background. This is perfect for signs, printable designs, lightboard graphics, chalkboard-style images, and high-contrast art.
The process is the same:
- Open the image in Paint.
- Press Ctrl + A to select everything.
- Right-click the selected image.
- Choose Invert color.
- Save the result as a new file.
If your image contains gray tones, those will invert too. Light gray becomes dark gray, and dark gray becomes light gray. This can be useful, but it can also change the mood of the image. Always preview before publishing or printing.
Why Can’t I Find “Invert Color” in MS Paint?
If you cannot find the Invert color option, do not panic. There are several possible reasons:
- You have not selected the image or area first.
- You right-clicked outside the selected area.
- Your version of Paint has a different interface.
- The feature may not appear in the same place after a Windows update.
- You may be using Paint 3D, Photos, or another image app instead of classic Microsoft Paint.
First, press Ctrl + A, then right-click inside the image. If the option still does not appear, update Paint through the Microsoft Store or try the accessibility alternatives below.
MS Paint Color Inversion vs. Windows Color Filters
It is important to understand the difference between inverting an image file and inverting your screen display.
MS Paint Invert Color
When you use Invert color in Paint, the pixels in the image actually change. If you save the file, the inverted version becomes a real image that you can upload, print, email, or use in a project.
Windows Color Filters
Windows Color Filters can invert colors on your screen for accessibility. This changes how everything looks on your display, but it does not permanently edit the image file. It is excellent for reading, visibility, and reducing eye strain, but it is not the same as saving an inverted image.
Windows Magnifier Invert Colors
Windows Magnifier also includes an invert colors shortcut. This is helpful for people who need temporary high contrast while zooming. Again, it changes the screen view, not the actual image file.
Use Paint when you need a saved inverted image. Use Windows accessibility tools when you only want your display to look inverted.
Best Uses for Inverting Colours in MS Paint
1. Creating Negative Photo Effects
Color inversion creates a classic photo-negative look. It can make ordinary images feel dramatic, surreal, vintage, or experimental. This is great for posters, thumbnails, social media graphics, and creative school projects.
2. Improving Contrast
Some images become easier to read after inversion. A scanned worksheet, handwritten note, or diagram may become clearer when dark and light areas switch places.
3. Preparing Designs for Printing
If you are printing on dark paper, transparent sheets, or specialty materials, inverting colors can help you test how the design might appear. It is not a replacement for professional print setup, but it is useful for quick planning.
4. Editing Line Art
Artists often use inversion to turn black line art on a white background into white line art on a black background. It is a fast way to create a chalkboard, neon, blueprint, or night-mode style.
5. Making Tutorial Images
When creating tutorials, you can invert a selected area to draw attention to a button, shape, or section. This can make screenshots more visually interesting and easier to follow.
Tips for Better Results When You Invert Colors
Start With a Clean Image
The cleaner your original image, the better the inverted version will look. Remove unnecessary marks, crop empty edges, and use a sharp source file whenever possible.
Use PNG for Text and Graphics
PNG is usually the best format for screenshots, icons, diagrams, logos, and images with text. It keeps edges sharper than JPG and avoids extra compression blur.
Do Not Save Over the Original
Always use Save as when editing important files. Once you overwrite the original, getting it back may be difficult unless you have backups or file history turned on.
Zoom In Before Selecting Small Areas
If you want to invert only a small part of an image, zoom in first. This helps you make a more accurate selection and avoid changing nearby pixels by mistake.
Undo Is Your Friend
Paint supports undo, and Ctrl + Z is the keyboard shortcut you should treat like a safety rope. If the inverted image looks wrong, undo and try again.
Common Mistakes to Avoid
Mistake 1: Forgetting to Select the Image
The Invert color command works on a selection. If nothing is selected, you may not see the option you need. Press Ctrl + A first if you want to invert the whole image.
Mistake 2: Confusing Invert with Flip
In Paint, “invert color” changes colors. “Flip” changes direction. A horizontal flip creates a mirror image. A vertical flip turns the image upside down. These are not the same thing, even though the word “invert” sometimes causes confusion.
Mistake 3: Expecting Professional Color Control
MS Paint performs a basic color inversion. It does not offer advanced controls for curves, levels, masks, or blending modes. For more detailed editing, use a dedicated photo editor.
Mistake 4: Publishing Without Checking
Always preview the final image before publishing. Inversion can make logos, skin tones, gradients, and shadows look very different. Sometimes the result is stylish. Sometimes it looks like the image has joined a haunted printer cult.
Frequently Asked Questions About Inverting Colors in MS Paint
Can I invert colors in MS Paint on Windows 11?
In many versions of Microsoft Paint, you can invert colors by selecting an area, right-clicking, and choosing Invert color. However, Paint’s interface can change with Windows updates. If you do not see the option, make sure the image is selected and check whether Paint is updated.
Can I invert only one part of an image?
Yes. Use the Select tool to choose a specific part of the image, then right-click inside that selection and choose Invert color. Only the selected area will change.
Does inverting colors reduce image quality?
The inversion itself is simple and does not necessarily damage the image. However, saving as JPG repeatedly can reduce quality because JPG uses compression. For best results with graphics or text, save as PNG.
Is there a keyboard shortcut for invert color in Paint?
Some older Paint versions used keyboard shortcuts for color inversion, but the most reliable method across many Windows versions is to select the image and use the right-click context menu. Windows accessibility tools also offer shortcuts for screen-level color inversion, but those do not permanently edit the image file.
Can I invert colors in Paint 3D?
Paint 3D is different from classic Microsoft Paint and does not always include the same simple right-click invert color workflow. For basic color inversion, classic Paint is usually the better choice.
of Practical Experience: What It Is Really Like to Invert Colours in MS Paint
The first thing you learn when using MS Paint to invert colors is that the feature is simple, but the results can be surprisingly dramatic. A plain black-and-white drawing can suddenly look like it belongs on a concert poster. A regular photo can turn into something that feels experimental, edgy, or accidentally genius. The second thing you learn is that not every image wants to be inverted. Some photos become cool. Others become mildly alarming. Portraits, especially, can go from “nice family picture” to “evidence from a paranormal investigation” in one click.
In real use, Paint’s invert color option is most helpful when working with clean, high-contrast images. Black logos on white backgrounds invert beautifully. Line drawings, handwriting samples, scanned notes, icons, and simple illustrations usually produce clear results. For example, if you have a black outline drawing and want it to appear white on a dark background, Paint can do that almost instantly. You open the file, press Ctrl + A, right-click, choose Invert color, and suddenly the design has a completely different personality.
Photos are more unpredictable. Inverting a landscape can create a strange but interesting abstract effect. Blue skies shift into warm tones, green trees become unusual purples or magentas, and shadows turn bright. This can be useful for creative projects, album-style graphics, mood boards, and social media experiments. However, if your goal is a polished professional photo, Paint may not provide enough control. You cannot fine-tune the inversion, adjust individual colors, or soften the effect inside Paint. What you get is quick, bold, and direct.
One practical experience worth remembering is that file format matters. If you invert a screenshot with text and save it as JPG, the letters may look fuzzy around the edges. Save it as PNG instead. PNG keeps text, lines, and flat colors cleaner. If you are editing a real photograph, JPG may be acceptable, but avoid repeatedly opening, saving, and resaving the same JPG file. Each save can add compression artifacts, and after a while the image may start looking like it was printed on toast.
Another useful habit is to duplicate the file before editing. Paint is wonderfully fast, but that speed can work against you. It is easy to open an image, invert it, press Ctrl + S, and only then realize you overwrote the original. The safest workflow is to right-click the file in File Explorer, copy it, paste it, and edit the copy. Or, inside Paint, use Save as immediately after opening the image. This tiny step prevents a lot of regret.
Partial inversion is where Paint becomes more interesting. Selecting only one section of an image and inverting that area can create a spotlight effect. For example, you can invert a button in a tutorial screenshot to show readers exactly where to click. You can invert one object in a photo for a surreal highlight. You can also make before-and-after comparisons by inverting only half the image. The trick is to zoom in and select carefully. A messy selection makes the edit look rushed, while a clean selection makes it look intentional.
Overall, inverting colors in MS Paint is best for quick edits, simple graphics, contrast experiments, and creative effects. It is not fancy, but that is part of its charm. Paint does not overwhelm you with sliders, panels, or mysterious settings named after things only photographers understand. It gives you a direct tool that works in seconds. For many everyday tasks, that is exactly enough.
Conclusion
Learning how to invert colours in MS Paint is a small skill with plenty of practical uses. You can reverse black and white, create a negative image effect, improve contrast, prepare line art, or make a selected area stand out. The key steps are simple: open your image, select the whole canvas or a specific area, right-click the selection, choose Invert color, then save the edited image as a new file.
For the best results, start with a clean image, use PNG for graphics and screenshots, avoid saving over the original, and preview the final file before publishing. MS Paint may be simple, but it remains one of the quickest tools for basic image editing on Windows. Sometimes the fastest tool is the best tool, especially when all you need is one click and a little color magic.
Note: This article uses standard American English while preserving the original title spelling “Colours.” The instructions are based on real Microsoft Paint behavior across commonly used Windows versions, with practical alternatives included for users whose Paint interface may vary after updates.


