Table of Contents >> Show >> Hide
- Why Use Resistance Bands for Bicep Curls?
- Before You Start: Form Rules That Matter
- Way 1: Standing Resistance Band Bicep Curl
- Way 2: Resistance Band Hammer Curl
- Way 3: Single-Arm Resistance Band Concentration Curl
- How Many Sets and Reps Should You Do?
- Sample Resistance Band Bicep Workout
- How to Make Resistance Band Curls Harder
- Safety Tips for Better Band Training
- Experience-Based Tips: What Resistance Band Bicep Curls Feel Like in Real Life
- Conclusion
Resistance bands may look like oversized rubber bands that escaped from an office supply drawer, but do not underestimate them. These portable, budget-friendly tools can light up your biceps, challenge your grip, improve muscle control, and turn a living room, hotel room, garage, or tiny apartment corner into a surprisingly effective arm-training zone.
If your goal is to build stronger, more defined arms without relying on dumbbells or gym machines, bicep curl resistance band exercises are a smart place to start. The biceps help bend the elbow, rotate the forearm, and assist in everyday pulling movements like carrying groceries, lifting a backpack, opening stubborn doors, or heroically bringing all the shopping bags inside in one trip.
This guide breaks down three effective ways to do resistance band bicep curls: the standing band curl, the hammer curl, and the concentration-style single-arm curl. You will learn proper form, common mistakes, beginner-friendly modifications, and practical ways to make each move harder as your arms get stronger. No complicated equipment. No gym intimidation. No need to pretend you understand what half the cable machine attachments are for.
Why Use Resistance Bands for Bicep Curls?
Resistance bands are popular for a reason: they are simple, affordable, lightweight, and easy to use almost anywhere. Unlike free weights, which provide the same load throughout a movement, bands create variable resistance. The farther you stretch the band, the more tension you feel. That means the top part of a curl can become especially challenging, forcing your biceps to stay engaged through the movement.
Another advantage is control. Resistance band exercises encourage slower, more deliberate reps because letting the band snap back is not only ineffective but also mildly dramatic in the worst possible way. With bands, your muscles work during the lifting phase and the lowering phase, which can help improve strength, endurance, and mind-muscle connection.
Resistance band bicep curls are also joint-friendly for many people. You can adjust tension quickly by changing your foot position, shortening the band, using a thicker band, or slowing down the tempo. This makes bands useful for beginners, travelers, older adults, home-workout fans, and anyone who wants a low-clutter strength-training tool.
Before You Start: Form Rules That Matter
Good curls are not about flinging your hands upward and hoping your arms figure it out. Proper technique makes the exercise safer and more effective. Before trying any resistance band bicep curl variation, keep these key form tips in mind.
Keep Your Elbows Close to Your Sides
Your elbows should stay near your ribs during most curl variations. If they drift forward, your shoulders may start helping too much. If they swing backward, you may lose tension. Imagine your elbows are politely glued to your sidesnot aggressively glued, just committed.
Stand Tall and Brace Your Core
Keep your chest lifted, shoulders relaxed, and core engaged. Avoid leaning backward to “help” the curl. If you have to turn your body into a human slingshot, the band is probably too heavy.
Control the Lowering Phase
Do not let the band pull your hands down quickly. Lower your hands slowly until your arms are extended but not locked. This controlled eccentric phase is where a lot of valuable muscle work happens.
Choose the Right Band Tension
A good starting point is a band that lets you complete 8 to 15 clean repetitions while feeling challenged near the end. If you can barely complete three reps with good form, go lighter. If you can casually curl while answering emails and questioning your life choices, go heavier.
Inspect Your Band
Before each workout, check the band for cracks, tears, thinning spots, or damaged handles. A worn resistance band can snap unexpectedly, and nobody wants their workout to include surprise facial percussion.
Way 1: Standing Resistance Band Bicep Curl
The standing resistance band bicep curl is the classic version and the best place to begin. It closely resembles a traditional dumbbell curl, but the band creates increasing tension as your hands rise toward your shoulders.
Muscles Worked
This exercise primarily targets the biceps brachii, the front muscle of the upper arm. It also recruits the brachialis, brachioradialis, forearms, and core muscles that help stabilize your posture.
How to Do It
- Stand on the center of a long resistance band with both feet about hip-width apart.
- Hold one handle or end of the band in each hand with your palms facing forward.
- Stand tall with your shoulders down, chest open, and elbows close to your sides.
- Bend your elbows and curl your hands toward your shoulders.
- Squeeze your biceps briefly at the top without shrugging your shoulders.
- Slowly lower your hands back to the starting position.
- Repeat for 8 to 15 reps.
Form Tips
Keep your wrists straight throughout the movement. If your wrists bend backward, your forearms may take unnecessary strain. Move slowly and smoothly, especially on the way down. The goal is not to win a speed-curl contest, which, frankly, sounds like a very chaotic sporting event.
To increase resistance, step wider on the band or use a thicker band. To decrease resistance, stand with one foot on the band instead of two, or give yourself more slack at the starting position.
Common Mistakes
The most common mistake is swinging the body to lift the band. This turns a bicep exercise into a full-body negotiation. Another mistake is letting the elbows drift forward at the top. Keep the movement focused on elbow bending, not shoulder lifting.
Best For
The standing resistance band curl is best for beginners, general arm strength, quick home workouts, and anyone learning how band tension feels. It is simple, effective, and easy to progress.
Way 2: Resistance Band Hammer Curl
The hammer curl changes your hand position. Instead of palms facing forward, your palms face each other. This small adjustment shifts more emphasis to the brachialis and brachioradialis, muscles that help give the arms a thicker, stronger appearance.
Why It Works
Hammer curls are excellent for building balanced arm strength. While standard curls focus heavily on the biceps, hammer curls bring the forearms and deeper upper-arm muscles into the party. Think of them as the supporting cast that secretly makes the whole movie better.
How to Do It
- Stand on the center of the resistance band with feet hip-width apart.
- Hold the handles or ends of the band with your palms facing each other.
- Keep your elbows tucked close to your torso.
- Curl your hands upward while maintaining the neutral grip.
- Pause briefly at the top and squeeze your arms.
- Lower slowly until your arms are extended but not locked.
- Perform 8 to 15 controlled reps.
Form Tips
Do not rotate your palms upward as you curl. Keep the hammer grip from start to finish. Your shoulders should stay relaxed, and your elbows should remain steady. If your elbows start flying outward like chicken wings, reduce the resistance and reset your posture.
You can perform hammer curls with both arms at the same time or alternate one arm at a time. Alternating curls can help you focus on control and reduce the urge to rush.
Common Mistakes
A common error is using too much band tension and shortening the range of motion. A half-rep with heroic facial expressions is still a half-rep. Choose a level of resistance that allows you to curl fully and lower under control.
Best For
Resistance band hammer curls are ideal for forearm development, grip strength, balanced arm training, and people who want more variety than standard curls. They are also useful if traditional palm-up curls feel uncomfortable on the wrists.
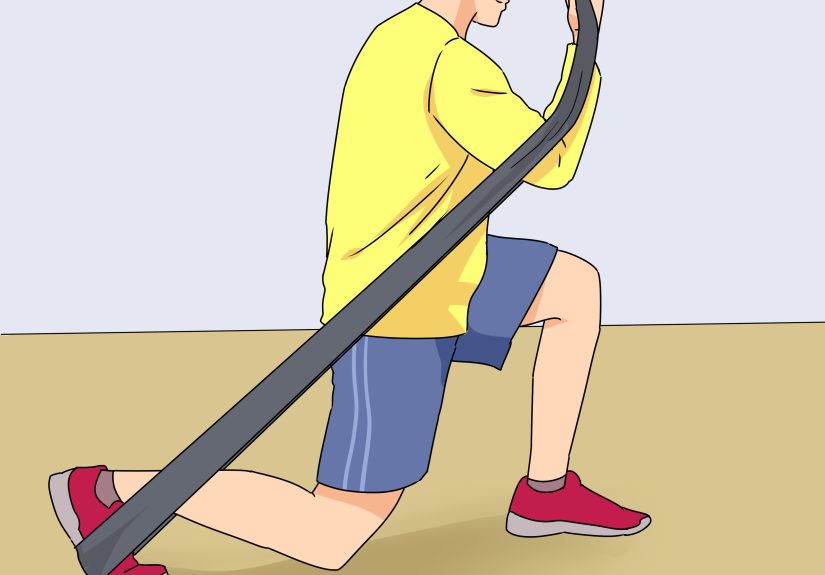
Way 3: Single-Arm Resistance Band Concentration Curl
The single-arm resistance band concentration curl is a focused variation that helps you train one arm at a time. It is especially useful for fixing strength imbalances, improving mind-muscle connection, and making light bands feel more challenging.
Why It Works
Training one arm at a time helps prevent your stronger side from doing extra work. It also allows you to pay close attention to your elbow position, wrist alignment, and tempo. This is the curl variation for people who want their biceps to stop freeloading and start clocking in.
How to Do It
- Sit on a sturdy chair or bench with your feet flat on the floor.
- Place one end of the resistance band under your right foot.
- Hold the other end or handle with your right hand.
- Lean slightly forward while keeping your back neutral.
- Rest your right elbow against the inside of your right thigh or keep it close to your side.
- Curl your hand toward your shoulder slowly.
- Squeeze at the top, then lower with control.
- Complete 8 to 12 reps, then switch sides.
Form Tips
Keep the movement strict and controlled. Because this variation isolates one arm, you may need a lighter band than you use for standing curls. Avoid twisting your torso or yanking the band. Your biceps should do the work, not your spine, ego, or dramatic background music.
Common Mistakes
One common mistake is leaning back as the band gets tighter. Another is letting the elbow slide around during the curl. Keep the upper arm stable so the movement comes from the elbow joint.
Best For
Single-arm concentration curls are great for beginners learning control, advanced exercisers chasing a stronger contraction, and anyone trying to balance left-right strength differences. They also work well as a finisher at the end of an arm workout.
How Many Sets and Reps Should You Do?
For general strength and muscle tone, start with 2 to 3 sets of 8 to 15 repetitions for each exercise. Rest 30 to 60 seconds between sets. Beginners can train biceps with resistance bands two times per week, leaving at least one day between sessions for recovery.
If your goal is muscle growth, gradually increase your total weekly volume. That can mean adding another set, using a stronger band, slowing the lowering phase, or combining two curl variations in the same workout. Progress should feel challenging, not reckless. Your arms should feel trained, not like they are filing a complaint with management.
Sample Resistance Band Bicep Workout
Here is a simple routine using the three curl variations above:
- Standing resistance band bicep curl: 3 sets of 10 to 15 reps
- Resistance band hammer curl: 3 sets of 10 to 12 reps
- Single-arm concentration curl: 2 sets of 8 to 12 reps per arm
- Optional finisher: 20-second hold halfway through a curl
Perform this workout after a warm-up or as part of an upper-body strength day. If you pair biceps with back exercises such as rows, pulldowns, or band pull-aparts, your arms may already be partially fatigued. In that case, keep the curl volume moderate.
How to Make Resistance Band Curls Harder
Once the exercises start feeling easy, you do not need to abandon your band and buy half a gym. Try these progression methods first:
Step Wider on the Band
A wider stance shortens the band and increases starting tension. This makes every rep harder, especially near the top.
Use a Slower Tempo
Try curling for two seconds, pausing for one second, and lowering for three seconds. Slower reps reduce momentum and increase time under tension.
Add a Pause
Hold the top of each curl for one to two seconds. This forces the biceps to work harder instead of bouncing through the movement.
Use a Heavier Band
When you can complete all reps with clean form and still feel like you have plenty left in the tank, move to a stronger band.
Try One-and-a-Half Reps
Curl all the way up, lower halfway, curl back up, then lower fully. That counts as one rep. It is spicy. Your biceps will notice.
Safety Tips for Better Band Training
Resistance bands are generally beginner-friendly, but safe setup matters. Always anchor the band securely under your feet or around a stable object designed to handle exercise tension. Never attach a band to something flimsy, sharp, rolling, or suspiciously wobbly.
Move through each rep with control. Do not jerk, snap, or release the band suddenly. Keep your joints aligned, breathe naturally, and stop if you feel sharp pain, numbness, or unusual discomfort. Muscle fatigue is normal. Pain that feels like a warning siren is not.
If you are new to exercise, returning after an injury, or managing a medical condition, consider asking a qualified health or fitness professional for guidance before starting a new strength routine.
Experience-Based Tips: What Resistance Band Bicep Curls Feel Like in Real Life
The first thing many people notice about resistance band bicep curls is that they feel different from dumbbell curls. With dumbbells, the hardest part is often around the middle of the movement. With bands, the tension usually increases as you curl higher. That means the top of the rep can feel surprisingly intense, even when the band looks harmless on the floor.
One practical experience tip is to start lighter than your pride wants. A band that feels easy during the first three reps can suddenly turn into a tiny elastic monster by rep twelve. This is especially true with standing curls, where the band stretches more as your hands move upward. Choosing a manageable band lets you complete the full range of motion instead of turning the last few reps into awkward shoulder shrugs.
Another lesson: foot placement changes everything. Standing with both feet on the band usually creates more resistance than standing with one foot. Moving your feet wider increases tension even more. If you are working out at home and do not have multiple bands, your stance becomes your resistance dial. Narrow stance for easier curls. Wider stance for harder curls. Very wide stance for “why did I do this?” curls.
Tempo also makes a huge difference. Many beginners rush the lowering phase because the band wants to return to its original length. But resisting that pull is one of the best parts of the exercise. A slow three-second lower can make a light band feel much more challenging. It also teaches control, which carries over to other strength exercises.
Single-arm curls are especially useful when one arm feels weaker or less coordinated. Most people have a dominant side, and bilateral curls sometimes hide the difference. When you train one arm at a time, there is nowhere to hide. The weaker arm gets direct attention, and over time, both sides can become more balanced.
For people who travel, resistance bands are a secret weapon. They fit in a suitcase, backpack, desk drawer, or even a jacket pocket. A quick hotel-room arm workout can include standing curls, hammer curls, rows, and triceps extensions in less than 20 minutes. You do not need perfect conditions. You just need a little floor space and a band that has not been chewed by a pet.
Another real-world advantage is confidence. Resistance band curls are less intimidating than heavy free weights, especially for beginners. There is no loud clanking, no crowded weight rack, and no pressure to perform in front of strangers who appear to live permanently near the squat rack. You can practice form privately and build consistency.
Finally, the best results come from treating resistance band curls like real strength training, not filler exercises. Track your reps. Notice your band tension. Progress gradually. Keep your form clean. When used consistently, bicep curl resistance band exercises can help build stronger arms, better control, and a more reliable workout habitwithout needing a gym membership or a garage full of iron.
Conclusion
Resistance band bicep curls are simple, effective, and surprisingly versatile. The standing curl builds a strong foundation, the hammer curl strengthens the arms and forearms, and the single-arm concentration curl sharpens control while helping correct imbalances. Together, these three exercises create a practical arm workout you can do almost anywhere.
The key is not just pulling the band upward. It is using good posture, steady elbows, controlled lowering, and the right amount of resistance. Start with clean reps, progress gradually, and let your biceps earn their applause one controlled curl at a time.


