Table of Contents >> Show >> Hide
- Why a Clay Volcano Works (and What It’s Actually Modeling)
- Materials and Supplies
- Step-by-Step: Build a Stable Base and “Magma Chamber”
- Step-by-Step: Sculpt the Clay Volcano (Without the Crack-a-Palooza)
- Step-by-Step: Paint Your Volcano Like a Tiny Geology Celebrity
- Eruption Time: The Baking Soda + Vinegar Recipe
- Safety and Cleanup (Because “Lava” Is Still a Mess)
- Troubleshooting: When Your Volcano Is Being a Drama Queen
- Make It a Science Fair Project (Easy Ways to Add Real Analysis)
- Conclusion
- Experiences and Lessons Learned (500-ish Words of Real-World Volcano Wisdom)
If you’ve ever wanted to build a tiny mountain that dramatically “erupts” on command (without the paperwork that usually comes with explosions),
a clay volcano is the ultimate kitchen-table science project. It’s part art class, part chemistry, and part “wow, that got foamy fast.”
In this guide, you’ll learn how to sculpt a sturdy volcano model with clay, paint it like a miniature landmark, and trigger a reliable
baking soda and vinegar eruption that’s science-fair ready.
The best part? You don’t need fancy gearjust a few common supplies, a little patience while the clay dries, and a willingness to accept that
your “lava” may try to escape and redecorate your table. (We’ll prevent that.)
Why a Clay Volcano Works (and What It’s Actually Modeling)
Real volcanoes erupt because molten rock (magma) contains dissolved gases. As magma rises, pressure drops and gases expand, helping push
material upwardsometimes gently, sometimes explosively. Thick, sticky magma can trap gases more easily, allowing pressure to build. When it finally
releases, eruptions can be more violent.
Your clay volcano isn’t making magma, of course. Instead, it’s demonstrating a simple acid-base reaction:
when vinegar (an acid) meets baking soda (a base), they react and produce carbon dioxide gas. Those gas bubbles rapidly expand through
the liquid, creating foam that rushes out of the crateryour “eruption.”
Materials and Supplies
Think of this as a choose-your-own-adventure list. The essentials are non-negotiable; the upgrades are for extra realism (or extra chaosyour choice).
Volcano build (the sculpture)
- Air-dry clay (kid-friendly and easy) OR modeling clay (reusable but softer)
- Plastic bottle (8–16 oz works great) or a sturdy plastic cup for the “magma chamber”
- Base: cardboard, foam board, or a plastic tray (a tray makes cleanup easier)
- Masking tape or duct tape
- Optional: aluminum foil, scrap cardboard, or paper to bulk out the volcano (saves clay)
- Plastic knife or craft stick for shaping and texture
Painting and finishing (the “looks like a real volcano” phase)
- Acrylic paints (brown, black, gray, green, plus red/orange/yellow for lava details)
- Paintbrushes + water cup + paper towels
- Optional: acrylic varnish/sealer (helps protect the paint once fully dry)
Eruption supplies (the “science happens here” phase)
- Baking soda
- White vinegar
- Dish soap (for thicker, foamier lava)
- Warm water (optional, helps mix and foam)
- Food coloring (red/orange looks “lava-ish”) or washable paint
- Funnel or rolled paper funnel (recommended unless you enjoy baking soda snowstorms)
- Measuring spoons/cups (helpful for repeatable eruptions)
Step-by-Step: Build a Stable Base and “Magma Chamber”
Step 1: Pick the right bottle size
A smaller bottle (around 8–16 oz) is easier to surround with clay and less likely to make your volcano top-heavy.
Bigger bottles can work, but they require more clay and can get heavy fastespecially if you want to move it later.
Step 2: Attach the bottle to the base
- Place your bottle in the center of your base (cardboard, foam board, or tray).
- Tape it down securely. Use multiple strips like a seatbelt systemcrisscrossing tape works well.
- Make sure the bottle opening is clear and easy to access. That opening is your crater.
Pro tip: If you’re working on a science fair display board, choose a base that fits your setup and won’t bend when carried.
A plastic tray is underrated hereit’s basically a built-in “lava moat.”
Step 3: Add supports (especially for taller volcanoes)
If you want a steep cone, give the clay something to lean on. Tape scrap cardboard triangles around the bottle like ribs,
or crumple aluminum foil to create a lightweight mountain shape. This reduces clay use and helps prevent sagging.
Step-by-Step: Sculpt the Clay Volcano (Without the Crack-a-Palooza)
Step 4: Plan the cone shape
Before you start slapping on clay like it’s frosting, decide your volcano style:
a classic cone, a wide shield volcano, or a dramatic stratovolcano with sharp ridges.
Any shape works as long as the crater opening stays unobstructed.
Step 5: Build the first clay layer
- Roll the clay into thick “snakes” or flat slabs.
- Press the clay onto your supports and base, building upward around the bottle.
- Keep the clay thickness fairly even. Very thick solid clay can dry slowly and crack more easily.
- Leave the top opening clear. Think “volcano crater,” not “sealed jar of doom.”
Step 6: Shape the crater and lava channels
Shape the rim around the bottle opening so it looks like a crater. Then carve a few shallow grooves down the sides to guide lava flow.
These channels won’t control the foam perfectly (foam has its own opinions), but they can help direct the first rush.
Step 7: Add realistic texture
Real volcanoes are rough and rocky, not smooth like a birthday cake. Lightly poke, tap, and drag a craft stick along the surface
to create bumps and ridges. Add small clay “rocks” near the base for extra detail.
Step 8: Let it dry completely
Air-dry clay often feels dry to the touch in about a day, but thick sculptures can take up to 72 hours to dry fully.
Drying time depends on thickness, humidity, and airflow. If you paint too early, the surface may look fine while the inside stays damp,
which can lead to cracking later.
Drying tips: Keep it indoors, rotate it once or twice during drying, and don’t place it near high heat.
Slow-and-steady drying usually wins the “not cracked” trophy.
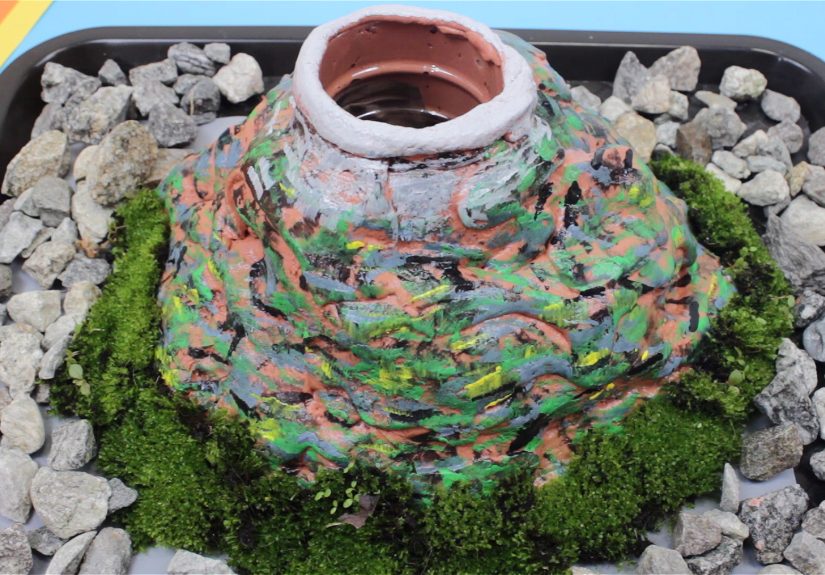
Step-by-Step: Paint Your Volcano Like a Tiny Geology Celebrity
Step 9: Base coat first
Paint the whole volcano with a base coat (brown, dark gray, or black). Let it dry.
Then dry-brush lighter colors (tan, gray) across raised areas to highlight texture.
This is the easiest way to make your volcano look “rocky” instead of “mud blob chic.”
Step 10: Add lava details
Paint thin streaks of red/orange/yellow along your carved channels. For a glowing effect:
start with dark red near the crater, blend to orange mid-way, then add a small highlight of yellow where you want the hottest “lava.”
(No one will fact-check your lava temperature. You’re the artist here.)
Step 11: Optionalseal it (after it’s fully dry)
If you want your volcano to last longer, you can apply an acrylic varnish once the clay is completely dry.
Important: sealing can protect the paint, but it won’t necessarily make air-dry clay waterproof.
If you plan to do repeated eruptions, use a tray and wipe spills quickly.
Eruption Time: The Baking Soda + Vinegar Recipe
Here’s where your clay volcano becomes an “active” volcano model. The foam is carbon dioxide bubbles getting trapped in soapy liquid,
which makes the eruption thicker and longer-lasting than plain fizz.
Recipe A: The reliable classic eruption
- 2–3 tablespoons baking soda
- 1/2 cup vinegar
- A few drops of food coloring
- Optional: 1 teaspoon dish soap (foam upgrade)
- Use a funnel to add baking soda into the bottle.
- In a separate cup, mix vinegar + food coloring + dish soap (if using).
- Pour the vinegar mixture into the bottle and step back.
Recipe B: Extra-foamy “lava flow” eruption
If you want a slower, thicker ooze (less geyser, more lava),
add a bit of warm water and a slightly bigger soap boost.
- 2 tablespoons baking soda
- 1/2–3/4 cup vinegar
- 1–2 teaspoons dish soap
- 2–4 tablespoons warm water
- Food coloring
Mix vinegar + soap + warm water + coloring in a cup, then pour into the crater.
The warm water helps the soap mix smoothly, and the foam tends to look more “lava-like.”
Recipe C: The “reload” method for multiple eruptions
Want multiple eruptions without rebuilding your whole setup?
Do smaller, repeatable rounds and measure everything so you can compare results.
- Round 1: 1 tablespoon baking soda + 1/4 cup vinegar mixture.
- Let the foam settle and rinse the outside of the crater if needed.
- Round 2: Repeat with the same amounts to compare consistency.
- Try one variable at a time (more soap, warmer liquid, different vinegar amount) and observe the changes.
Safety and Cleanup (Because “Lava” Is Still a Mess)
- Adult supervision is smartespecially with younger kids and painting supplies.
- Keep vinegar and foamy mixtures away from eyes and mouths. Wash hands after experimenting.
- Do the eruption on a tray, baking sheet, or outside on a washable surface.
- Wipe up spills quickly, especially on air-dry clay. The longer it sits wet, the more it can soften the surface.
- Rinse tools in the sink. The leftover mixture is generally safe to rinse with plenty of water.
Troubleshooting: When Your Volcano Is Being a Drama Queen
Problem: “It barely fizzed.”
Usually this means you didn’t have enough vinegar to react with the baking soda, or the baking soda clumped.
Try adding a little warm water to the bottle first (before baking soda), or use a funnel to get the baking soda into the bottom cleanly.
Make sure the baking soda is fresh and not damp.
Problem: “It erupted inside the bottle and then stopped.”
Too much soap can create thick foam that plugs the neck. Use a wider bottle opening if possible,
or slightly reduce soap and add a touch more vinegar so the reaction stays active.
Problem: “Foam went everywhere.”
Congratulationsyou successfully invented “volcano weather.” Reduce vinegar slightly, use less soap,
or keep the volcano on a bigger tray. Also: a taller crater rim can contain the first surge.
Problem: “My clay cracked.”
Common causes are clay applied too thick, drying too fast, or uneven drying. Patch small cracks with a thin layer of fresh clay,
smooth it, and let it dry slowly. Next time, bulk the inside with foil/cardboard so you can keep the clay shell thinner and lighter.
Problem: “The paint looks dull.”
Add highlights with dry-brushing: dip a nearly dry brush in a lighter color and lightly drag across texture.
It instantly adds depth. A thin acrylic sealer can also make colors pop once everything is fully dry.
Make It a Science Fair Project (Easy Ways to Add Real Analysis)
A clay volcano can be more than a one-time “boom.” Turn it into a real STEM experiment by testing variables and recording results.
Here are a few science fair–friendly ideas:
- Ratio test: Keep vinegar constant and change baking soda (or vice versa). Measure foam height or eruption duration.
- Soap test: Compare no soap vs. 1 teaspoon vs. 2 teaspoons. Which produces the most stable foam?
- Temperature test: Try room-temp vinegar vs. slightly warm liquid (not hot). Does foam change?
- Crater design test: Wider opening vs. narrower opening. Which gives a faster “burst” and which gives a longer flow?
- Observation log: Record time to peak foam, total eruption time, and cleanup difficulty (yes, that’s data too).
Keep your experiment fair by changing only one variable at a time and repeating each trial. Science loves consistency almost as much as it loves bubbles.
Conclusion
Making a clay volcano is the kind of project that checks every box: creative, hands-on, and genuinely educational.
You build a volcano model that looks impressive on a shelf, then power an eruption with a simple acid-base reaction that produces carbon dioxide gas.
With a sturdy base, a well-shaped crater, and a foamy vinegar mixture, your volcano can erupt reliablyagain and againwithout turning your kitchen
into a disaster movie set.
Take your time with drying, paint it with texture in mind, and treat your eruption like a mini science experiment:
measure, tweak, compare, and learn. And rememberif your first eruption is a little underwhelming, that’s not a failure.
That’s just your volcano asking for a sequel.
Experiences and Lessons Learned (500-ish Words of Real-World Volcano Wisdom)
After you build a few clay volcanoes (or even just one very determined one), you start noticing the same patterns that show up in classrooms,
kitchens, and science fairs everywhere. First: everyone underestimates how important the base is. A volcano can be beautifully painted,
perfectly textured, and still wobble like a baby giraffe if the bottle isn’t taped down well. The “eruption” doesn’t care that you spent an hour
dry-brushing ash highlightsfoam will happily tip the whole mountain if gravity gets a vote.
Second: the crater opening is basically your volcano’s personality. A wide opening tends to produce a quick, enthusiastic overflow that looks like
lava spilling out of a caldera. A narrower opening can look dramatic at first, but it’s more likely to clog with thick foam, especially if you used
a generous squeeze of dish soap. (A little soap makes great lava. A lot of soap makes a bubble monster that tries to live inside the bottle.)
Third: dry time is not a suggestion. Air-dry clay can feel dry on the outside while still damp inside, and painting too early is one of
the fastest ways to invite cracks later. The most successful builds are the ones that dry slowly and evenly, with a clay shell that isn’t overly thick.
People who bulk out the inside with foil or cardboard tend to have lighter volcanoes, fewer cracks, and less heartbreak.
Fourth: color matters more than you think. Red food coloring alone can look a little “pink lemonade” in bright light. Mixing red with a tiny drop of
blue or green can deepen the shade; adding a touch of orange makes it look more lava-like. Some people even layer color: a darker “magma” mix first,
then a brighter orange pour right after for a two-tone flow. It’s a small detail, but it makes photos look amazing.
Fifth: the most memorable volcano moments usually come from troubleshooting. The “weak fizz” teaches you about ratios and fresh ingredients. The
“foam geyser” teaches you about surface tension, soap, and why trays deserve respect. Even cleanup becomes part of the lessonespecially when you
realize that doing the eruption outside or on a washable surface transforms the whole experience from stressful to fun.
Finally: the best clay volcano projects are the ones that turn into mini experiments. When you measure your ingredients, change only one variable,
and write down what happens, you’re not just making bubblesyou’re doing real scientific thinking. And that’s the secret: the volcano is cool,
but the curiosity you build around it is the real eruption.


