Table of Contents >> Show >> Hide
- Kerosene Lamp 101: What’s Happening Inside That Glass
- Safety Setup (Do This Before Step 1)
- The 14 Steps: How to Use and Maintain a Kerosene Lamp
- Step 1: Identify Your Lamp Type (So You Don’t Maintain It Like the Wrong Species)
- Step 2: Use the Right Fuel (This Is Non-Negotiable)
- Step 3: Inspect the Lamp Like You’re Buying It Used (Even If You Own It)
- Step 4: Install the Correct Wick (Size and Fit Matter)
- Step 5: Fill the Reservoir Safely (Cool, Steady, and Not Overfull)
- Step 6: Let the Wick Saturate (Patience Prevents Drama)
- Step 7: Trim the Wick Properly (Your Main Tool for a Clean Burn)
- Step 8: Light It the Right Way (Low and Slow)
- Step 9: Adjust for a Clean Flame (Bright Enough, Not Angry Enough)
- Step 10: Operate Safely While It’s Lit (This Is Not a Roaming Lamp)
- Step 11: Extinguish Safely (Don’t “Snap” the Flame Off)
- Step 12: Clean the Chimney/Globe (Clear Glass = Better Light)
- Step 13: Maintain the Burner and Wick System (Small Parts, Big Impact)
- Step 14: Store Fuel and the Lamp Like a Responsible Time Traveler
- Troubleshooting: Fix the Usual Problems Before They Fix Your Walls
- A Simple Maintenance Rhythm (So You’re Not Guessing)
- Extra Safety Notes (Especially for Homes With Kids)
- Real-World Experiences (): What People Learn After Actually Living With Kerosene Lamps
- Conclusion
A kerosene lamp is basically a tiny, old-school science project that happens to glow. It’s cozy, useful in a power outage, and looks great on a shelfright up until it’s misused and turns into a soot factory (or worse, a fire hazard).
This guide walks you through using and maintaining kerosene lamps safely, with the “why” behind each step, real-world troubleshooting, and a bonus 500-word experience section at the endbecause the only thing stronger than kerosene smell is hindsight.
Kerosene Lamp 101: What’s Happening Inside That Glass
Most classic kerosene lamps are wick-fed: the wick pulls fuel upward via capillary action, and the flame burns the fuel vapor at the wick’s surface.
The chimney (glass globe) isn’t just decorativeit helps create steady airflow, which makes the flame brighter and cleaner. When airflow is poor, fuel is dirty, or the wick is trimmed badly, you get a yellow, smoky flame and black soot.
Quick reality check: battery lanterns are generally safer for routine emergency lighting. Kerosene lamps are best treated like a “use carefully, store smartly” backupespecially indoors.
Safety Setup (Do This Before Step 1)
- Ventilation matters: any flame consumes oxygen and produces combustion byproducts. Crack a window if you’re using a kerosene lamp indoors.
- Use a CO alarm: carbon monoxide risk is most discussed with unvented heaters, but good ventilation and detection are smart any time you burn fuel indoors.
- Pick a safe spot: a stable, heat-resistant surface, away from curtains, paper, and “I’ll just set this here for a second” clutter.
- Keep it supervised: never leave a lit lamp unattended, and don’t use it while you’re falling asleep.
- Kids/pets: treat lamp fuel like a serious poison hazard. Store fuel locked up or high and secured.
If you’re a teen: please have a parent/guardian handle fueling and lighting until you’ve learned the process and your household’s safety rules. Open flame plus flammable liquid is not the moment for “I saw a cool hack on the internet.”
The 14 Steps: How to Use and Maintain a Kerosene Lamp
-
Step 1: Identify Your Lamp Type (So You Don’t Maintain It Like the Wrong Species)
Common types include flat-wick “hurricane” lamps and mantle-style lamps (like Aladdin-style) that burn brighter but have specific parts and rules.
Check for a brand/model mark on the burner or base. If you can find a manual, follow itmanufacturers often specify wick type and fuel grade for a reason. -
Step 2: Use the Right Fuel (This Is Non-Negotiable)
For most kerosene lamps, use clear K-1 kerosene (often sold as “1-K” heater fuel) or the manufacturer’s recommended lamp fuel.
Avoid gasoline, alcohol, paint thinner, “mystery fuel,” or anything that sounds like a TikTok dare. Wrong fuel can flare, smoke heavily, smell awful, and increase fire risk.Cleaner fuel generally means less odor, less soot, and longer wick life. If your fuel looks cloudy, has visible debris, or smells “off,” don’t pour it into your lamp and hope for the best.
-
Step 3: Inspect the Lamp Like You’re Buying It Used (Even If You Own It)
Before each season (or anytime it’s been sitting), check:
- Burner fit: the burner should thread in securely and sit straight.
- Wick raiser: it should turn smoothly without grinding.
- Chimney/globe: no cracks or chips (heat + cracks = bad surprise).
- Fuel reservoir: look for leaks, corrosion, or loose seams.
If a part is damaged, replace it before lighting. “It’ll probably be fine” is not a safety plan.
-
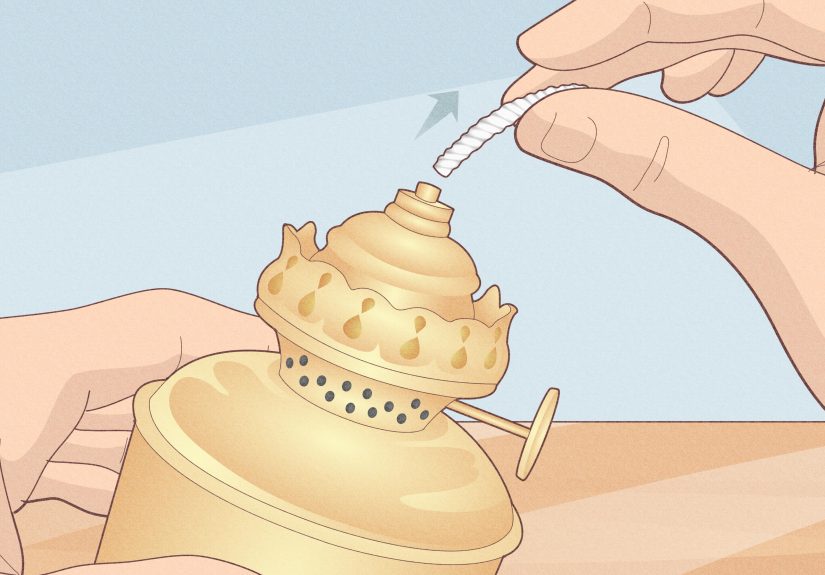
Step 4: Install the Correct Wick (Size and Fit Matter)
Use the wick size your burner is designed for. Too small can starve the flame; too large can bind, fray, and burn unevenly.
Feed the wick evenly through the burner. Make sure it sits straight and can be raised/lowered smoothly.New wick tip: if the wick has stiff sizing from manufacturing, it often softens once saturated with fueldon’t force it aggressively through gears.
-
Step 5: Fill the Reservoir Safely (Cool, Steady, and Not Overfull)
Only fill when the lamp is completely cool. Remove the burner, use a small funnel, and fill slowly to avoid splashes.
Leave some headspacedon’t fill to the brim. Wipe any drips immediately and keep fuel off the outside of the lamp.Pro move: keep a dedicated “lamp towel” you don’t care about. Kerosene has a talent for lingering.
-
Step 6: Let the Wick Saturate (Patience Prevents Drama)
A dry wick won’t burn evenly and can scorch. After filling, let the wick soak until the top is fully dampoften at least 15–30 minutes for a new wick.
If you rush this step, you may get an uneven flame, excess odor, and that “why is it doing that?” moment. -
Step 7: Trim the Wick Properly (Your Main Tool for a Clean Burn)
Wick trimming is where clean light is madeor where soot is born.
- Flat wicks: trim the top evenly with slightly rounded corners (think “soft smile,” not jagged haircut). Sharp corners can create taller points that smoke.
- Round wicks: keep the top level and tidy. Remove charred crust so fuel can feed evenly.
Use sharp scissors or a wick trimmer. If the wick is hard, brittle, or permanently uneven, it’s time to replace it.
-
Step 8: Light It the Right Way (Low and Slow)
Raise the wick just slightly above the burnerless than you think. Light it with a long match or long lighter.
Let the flame stabilize for a minute, then install the chimney/globe carefully (if it’s not already in place).If your lamp design requires removing the chimney to light, do it gently and keep your face backthere’s no prize for “closest eyebrows.”
-
Step 9: Adjust for a Clean Flame (Bright Enough, Not Angry Enough)
A well-adjusted flame is steady and bright without heavy flicker, smoke, or a strong fuel smell.
If you see soot collecting quickly on the chimney, or the flame is tall and yellow, turn the wick down.Think of the wick like volume control: louder isn’t better if it’s distorting. Clean combustion beats maximum flame every time.
-
Step 10: Operate Safely While It’s Lit (This Is Not a Roaming Lamp)
Keep the lamp in one safe location. Don’t carry it around the house like a movie character in a haunted hallway.
Keep it away from drafts (fans, HVAC vents, open doors), and maintain ventilation in the room.Never refuel a lit or hot lamp. And don’t use open flames (including candles) while fuelingflammable vapors can ignite.
-
Step 11: Extinguish Safely (Don’t “Snap” the Flame Off)
Turn the wick down until the flame goes out. Let the lamp cool fully before touching the chimney, moving it, or refueling.
Blowing out a kerosene lamp can spread smoke and sootuse the wick control instead.After extinguishing, some odors are normal. Strong lingering odor often signals dirty fuel, an over-high burn, spills, or a wick that needs attention.
-
Step 12: Clean the Chimney/Globe (Clear Glass = Better Light)
Once the lamp is cool, remove the chimney and wash with mild dish soap and warm water. Dry completely.
If soot is stubborn, gentle rubbing with a soft cloth works better than scraping. Avoid sudden temperature changes that can crack glass (no icy rinse on warm glass).Keeping the chimney clean improves airflow and brightnessand prevents your lamp from looking like it moonlights as a tiny coal plant.
-
Step 13: Maintain the Burner and Wick System (Small Parts, Big Impact)
Periodically inspect the burner for carbon buildup and wipe away residue. If the wick raiser feels stiff, check for frayed wick fibers caught in the mechanism.
Replace the wick when:
- It won’t trim evenly (keeps forming hard ridges or holes)
- It produces persistent smoke/odor despite correct adjustment
- It won’t raise/lower smoothly
Mantle-style lamps may have additional care steps (mantles, galleries, specific cleaning tools). Follow that lamp’s manual.
-
Step 14: Store Fuel and the Lamp Like a Responsible Time Traveler
Store kerosene in its original, clearly labeled container, tightly closed, away from heat sources, and out of reach of children.
Keep the lamp empty or filled based on your manufacturer guidance and how you use it, but always store it upright and protected from tipping.For emergency readiness, make a small “lamp kit”:
spare wick, matches/lighter, funnel, a wiping cloth, and a safe tray or heat-resistant mat for the lamp to sit on.
Troubleshooting: Fix the Usual Problems Before They Fix Your Walls
Problem: The chimney turns black fast (soot)
- Turn the wick downflame is too high.
- Trim the wick evenly and round the corners (flat wick).
- Switch to cleaner fuel (clear K-1) and avoid contaminated fuel.
- Ensure the chimney is seated correctly so airflow is steady.
Problem: Strong odor
- Check for spills and wipe the lamp thoroughly.
- Lower the flame. Over-burning increases odor and soot.
- Ventilate the room.
- Consider replacing old/dirty fuel and/or the wick.
Problem: Flame flickers or dims
- Move the lamp away from drafts.
- Clean the chimney and burner.
- Make sure the wick is properly saturated and not crusted with carbon.
Problem: Wick won’t raise/lower smoothly
- Look for frayed fibers caught in the raiser.
- Confirm the wick is the correct size for the burner.
- If it’s stiff and damaged, replace it.
A Simple Maintenance Rhythm (So You’re Not Guessing)
- Every use: quick check for stability, ventilation, and proper flame height.
- Every few burns: wipe soot, re-trim wick if needed.
- Monthly (if used often): deeper chimney cleaning, inspect burner parts, check wick movement.
- Seasonally: full inspection, replace worn wicks, confirm safe fuel storage.
Extra Safety Notes (Especially for Homes With Kids)
Lamp fuel and kerosene are hazardous if swallowed or inhaled in the wrong way, and small children are at high risk because lamp oils can look like “juice” in certain containers. Keep fuel locked up or secured high, in the original container.
Never leave a burning lamp unattended, and don’t let kids “help” by topping off fuel or adjusting the wick.
If anyone might have swallowed lamp oil/kerosene or is having trouble breathing after exposure, seek urgent medical help. For non-emergency poison questions in the U.S., Poison Control is available at 1-800-222-1222.
Real-World Experiences (): What People Learn After Actually Living With Kerosene Lamps
The first lesson most people learn is that a kerosene lamp doesn’t behave like a lightbulb. You don’t click it “all the way on” and forget it. The lamp has moods, and those moods are mostly controlled by two things: fuel quality and wick height.
A lot of beginners start with the wick too high because they want maximum brightnessand then they discover the ancient art of soot removal. It usually begins with a faint gray haze on the chimney, followed by a dramatic black ring that makes the lamp look like it just came back from a chimney sweep convention. The fix is almost always the same: turn it down, trim the wick, and accept that clean light beats “torch mode.”
Another common experience: the “kerosene smell mystery.” People blame the lamp, the fuel, the weather, and sometimes the neighbors. But the smell is often from tiny spills that went unnoticed during filling, or from a wick that’s charred and uneven. Once you start using a small funnel and keeping a dedicated rag nearby, the mystery smell becomes far less mysterious.
Many folks also learn to respect cool-down time. A hot chimney looks harmless right up until you touch it. After one near-miss, people develop a routine: extinguish, wait, then move. It’s boring, which is exactly what you want when fire is involved.
During power outages, experienced users tend to do the same practical setup every time. They place the lamp on a stable tray in a low-traffic area, away from curtains and away from the “where everyone keeps walking” route. They crack a window slightly, even if it’s chilly, because stuffy air plus open flame is not a vibe. They also keep a backup flashlight nearby, because sometimes you need to turn the lamp off to handle something safelyand nobody wants to fumble in the dark while holding a long match like a tiny torchbearer in a medieval drama.
People who use kerosene lamps regularly also end up building a little “lamp kit” without being told. It’s not fancyjust a spare wick, a wick trimmer, matches, a lighter, a funnel, and a cloth. The kit prevents the classic problem of realizing you need to trim a wick while the lamp is already lit and you’re hunting for scissors like it’s a game show challenge.
Over time, you start to recognize what “good” looks like: a steady flame, minimal odor, clear glass, and no smoke. It’s oddly satisfyinglike you’re keeping a tiny mechanical creature happy. And if you do it right, the reward is reliable light that feels warm and human, not like a harsh overhead LED interrogating your living room.
Conclusion
Kerosene lamps can be practical and charming, but they demand respect: clean fuel, correct wick trimming, good ventilation, and calm, consistent habits.
Treat your lamp like a tool (not a toy), keep your flame modest, keep your glass clean, and your lamp will reward you with steady lightwithout redecorating your ceiling in “soot chic.”


