Table of Contents >> Show >> Hide
- Quick Table of Contents
- What Is a Flower Pot Wreath (and Why Everyone Loves It)?
- Materials: The Shopping List That Won’t Judge You
- Before You Build: Prep That Saves You From Regret
- How to Make a Flower Pot Wreath (Step-by-Step)
- Design Ideas That Look Intentional (Not Accidental)
- Want a Living Version? Here Are Two Realistic Paths
- Hanging, Weight, and Weatherproofing
- Troubleshooting: When Your Wreath Develops a Personality
- Conclusion: Your Door Just Threw a Tiny Garden Party
- Real-World Experiences: What Making a Flower Pot Wreath Actually Feels Like (500+ Words)
A flower pot wreath is what happens when your front door says, “I’d like to look charming,” and your craft stash says,
“Cool, I have forty tiny terra cotta pots and unresolved ambition.” It’s part wreath, part mini garden moment, and 100%
guaranteed to make guests smilebecause it looks like a door decoration that has hobbies.
In this guide, you’ll learn how to make a flower pot wreath that looks polished (not “I wrestled a spool of wire and lost”),
plus smart options for faux florals, faux succulents, or even a living, plant-forward version if you’re feeling brave.
Quick Table of Contents
- What a Flower Pot Wreath Is (and why it works)
- Materials List
- Prep: paint, “age,” and seal the pots
- Step-by-step: building the wreath
- Design ideas that look intentional
- How to make it living (succulents + care)
- Hanging, weight, and weatherproofing
- Troubleshooting
- 500+ words of real-world “what it feels like”
- SEO tags (JSON)
What Is a Flower Pot Wreath (and Why Everyone Loves It)?
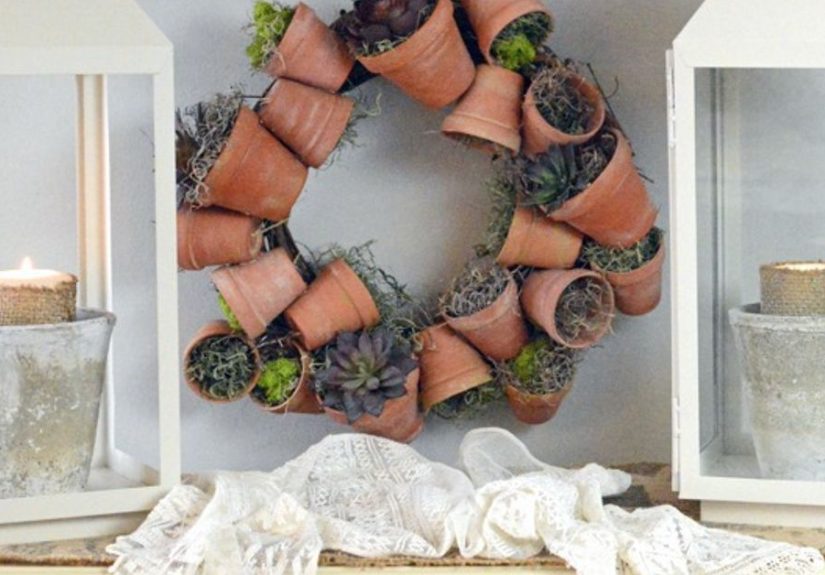
A flower pot wreath is a wreath formusually grapevine, wire, or foamcovered with mini terra cotta or clay pots arranged
around the circle. Some pots hold faux greenery or flowers. Some are left empty on purpose (negative space is your friend).
And some makers go full plant-parent mode and build a version that’s actually planted.
It works visually because it stacks texture: rough clay + a rustic base (like grapevine) + soft botanicals + a little moss
to hide gaps. It’s also “modular,” meaning you can swap seasonal stems without rebuilding the whole thing. In other words:
one craft, many outfits.
Materials: The Shopping List That Won’t Judge You
You can make a beautiful DIY flower pot wreath with basic supplies. Choose the options that match where you’ll hang it
(inside, covered porch, outdoor exposure) and how permanent you want the design to be.
Base options
- Grapevine wreath (classic, hides gaps naturally, easy to wire into)
- Wire wreath frame (strong, great for heavier pots or planted versions)
- Foam wreath form (lightweight; best when fully covered with pots/florals)
Pots + fasteners
- Mini terra cotta pots in mixed sizes (common mix: 1.5″, 2″, 2.5″, 3–3.5″)
- Floral wire (or heavier wire for outdoor durability)
- Jute twine (cute, rustic, but less weatherproof than wire)
- Pliers/wire cutters (your hands will thank you)
- Hot glue for accents (optional; not always necessary)
Decor + fillers
- Spanish moss, sphagnum moss, or preserved moss to hide mechanics
- Faux succulents or faux flowers (easy, long-lasting)
- Greenery stems (eucalyptus-style, ferny bits, seasonal sprays)
- Floral foam (small pieces) if you want to “plant” faux stems neatly
- Ribbon (optional; use sparingly so it doesn’t steal the show)
Paint + protection (optional but smart)
- Chalk paint (great for an “aged” terra cotta look)
- Acrylic paint (budget-friendly for color)
- Clear sealer (especially if pots will be exposed to moisture)
- Drop cloth + a ventilated area if spray priming/painting
Before You Build: Prep That Saves You From Regret
1) Clean the pots
Terra cotta is dusty by nature. Wipe pots with a damp cloth and let them fully dry. If you’re painting, starting clean
helps paint stick evenly instead of turning into a mysterious “rustic texture” you didn’t ask for.
2) Decide: raw terra cotta, painted, or “aged”
Raw looks warm and classic. Painted is punchy and modern. Aged looks
collected-over-time and slightly French-cottage without requiring a trip to Provence.
For an aged effect, you can layer two tones of chalk paint (a darker swipe first, then a lighter color over it) so bits of
the clay and the darker paint peek through. Another simple option is a dry-brush technique: load paint on
a rough brush, dab most of it off, then lightly brush the pots so the paint catches only the raised texture.
3) Seal strategically (especially if you’re painting)
Here’s the deal: terra cotta is porous. If you’re using painted pots near moisture (even humid air on a covered porch),
sealing helps prevent bubbling, peeling, and that sad “my craft is flaking” situation.
If your wreath is purely decorative (faux plants, no soil, no watering), you can usually get away with sealing only the
outside for durability. If you’re doing a planted or live approachanything involving damp moss, soil, or wateringseal
more thoroughly and use a clear outdoor-safe sealer.
How to Make a Flower Pot Wreath (Step-by-Step)
This method works whether you’re making a terracotta pot wreath for spring, a succulent-style wreath for summer, or a
year-round neutral wreath that lives on your door like it pays rent.
-
Pick your base and add a hanger first.
Before pots cover everything, attach a sturdy hanging loop (wire or a wreath hanger piece). If you forget, you’ll be
doing the craft equivalent of putting on socks after shoes. -
Lay out your pot sizes.
Sort by size so you can build from “big anchors” to “small gap-fillers.” Mixed sizes create depth and help the circle
look full without looking too uniform. -
Attach the largest pots first.
Thread floral wire through the drainage hole(s), position the pot on the wreath, and twist the wire tightly on the back.
Use pliers for a snug twistpots that wiggle now will absolutely migrate later. -
Vary direction and tilt for a natural look.
The magic is “casually arranged,” not “marching band formation.” Point some pots outward, some sideways, and tilt a few
slightly. Keep checking your front view as you go. -
Keep everything in the same frontal plane.
If pots start wrapping behind the form, the wreath won’t sit flat against a door or wall. Your goal is a nice, tidy
profile that hangs evenly (and doesn’t scratch your door like an angry cat). -
Fill gaps with smaller pots.
Once the big pots create the structure, tuck 2″ and 1.5″ pots into the awkward spaces. This is where the wreath starts
looking “store-bought” instead of “work-in-progress.” -
Hide sharp wire ends.
Snip the twisted ends short and press them down into the base (or tuck into grapevine) so nothing scratches you or the
door. Wire is sneaky; it will find your finger at the worst possible moment. -
Test hang for balance early.
Hang it temporarily and check: Is it lopsided? Do any pots spin? Fix now before decorations hide the wiring. -
Add moss and filler.
Tuck Spanish moss or preserved moss into pots and around gaps to soften transitions and hide any visible base. This is
also your best friend if your pot spacing isn’t perfect (because none of us are). -
“Plant” your pots: faux or fresh-looking.
For faux stems: wedge a small piece of floral foam into selected pots and insert faux succulents/flowers. Don’t fill
every potleave some empty or moss-filled so the design can breathe. -
Finish with a few statement accents.
Add one focal cluster (a bigger bloom, a bow, a small sign, or a seasonal spray) and keep the rest supportive. The best
wreaths have a clear “main character.”
Design Ideas That Look Intentional (Not Accidental)
1) The “Always Alive” Faux Succulent Flower Pot Wreath
Use mostly faux succulents with moss. Pick three succulent styles (spiky, rosette, trailing), repeat them around the
wreath, and vary placement so it feels organic. This is the easiest “hang it and forget it” versionand it still looks
luxe.
2) A Bright Spring Flower Pot Wreath
Choose one flower family (like pansy-style blooms, daisies, or ranunculus) and stick to a tight palette. Add airy greenery
for movement. The pots become “mini vases,” which is why this version looks so happy on a front door.
3) Farmhouse-Neutral (Aged Pots + White/Greenery)
Paint or age the pots using chalky whites and soft grays, then keep florals minimal: a few creamy blooms, lots of muted
greenery, and moss. It reads clean and elevatedlike a boutique finds section, but with fewer price tags and more smugness.
4) Seasonal Swaps (One Base, Four Seasons)
Build the wreath with mostly moss and greenery, then hot-glue only the seasonal items onto removable picks (or twist them
in with wire). Think:
- Summer: faux succulents + lemon picks
- Fall: mini pumpkins + warm leaves
- Winter: faux pine + berries (avoid soaking; keep it dry)
- Spring: pastel flowers + light greenery
Want a Living Version? Here Are Two Realistic Paths
“Living flower pot wreath” can mean two different builds. One is genuinely planted in pots. The other is a succulent
wreath made from a moss form and cuttings (no pots required). Both are beautifulboth have maintenanceand only one will
judge you if you go on vacation.
Option A: Pots attached to a strong frame, plants inside
Use a wire wreath frame (or a sturdy grapevine base) and attach slightly larger pots (around 3″) with wire. Then use
small succulents (or nursery pot inserts) that fit the containers. Choose drought-tolerant plants because watering a door
decoration is… a lifestyle.
Best tip: keep it in bright light, but avoid harsh, baking sun if it’s directly on a hot door. Succulents
can handle sun, but a dark front door in summer can turn into a skillet.
Option B: Succulent wreath (moss form + cuttings)
This is the classic “living wreath” approach: a moss-filled form, succulent cuttings allowed to callus, then inserted into
the moss and pinned until rooted. It’s surprisingly clean when done carefully and doesn’t require soil in many cases.
Watering basics: most guidance agrees soaking beats misting. Some makers soak briefly (around 5 minutes),
others soak longer for deep hydration (up to about an hour), depending on the thickness of the form and how dry it feels.
Always let it drain well before rehangingwet moss gets heavy fast.
Door protection: if moisture might touch wood, add a plastic barrier to the back or hang it where drips
won’t stain.
Hanging, Weight, and Weatherproofing
Choose hardware like your door is valuable (because it is)
Flower pot wreaths can get heavy. Use a sturdy over-the-door wreath hanger or a properly anchored hooknot a flimsy
adhesive strip that will “surprise” you at 2 a.m. with a crash and a tiny pot avalanche.
Outdoor durability tips
- Wire beats twine outside (twine can loosen or degrade in damp weather).
- Seal painted pots so moisture doesn’t bubble the paint.
- Keep it sheltered if possible (covered porch = longer life).
- Expect some patinaterra cotta looks better with a little “weathered honesty.”
Troubleshooting: When Your Wreath Develops a Personality
-
Pots are sliding or spinning: tighten wire twists with pliers, or add a second wire loop through a
neighboring vine/section of the frame for stability. -
Wreath won’t sit flat: keep pots in the front plane; avoid wrapping behind the form. Reposition a few
offenders and retwist. - Gaps show the base: tuck moss into cracks, or add a few small pots to “bridge” the space.
- Paint is chipping: you likely needed primer/sealer. Touch up and topcoat with a clear sealer.
-
Living plants look stressed: reassess sun/heat exposure and watering. Soak-and-drain beats light misting
for most moss-based living wreaths.
Conclusion: Your Door Just Threw a Tiny Garden Party
A flower pot wreath is one of those rare DIYs that’s both budget-friendly and genuinely charming. It’s textural, playful,
and endlessly customizablewhether you want a neutral terracotta pot wreath, a bright DIY spring wreath, or a succulent
version that flirts with becoming a living installation.
Build it once, tweak it seasonally, and enjoy the small joy of a front door that looks like it knows how to have fun.
Real-World Experiences: What Making a Flower Pot Wreath Actually Feels Like (500+ Words)
Let’s talk about the part no tutorial fully prepares you for: the experience of making a flower pot wreath. Not
the glamorous “after” photothe “why do I own 30 identical tiny pots and what is my life” moment in the middle.
First, there’s the shopping phase, which tends to go one of two ways. Either you buy a neat little set of mini terracotta
pots and feel wildly responsible… or you find them at a dollar store and suddenly you’re doing mental math like you’re
budgeting for a small wedding. “If I need a 24-inch wreath and I want it full… is that 18 pots? 25? 40? Who can say.”
This is normal. The good news is extra pots are never wastedsomeday you’ll use them for place cards, tiny centerpieces,
or that one friend who likes plants but also forgets to water them.
Next comes layout, and this is where you discover the unspoken truth: your wreath will look a little weird until it looks
amazing. Early on, you’ll attach a few pots and think, “This resembles a science project.” Stick with it. Once you’ve
anchored the big pots and started filling gaps with smaller ones, the design suddenly clicks. It’s like watching a
crossword puzzle solve itselfexcept with more wire and fewer dictionaries.
Then there’s the wire situation. The first time you twist floral wire, you learn two things:
(1) pliers are not optional, and (2) wire has the emotional range of a toddlerit will be fine until it is absolutely not.
The twist must be tight, because pots that wiggle now will drift later, especially if the wreath is bumped by a door
swing, a gust of wind, or a delivery box that got a little too friendly with your entryway. Most makers end up developing
a rhythm: thread, position, twist, check the front, tighten, snip, press down ends, repeat. It’s not hard, but it can be
a bit tediousso plan a podcast, a playlist, or a friend who doesn’t mind hearing “Wait, does this look crooked?” twenty
times.
Painting and “aging” the pots is the surprisingly satisfying part. Dry-brushing makes even brand-new pots look like they’ve
been sitting in a charming garden shop for years. The key experience here is restraint: it’s tempting to paint everything
evenly, but the best aged look happens when you let clay peek through. Many people do a test pot, step back, and say,
“Oh! That’s the one.” Then they match the rest to that vibe. It’s like finding the perfect filter, but in real life.
Decorating is where your personality shows up. If you’re a maximalist, you’ll want to fill every pot with blooms. If you
love minimal design, you’ll leave a few pots with moss only, and it’ll look sophisticated and intentional. Either way,
you’ll probably discover that less is moreespecially with focal points. One strong cluster can make the entire wreath
look designed, while too many competing pieces can make it look like the craft aisle exploded. A helpful trick is to
decorate in “zones”: create one main focal area, then echo it subtly on the opposite side for balance.
Finally, there’s the hanging moment. This is the victory lapand also the reality check for weight. If the wreath is
heavier than expected (it often is), upgrade your hanger. If it sits slightly off, you’ll adjust it, squint, adjust again,
and then accept that perfection is not the point. The point is that your front door now has a playful, textured, handmade
piece that looks like you own a secret greenhouseeven if your actual houseplants are currently negotiating their survival.
The best part? Once it’s up, it becomes a seasonal canvas. Swap a few stems, add a ribbon, tuck in tiny pumpkins, or go
wintery with faux greens. Your flower pot wreath isn’t just a one-time projectit’s the craft that keeps on giving, like a
charming little door accessory with excellent rewear value.


