Table of Contents >> Show >> Hide
- What Is a Flap Sander and Why It’s So Handy
- Tools and Materials You’ll Need
- Step-by-Step: How to Make a DIY Flap Sander
- How to Use Your Homemade Flap Sander
- Safety Tips You Shouldn’t Skip
- Pro Tips and Troubleshooting
- Creative Variations on the Basic Flap Sander
- Real-Shop Experiences and Extra Tips for Making a Flap Sander
- Conclusion
If you’ve ever tried to sand a curvy table leg, a carved handle, or that oddly shaped DIY project that
“looked easier in the sketch,” you already know: flat sanding blocks and big power sanders are not
your friends. That’s where a simple DIY flap sander comes in a flexible, drill-powered
sanding tool that hugs curves, softens edges, and makes you look way more professional than you feel.
The good news? You don’t need a fancy drum sander or an expensive specialty tool. With one dowel,
a handheld drill, and a scrap sanding belt, you can build a homemade flap sander in just a few
minutes, Family Handyman–style. In this guide, we’ll walk through how to make it, how to use it,
how to stay safe, and a few real-shop tips that only show up after you’ve thrown some sawdust
around.
What Is a Flap Sander and Why It’s So Handy
A flap sander is a sanding tool made from overlapping “flaps” of abrasive material attached
around a center hub or mandrel. As it spins, the flexible flaps:
- Conform to curves, round-overs, and irregular shapes.
- Remove milling marks and tool scratches without leaving harsh flat spots.
- Feather edges and blend profiles more gently than a rigid sanding block.
Store-bought flap wheels are great, but they come in fixed sizes and grits. A DIY flap sander
for a drill lets you:
- Choose the exact grit you want.
- Make it narrow for tight details or wider for big sweeping curves.
- Swap out worn flaps without tossing the whole tool.
The classic Family Handyman version is about as simple as it gets: a short dowel, a saw kerf, and
a couple of strips from an old sanding belt. It’s the kind of shop tip that lives forever because
it’s cheap, quick, and works ridiculously well.
Tools and Materials You’ll Need
Here’s a straightforward shopping (or scrap-bin) list for making your flap sander:
Core Components
- 3/8-inch drill (corded or cordless) with a standard chuck.
-
Wood dowel, about 3 inches long and roughly 1/2 inch in diameter
(a hardwood dowel holds up better, but softwood works in a pinch). -
Sanding belt or sandpaper:
- 1-inch wide strips cut from a 3-inch wide sanding belt, or
- Regular sheet sandpaper cut into strips and doubled up for stiffness.
Basic Tools
- Fine-tooth handsaw or pull saw (for cutting the slot in the dowel).
- Rasp, file, or belt sander (for tapering the dowel end).
- Utility knife or scissors (for cutting sanding strips).
- Clamp or vise (to hold the dowel while you cut the slot).
- Safety gear: safety glasses, dust mask or respirator, and hearing protection.
Optional but nice to have: a permanent marker to label grits, and a box or drawer to store
different flap sander heads (because once you make one, you’ll make five more).
Step-by-Step: How to Make a DIY Flap Sander
Step 1: Shape the Dowel Mandrel
-
Cut the dowel to length.
Aim for about 3 inches long. This length gives enough room for the flaps to flex while still
fitting comfortably in the drill chuck. -
Taper one end.
Use a rasp, file, or belt sander to gently taper one end of the dowel to a slight cone.
You don’t need a dramatic point just enough taper so the sanding flaps can flare slightly
as they spin. This helps the flaps “open up” and conform to curves. -
Leave a straight section for the drill chuck.
The opposite end of the dowel should stay cylindrical and square so your drill chuck
can grip it securely. Don’t over-sand that end.
Step 2: Cut the Slot for the Sanding Flaps
-
Secure the dowel.
Clamp it in a vise or to your workbench with the tapered end pointing up. Make sure it’s
stable you’ll be sawing down into it. -
Cut a centered slot.
Using a fine-tooth handsaw or pull saw, cut a slot down through the center of the tapered
end. Aim for a slot about 1 inch deep. This will act as the “mouth” that grips your
sanding strips. -
Check the fit.
Slip a test strip of sandpaper or belt into the slot to ensure it slides in snugly but
not so tight that you have to wrestle it. The friction of the spinning motion will hold it
in place, but you don’t want it falling out mid-sand.
Step 3: Cut the Sanding Flaps
Now we’ll turn that tired old sanding belt into something glorious: a fresh flap sander.
-
Choose your grit.
For shaping and smoothing curves, 80–120 grit is a good starting range. Coarser grits hog off
material faster; finer grits refine the surface. -
Slice the belt into strips.
Cut two strips, each about 1 inch wide and roughly 6–8 inches long. If you’re using sheet
sandpaper, cut strips and fold them once lengthwise to double thickness. -
Create the flaps.
Stack the strips and align them. The part that goes in the slot should stay intact, but
you can cut short slits into the free ends (like a fringe) if you want the flaps to be
extra flexible and “feathery.”
Step 4: Load the Sanding Flaps into the Dowel
-
Insert the strips.
Slide the ends of the sanding strips into the slot in the dowel, centered so the flaps
extend evenly around both sides. -
Adjust the length.
If the flaps seem too long and floppy, trim them a bit. If they’re too short and stiff,
they’ll act more like a grinding wheel and less like a flexible flap sander, so err on the
side of medium length. -
Test grip.
Tug gently on the flaps. They should feel secure. If they slide out too easily, you can
deepen the slot a touch or add a third narrow strip to pack the slot more tightly.
Step 5: Mount the Flap Sander in Your Drill
-
Open the drill chuck.
Insert the plain, untapered end of the dowel into the chuck at least 3/4 inch so it has a
solid grip. -
Tighten securely.
Tighten the chuck with all three jaws engaged. Give the dowel a firm twist by hand to
confirm it won’t spin independently inside the chuck. -
Spin-test in the air.
With your safety glasses on, run the drill at low speed with the flap sander pointed away
from you. Watch for wobble or loose flaps. A little vibration is normal; wild shaking means
something is off-center and needs adjustment.
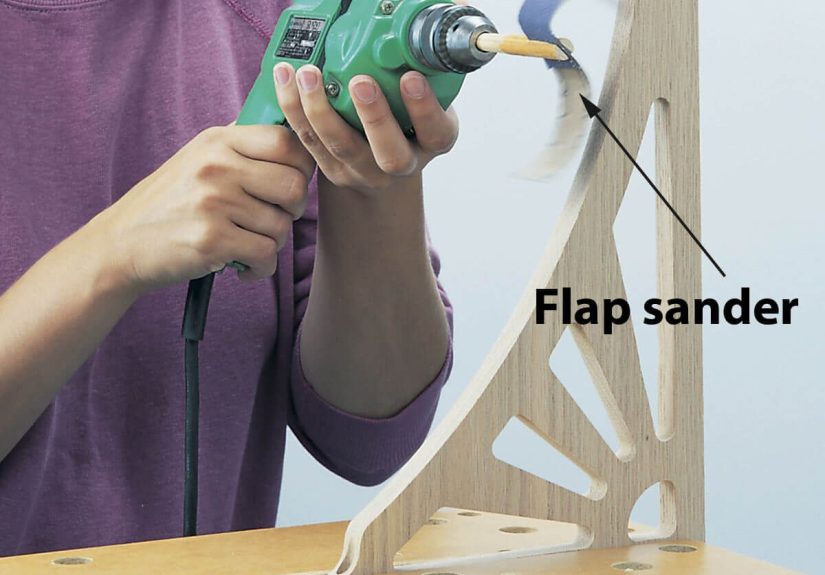
How to Use Your Homemade Flap Sander
Once you’ve built your DIY flap sander, it’s time for the fun part: using it to make your
projects look like you totally meant to cut that curve that way.
Best Applications
- Sanding inside curves on chair seats and arms.
- Cleaning up bandsaw marks on decorative cutouts.
- Softening routed profiles and round-overs.
- Blending transitions on carved handles or sculpted edges.
- Refining wooden toys, signs, and small craft pieces.
Technique Tips
-
Let the flaps do the work. Keep the drill speed moderate and use light pressure.
Pushing too hard compresses the flaps and can create flat spots. -
Keep it moving. Just like with any sander, don’t park in one spot. Move smoothly
along the curve to avoid dips and grooves. -
Work through the grits. Start with a coarser grit (80 or 100) to remove saw marks,
then step up to 150 or 180 to refine the surface. -
Check your progress often. Stop periodically, blow off the dust, and feel the
surface with your hand. Your fingers will find bumps long before your eyes do.
Safety Tips You Shouldn’t Skip
Flap sanders may feel less intimidating than a big belt sander, but they’re still spinning
power tools. A little caution goes a long way.
- Wear eye protection. Flaps can shed grit and fibers, and dust is guaranteed.
-
Use a dust mask or respirator. Wood dust, especially from hardwoods or MDF,
isn’t something you want to breathe all day. -
Secure your workpiece. Clamp your work to the bench. Trying to hold the
work in one hand and the drill in the other is how projects learn to fly. -
Avoid loose clothing and jewelry. Spinning tools love to grab long sleeves,
loose strings, or dangling accessories. -
Stay within reasonable speed. You don’t need max RPM. Moderate speed
provides control and reduces heat. - Unplug or remove the battery before adjusting the flaps or changing grits.
Pro Tips and Troubleshooting
If the Flap Sander Feels Too Aggressive
- Switch to a finer grit (150–180 and up).
- Shorten your sanding sessions and lighten pressure.
- Reduce drill speed; high RPM plus coarse grit can chew wood fast.
If the Flaps Wear Out Quickly
- Use high-quality sanding belts instead of cheap paper.
- Avoid pressing too hard let the abrasive do the cutting.
- Keep the flaps relatively short; very long flaps flex more and wear faster.
If the Tool Vibrates or Wobbles
- Check that the dowel is straight and fully seated in the chuck.
- Make sure your slot is centered and the flaps are balanced on both sides.
- Trim the flaps to a consistent length.
Creative Variations on the Basic Flap Sander
Once you’ve tried the classic Family Handyman style, you can experiment with a few variations:
-
Narrow profile flap sander: Use a thinner dowel and shorter strips for tight,
intricate curves like scrollwork or fretwork. -
Extra-soft finishing flap: Use finer grit (220–320) and slightly longer flaps
for a gentle, polishing action on delicate curves. -
Metal-friendly version: Swap in aluminum or steel for the mandrel and choose
abrasives rated for metal to clean up welds or deburr edges. -
Multi-grit kit: Make a handful of mandrels and keep them pre-loaded with
different grits. Swap them at the chuck instead of rebuilding the flaps each time.
Real-Shop Experiences and Extra Tips for Making a Flap Sander
On paper, making a flap sander is straight mechanical: dowel, slot, sandpaper, done. But in a
real shop, you start noticing little tricks and lessons that don’t always make it into a
basic how-to. Here are some experiences and refinements that can help you get the most out of
this simple tool.
Start with Scrap Wood and Sacrificial Projects
The first time you fire up your DIY flap sander, don’t aim it at your finished walnut jewelry
box. Grab a piece of scrap with a couple of random curves and practice. You’ll quickly learn:
- How fast the tool removes material.
- How much pressure feels “just right.”
- Which drill speed gives you the most control.
You’ll also see how the flaps naturally round sharp edges. This is great when you’re
softening corners on children’s furniture or wooden toys, but less great if you need a crisp
line. Practicing on scrap lets you build that “touch” before you risk your real project.
Fine-Tuning Flap Length to Match the Job
One of the biggest advantages of a homemade flap sander is that you’re not stuck with the
factory configuration. Changing the flap length dramatically affects how the tool behaves:
-
Shorter flaps feel stiffer and cut more aggressively. They’re good for fairing
rough bandsaw cuts or leveling small ridges. -
Longer flaps flex more and “wrap” around the workpiece. They excel at blending
and final shaping where you want smooth transitions.
Over time, many woodworkers end up with a little collection of flap sanders in different
lengths and grits, each kind of “tuned” for a specific job one for chair legs, another for
small toy parts, another for blending sculpted seat shapes. Think of it like having multiple
paintbrushes instead of one giant roller.
Grain Direction Still Matters
It’s easy to forget that even a flexible sanding tool can leave visible scratches if you work
against the grain. When possible, use the flap sander so that it moves roughly with the
grain, especially on the final passes. On tight inside curves, you may not always have that
luxury, but paying attention to grain direction saves you time later when you move to hand
sanding or finish prep.
Heat Buildup and Burn Marks
Because a flap sander spends a lot of time touching the same small area, it can build heat
faster than a big orbital sander that’s constantly moving. If you see the wood start to
darken or smell burning:
- Back off the pressure.
- Slow the drill speed.
- Give the flap sander a few seconds to cool between passes.
On resinous woods like pine, heat can also clog the abrasive quickly. When the flaps look
shiny or loaded up, tap them against a scrap piece or brush them with a worn wire brush to
knock loose the dust. If the grit looks polished smooth, it’s time to retire that set of
flaps and load fresh strips.
Labeling and Storing Your Flap Sanders
A tiny shop habit that pays off: label each flap sander mandrel with the grit on the end of
the dowel using a marker. When you’re in the middle of a project, it’s much easier to grab
“120” than to squint at the abrasive trying to guess the grit by color.
Keep them in a shallow drawer or small parts bin so they’re easy to find. Over time you’ll
probably end up with a mini “sanding system” flap sanders, foam blocks, hand sanding pads
that all live in one dedicated spot. When sanding doesn’t feel like a scavenger hunt, you’re
more likely to do a thorough job instead of rushing it.
Knowing When Not to Use a Flap Sander
For all its benefits, a flap sander isn’t the universal answer. It’s not ideal when:
- You need dead-flat surfaces, like tabletops or cabinet doors.
- You’re trying to maintain sharp reveal lines or very precise edges.
- You’re working on delicate veneers that could be sanded through quickly.
In those cases, stick with flat sanding blocks, random-orbit sanders, or even cabinet
scrapers. The flap sander shines when you move into the world of curves and organic shapes
the weird places solid blocks can’t go without making a mess.
Why This Simple Shop Tip Sticks Around
The charm of the Family Handyman–style flap sander is that it hits the sweet spot between
simplicity and usefulness. You can build it from offcuts and worn belts in the time it takes
for your coffee to cool, and it instantly upgrades how you handle curves and profiles.
Whether you’re a weekend DIYer building your first funky coffee table or a seasoned
woodworker shaping sculpted furniture, this little drill-powered flap sander earns its spot
in the drawer. It’s the kind of tool that makes sanding feel less like punishment and more
like sculpting and that’s a win in any shop.
Conclusion
Making your own flap sander is one of those small shop upgrades that delivers big results.
With a short dowel, a few strips of abrasive, and a drill you already own, you get a flexible,
curve-friendly sanding tool that makes your projects look smoother, more intentional, and
more professional. Along the way, you learn to control pressure, speed, and flap length to
match the shape in front of you.
Build one today, try it on your next curved project, and you’ll understand why this simple
shop tip has been passed around woodshops for years. Just be warned: once you discover how
useful a DIY flap sander is, you may never look at a worn sanding belt as “trash” again.


