Table of Contents >> Show >> Hide
- What Exactly Is a Woodland Jewelry Box Diorama?
- Why a Jewelry Box Is the Perfect Tiny Forest Container
- Planning the Scene: Story, Scale, and Sneaky Perspective
- Building the Box Setup: Base, Inserts, and Lining Without Tears
- Making Woodland Elements: Trees, Mushrooms, Moss, and Tiny Drama
- Ground Cover That Looks Alive: Flocking, Static Grass, and Forest Litter
- Lighting and Atmosphere: The Tiny Sunbeam Effect
- Sealing, Durability, and Not Accidentally Inventing a Mold Terrarium
- Common Mistakes (That I Have Made So You Don’t Have To)
- My Field Notes: of Real Experience Making These Tiny Forests
- Conclusion
There are two kinds of people in the world: people who open a jewelry box to find jewelry, and people who open a jewelry box to find… a tiny forest.
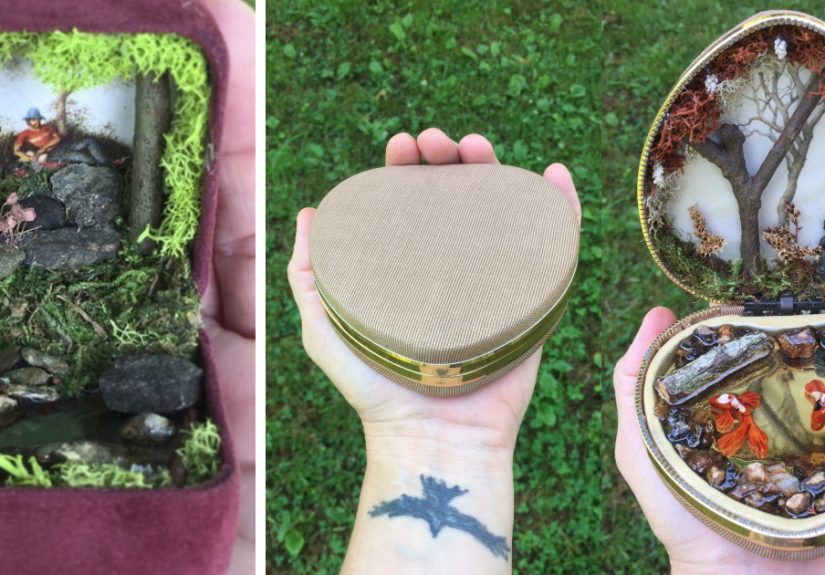
I’m firmly in the second camp. I make woodland jewelry box dioramasminiature, storybook scenes tucked inside a box where a ring tray would normally live.
Think mossy logs, little mushrooms, a stream that looks suspiciously like it’s made of resin (because it is), and a deer that’s basically the size of a peanut.
If you’ve ever wanted to build a “pocket habitat” that feels like you shrunk down and wandered into the woodswithout getting eaten by mosquitoesthis is your sign.
I’ll walk you through how I design, build, light, seal, and (most importantly) keep these tiny woodland worlds from turning into tiny woodland tragedies.
What Exactly Is a Woodland Jewelry Box Diorama?
A diorama is a scene you can “see into”a little staged world with depth, foreground and background, and enough detail to trick your brain into believing it’s real.
Museums made them famous. I just decided they’d look better next to your earrings.
A woodland jewelry box diorama is that same immersive idea, but built inside (or on top of) a jewelry box. The box becomes both the frame and the “transportation device.”
Open the lid and you’re suddenly on a forest trail. Close it and you’re back in normal life where taxes exist.
Why a Jewelry Box Is the Perfect Tiny Forest Container
It’s already a display case (with a lid!)
Dioramas love protection. Dust is the silent villain of miniature work, followed closely by “oops I bumped it” and “why is there a cat hair embedded in my river?”
A jewelry box gives you a built-in cover and a satisfying reveal moment.
Scale feels intentional, not accidental
Shadow boxes and mini scenes can feel like random small stuff glued together (no shadeokay, a little shade). A jewelry box has purpose and proportions.
The scene feels curated, like it belongs there, like it pays rent.
It makes a memorable gift
Giving someone a woodland scene inside a jewelry box says, “I thought about you,” and also, “I might have tiny paintbrushes and I’m not afraid to use them.”
It’s functional art: a handmade jewelry box meets a forest miniature scene.
Planning the Scene: Story, Scale, and Sneaky Perspective
Start with a micro-story
The best dioramas aren’t just “stuff in a box.” They’re “a moment.” I pick a storyline like:
- A fox paused mid-step near a fallen log
- A tiny campsite with a lantern glow
- A mushroom ring that looks like it’s up to something
- A forest path after rain, with puddles catching light
Once you have a story, your decisions get easier: lighting, colors, where the viewer’s eye lands first, what’s foreground “loud,” and what’s background “whisper.”
Choose a scale you can actually live with
You don’t have to follow a strict model-railroad scale, but you should be consistent inside the scene.
I like “jewelry box scale,” which is a highly scientific measurement meaning:
small enough to feel magical, big enough that my fingers don’t file a complaint.
A practical trick: pick one “anchor object” (a deer, a lantern, a stump) and build everything else relative to it.
Use forced perspective for instant depth
Here’s the cheat code: larger texture and elements in front, finer texture and smaller elements in back. Big leaves up front, tiny leaf litter in back.
Taller trees at the edges, shorter trees toward the center. Your brain reads “distance” even if the back wall is only a few inches away.
Building the Box Setup: Base, Inserts, and Lining Without Tears
Decide where the diorama lives
You’ve got options:
- Inside the box base: the classic “open and discover the forest” approach.
- Under the lid: a surprise ceiling scene (hanging vines, stars, or a canopy effect).
- On a removable tray: easiest for upgrades and repairshighly recommended if you’re experimenting.
Line the “jewelry parts” like a woodworker, not a wrestler
If your box still needs to function as a jewelry box, lining matters. Felt is forgiving. Velvet is dramatic.
The goal is a clean interior without bubbles, wrinkles, or glue stains that scream, “I panicked.”
For velvet or delicate fabric, I prefer attaching fabric to a thin insert panel first (like cardstock or thin board), then dropping it into place.
For felt, a spray adhesive can work nicelyespecially if you mask clean edges and work in light coats.
For long-term durability, I avoid “quick fixes” that can peel later.
Finish the wood before you build the forest
It’s tempting to jump straight to trees and mushrooms. Don’t. Finish the box first.
If you’re sealing wood, do it before you bring in flocking and tiny detailsotherwise you’ll be picking “mystery fuzz” out of your finish forever.
Making Woodland Elements: Trees, Mushrooms, Moss, and Tiny Drama
Polymer clay miniatures: small, durable, and deeply addictive
Polymer clay is my go-to for mushrooms, stones, little critters, and anything that needs crisp detail.
It can be sculpted, textured, baked, sanded, and painted. It’s basically the overachiever of miniature materials.
My polymer clay rules of survival:
- Use an oven thermometer (ovens lie; it’s their hobby).
- Bake at the temperature your brand specifies and don’t “turn it up to save time.”
- Shield pieces with foil if you want to reduce scorching.
- Ventilation mattersdon’t bake clay like you’re slow-roasting a brisket for twelve hours.
Natural materials: beautiful, but treat them like they’re suspicious
Real twigs, bark, and dried seed pods look incredible in a woodland diorama. But nature has… hobbies.
Bugs, moisture, and crumbling can show up later like an uninvited sequel.
I seal natural pieces (when appropriate), bake or dry them thoroughly, and avoid anything that feels damp, soft, or flaky.
Moss vs. “moss”
Real moss is charming, but it can discolor over time. Preserved moss is more stable, but still benefits from gentle sealing and careful placement.
Faux moss and ground foam can be your best friend if the diorama will be handled a lot.
The trick is mixing textures so nothing looks like a green bath mat.
Ground Cover That Looks Alive: Flocking, Static Grass, and Forest Litter
Layering is everything
Real forest floors aren’t one shade of green. They’re layers: soil, decomposing leaves, twigs, needles, patches of grass, then the occasional mushroom that looks like it has a tiny secret.
So I build the base in layers:
- Painted ground (brown-black base with lighter dry brushing)
- Fine texture (sand, dirt texture paste, or fine turf)
- Leaf litter (tiny punched leaves, tea-leaf texture, or mixed scatter)
- Static grass + tufts
- Highlights (moss clumps, fungi, stones)
Adhesives: the invisible hero (or the villain)
For scenic materials, I like water-based scenic adhesives that soak in and dry matte, so the ground doesn’t look like it’s been laminated.
If I need repositioning time for lining or inserts, I use adhesives with a workable open time.
For scenery, I want a strong bond that doesn’t leave everything shiny.
Static grass: instant realism, mild chaos
Static grass is one of those materials that turns “craft project” into “wait, is that real?”
Even without fancy equipment, you can get great results by applying grass in patches, mixing lengths, and keeping it uneven like nature intended.
Forest floors are messy. Let them be messy.
Lighting and Atmosphere: The Tiny Sunbeam Effect
Pick a mood: sunrise, moonlight, lantern glow
Lighting is where a jewelry box diorama goes from cute to cinematic.
A warm LED makes a campsite feel cozy. A cool LED makes it feel like the forest is quietly judging you.
Hide your tech like it’s stage magic
I conceal wires behind tree trunks, under faux rocks, or inside a “hollow log.”
If the box has depth, I’ll carve a slim channel in the base for wiring and a battery compartment.
Dimmer control is a game-changertiny light gets dramatic fast.
Sealing, Durability, and Not Accidentally Inventing a Mold Terrarium
Seal for handling (but don’t drown detail)
A diorama inside a jewelry box might get opened often. That means oils from fingers, dust, and friction.
I seal painted surfaces with a clear coat appropriate to the material:
acrylic sealer for painted scenery, protective finish for wood, and gentle spot-sealing for delicate textures.
Keep it stable: temperature, humidity, and storage habits
Miniatures hate extremes. Try not to store a diorama box in a damp basement, a hot car, or an attic that turns into a sauna.
If I’m shipping one, I cushion it so the scene doesn’t vibrate itself into a tiny landslide.
Archival mindset (even if it’s “just” a craft)
Museums think about acid migration, off-gassing, and long-term stability for good reason: materials can interact over time.
When I can, I choose neutral, stable storage materials and keep delicate surfaces away from questionable plastics or adhesives that might discolor later.
It’s not about being fancyit’s about future-you not having to fix weird yellow stains.
Common Mistakes (That I Have Made So You Don’t Have To)
- Overcrowding the scene: Leave breathing room. Forests have negative space.
- One-texture ground: Mix fine and chunky textures to avoid “green carpet syndrome.”
- Too much gloss: Save shine for water and wet stones, not the entire forest floor.
- Glue panic: Apply adhesives in thin layers; let capillary action help; don’t “ice the cake.”
- Unplanned lighting: Decide lighting early so you can hide wiring like a responsible wizard.
My Field Notes: of Real Experience Making These Tiny Forests
The first woodland jewelry box diorama I ever made was a masterpieceif your definition of “masterpiece” is “looks okay from six feet away and in low light.”
I had big dreams: a winding trail, a creek, ferns, a fox, and maybe a mysterious lantern. What I built was closer to:
“a moss blob with a rock that looks like a potato.” Still, it was the moment I got hooked.
The biggest lesson I learned early is that scale isn’t mathit’s vibe. I tried measuring everything precisely, then realized my “perfectly scaled” mushrooms looked boring.
Real forests are chaotic. So now I build with rules, but I let myself break them on purpose. One oversized mushroom becomes a focal point.
A slightly too-big stump makes the scene feel storybook instead of scientific. Suddenly it’s not a modelit’s a tiny myth.
Another hard-earned truth: your base layer does most of the work. I used to rush the ground because I was excited about the “cute parts.”
But the ground is what makes everything believable. When I started painting the base with more variationdarker in “low spots,” lighter on “high points,”
and adding texture before any greenerythe whole scene leveled up. Now I spend almost comical amounts of time on dirt. I’ve become the kind of person who owns multiple kinds of dirt.
Lighting was my “why didn’t I do this sooner” moment. The first time I added a warm LED under a tiny canopy, it felt like sunset in miniature.
It also revealed every glue mistake I’d been hiding from myself. Light is honest. Light is also rude.
But once I learned to place light where it made sensenear a lantern, through “trees,” along a pathit turned the diorama from a craft into a scene.
People stopped saying, “That’s cute,” and started saying, “Wait… is that real?”
I’ve also learned that durability is mostly about restraint. Too much sealer can flatten textures. Too much gloss makes everything look plastic.
Too much adhesive creates shiny “puddles” that weren’t invited. These days I seal in stages: protect what needs protecting, leave matte things matte, and test everything on scraps first.
Yes, testing is boring. No, I have not always done it. Yes, I have paid for my sins.
Finally: the best part is the reaction when someone opens the box. There’s a half-second pause where their brain recalculates reality.
Jewelry box… forest… tiny world… how? That moment is why I keep making them. It’s a miniature vacation you can hold in your hands.
And honestly, we could all use more tiny vacations.
Conclusion
Woodland jewelry box dioramas are a weirdly perfect mix of woodworking, miniature art, and “I swear this is relaxing” energy.
Start with a simple story, build depth with layers, choose materials that behave over time, and treat lighting like the special effect it is.
You don’t need a million toolsjust patience, a decent adhesive strategy, and the willingness to make a few questionable mushrooms on your way to greatness.
Open the lid, step into the tiny forest, and enjoy the fact that in this world, the only thing that can jump-scare you is a rogue speck of glitter.


