Table of Contents >> Show >> Hide
- Before You Snip: Know What You’re Pruning
- When to Prune Orchids
- Tools & Hygiene (Because Orchids Hate Germs)
- How to Prune Orchid Flower Spikes
- How to Prune Leaves, Roots, and Pseudobulbs
- Keikis (Baby Orchids): When and How to Separate Them
- Aftercare: What To Do After Pruning
- Common Pruning Mistakes (And How to Avoid Them)
- Quick Troubleshooting: “Is My Orchid Dead?”
- Pruning Experiences From the Real World (500+ Words)
- Conclusion
- SEO Tags
If orchids had a personality, they’d be that elegant friend who looks effortlessly put-together… while secretly being very picky about hygiene and boundaries.
Pruning is one of those “boundaries” moments. Done right, it helps your orchid stay healthy, conserve energy, and set the stage for future blooms.
Done wrong, it’s basically a haircut with a weed whacker.
This guide walks you through how to prune orchids the right wayincluding exactly where to cut, what not to cut, and how pruning changes depending on orchid type.
You’ll also get a simple decision tree, real-life-style scenarios, and aftercare tips so your plant rebounds like a champ.
Before You Snip: Know What You’re Pruning
Orchid anatomy in 60 seconds
- Flower spike (stem): The tall stalk that holds blooms (common on Phalaenopsis).
- Nodes: Little bumps or lines along a spike; some orchids can branch or rebloom from these.
- Crown: The center/top of a Phalaenopsis where new leaves emergecutting here is the plant equivalent of “delete system32.”
- Pseudobulbs / canes: Storage organs on many orchids (Cattleya, Oncidium, Dendrobium, Cymbidium). They feed the plant even after flowering.
- Roots: Often thick, silvery-green, and very much alive even when they look weird. (Orchids are dramatic. Their roots are also dramatic.)
Monopodial vs. sympodial: why it matters
Monopodial orchids (like Phalaenopsis, the “moth orchid”) grow upward from a single stem/crown.
Sympodial orchids (like Cattleya, Oncidium, Cymbidium, and many Dendrobium) grow sideways, producing new growths and storage bulbs/canes.
Pruning decisionsespecially after bloomingdepend heavily on which growth style you’ve got.
When to Prune Orchids
Best timing: after blooming ends
The most common pruning moment is when flowers are finished (dropped or fading).
Many orchids enter a “rest and recharge” phase afterwardso pruning is often about removing spent parts and helping the plant redirect energy toward roots and leaves.
Prune immediately if something is sick
If you see black, mushy, smelly, or rapidly spreading rot on a leaf or root, that’s not a “wait and see” situation.
Diseased tissue can spread fast, so removing it with sterile tools is a plant-saving move.
Don’t prune just because you’re bored
Orchids aren’t like shrubs. They don’t reward “tidying” with more growth.
If it’s green and firm, it’s usually contributingeven if it’s not winning a beauty contest.
Tools & Hygiene (Because Orchids Hate Germs)
Gather:
- Sharp scissors, pruning snips, or a single-edge blade (dull tools crush tissueouch).
- Rubbing alcohol (70% is fine) or another disinfectant for tools.
- Paper towels for wiping blades and cleaning up sap.
- Optional: gloves if you’re squeamish (orchid sap is usually mild, but your comfort matters).
Rule #1: Sterilize your cutting tool before you cut, and again between plants.
This helps prevent spreading bacteria, fungi, and viruses. Orchids can be long-livedso keeping them clean is worth the tiny effort.
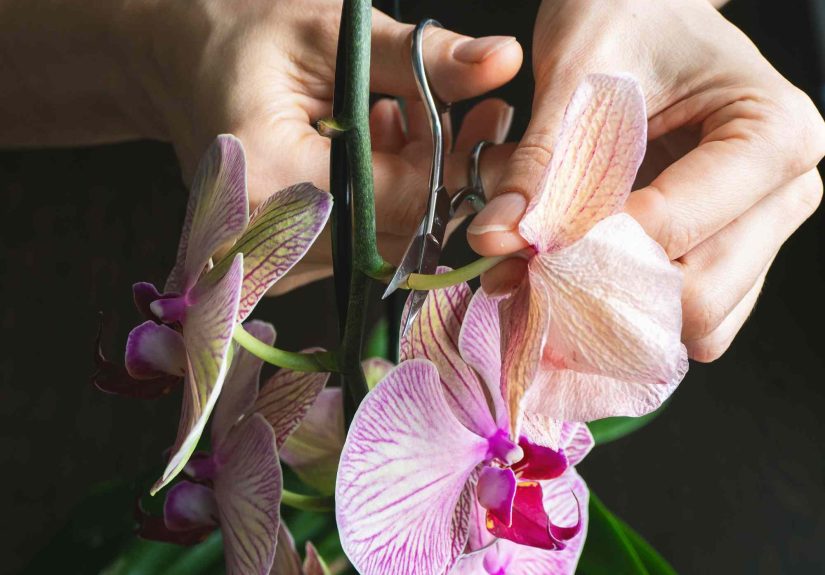
How to Prune Orchid Flower Spikes
Flower spikes are where most pruning drama happens. The “right” cut depends on:
(1) orchid type, (2) spike color/health, and (3) your goal (faster rebloom vs. overall plant strength).
Decision tree: where to cut the spike
- If the spike is brown/yellow and dry: cut it near the base (leave a small nub).
- If the spike is green: you may leave it, cut it above a node for a possible side branch, or remove it at the base.
- If your orchid looks weak (wrinkled leaves, poor roots, recently repotted, pest/disease stress): choose the “base cut” to help it recover.
Pruning Phalaenopsis (moth orchids): your three best options
Phalaenopsis is the orchid most people haveoften from grocery stores, big-box retailers, or well-meaning coworkers who gift plants when they don’t know your last name.
The good news: Phals can sometimes bloom again from a green spike.
The nuanced news: that “quick rebloom” can be a little taxing on the plant.
Option A: Leave the green spike alone (the “patience pays” approach)
If the spike is green and the orchid is healthy, you can simply wait. Sometimes the tip stays active or a node swells later.
This is the least invasive choiceperfect if your plant is already doing well and you don’t mind a slower timeline.
Option B: Trim above a node for a faster, smaller rebloom
If you want to encourage a side branch (and potentially get flowers sooner), trim the spike just above an unused node.
Many growers cut about 1/2 inch above the second or third node below the lowest flower.
This can trigger a lateral bloom in weeks rather than monthsbut the next flush may be smaller, and the plant may need extra recovery time afterward.
Step-by-step:
- Wait until the last flowers fade and drop.
- Find the nodes (look for small bumps/lines on the spike).
- Pick a node below the lowest bloom (commonly the 2nd or 3rd node).
- Sterilize your tool.
- Cut about 1/2 inch above the node with a clean, firm snip.
Option C: Cut the spike at the base (the “build strength” approach)
If the plant needs to focus on roots and leavesor you want bigger blooms latercut the spike down near where it emerges.
This encourages the orchid to put energy into vegetative growth and produce a new spike later (often the strongest long-term strategy).
Tip: A brown spike doesn’t mean the orchid is dead. It often just means “show’s over.”
Look at the leaves and roots for the real health report.
Pruning other common orchids: most are “one-and-done” on a spike
Many popular orchids bloom once per spike/inflorescence. After flowering, the spike typically dries and can be removed at the base.
Here are practical guidelines by group:
Cattleya, Paphiopedilum (slipper orchids), and many others
- These usually bloom once per spike.
- After blooming, the spike driesthen you can remove it close to its origin.
- Don’t cut healthy pseudobulbs; they store energy for future growth.
Oncidium (“dancing lady”) and Cymbidium
- Flower spikes generally don’t rebloom from old stems.
- Remove the spent spike at the base once blooms are finished.
- Keep pseudobulbs even if olderthey’re your orchid’s pantry.
Dendrobium: proceed with extra respect
Dendrobiums vary, but a common beginner mistake is cutting canes too early.
Many dendrobiums store energy in their canes and may bloom again on older canes depending on type.
A safe baseline: remove only what is clearly dead (brown, hollow, crisp), and keep healthy canes even if they look “done.”
How to Prune Leaves, Roots, and Pseudobulbs
Leaves: only remove what’s truly finished
Healthy green leaves are not optional accessories. They power the plant.
Remove leaves only when they are fully yellow/brown, limp, and clearly dyingor if disease requires it.
- Do: remove dead, papery leaves that pull away easily.
- Don’t: trim green leaves just because they’re large, awkward, or slightly scarred.
Roots: prune during repotting, not randomly
Root pruning is best done when you’re repottingbecause you can actually see what’s going on.
Orchid roots can look silver, green, or even tan and still be healthy.
The “dead root” signs are usually: mushy, hollow, blackened, or foul-smelling.
Root-pruning steps:
- Remove the orchid from its pot and gently loosen old media.
- Rinse or lightly shake off debris so you can inspect roots.
- Trim only roots that are clearly dead or rotting.
- Keep firm roots (even if they’re aerial or “messy-looking”).
- Repot in a chunky orchid mix (typically bark-based) and water appropriately after settling.
Important: Aerial roots are normalespecially on Phalaenopsis. They are not “mistakes” to be removed.
If they’re firm, keep them. If they’re shriveled and dead, they can be trimmed.
Pseudobulbs and canes: don’t rob the savings account
On sympodial orchids, older pseudobulbs/canes often feed new growth.
Even if they’re wrinkled, they may still be contributing.
Remove them only when they’re fully brown, dry, and clearly nonfunctional.
Keikis (Baby Orchids): When and How to Separate Them
Sometimes pruning reveals a surprise: a keiki (a baby plantlet) growing on the spikeespecially in Phalaenopsis.
The key is timing. Separating too early is like sending a toddler to college.
A practical “ready” checklist:
- At least 2–3 roots that are a couple inches long
- At least 2–3 leaves
- Roots look firm and capable of anchoring into media
How to remove a keiki:
- Sterilize your blade.
- Cut the keiki off with a small section of spike attached (if needed), avoiding root damage.
- Pot it in a small orchid pot with appropriate mix (often fine bark or sphagnum/bark blend).
- Keep humidity slightly higher while it establishes.
Aftercare: What To Do After Pruning
Let cuts stay dry briefly
Right after pruning, avoid soaking fresh cuts immediately.
You don’t need to panic-dry the plant for daysjust don’t drench the cut surfaces right away.
Light and watering: steady wins
Most common home orchids thrive in bright, indirect light.
Water when the mix is approaching dry, not on a rigid calendar.
Many orchids reduce water needs after flowering as they rest, and then increase during active growth.
Fertilizer: don’t “apologize” with plant food
After pruning, it’s tempting to over-fertilize as a peace offering.
Resist. Use a diluted fertilizer during active growth, and ease off during the plant’s slower season.
The goal is consistent support, not a chemical pep rally.
Common Pruning Mistakes (And How to Avoid Them)
- Cutting green leaves for looks: those leaves are solar panels. Keep them.
- Cutting into the crown of a Phalaenopsis: avoid the center where new leaves grow.
- Using unsterilized tools: one dirty snip can spread problems fast.
- Trimming healthy roots: firm roots are valuableeven if they’re not photogenic.
- Expecting instant rebloom: orchids often take months to recharge. Patience is part of the hobby.
Quick Troubleshooting: “Is My Orchid Dead?”
If your orchid’s blooms are gone and the spike is brown, don’t hold a funeral yet.
Check:
- Leaves: firm and green? Good sign. Limp and yellowing rapidly? Investigate watering and roots.
- Roots: firm green/silver? Healthy. Mushy/black? Rot riskadjust watering and repot if needed.
- New growth: a new leaf, root tip, or pseudobulb means the plant is alive and working.
Pruning Experiences From the Real World (500+ Words)
The internet makes orchid pruning look like a single clean cut followed by immediate applause and a standing ovation of blooms.
Real life is… slightly messier. Here are a few true-to-life scenarios growers run into again and again, plus what usually works.
1) The “I cut everything and now it’s just vibes” moment
A very common first-time experience: the flowers drop, panic rises, and suddenly the orchid gets a full makeoverspike chopped, aerial roots trimmed,
a leaf “evened out,” and maybe a repot into regular potting soil because it “looked dry.” The orchid then sits there quietly, not blooming,
while the grower refreshes their browser 17 times a day.
What usually fixes this? Returning to fundamentals. Orchids don’t need constant pruning; they need steady conditions.
Most of the time, the plant isn’t “mad”it’s recovering. If you’ve removed a lot of green tissue, the orchid simply has fewer resources to rebuild.
The best move is often boring: bright indirect light, appropriate orchid mix (not soil), watering only when nearing dry, and patience.
When new roots or leaves appear, that’s the orchid saying, “I’m back to paying bills.”
2) The “green spike gamble” that pays off… and the one that doesn’t
Many Phalaenopsis owners try the node cut because it’s exciting: cut above a node, wait a few weeks, and hope for a side branch.
Sometimes it works beautifullyyou get a smaller but satisfying second bloom faster than growing a whole new spike.
Other times, nothing happens, and the spike eventually yellows from the tip down.
The key lesson is that this isn’t failure; it’s just the plant’s budget decision. A secondary bloom is optional.
If the orchid decides it would rather invest in roots and leaves, that’s often the healthiest choice.
In those “nothing happened” cases, trimming the spike down to the base (once it yellows) and focusing on growth tends to produce the best next-season bloom.
It’s like choosing between dessert now or a better dinner laterboth are valid, but the plant gets the final vote.
3) The surprise keiki: cute, confusing, and slightly chaotic
A keiki can feel like a bonus prizeuntil you realize you now have responsibilities.
Growers often spot a little plantlet on the spike and immediately want to separate it, because it’s adorable and they want a second orchid (understandable).
The problem is that tiny keikis without strong roots struggle to establish on their own.
The best experiences come from waiting until the keiki has enough roots and leaves to function independently.
Once it’s ready, a careful cut with sterile tools and a small pot with appropriate media can turn that surprise into a long-term success story.
The funniest part? Many people end up more emotionally invested in the baby orchid than the original plantlike a plant soap opera where Season 2 is the spinoff.
4) The “I only removed dead stuff and it bloomed better” plot twist
One of the most consistent reports from experienced orchid keepers is that the biggest improvements come not from aggressive pruning,
but from selective pruning: removing dead spikes, trimming truly rotten roots during repotting, and leaving the living tissue alone.
Orchids are slow, deliberate growers. When you stop forcing them to “perform” and instead support their rhythm, they often reward you with sturdier spikes,
longer-lasting blooms, and fewer weird setbacks.
If you take only one experience-based takeaway, make it this: the right prune is usually the one that’s calm, clean, and conservative.
You’re not sculpting a hedgeyou’re helping a long-lived plant keep its energy where it belongs.
Conclusion
Pruning orchids the right way comes down to three habits: identify your orchid type, cut only what’s finished or unhealthy,
and keep everything clean. For Phalaenopsis, you can choose between a faster rebloom (node cut) or stronger long-term growth (base cut).
For many other orchids, spent spikes are removed at the base, while pseudobulbs/canes are kept until they’re truly done.
Snip with confidencebut also with restraint. Orchids don’t need frequent “fixing.” They need steady care and the occasional well-timed haircut.


