Table of Contents >> Show >> Hide
- The Project That Turned One Pose Into an Animation Time Machine
- Why “Draw Yourself in 100 Styles” Works So Well
- What Counts as a “Cartoon Style,” Anyway?
- A Practical Roadmap to Doing Your Own “100 Styles” Challenge
- Common “100 Styles” Pitfalls (And How to Dodge Them)
- Inspiration vs. Imitation: Keeping the Remix Respectful
- What You Gain After a Hundred Styles
- of Real-World Experiences Artists Share About Trying the Challenge
Imagine waking up, looking in the mirror, and thinking: “Today, I’m going to be a different cartoon.” Not a different outfit.
Not a different vibe. A different century of animation history.
That’s the core jokeand the sneaky geniusbehind the viral “draw yourself in 100 cartoon styles” idea.
One artist becomes a walking, arms-crossed museum exhibit: a single character redesigned again and again until you can practically hear
the theme songs in your head.
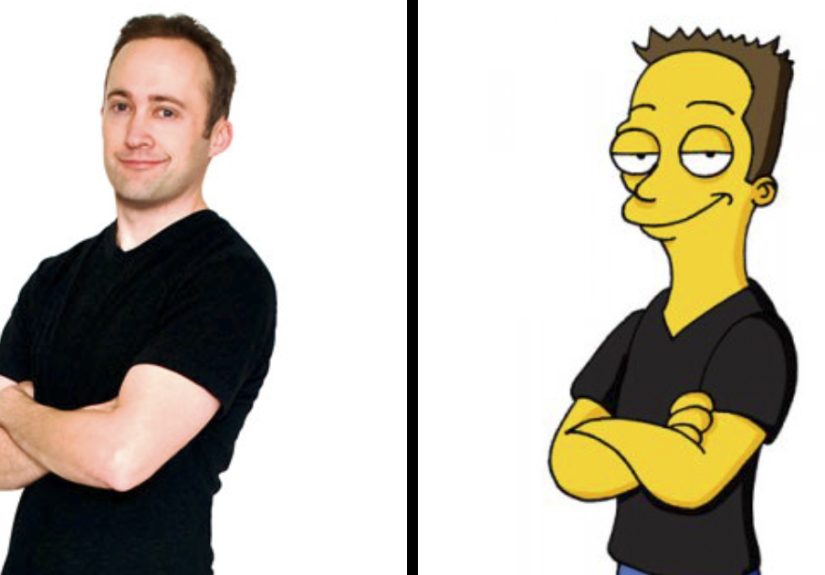
The best-known version of this challenge is Kevin McShane’s “Cartoon Kevin” project, where he repeatedly drew himself in the style of
famous animators and studios over roughly two years. The premise is simple: same subject, wildly different visual languages.
The result is a bingeable guessing game for viewersand a serious training plan for artists.
The Project That Turned One Pose Into an Animation Time Machine
McShane’s “Cartoon Kevin” is basically a controlled experiment in style.
He kept the character consistentoften a confident, arms-folded stancethen rebuilt the look through the lens of iconic creators, studios, and eras.
In coverage of the project, you’ll see references spanning early animation all the way to modern TV and feature-film styles, including nods to
everything from classic rubber-hose energy to contemporary, clean digital design.
That “one pose, many styles” constraint is what makes the project so satisfying. Viewers get an instant side-by-side comparison of how
different artists solve the same problems: Where do the eyes go? How big is the head? Do you outline everything? Do you shade? Is the silhouette
soft and round… or sharp and geometric?
McShane has also described the series as a character design explorationless about copying a single drawing and more about understanding what makes
each style instantly recognizable. In other words: he wasn’t just drawing himself; he was reverse-engineering the “visual DNA” of animation history.
(Which is a much cooler hobby than collecting stamps, and also significantly harder to store in a shoebox.)
Why “Draw Yourself in 100 Styles” Works So Well
Style challenges spread for the same reason trivia nights exist: humans love pattern recognition.
The moment your brain spots a familiar mouth shape or eye design, you get that tiny burst of victory.
“I KNOW THIS ONE!” becomes the viewer’s internal soundtrack.
For artists, the exercise is even more valuable because it forces you to separate fundamentals from finishing.
If your drawing only looks “right” after fancy rendering, it’ll fall apart the moment you try a flat, graphic styleor a loose, sketchy one.
Jumping between styles is like cross-training: you discover which muscles are actually doing the work.
There’s also a practical reason self-portraits are the go-to subject: you’re available for reference 24/7, you don’t need to pay a model,
and your face won’t ghost you because it found a better gig.
What Counts as a “Cartoon Style,” Anyway?
“Style” sounds mysterious, like artists are born with a secret dial in their elbow.
In reality, a cartoon style is usually a bundle of repeatable choices. Here are the biggest levers creators pullconsciously or not.
1) Silhouette and Shape Language
Before details, a character is a shape. Many designers use “shape language” to communicate personality quickly:
round shapes read as friendly and approachable, squares feel sturdy and dependable, and triangles feel sharp or dangerous.
When you redraw the same person using different underlying geometry, the character can swing from “sweet sidekick” to “villain who definitely owns a lair.”
2) Proportions and Feature Priorities
Different cartoon traditions emphasize different priorities: giant eyes for expressiveness, tiny noses for simplicity,
long limbs for comedic motion, or realistic anatomy for drama. A style study teaches you to ask,
“What does this style exaggerateand what does it simplify?”
3) Linework and Line Weight
Line quality is a style’s handwriting. Some looks depend on crisp, uniform outlines; others rely on tapered strokes that suggest volume.
Changing line weight alone can make the same drawing feel like a vector TV show, a newspaper strip, or a sketchbook concept page.
4) Color, Value, and Rendering Rules
Some styles are all flat color with minimal shading. Others use painterly gradients, textured brushes, or heavy shadows.
A key trick is to treat each style like it has its own rulebook:
“Do we shade at all? If yes, is it one shadow shape or full rendering?”
5) Expression Design
Expression is where style becomes personality. Mouth shapes, eyebrow angles, eyelid design, and cheek lines vary wildly across shows and eras.
In style challenges, artists often discover they’ve been drawing the same “default face” for yearsuntil a new style forces them to invent a new one.
A Practical Roadmap to Doing Your Own “100 Styles” Challenge
You don’t need two years, a heroic work ethic, or a magical stylus blessed by the animation gods.
You just need a smart process. Here’s a realistic way to approach itwhether you do 10 styles or the full 100.
Step 1: Choose a Consistent Base Character
Pick one pose (standing, arms crossed, hands in pocketswhatever you can repeat) and one “neutral” outfit.
Consistency is what makes the comparisons meaningful. If you change the pose every time, you’re studying choreography, not style.
Step 2: Build a Reference Board for Each Style
Don’t rely on memory. Collect a handful of clear images and focus on the repeating patterns:
eye shape, mouth design, nose treatment, head-to-body ratio, hands, and line thickness.
The goal isn’t to traceit’s to identify the rules.
Step 3: Write a Tiny “Style Recipe” Before You Draw
Keep it short. Something like:
- Head: oversized, circle-based
- Eyes: simple dots or big ovals with highlights
- Line: uniform outline, minimal interior lines
- Color: flat fills, no shading
- Expression: wide mouth, simple eyebrows
This step stops you from drifting back into your default habits.
Step 4: Do a Fast Thumbnail First
Before committing to a “final,” do a tiny version. If the thumbnail reads as the target style,
you’re on the right track. If it reads as “you, but slightly different,” adjust the biggest shapes first.
Step 5: Limit Your Tools Per Style
Tools influence style. Try setting constraints:
one brush only, two line weights, or a strict palette. If a style is known for clean shapes,
don’t sabotage yourself with a gritty pencil brushsave the texture for a style where it belongs.
Step 6: Track What You Learn
After each drawing, jot down one takeaway:
“This style uses negative space around the mouth,” or “Hands are simplified into mittens,” or “Shadows are one bold shape.”
After 20 styles, you’ll have your own personal playbook of design solutions.
Common “100 Styles” Pitfalls (And How to Dodge Them)
-
Pitfall: Copying surface details instead of structure.
Fix: Start with silhouette and proportions; add details last. -
Pitfall: Making every style “your style wearing a different hat.”
Fix: Change the rules: line quality, proportions, and shading approachat minimum. -
Pitfall: Burning out halfway through.
Fix: Batch the work. Do 5 quick styles a week instead of trying to sprint 30 in one weekend.
Inspiration vs. Imitation: Keeping the Remix Respectful
Style studies are a normal part of learning, but publishing them raises questions people love to argue about in comment sections.
Here’s the grounded version: characters and specific expressions of a work are protected, but “style” as a general concept is trickier.
If you’re referencing famous cartoons, be thoughtfulespecially if you plan to sell prints or use the images commercially.
If you’re doing the challenge as a learning exercise, credit your inspirations clearly.
If you’re doing it as a joke or commentary, know that parody and satire are treated differently in fair-use discussions.
And if you’re unsure about commercial use, it’s smart to get qualified legal guidance.
(Not because you’re “in trouble,” but because the internet has a talent for turning confusion into chaos.)
What You Gain After a Hundred Styles
The biggest payoff isn’t that you can impersonate a dozen studios on command.
It’s that you learn to identify what makes a design tickthen borrow those principles intentionally.
After enough style studies, your “original style” stops being accidental and starts becoming a choice.
And maybejust maybeyou’ll never look at a cartoon mouth the same way again. You’ll be at a party thinking,
“Ah yes, that’s a strong ‘two-line upper lip’ era.” Congratulations. You are now insufferable in the best possible way.
of Real-World Experiences Artists Share About Trying the Challenge
Artists who attempt a “draw yourself in 100 styles” marathon often describe it as a creative rollercoaster with very predictable hills.
The first ten styles feel like a victory lap. You pick recognizable looks, the results come out readable,
and your brain starts handing out trophies like, “See? You could totally work in animation.”
It’s the art equivalent of a new gym membership: everything is possible, and nothing hurts yet.
Then comes the middle stretchusually somewhere around styles 20 through 60where confidence meets reality.
The easy styles are gone. Now you’re dealing with subtle differences: two creators might both use simple shapes,
but one relies on thick outlines and flat color while the other uses delicate line breaks and carefully placed shadows.
This is where artists say they start noticing their own habits. They’ll realize they draw the same eyebrow angle in every style,
or they keep defaulting to the same “safe” hand shape.
The challenge becomes less about being clever and more about being honest: “What am I actually doing on autopilot?”
Many artists also report that the project changes how they see reference.
Early on, they collect images like souvenirs. Later, they collect images like a scientist.
They zoom in on eyes and mouth corners. They compare head-to-body ratios across characters.
They start making mini checklists: “In this style, the nose is basically a suggestion,” or “Teeth are never drawn,” or “Shadows are always one graphic shape.”
The act of writing a “style recipe” becomes just as important as drawing the final.
Burnout is common, but so are breakthroughs. Artists often say the biggest leap happens when they stop trying to copy a finished drawing
and instead copy the rules behind the drawing. They’ll simplify earlier, exaggerate more boldly, and commit to limitations:
one brush, one line weight, a strict palette. Oddly, the constraints feel freeing. The results get clearer.
The style starts to “snap” into place.
Near the endstyles 80 to 100another shift tends to happen: the artist starts blending influences automatically.
After studying enough approaches, they begin to develop opinions: “I love this kind of silhouette,” or “I prefer that kind of line.”
The challenge stops being about imitation and starts being about curation. Artists say this is the moment they feel their own style emerging,
not as a sudden lightning bolt, but as a quiet accumulation of choices.
And when they finally look back at the whole set, they often describe a surprising emotion: pride mixed with disbelief.
Not because every drawing is perfect, but because the collection proves something importantgrowth is visible when you give it enough pages.


