Table of Contents >> Show >> Hide
- What You’ll Need
- Before You Fold: Pick the Right Paper
- How to Make an Origami Pinwheel in 11 Steps
- Step 1: Start with a Perfect Square
- Step 2: Fold in Half (Top to Bottom), Then Unfold
- Step 3: Fold in Half (Left to Right), Then Unfold
- Step 4: Fold One Diagonal, Then Unfold
- Step 5: Fold the Other Diagonal, Then Unfold
- Step 6: Bring Two Opposite Corners to the Center
- Step 7: Flip the Paper Over
- Step 8: Bring the Remaining Two Corners to the Center
- Step 9: Form the Pinwheel Blades by Opening the Flaps
- Step 10: Shape the Blades for Better Spinning
- Step 11: Make It Spin (Two Options)
- Quick Troubleshooting: When Your Pinwheel Refuses to Spin
- Fun Ways to Use an Origami Pinwheel
- A Tiny Bit of Science (Because Spinning Paper Is Basically Physics With Confetti)
- Conclusion
- Real-Life Pinwheel Moments: of Hands-On “Yep, This Happens” Experience
Some crafts are all vibes: cozy, colorful, and suspiciously good at turning a boring afternoon into “wait, why is this so satisfying?”
An origami pinwheel (a.k.a. an origami windmill) is exactly that kind of craft. It’s quick enough for a lunch break,
impressive enough for a classroom demo, andbest of allone of the rare paper projects that can actually do something when you’re done:
it spins in moving air. Yes, your paper has dreams of becoming a tiny wind turbine.
This guide walks you through a beginner-friendly 11-step method to fold a classic pinwheel shape from a single square sheet.
You’ll also learn how to “tune” it so it spins more easily, plus a few fun ways to use it for parties, kids’ crafts, or a simple STEM activity.
No fancy tools requiredunless you count “having fingernails” as equipment.
What You’ll Need
- 1 square sheet of paper (origami paper is ideal; 6 in x 6 in or 15 cm x 15 cm is perfect)
- A flat surface for crisp creases (a table beats your lap, but your lap will try its best)
- Optional for a spinning-on-a-stick version: a pushpin or thumbtack, a straw/pencil/chopstick, and a small bead or paper spacer
- Optional: a ruler or bone folder for ultra-sharp creases (your thumbnail also works, proudly)
Before You Fold: Pick the Right Paper
If you want your paper pinwheel to spin well, the paper choice matters more than people think.
Lightweight origami paper folds cleanly and “catches” airflow nicely. Heavier cardstock looks bold, but it can resist the gentle curves and angles
that help blades grab the breeze. If you’re making a big decorative pinwheel, thicker paper can be greatjust expect slightly stiffer spinning.
Tip: If your paper is patterned on one side, start with the pattern facing down for a more dramatic reveal later.
If it’s double-sided, congratulationsyou’re living the premium paper life.
How to Make an Origami Pinwheel in 11 Steps
Follow the steps in order and take your time with creases. A clean fold now saves you from the classic finishing move later:
“Why is this crooked?!” (The answer is always Step 2. It’s always Step 2.)
-
Step 1: Start with a Perfect Square
Place your square paper in front of you like a diamond (one corner pointing up). If you’re using printer paper, trim it into a square first.
A true square keeps the pinwheel symmetrical, which helps it spin smoothly. -
Step 2: Fold in Half (Top to Bottom), Then Unfold
Fold the top corner down to meet the bottom corner. Crease firmly, then unfold back to a flat square.
You’ve just made a guide creasethink of it as a road map for your future self. -
Step 3: Fold in Half (Left to Right), Then Unfold
Fold the left corner over to the right corner. Crease, then unfold.
You should now see a “plus sign” crease crossing the center. -
Step 4: Fold One Diagonal, Then Unfold
Fold the paper diagonally by bringing one corner to the opposite corner. Crease, then unfold.
Diagonal creases help form the windmill structure that gives the pinwheel its “blades.” -
Step 5: Fold the Other Diagonal, Then Unfold
Fold along the other diagonal corner-to-corner. Crease, then unfold.
When you flatten it again, your paper should have creases forming a starburst that all meet at the center. -
Step 6: Bring Two Opposite Corners to the Center
Pick two opposite corners (top and bottom works nicely) and fold each corner into the center point.
Align carefullythis is where the model starts looking like it means business. -
Step 7: Flip the Paper Over
Turn the model over like you’re flipping a pancake that’s too emotional to be handled directly.
Keep your folds crisp and pressed. -
Step 8: Bring the Remaining Two Corners to the Center
Fold the other two corners into the center point as well. You should now have a smaller square with layered flaps.
Press everything flat so the center is neatmessy centers create friction later, and friction is the enemy of spin. -
Step 9: Form the Pinwheel Blades by Opening the Flaps
Here’s the fun part: gently lift and open the layered flaps so the four “arms” begin to look like a pinwheel.
Use your existing creases as guides. You’re not ripping anythingjust coaxing the paper into its new shape.
If your model resists, slow down and re-crease the fold lines. -
Step 10: Shape the Blades for Better Spinning
A pinwheel spins best when the blades have a slight angle (like tiny sails).
Gently curve or “cup” each blade forward just a bit. Don’t crush the foldsthink: subtle airflow engineering, not paper wrestling.
This small shaping step often makes the difference between “it spins!” and “it politely wiggles.” -
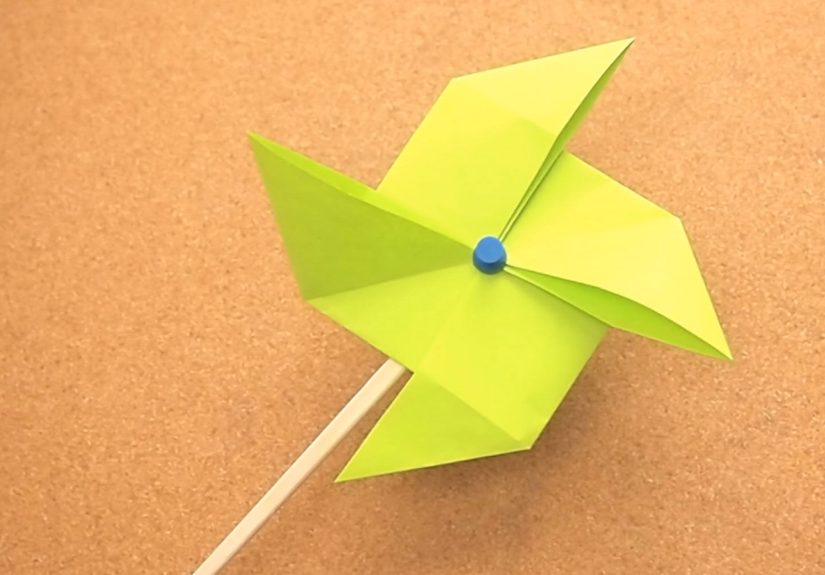
Step 11: Make It Spin (Two Options)
Option A: Blow-to-spin (simple)
Hold the pinwheel lightly at the center between two fingers and blow across the angled blades.
Try different anglesair moving across the blades is what creates rotation.Option B: Mount it on a stick (party-ready)
Carefully poke a pushpin through the center of the pinwheel. Add a tiny spacer (a bead is perfect, or a small rolled paper “donut”)
between the pinwheel and the straw/pencil/handle. Then push the pin into the handle (an eraser-top pencil works especially well).
The spacer reduces friction so the pinwheel can spin freely instead of dragging against the handle like a tired shopping cart wheel.
Quick Troubleshooting: When Your Pinwheel Refuses to Spin
Problem: It spins for half a second, then quits
- Likely cause: Too much friction at the center.
- Fix: Loosen the pushpin slightly, add a bead/paper spacer, and make sure the pinwheel isn’t pressed tightly to the handle.
Problem: It won’t spin unless you summon a hurricane
- Likely cause: Blades are too flat.
- Fix: Add a gentle curve to each blade (Step 10). Even a small “sail” angle helps catch air.
Problem: It looks lopsided
- Likely cause: Off-center folds or uneven corner-to-center alignment.
- Fix: Re-make it with extra care on Steps 6 and 8. Symmetry is your best friend in origami.
Problem: The center gets bulky and messy
- Likely cause: Creases weren’t flattened firmly early on.
- Fix: Press every fold sharply as you go. A neat center improves both appearance and spinning.
Fun Ways to Use an Origami Pinwheel
1) Party décor that doesn’t require a glue gun marathon
Make a bunch in matching colors and stick them into centerpieces, flower pots, or dessert tables.
If you’re going for a photo-friendly look, use double-sided paper so the blades pop from every angle.
2) Easy origami for kids (and secretly for adults, too)
Kids love the “I made it move!” moment. Adults love that it’s a craft with a clear ending and no 47 leftover beads.
Use larger squares (8 in x 8 in) for small hands, and keep “folding corners to the center” as the main repeating concept.
3) Gift toppers that flex just a little
Tape or tie a finished pinwheel onto a gift wrap bow. It’s festive, unexpected, and it says,
“Yes, I could have bought a bow… but I chose art.”
A Tiny Bit of Science (Because Spinning Paper Is Basically Physics With Confetti)
Your pinwheel spins because angled blades experience force from moving air. When air pushes more on one side of the angled blades than the other,
it creates torque (a turning force). That same basic ideaairflow causing rotationis why wind turbines can generate electricity and why pinwheels
are often used in simple wind experiments.
Want to turn this craft into a quick STEM activity? Try testing your pinwheel in front of a fan at different speeds or distances.
Or use a hairdryer on the lowest cool setting (carefully) and compare how blade angle changes performance.
Keep a simple chart: blade angle vs. spin speed, or paper type vs. spin reliability. Congratulationsyou’re now running a wind lab.
Conclusion
An origami pinwheel is one of those rare crafts that hits the sweet spot: easy to learn, fun to customize, and genuinely interactive.
Fold it cleanly, shape the blades with a slight curve, and reduce friction if you mount itthose are the three big secrets.
Whether you’re making a DIY paper craft with kids, decorating for a celebration, or sneaking in a science lesson,
this little paper windmill proves one thing: sometimes the simplest projects are the ones that keep you smiling the longest.
Real-Life Pinwheel Moments: of Hands-On “Yep, This Happens” Experience
If you’ve ever made something from paper and immediately tried to convince it to performspin, bounce, fly, or at least not collapse like a tired sandwich
you already understand the emotional arc of the origami pinwheel. There’s the optimistic beginning (“This is going to be adorable!”), the middle stage where you
stare at a crease like it personally insulted you, and the finale where it finally spins and you feel like you’ve hacked the universe using nothing but folded cellulose.
In classrooms, pinwheels have a magical effect: they’re one of the fastest ways to get kids to care about invisible air. The moment a child blows and the pinwheel
rotates, the room changes from “paper craft time” to “I am a wind wizard.” That’s why teachers love them for weather units. You can talk about wind direction, speed,
and why a slightly angled blade works better than a flat oneand it doesn’t feel like a lecture because the pinwheel gives instant feedback. If it spins well, you did
the engineering right. If it doesn’t, you troubleshoot like a tiny scientist. (Plus, nobody argues with a spinning piece of paper. It’s too busy being impressive.)
At home, pinwheels tend to become part craft, part décor, part accidental family competition. Someone makes one that spins beautifully, and suddenly everyone is
experimenting: “What if I use bigger paper?” “What if I curve the blades more?” “What if I use a bead in the middle?” Before long, the kitchen table looks like a
small wind farm got into a polite disagreement with an origami club.
The most common “aha” moment people have is realizing how much friction matters. A pinwheel that’s pinned too tight will spin like it’s doing you a favor. But add a
little spacerlike a bead or a tiny rolled paper ringand the whole thing suddenly turns smoother, longer, and faster. It’s a great real-world lesson: tiny mechanical
changes can produce huge results. The second big realization? Blade angle is everything. You don’t need to bend the paper dramatically; even a gentle curve helps it
catch air. It’s like adjusting a sail on a boat, except your boat is a paper square and your ocean is your living-room fan.
And then there are the unexpected uses: pinwheels stuck into potted plants to add color, taped to gift bags as playful toppers, or lined up on a windowsill so they
spin whenever someone opens the door. People also love making themed setsred, white, and blue for July celebrations, pastel for baby showers, or metallic paper for
a “tiny carnival” vibe. The best part is that the craft scales beautifully: make one for a quick win, or make twenty and suddenly you have a whole scene.
Either way, it’s hard not to smile when your paper creation catches the breeze and decides to dance.


