Table of Contents >> Show >> Hide
- What Exactly Is a Fruit Crisp?
- Best Fruit for Fruit Crisp
- Core Fruit Crisp Recipe (Flexible Base)
- Tips for the Perfect Fruit Crisp (No Soggy Topping Allowed)
- Easy Variations and Flavor Twists
- Food Safety and Storage for Fruit Crisp
- Why Fruit Crisp Is Sneakily a Smart Dessert Choice
- Real-Life Fruit Crisp Experiences and Lessons
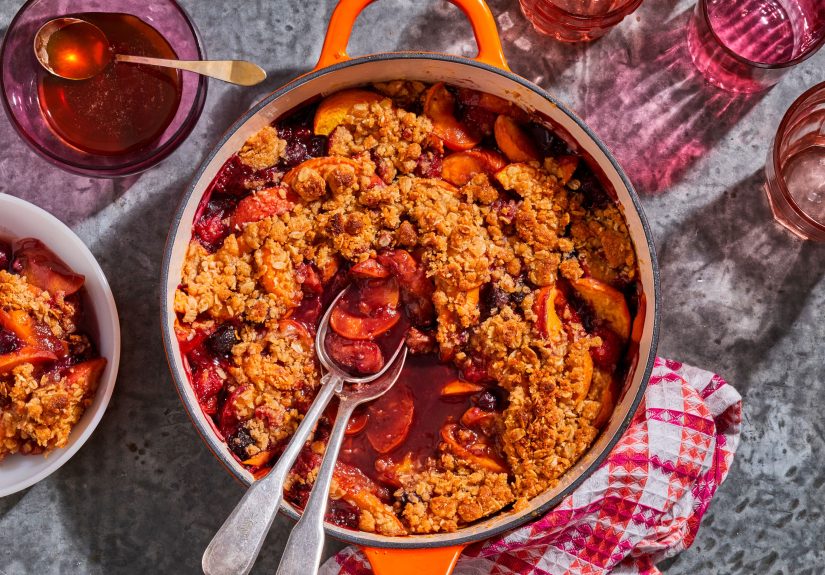
If there’s a dessert that feels like a cozy sweater in a baking dish, it’s fruit crisp. Warm, jammy fruit on the bottom, crunchy oat streusel on top, and a scoop of melting vanilla ice cream doing its best dramatic slide down the sidethis is the kind of baked fruit dessert that makes people think you’re a kitchen genius, even though it’s secretly one of the easiest recipes on the planet.
Whether you’re using apples from a fall farm run, a bag of frozen berries you forgot in the freezer, or that slightly sad stone fruit rolling around the crisper drawer, a good fruit crisp recipe can rescue it all. Below you’ll find a flexible, beginner-friendly, and endlessly customizable fruit crisp formula, plus tips, tricks, and real-life lessons to help you nail it every time.
What Exactly Is a Fruit Crisp?
Fruit crisp is a baked fruit dessert with two main parts: a juicy fruit layer on the bottom and a crumbly, buttery topping (usually made with oats, flour, sugar, and butter) on top. As it bakes, the fruit softens into a thick, spoonable filling while the topping turns golden and, as the name promises, crisp.
If you’ve heard terms like fruit crumble, apple crisp, cobbler, or buckle, you’re in the same dessert neighborhood. The difference is usually in the topping: cobblers have biscuit-like dough, buckles have a cake-style batter, and crisps lean heavily on oats and a crumbly streusel. Think of crisp as the crunchy, oat-loving cousin in the baked fruit family.
Best Fruit for Fruit Crisp
The beauty of a crisp recipe is how forgiving it is. Nearly any combination of fruit can work as long as you think about sweetness and juiciness. Here are some winning options:
- Apples: Use firm varieties that hold their shape and offer a balance of sweet and tart. Granny Smith, Honeycrisp, Fuji, Gala, Braeburn, Jonagold, and Pink Lady are all excellent choices. A mix of tart and sweet apples gives the filling more dimension.
- Berries: Blueberries, blackberries, raspberries, and strawberries all shine in a mixed berry crisp. Frozen berries work greatjust don’t thaw them first and add an extra spoonful of thickener to handle the extra juice.
- Stone fruit: Peaches, nectarines, plums, and cherries bring that juicy, summery vibe. Slightly underripe fruit can actually be an advantage because it holds its shape better while baking.
- Mix and match: Some of the best fruit crisps happen when you combine what you have: apples with blackberries, peaches with blueberries, or pears with cranberries for a tart holiday twist.
The basic rule: you want about 6–8 cups of chopped fruit for a standard 9×9-inch (or similar) baking dish.
Core Fruit Crisp Recipe (Flexible Base)
Ingredients
For the fruit layer
- 6–8 cups fruit, prepared (peeled and sliced apples, pitted and sliced stone fruit, or mixed berries)
- 1/3–1/2 cup granulated sugar or brown sugar (adjust based on how sweet your fruit is)
- 2–3 tablespoons cornstarch or arrowroot starch (use 3 if fruit is very juicy or frozen)
- 1–2 tablespoons fresh lemon juice
- 1 teaspoon vanilla extract (optional but delicious)
- 1 teaspoon ground cinnamon, plus a pinch of nutmeg, cardamom, or ginger if you like
- Pinch of salt
For the crisp topping
- 1 cup old-fashioned rolled oats
- 3/4 cup all-purpose flour (or a gluten-free 1:1 blend)
- 1/2 cup packed brown sugar
- 1/4 cup granulated sugar
- 1/2 teaspoon ground cinnamon
- 1/4 teaspoon fine salt
- 1/2 cup (1 stick) cold unsalted butter, cut into small cubes
- Optional: 1/2 cup chopped nuts (pecans, walnuts, or almonds) for extra crunch
Step-by-Step Instructions
1. Prep the pan and preheat the oven
Preheat your oven to 350–375°F. Both temperatures work; 350°F is a bit more forgiving, while 375°F gives a slightly deeper golden top. Lightly grease a 9×9-inch baking dish or similar-sized casserole dish with butter or cooking spray.
2. Make the fruit filling
- Add your prepared fruit to a large bowl.
- Sprinkle over the sugar, cornstarch, cinnamon, and a pinch of salt.
- Add lemon juice and vanilla, then toss gently until the fruit is evenly coated and there’s no visible powdery starch left.
Transfer the fruit mixture to your prepared baking dish and spread it into an even layer. If there’s a lot of juice at the bottom of the bowl, you can pour most of it init will thicken into that luscious sauce once baked.
3. Make the crisp topping
- In a medium bowl, combine oats, flour, brown sugar, granulated sugar, cinnamon, and salt.
- Add the cold butter cubes.
- Use your fingertips, a pastry cutter, or two forks to work the butter into the dry mixture until it forms pea-sized clumps and the texture looks like slightly damp, chunky sand. Stir in chopped nuts if using.
You don’t want the mixture to be pasty or greasyif it looks too wet, sprinkle in another tablespoon or two of oats or flour.
4. Assemble and bake
- Sprinkle the oat topping evenly over the fruit. Try not to pack it down; you want little craggy bits so the hot air can circulate and crisp everything up.
- Bake for 30–45 minutes, depending on your fruit and oven. You’re aiming for a bubbling fruit layer around the edges and a deep golden-brown topping.
If the topping is browning too fast while the fruit still looks underdone, loosely tent the dish with foil and keep baking until the fruit is tender and juicy.
5. Cool (a little!) and serve
Let your fruit crisp rest for at least 10–15 minutes before serving. This helps the juices thicken so you get luscious spoonfuls instead of a fruity soup. Serve warm with vanilla ice cream, whipped cream, or a drizzle of heavy cream for full cozy-dessert vibes.
Tips for the Perfect Fruit Crisp (No Soggy Topping Allowed)
1. Use the right amount of thickener
The difference between “beautifully saucy” and “suspiciously watery” is usually the starch. Juicier fruits (berries, peaches, plums) and frozen fruit need more thickener than firm apples or pears. When in doubt: use 3 tablespoons of cornstarch for very juicy fruit or frozen fruit and 2 tablespoons for apples and firmer fruit.
2. Keep the topping cold
Cold butter is your best friend for a crisp, crumbly topping. If your kitchen is warm, pop the bowl of topping into the fridge for 10–15 minutes while you prep the fruit. Cold butter + hot oven = crunchy, toasty streusel instead of a greasy melt-over.
3. Avoid over-sweetening
Modern fruit, especially in season, is often sweeter than you think. Start with the lower end of the sugar range and taste a piece of fruit from the bowl before baking. You can always add a tablespoon or two more sugar, but you can’t un-sweeten a dessert that tastes like it fell into a sugar bowl.
4. Don’t pack down the topping
It’s called “crisp,” not “press,” for a reason. Lightly scatter the topping over the fruit so you get little peaks and valleys. Those uneven bits create texture and allow steam to escapekey for keeping that oat crumble actually crisp.
5. Bake until you see bubbles
A common mistake is pulling the fruit crisp out too early because the topping looks done. Don’t just watch the top; watch the edges. When the fruit layer is actively bubbling around the sides, you know the thickener has cooked through and the filling will set as it cools.
Easy Variations and Flavor Twists
Mixed Berry Crisp
Use a mix of blueberries, blackberries, and strawberries (fresh or frozen), bump the cornstarch up to 3 tablespoons, and add a little lemon zest to brighten the flavors. This version is extra juicy and perfect with vanilla ice cream or lemon sorbet.
Classic Apple Crisp
Use firm baking apples like Granny Smith and Honeycrisp. Add a bit of nutmeg and allspice to the filling. You can even swap a few tablespoons of flour in the topping for finely chopped nuts for extra crunch.
Peach & Blueberry Crisp
Combine sliced peaches with a handful of blueberries for color and flavor contrast. A touch of vanilla and almond extract in the filling makes it taste like summer in a bowl.
Gluten-Free Fruit Crisp
Use gluten-free certified oats and swap the flour in the topping for a gluten-free 1:1 baking blend or finely ground almond flour. The texture is still rich and crisp, and most people can’t tell the difference.
Lower-Sugar or Naturally Sweetened Version
Cut the sugar in the filling by a third and use maple syrup or coconut sugar in the topping. When fruit is in peak season, you can often get away with significantly less sugar and still have a beautifully flavorful dessert.
Food Safety and Storage for Fruit Crisp
Fruit crisp is a casual dessert, but food safety is still a thing. Once baked, let the crisp cool slightly, serve, and then be mindful of how long it sits out. As a general guideline, perishable foods shouldn’t sit at room temperature for more than about 2 hours (or 1 hour if it’s a very hot day). After that, cover and refrigerate.
How to store fruit crisp:
- Room temperature (short term): Up to several hours while serving, but plan to refrigerate the leftovers the same day.
- Refrigerator: Cover tightly and store for 3–4 days. Reheat individual portions in the microwave or warm the whole dish in a 300°F oven until heated through.
- Freezer: You can freeze baked or unbaked crisp. For unbaked, assemble, wrap tightly, and freeze. Bake from frozen, adding extra time. For baked, cool completely, wrap, freeze, and reheat covered until warm, then uncover to re-crisp the topping.
Reheating in the oven instead of the microwave is your best bet if you want that topping to crisp back up instead of turning soft.
Why Fruit Crisp Is Sneakily a Smart Dessert Choice
Is fruit crisp a health food? Let’s not go that farit definitely involves butter and sugar. But compared with many desserts, it has some advantages:
- Fruit-forward: You’re getting a solid serving of fruit, often with fiber and beneficial plant compounds.
- Whole grains: The oat topping adds some whole grain goodness and texture.
- Customizable: You can reduce sugar, use less butter, or swap in nuts depending on your preferences and goals.
Basically, it’s a dessert that feels indulgent but still leans on real, recognizable ingredients. And if you happen to eat it for breakfast the next day with yogurt, that’s between you and your conscience.
Real-Life Fruit Crisp Experiences and Lessons
Home cooks who make fruit crisp regularly tend to develop strong opinionsusually learned the hard (and slightly burnt) way. Here are some experience-based tips and little stories that might save you from your own dessert drama.
The “Too Juicy Berry Disaster”
One of the most common fruit crisp mishaps goes like this: you toss a big bag of frozen berries in a pan, sprinkle a little sugar on top, add a thin layer of topping, bake it, and end up with… purple fruit soup under a pale oat lid. The fix comes from experience: if you’re using frozen berries, don’t thaw them first, and always add extra thickener. That extra tablespoon of cornstarch or arrowroot can be the difference between a runny filling and a wonderfully spoonable sauce.
Another pro move is to mix the berries with sugar, lemon, and thickener in a bowl first, instead of sprinkling things directly into the pan. This gives you a chance to check that the starch is evenly distributed and adjust the sweetness before committing to the bake.
The “Soggy Topping” Problem
A soggy topping is the heartbreak of the crisp world. Often, it’s not the recipeit’s the technique. Over time, many bakers learn three key things:
- Cold butter is non-negotiable. When the butter starts out cold and solid, it slowly melts in the oven, leaving behind those crispy, crunchy pockets that make the topping so addictive.
- Thickness matters. If the layer of fruit is very deep and the topping is very thin, the steam from the fruit can soften the crisp. A balanced ratioroughly equal depths of fruit and toppinghelps keep the top from turning soggy.
- Don’t cover it too early. If you tent the pan with foil from the beginning, the topping essentially steams instead of crisps. Most experienced bakers only tent the crisp near the end if it’s browning too fast.
The “That Was Way Too Sweet” Lesson
If you’ve ever made a fruit crisp that tasted more like candy than dessert, you’re not alone. A lot of people start by following recipes designed for very tart apples or underripe fruit, then apply the same sugar amount to perfectly ripe peaches or incredibly sweet berries. The result: sugar overload.
The experience-backed fix is simple but powerful: always taste your fruit first. If your berries are already sweet enough to snack on as-is, dial back the sugar in the filling. If you’re using fruit that’s a little bland or out of season, a bit more sugar and a squeeze of lemon juice can wake things up. Over time, your palate gets better at balancing sweetness with acidity, and your fruit crisp gets better too.
Small Pans, Big Wins
Another trick people discover after a few rounds of fruit crisp making is the magic of individual portions. Instead of baking one large crisp, you can divide the fruit and topping into smaller ramekins or mini baking dishes. Not only do they look fancy, but they also bake more quickly and evenly, and it’s easier to give each portion the perfect amount of topping.
Individual crisps are especially helpful when you’re dealing with guests who have different preferences. You can make a couple of gluten-free versions with a modified topping, a low-sugar one for someone who prefers a lighter dessert, and a fully loaded version with extra nuts and butter for the person who “just wants dessert, no negotiations.”
Fruit Crisp as a “Zero-Waste Hero”
Perhaps the most underrated lesson: fruit crisp is one of the best ways to use up odds and ends. That lonely apple, the slightly wrinkled peach, the handful of berries that’s not enough for a smoothieput them all together and suddenly you have a rustic, charming dessert that tastes intentional instead of improvised.
Many home cooks keep a “crisp bag” in the freezer, tossing in small amounts of chopped fruit over time. When the bag is full, they make a mixed fruit crisp. The result is always a little different, but that’s part of the fun. Add a basic oat topping and you’ve turned leftovers into something people will ask you to “please make again exactly like this,” even though you have no idea how you did it.
The Bottom Line
Fruit crisp is one of those recipes that rewards experimentation. Once you understand the basicsenough thickener for the fruit, a well-balanced oat crumble topping, and a hot ovenyou’re free to improvise with whatever fruit and flavors you have on hand. Every batch teaches you something, whether it’s “add more lemon next time” or “those toasted pecans were a stroke of genius.”
So the next time your fruit bowl is a little too full, or you need a no-stress dessert that still feels special, pull out a baking dish and make a fruit crisp. It’s comfort food, crowd-pleaser, and low-key baking lesson all in one pan.
SEO JSON


