Table of Contents >> Show >> Hide
- Why a Patterned Ceiling Works So Well in an Entry Hall
- Pick the Right Pattern: 8 Entry-Hall Ceiling Ideas That Actually Make Sense
- 1) Tone-on-tone stripes (the “I’m stylish, not chaotic” option)
- 2) Checkerboard or harlequin (graphic impact, still timeless)
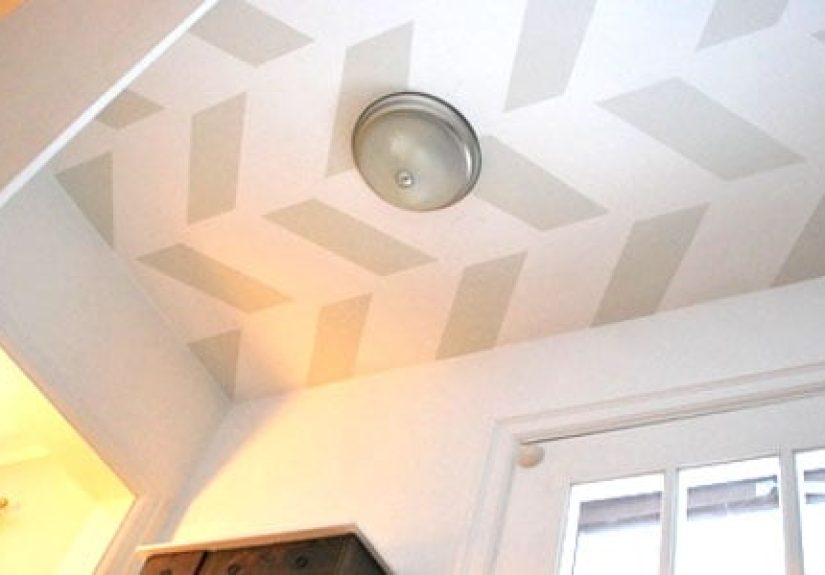
- 3) Stenciled repeat pattern (the “wallpaper look” without wallpaper commitment)
- 4) Border + center medallion (classic and great for chandeliers)
- 5) Color-blocked shapes (modern, playful, and surprisingly easy)
- 6) “High gloss moment” (dramatic, but only if your ceiling is smooth)
- 7) Starry speckle or micro-pattern (whimsical without being childish)
- 8) Faux beams or coffer outlines (architectural look with paint)
- Design Rules for Entry Halls: Scale, Light, and What People See First
- Paint Finish and Materials: What Works Best Over Your Head
- How to Plan the Pattern So It Looks “Designer” (Not “DIY Panic”)
- How to Paint a Ceiling Pattern: Practical Methods That Reduce Regret
- Common Mistakes (and How to Avoid the “Why Does It Look Crooked?” Spiral)
- Entry-Hall Pattern “Recipes”: Realistic Examples You Can Steal
- Quick Checklist Before You Open the Paint Can
- of Real-World “Experience” (What It’s Like to Actually Do This)
- Conclusion
Your entry hall has one job: greet people before they judge your throw pillows. And yet most entry halls are
painted like an airport corridorwhite ceiling, beige walls, zero personality. That’s a missed opportunity,
because the ceiling is the most underused design real estate in the house. Designers even have a nickname for it:
the “fifth wall.” And in an entry hallwhere people naturally pause, look around, and take in the vibepainting a
ceiling pattern can deliver maximum “wow” with minimal square footage.
This guide breaks down how to choose the right ceiling pattern for a foyer or entry hall, how to plan it so it
looks intentional (not like you lost a fight with painter’s tape), and how to actually paint it without
sacrificing your neck to the DIY gods. We’ll also cover real-world examples, common mistakes, and a longer
“what it feels like” experience section at the endbecause the best ceiling plans account for both style and
sanity.
Why a Patterned Ceiling Works So Well in an Entry Hall
Entry halls are often small, awkwardly shaped, or short on natural light. That’s exactly why a painted ceiling
pattern works: it creates a focal point where you actually have open visual space. Walls in an entry hall get
crowded fastcoats, mirrors, keys, art, switches, doorswhile the ceiling stays empty, quietly begging for
attention like a neglected houseplant.
A ceiling pattern also helps an entry hall do three useful things:
- Defines the zone in open layouts where the front door opens right into the living space.
- Adds height or structure (depending on the pattern direction and scale).
- Sets the mood instantlyplayful, classic, moody, coastal, you name it.
Think of it as the design equivalent of a great handshake: confident, memorable, and not weirdly sweaty.
Pick the Right Pattern: 8 Entry-Hall Ceiling Ideas That Actually Make Sense
The best ceiling pattern is the one that matches your home’s style and the reality of your space (height,
light, and your tolerance for taping). Here are options that tend to look especially good in entry halls:
1) Tone-on-tone stripes (the “I’m stylish, not chaotic” option)
Use two shades of the same color familylike a soft warm white plus a slightly deeper cream, or pale gray plus a
misty blue-gray. Stripes add architecture without yelling for attention. In a narrow hall, lengthwise stripes
can visually stretch the space; in a wide foyer, stripes can guide the eye toward a statement light fixture.
2) Checkerboard or harlequin (graphic impact, still timeless)
Checkerboard reads crisp and tailored; harlequin (diamond) reads a bit more playful. Both can be bold in black
and white, or subtle in low-contrast neutrals. For an entry hall, a medium-to-large scale keeps it from feeling
like a cafe floor migrated upward.
3) Stenciled repeat pattern (the “wallpaper look” without wallpaper commitment)
A stencil pattern can mimic vintage tin tile, Moroccan motifs, botanicals, or geometric repeats. Stenciling is
forgiving in older homes where ceilings aren’t perfectly smooth. It also lets you go intricate without freehand
artistry (because not everyone is secretly Michelangelo).
4) Border + center medallion (classic and great for chandeliers)
If your entry hall has crown molding or a ceiling medallion, emphasize it with a painted borderGreek key, thin
stripes, or a stencil bandplus a subtle motif around the fixture. This works beautifully in traditional homes.
5) Color-blocked shapes (modern, playful, and surprisingly easy)
Paint a large circle, arch, or rectangle centered over a console table or runner. This works well for small
entryways and for renters who want a high-impact moment without tackling an all-over pattern.
6) “High gloss moment” (dramatic, but only if your ceiling is smooth)
A glossy ceiling reflects light and can make an entry hall feel brighter and more glamorous. The catch: gloss
highlights imperfections, so it’s best on a well-prepped, smooth surface (or on new drywall).
7) Starry speckle or micro-pattern (whimsical without being childish)
Tiny stars, dots, or a subtle splatter effect can make a small entry feel magicalespecially in a home with kids
or a cottage vibe. Keep colors restrained for a grown-up look: warm white + soft gold, navy + pale gray, or
charcoal + dusty blue.
8) Faux beams or coffer outlines (architectural look with paint)
You can “draw” a coffered grid with careful taping and shadinggreat for high ceilings or large foyers where you
want structure. This is also a smart alternative when real millwork isn’t in the budget.
Design Rules for Entry Halls: Scale, Light, and What People See First
A painted ceiling pattern looks best when it’s planned like a design featurenot a last-minute “we had leftover
paint” situation. Use these practical rules:
Choose scale based on ceiling height
- 8-foot ceilings: go smaller and lighter. Tight stripes, micro-stencil, tone-on-tone checks.
- 9–10 feet: medium patterns work well2–6 inch stripes, medium stencil repeat.
- Two-story foyers: go bigger. Large checks, bold geometry, or architectural grids read best from below.
Work with your lighting (not against it)
Entry halls often have a single overhead fixture and limited daylight. A pattern can brighten the feel if you
keep contrast controlled and choose colors that don’t swallow light. If your foyer is dim, consider a lighter
background color and a slightly deeper pattern, instead of a dark overall ceiling.
Match the ceiling to at least one other element
Your ceiling pattern shouldn’t be an only child. Tie it to something nearby: the front door color, the rug, the
stair runner, the console table finish, or the metal tone of the light fixture. Even a subtle echo makes the
ceiling feel intentional.
Paint Finish and Materials: What Works Best Over Your Head
Ceilings are traditionally painted flat because flat finishes hide flaws and reduce glare. That still applies
when you add patternespecially in older homes where ceilings may have texture, seams, or patchwork repairs.
That said, entry halls are high-traffic zones. People aren’t usually touching the ceiling (and if they are, you
may have bigger concerns), but the area can be prone to dust, cobwebs, and the occasional scuff from moving tall
furniture. Here’s a sensible approach:
- Flat / ceiling-specific paint: best for most ceilings; minimizes flashing and imperfections.
- Matte: slightly more durable than true flat in many paint lines; still low glare.
- Eggshell or satin: only for very smooth ceilings where you want light reflection; prep must be excellent.
If you’re changing from a darker ceiling color to a lighter one (or covering stains), use primer. Primer helps
with adhesion and prevents old color or water marks from ghosting through.
How to Plan the Pattern So It Looks “Designer” (Not “DIY Panic”)
The secret to a professional-looking ceiling pattern is boring, unsexy planning. Yes, math. Yes, measuring. And
yes, it’s worth it.
Step 1: Photograph the entry hall from real viewing angles
Stand at the front door, then step inside and look back. Those are the two angles most people experience. If a
pattern looks off-center from the doorway view, it’ll always feel slightly wrongeven if it’s technically
centered to the room.
Step 2: Find your “visual center”
In an entry hall, the visual center is often aligned with the light fixture, runner, or the front door linenot
necessarily the exact midpoint of the drywall. Mark a centerline with a chalk line or laser level if you have
one.
Step 3: Dry-layout the pattern with low-tack tape
For stripes or grids, tape a small section and step back. For stencil patterns, use paper templates or lightly
pencil a repeat grid. Do not skip the “step back” partyour ceiling will look different from floor level than it
does when you’re directly under it squinting like a confused raccoon.
Step 4: Decide where the pattern ends
Crisp transitions matter. If you have crown molding, you can end the pattern cleanly at the molding line. If you
don’t, consider a thin border stripe around the perimeter to frame the pattern and hide tiny alignment
inconsistencies at the edges.
How to Paint a Ceiling Pattern: Practical Methods That Reduce Regret
Different patterns require different techniques. Here are the most common entry-hall approaches with a clear,
doable process.
Method A: Striped ceiling (clean, classic, and tape-heavy)
- Paint the base color first and let it fully dry.
- Measure stripe widths and mark points along the ceiling edges.
- Use a level/laser to connect marks into straight guidelines.
- Tape the stripes (place tape just outside your pencil line so the paint covers the marks).
-
Seal tape edges by burnishing firmly; for extra-crisp lines, paint a thin coat of the base
color along the tape edge first. - Roll the stripe color in light coats. Heavy paint increases bleed.
- Remove tape while paint is still slightly tacky, pulling back at a 45-degree angle.
Method B: Checkerboard ceiling (high impact, surprisingly doable)
- Map the grid: measure ceiling dimensions; calculate square size; snap chalk lines.
- Paint the base color across the whole ceiling.
- Tape off alternating squares (this is where podcasts earn their keep).
- Paint the second color with a roller; keep coats light and even.
- Pull tape carefully before paint fully cures.
Pro tip: in an entry hall, low-contrast checkerboard (two close neutrals) feels elevated and less “diner.”
Method C: Stenciled ceiling (the “looks expensive, costs less” favorite)
- Start at the center and work outward so the layout stays symmetrical.
- Use repositionable spray adhesive on the stencil back so it stays put overhead.
- Load your roller/brush lightlyit should look almost dry. Too much paint causes bleed.
- Dab edges first and then fill in with a gentle rolling motion.
- Use registration marks to align repeats.
- Take breaks. Your shoulders will file a complaint if you pretend you’re a machine.
Method D: Painted border + motif (perfect for traditional foyers)
- Measure the border width (2–6 inches is typical, depending on scale).
- Tape the border with a clean, consistent offset from the wall or crown molding.
- Paint the border color, remove tape, then add a stencil motif or thin pinstripe detail.
- Center a medallion detail around the light fixture if desired.
Common Mistakes (and How to Avoid the “Why Does It Look Crooked?” Spiral)
- Skipping surface prep: Dust and grime reduce adhesion. Clean first, especially near HVAC vents.
- Using too much paint on tape or stencil: Heavy application increases bleed and drips.
- Not keeping a wet edge: Ceilings can show lap marks if sections dry before you overlap.
-
Painting in bad conditions: High humidity slows drying and can affect finish; direct sun can
dry paint too fast and leave marks. -
Choosing ultra-high contrast in a tiny hall: Sometimes bold is beautiful; sometimes bold is
“optical illusion headache.” Test first.
Entry-Hall Pattern “Recipes”: Realistic Examples You Can Steal
Recipe 1: Soft stripe lift for a low ceiling
Look: airy, tailored, subtle.
Colors: warm white base + creamy beige stripes (low contrast).
Stripe width: 3 inches (repeat evenly).
Works best when: your entry hall is narrow and needs visual height without darkness.
Recipe 2: Moody checkerboard for a dramatic foyer
Look: bold, designer, unforgettable.
Colors: charcoal base + smoky gray squares (still not pure black/white).
Square size: 12–18 inches depending on ceiling height.
Pair with: brass or black metal light fixture; simple walls so the ceiling can star.
Recipe 3: Stenciled “tin tile” in a vintage home
Look: historic charm without installing actual tin tile.
Colors: soft white base + muted metallic (champagne or brushed gold) stencil.
Pro move: add a thin painted border to frame the stencil field.
Recipe 4: Modern color-block halo
Look: minimal, playful, Instagram-friendly.
Colors: white ceiling + dusty blue circle centered on the fixture.
Best for: small entryways where an all-over pattern feels too busy.
Quick Checklist Before You Open the Paint Can
- Test your colors in entry-hall lighting (day and night).
- Confirm your pattern scale from the doorway view.
- Pick the right finish (flat/matte is usually safest overhead).
- Plan your centerline and border/end points.
- Buy more tape than you think you need. Then buy one more roll.
- Schedule breaks so your neck doesn’t hate you forever.
of Real-World “Experience” (What It’s Like to Actually Do This)
People imagine painting a ceiling pattern as a glamorous weekend project: a little music, a little paint, a big
reveal. The reality is more like a character-building montagestill satisfying, but with more stretching and
muttering than you expected.
One of the most common experiences is the “tape optimism phase.” At first, taping feels productive. You’re
measuring, aligning, pressing edges, and thinking, Wow, I am extremely competent. Then you get to the
third or fourth strip (or the 37th square of a checkerboard) and realize your ceiling is larger than your
patience. This is where people learn the value of a laser level, a good pencil, and taking five-minute breaks
before your mood turns into a felony.
Stenciling has its own emotional arc. The first repeat looks amazing. The second repeat still looks amazing. By
the eighth repeat, your shoulders start negotiating like a union rep: “We can continue, but we need snacks and a
chair.” The good news is that stenciling is forgivingtiny misalignments disappear from floor level, and the
texture of real homes often makes perfectly crisp edges unrealistic anyway. Many DIYers report that the biggest
improvement comes from using less paint than they think they need. When the roller looks almost dry, the pattern
comes out cleaner, and drips become rare.
Stripes and grids create a different kind of challenge: crisp lines depend on prep. People who rush tape
burnishing (pressing edges down firmly) tend to get little bleeds that show up only after the tape is removed,
which is emotionally rude. The “aha” moment for many is sealing the tape edgeeither by pressing carefully, or by
painting a thin coat of the base color along the tape edge before applying the stripe color. That small step can
turn a DIY-looking project into something that reads professional.
Then there’s the lighting surprise. Entry halls often look totally different at 10 a.m. than they do at 8 p.m.
under a warm bulb. People who test sample swatches overheadyes, on the ceiling, not just the walltend to be
happiest with the final result. A pattern that looks charming in daylight can look overly contrasty at night, and
a subtle tone-on-tone can look richer and more layered once the lights are on.
Finally, there’s the reveal momentwhen you clean up drop cloths, put the console table back, and walk in through
the front door like a guest. This is when the ceiling earns its keep. A well-planned painted pattern makes the
entry hall feel “finished,” like the home has a point of view. It’s the kind of detail people notice without
knowing exactly why they’re impressed. And yesmost of them will look up. Mission accomplished.


