Table of Contents >> Show >> Hide
- What Are Soda Bottle Carry-Alls, Exactly?
- Why This Works (A Little “DIY Engineering” Without the Hard Hat)
- Best Bottles to Use
- Tools and Materials
- Step-by-Step: The Classic Soda Bottle Carry-All
- Five Carry-All Variations You’ll Actually Use
- Durability Tips (So It Doesn’t Become “Soda Bottle Sadness”)
- Safety Notes (Fast, Important, Not Buzzkill)
- The “Real Talk” Sustainability Angle
- FAQ
- Real-World Lessons and “Experience-Based” Tips (The Part You’ll Be Glad You Read)
- SEO Tags
If your house has ever hosted a birthday party, a movie night, or one “we’ll just grab a couple sodas” grocery run,
you already know the truth: plastic bottles multiply like gremlins. The good news is you can turn those bottles into
surprisingly sturdy, surprisingly cute, actually useful little caddiesaka soda bottle carry-alls.
This project is the sweet spot between “I want to be less wasteful” and “I need somewhere to put these 47 markers,
three paintbrushes, and a rogue screwdriver.” We’re making an upcycled bottle organizer that’s lightweight, portable,
easy to customize, and friendly to tight budgets and small spaces.
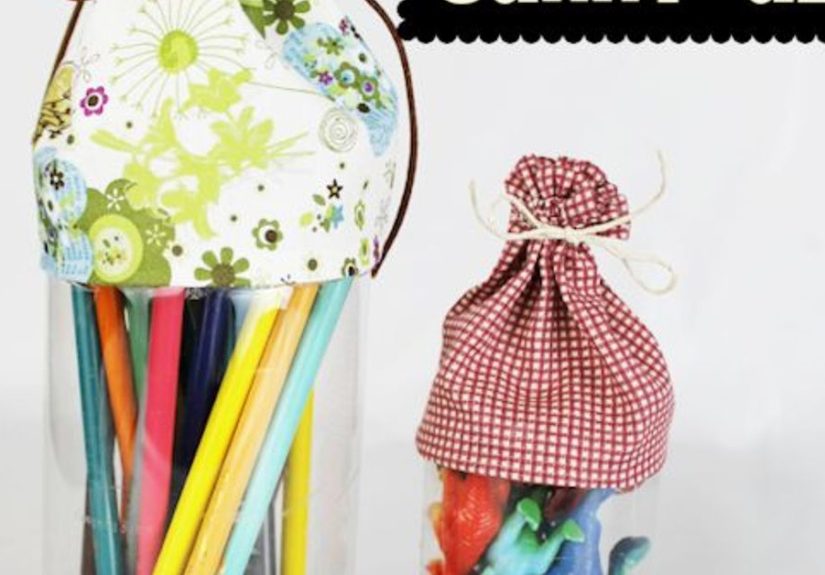
What Are Soda Bottle Carry-Alls, Exactly?
A soda bottle carry-all is a DIY caddy made from a plastic beverage bottle (think 16.9 oz, 1-liter, or 2-liter sizes)
that’s been cut and shaped to hold supplies. Add a handle or strap and you’ve got a grab-and-go organizer you can
carry from room to roomor toss in the car without everything turning into a rolling junk avalanche.
The classic version keeps the bottle’s base (because it’s already engineered to be stable), trims the body down to a
useful height, then adds a handle and a “pretty layer” (fabric, twine, paper, paint, labels) so it looks intentional
instead of like you’re transporting snacks in yesterday’s recycling.
Why This Works (A Little “DIY Engineering” Without the Hard Hat)
Plastic bottles are designed to be lightweight but strong enough to hold liquid, survive shipping, and handle being
squeezed by impatient humans who need carbonation now. That structure gives you three built-in advantages:
- A stable base: Most bottles have a wide, dimpled bottom that resists tipping.
- Curved walls: The shape naturally cradles tools, brushes, clothespins, and small bottles.
- Easy grip potential: With a strap or handle, it becomes portable storage in minutes.
The key is making the rim comfortable and safe (no sharp edges), then choosing a handle style that matches what you’ll
carrylight craft supplies vs. heavier cleaning bottles are two very different lifestyles.
Best Bottles to Use
Size picks (quick guide)
- 16.9–20 oz bottles: Ideal for pens, makeup brushes, kids’ craft tools, screws, or small pantry packets.
- 1-liter bottles: Great all-purpose caddy size for markers, paint, sponges, or garden twine.
- 2-liter bottles: Best for bulkier itemsspray bottles, rags, gloves, small hand tools.
Shape matters
Look for bottles with straighter sides if you want maximum interior space. If you want a “hugging” shape for items that
like to fall over (paintbrushes, screwdrivers, kitchen utensils), curvier bottles can actually help.
Tools and Materials
Basic supplies
- Clean, empty plastic soda bottle(s), label removed
- Scissors and/or a utility knife (for the first puncture)
- Permanent marker
- Ruler or measuring tape
- Sandpaper (medium and fine grit) or an emery board
- Hot glue gun + glue sticks or strong craft glue
Optional “make it cute” upgrades
- Scrap fabric, ribbon, twine, or adhesive vinyl
- Washi tape
- Contact paper
- Acrylic paint + brush (paint formulated for plastic is a bonus)
- Hole punch or awl (for strap holes)
- Grommet kit (for a cleaner, stronger strap opening)
Handle options
- Fabric strap: Soft, comfortable, very “Hometalk energy.”
- Paracord or rope: Strong, washable, outdoors-friendly.
- Zip-tie + grip wrap: Minimalist and surprisingly tough.
- Repurposed handle: Old bag strap, drawer pull, or a scrap of webbing.
Step-by-Step: The Classic Soda Bottle Carry-All
Step 1: Clean and de-sticker the bottle
Wash the bottle with warm soapy water and let it dry fully. Peel off the label. If sticky residue remains, rub it off
with cooking oil or a gentle adhesive remover, then wash again. (Because nothing says “craft day” like accidentally
gluing your fingers to a mystery syrup film.)
Step 2: Mark your cut lines
Decide how tall you want your carry-all. A good starting point is 5–7 inches tall for a general caddy, or 8–10 inches
tall for taller tools. Use a marker and ruler to draw a line around the bottle.
Pro tip: Wrap a strip of paper around the bottle, align the edges, and traceinstant straight guideline.
Step 3: Cut safely (and cleanly)
Use a utility knife to make a starter slit, then switch to scissors for control. Cut slowly along your marked line.
Rotate the bottle as you cut instead of twisting your wrist into a modern-art pose.
Step 4: Smooth the rim
This is the step that separates “cute organizer” from “why is my thumb bleeding?” Sand the cut edge with medium grit,
then finish with fine grit. If you want extra comfort, glue on a strip of ribbon, bias tape, or a folded fabric band
around the rim.
Step 5: Add the handle (two easy methods)
Method A: Strap holes + fabric handle
- Mark two points on opposite sides, about 1 inch below the rim.
- Punch holes (or carefully pierce with an awl/knife). If you have grommets, install them now.
- Thread ribbon, webbing, or a sewn fabric strap through the holes.
- Tie sturdy knots inside, or fold and glue the ends. Test by lifting before loading it up.
Method B: Glue-on handle (quick and cute)
- Create a strap from ribbon or fabric (double it for strength).
- Hot glue one end to the outside of the bottle, hold until set.
- Repeat on the opposite side, keeping the handle centered and level.
- Add a second glue line or a fabric patch over the attachment points for reinforcement.
Step 6: Make it look intentional
Wrap the body with fabric, twine, or adhesive paper. For fabric: cut a rectangle that fits around the bottle, glue it
in sections, and smooth as you go. If you want a no-fuss look, contact paper or peel-and-stick vinyl gives clean lines
and wipes down easily (great for cleaning-caddy versions).
Finish with a label: “Craft Stuff,” “Garden Bits,” “Paint Party,” “Emergency Snacks,” or whatever truth you live by.
Five Carry-All Variations You’ll Actually Use
1) The cleaning caddy mini
Use a 2-liter bottle, keep it slightly taller, and add a strong rope handle. Line the bottom with a washable cloth or
shelf liner. Perfect for carrying sponges, microfiber cloths, bathroom spray, and a pair of gloves.
2) The art-supply wrangler
Make two smaller carry-alls: one for markers/pencils, one for scissors/glue/paintbrushes. Add dividers using cardboard
wrapped in tape (slide-fit or glue in place). The secret joy here is that cleanup becomes “dump everything back in the
bottle” instead of “why is glitter in my socks?”
3) The garden “pocket caddy”
Great for seed packets, plant tags, twine, small pruners, and clips. Use twine wrap or outdoor vinyl and choose a handle
that can get dirty without drama. Optional: poke a couple tiny drainage holes in the bottom so wet tools don’t sit in a
puddle.
4) The car catch-all
Create a medium-height carry-all and keep it in the trunk: flashlight, phone charger, tissues, wet wipes, small trash
bags, and a couple emergency snacks (because you’re one traffic jam away from becoming a philosopher about hunger).
A wipeable exterior is best here.
5) The pantry packet sorter
Short bottle, wide opening, label it, and store sauce packets, seasoning packets, or tea bags. This is the kind of
organization win that makes you feel like you have your life togethereven if you’re eating cereal for dinner.
Durability Tips (So It Doesn’t Become “Soda Bottle Sadness”)
- Reinforce stress points: Wherever the handle attaches, add extra glue and/or a fabric patch.
- Don’t overload: Bottles are tough, but a carry-all full of heavy tools can pull holes open over time.
- Choose the right handle: Soft ribbon is comfy, but webbing/rope is stronger for heavier loads.
- Make the rim gentle: Sand thoroughly, and consider edging with tape or fabric for comfort.
- Keep heat away: Plastic can warp near heaters, hot cars in extreme heat, or direct flames (obvious, but worth saying).
Safety Notes (Fast, Important, Not Buzzkill)
Use a sharp blade for the first puncture and cut away from your body. Dull tools slip more easily than sharp ones.
Sand edges until smooth. If kids are helping, let them handle decorating, wrapping, and labelingsave the cutting for
grown-ups.
The “Real Talk” Sustainability Angle
Upcycling isn’t a magical solution to plastic waste, but it’s a practical habit: you’re keeping something in use longer,
reducing the need to buy a new organizer, and building the reflex to repurpose before replacing. PET (the plastic used
in many beverage bottles) is widely accepted in recycling programs, but recycling rates and outcomes depend heavily on
collection systems and contamination levels. Turning a bottle into a carry-all sidesteps that uncertainty for a while
and gives the item a second (or third) useful life.
Translation: you get a handy caddy, your space gets tidier, and one bottle delays its trip to the bin. Small win,
repeatable winthose add up.
FAQ
Can I make these without hot glue?
Yes. Strong craft glue can work, but it usually needs longer drying time and may not bond as quickly to smooth plastic.
If you’re going glue-free, use adhesive vinyl/contact paper for the wrap and tie-on handles through holes instead of
gluing handles on.
What if my bottle collapses when I pick it up?
Use a thicker bottle (some 2-liter bottles are sturdier), keep the walls taller, and reinforce the rim. If needed, add
an inner sleeve: a second cut bottle section that nests inside to stiffen the body.
How do I make it look less… bottle-y?
Wrap it fully in fabric, twine, or vinyl. Add a crisp label. Edge the rim with ribbon. And pick a color scheme you
actually like. The bottle is just the skeletonyour finish is the outfit.
Real-World Lessons and “Experience-Based” Tips (The Part You’ll Be Glad You Read)
People tend to assume this project is all about cutting and gluing, but the real success comes from how you
use the carry-all afterward. In practice, the best soda bottle carry-alls are designed around one specific
routine. For example: if you’re always hunting for scissors, tape, and a marker, that’s not a “general storage” problem.
That’s a “three items that should live together forever” problem. A small carry-all dedicated to those tools becomes a
home base you can grab in one motionespecially helpful when you’re wrapping gifts, labeling pantry jars, or doing a
quick craft with kids.
Another common reality: the handle choice changes everything. Ribbon handles look adorable, but if you load the caddy
with heavier items (cleaning spray, a putty knife, a wrench you swear you’ll return to the garage later), ribbon can
dig into your hand and the attachment points can fatigue. That’s where rope or webbing feels like an upgrade, even if
it’s less “pretty.” A good compromise is a strong handle with a soft wrapthink rope with a little fabric sleeve where
your hand grips.
Edge comfort is the underrated hero. Most “it didn’t work” stories come down to a rim that was left slightly sharp or
uneven. When the rim is smooth (and ideally wrapped), the carry-all becomes something you’ll reach for without thinking.
When it’s scratchy, you’ll avoid it… and then it becomes that thing that lives in a closet until you “deal with it
later,” which is adult code for “never.”
Decorating also has a practical side. If your carry-all is for cleaning supplies, a wipeable surface (vinyl, contact
paper, even a sealed paint finish) makes the difference between “cute forever” and “cute until the first spill.” For
craft supplies, fabric is great because it adds grip and warmthplus it’s forgiving if your cuts aren’t perfectly
straight. A patterned fabric also hides scuffs and glue lines, which is basically free confidence.
Finally, the most useful trick is labeling in plain language. Not “Misc.” Not “Stuff.” Be specific: “Batteries +
Flashlights,” “School Glue + Scissors,” “Garden Tags,” “Car Wipes,” “Paint Brushes.” Clear labels reduce decision fatigue,
and decision fatigue is the sneaky villain behind clutter. When the carry-all tells you what it’s for, you don’t have to
negotiate with yourself every time you put something away.
The fun part is that these organizers improve over time. You’ll make one, use it for a week, and realize the opening
should be lower or the handle should be wider or the caddy needs a divider. That’s not failurethat’s the normal “field
testing” phase of any good DIY. The bottle is free, the iteration is fast, and the end result is custom storage built
around how you actually live, not how an aisle display thinks you live.


