Table of Contents >> Show >> Hide
- Why a Loose Outlet Is More Than Just Annoying
- Common Signs and Causes of Loose Outlets
- Safety First: When to DIY and When to Call an Electrician
- Tools and Materials You’ll Need
- Step-by-Step: How to Fix a Loose Outlet
- Step 1: Turn Off the Power and Confirm It’s Off
- Step 2: Remove the Cover Plate and Inspect the Outlet
- Step 3: Try Tightening the Outlet Mounting Screws
- Step 4: Use Outlet Spacers or Shims
- Step 5: Install an Electrical Box Extender (For Deep Boxes)
- Step 6: Secure a Loose Electrical Box (If the Box Itself Moves)
- Step 7: Reassemble and Test the Outlet
- What If Plugs Fall Out but the Outlet Doesn’t Move?
- Code and Safety Tips to Keep in Mind
- How to Prevent Loose Outlets in the Future
- Real-Life Experiences and Practical Tips on Fixing Loose Outlets
- Conclusion: A Small Fix with a Big Safety Payoff
You go to plug in your phone charger, and the outlet wiggles like a loose tooth.
Or the plug just slides right back out like it’s offended you even tried.
Annoying? Absolutely. But a loose electrical outlet is more than a daily nuisance
it can also be a genuine safety hazard if you ignore it.
The good news: in many cases, you can fix a loose outlet yourself with a few basic tools,
some outlet spacers, and a healthy respect for your home’s electrical system.
This guide walks you through how to fix loose outlets step by step, when it’s safe to DIY,
and when you should call a licensed electrician instead.
Why a Loose Outlet Is More Than Just Annoying
A loose outlet might not look dangerous, but behind the wall it can cause trouble.
When plugs don’t fit snugly or the entire receptacle moves inside the wall box,
it can lead to:
- Arcing: Intermittent contact between the plug and outlet can cause tiny electrical arcs, which generate heat.
- Heat buildup: Loose connections can overheat the outlet, wires, or even nearby materials like insulation or wood framing.
- Shock risk: If the outlet shifts and exposes live components, someone touching the cover plate could be at risk.
- Device damage: Flickering power isn’t just annoying it can be hard on electronics and appliances.
Electricians and safety experts consistently warn that loose outlets are a fire and shock hazard
that shouldn’t be ignored. Fixing the problem promptly is a small project that can prevent much bigger issues later.
Common Signs and Causes of Loose Outlets
Signs Your Outlet Is Loose
You probably have a loose outlet if you notice any of these:
- The entire outlet shifts backward, forward, or side-to-side when you plug or unplug something.
- There’s a visible gap between the outlet and the wall plate or between the plate and the wall.
- Plugs fall out easily or feel barely held in place.
- The cover plate won’t sit flat or keeps cracking around the screws.
Why Outlets Become Loose Over Time
Even a properly installed outlet can loosen as years go by. Common causes include:
- Age and wear: Screws loosen, plastic parts fatigue, and the box or outlet shifts with use.
- Deep or recessed boxes: The electrical box is set too far back from the finished wall surface, leaving the outlet “floating” in space.
- Damaged drywall: Crumbling drywall around the box makes it hard for the outlet or plate to hold firmly.
- Too-short mounting screws: The original screws don’t reach far enough once tile, paneling, or shiplap is added.
- Heavy use: Frequently plugging and unplugging big adapters, chargers, or kitchen appliances puts stress on the outlet and box.
Safety First: When to DIY and When to Call an Electrician
Before you do anything: if you are not comfortable working around electricity, call a licensed electrician.
There is no shame in outsourcing anything that might zap you.
Call an electrician instead of DIY if you notice:
- Burn marks, discoloration, or melted plastic on the outlet or cover plate.
- A burning smell, sizzling, or popping sounds from the outlet.
- Very old outlets with two-prong (ungrounded) receptacles you want upgraded.
- Aluminum wiring, knob-and-tube wiring, or any wiring you don’t recognize.
- The breaker trips repeatedly when that outlet is used.
- The outlet is in a damp or wet location (bathroom, outdoors, near a sink) and appears damaged.
In those situations, the problem may go beyond “a little loose” and into “serious wiring issue” territory.
A pro can check the entire circuit, verify grounding, and make sure everything meets current electrical codes.
Tools and Materials You’ll Need
For a typical loose outlet repair (where the outlet works but just moves around), you’ll want:
- Non-contact voltage tester (to ensure the power is off)
- Flat-head and Phillips screwdrivers
- Outlet spacers or shims (plastic outlet spacers, nylon washers, or fiber shims)
- Electrical box extender (for recessed boxes)
- Longer 6-32 outlet screws (if needed)
- Flashlight or headlamp
- Safety glasses
These parts are inexpensive and widely available at home centers and hardware stores.
Many kits are specifically marketed as “outlet spacers” or “box extenders” to fix loose outlets safely and quickly.
Step-by-Step: How to Fix a Loose Outlet
Step 1: Turn Off the Power and Confirm It’s Off
- Go to your electrical panel and locate the breaker that controls the outlet’s circuit.
- Switch the breaker to the OFF position.
- Back at the outlet, plug in a small lamp or use a receptacle tester to confirm it has no power.
- Use a non-contact voltage tester on the outlet slots and around the box before touching anything.
If your tester lights up or beeps anywhere on the outlet, stop and check the breaker again.
Never assume the power is off without testing.
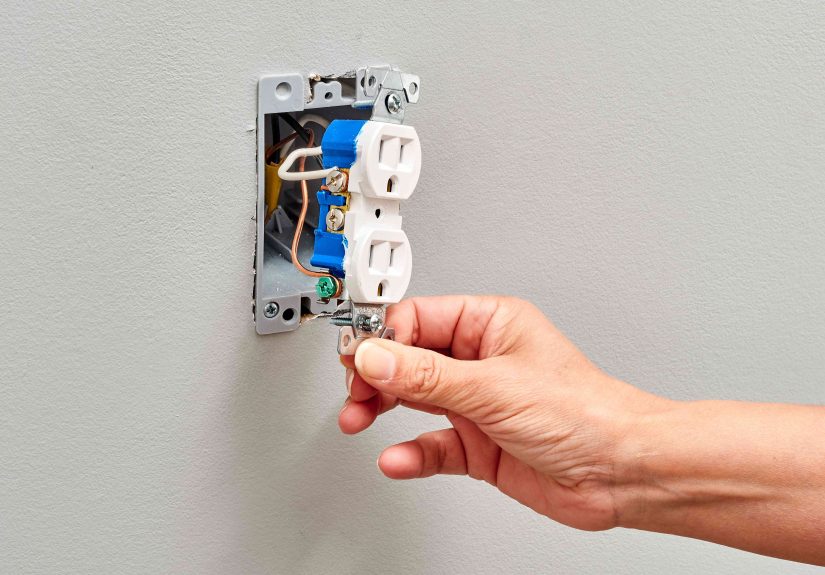
Step 2: Remove the Cover Plate and Inspect the Outlet
- Use a screwdriver to remove the screws holding the cover plate in place.
- Carefully take off the plate and set it aside.
- Look inside: is the outlet sitting crooked, or is there a gap between the outlet “ears” and the wall surface?
- Check for obvious damage like melted plastic, loose wires, or frayed insulation. If you see any, call an electrician.
Step 3: Try Tightening the Outlet Mounting Screws
In some cases, the fix is as simple as tightening the screws that hold the outlet to the electrical box.
- Locate the two screws in the center of the outlet, one at the top and one at the bottom.
- Gently tighten them with a screwdriver while holding the outlet so it sits straight.
- Do not overtighten; you want the outlet snug, not crushing the plastic or stripping threads.
If the outlet is now solid and sits flush with the wall, you may be done.
But if it still moves or the box is recessed deeper than the wall, you’ll need spacers or a box extender.
Step 4: Use Outlet Spacers or Shims
If the box is slightly recessed common when tile or paneling was added after the box was installed
spacers help “bridge the gap” so the outlet can be tightened securely.
- Loosen the outlet mounting screws enough that the outlet can move forward a bit, but leave the wires attached.
- Slide plastic outlet spacers or shims over the screws between the outlet “ears” and the electrical box tab.
- Stack spacers as needed until the outlet will sit flush with the finished wall surface.
- Retighten the mounting screws, keeping the outlet straight and level as you tighten.
Properly shimmed, the outlet should no longer rock in the wall, and the cover plate should sit flat without bending or cracking.
Step 5: Install an Electrical Box Extender (For Deep Boxes)
If the box is more than about 1/4 inch behind the wall surface, an electrical box extender is often a better fix than stacking many spacers.
- With the power still off, remove the outlet mounting screws and carefully pull the outlet forward.
- Without disconnecting wires, slide the plastic or metal box extender into the existing box opening.
- Secure the extender according to the manufacturer’s instructions (usually with screws that tie into the original box).
- Push the outlet back into place within the extender and reinstall the mounting screws.
The extender brings the box “out” to meet the wall surface, which is safer and more code-friendly than leaving wires exposed in a recessed cavity.
Step 6: Secure a Loose Electrical Box (If the Box Itself Moves)
Sometimes the real problem is that the entire electrical box is loose in the wall, especially in older drywall or plaster.
You have a few options:
-
Old-work box with clamps: If you have an “old work” plastic box, check the side clamps or wings.
Tighten the screws so the wings grip the drywall firmly. -
Re-secure to framing: For metal boxes originally mounted to studs, you may be able to add screws or a repair bracket
that fastens the box to nearby framing. -
Replace the box: If the box is cracked, badly bent, or the drywall around it is destroyed, replacing it with a new
old-work box might be the safest option. This is often a good time to call in an electrician if you’re unsure.
A secure box is the foundation of a solid, non-wobbly outlet if the box moves, the outlet will never feel stable.
Step 7: Reassemble and Test the Outlet
- Once the outlet is firmly secured, reinstall the cover plate.
- Make sure the cover plate sits flat against the wall and that the outlet is centered in the opening.
- Return to the electrical panel and turn the breaker back on.
- Plug in a small device or use a receptacle tester to confirm the outlet works correctly.
- Try plugging and unplugging a few times; the outlet should feel solid with no wobble.
What If Plugs Fall Out but the Outlet Doesn’t Move?
Sometimes the outlet doesn’t wobble, but plugs barely stay in. That usually means the outlet’s internal contacts are worn out.
In that case, the safest fix is to replace the receptacle entirely rather than try to “tighten” anything.
Replacing a receptacle is a common DIY project if you’re comfortable working with wiring, but you must:
- Turn the power off and confirm it’s off at the outlet.
- Note where each wire (hot, neutral, ground) is connected before removing the old outlet.
- Match the amperage (typically 15A or 20A) and type (standard, GFCI, tamper-resistant) of the original outlet.
- Ensure all connections are tight under the proper terminal screws and that no bare copper is exposed.
If any part of that feels over your comfort level, bringing in an electrician is money well spent.
Code and Safety Tips to Keep in Mind
- Most electrical codes require the box front edge to be nearly flush with the wall surface, not deeply recessed.
- Use box extenders in combustible walls (like wood framing with drywall) if the box is recessed.
- In locations where GFCI protection is required (bathrooms, kitchens, outdoors, garages, basements), don’t “downgrade” the outlet.
- Never stuff wires back into a too-small box; overcrowding can cause overheating and code violations.
- If multiple outlets feel loose on the same wall, it might signal broader installation issues worth a professional inspection.
How to Prevent Loose Outlets in the Future
Once your outlets are solid again, a few habits can help them stay that way:
- Don’t yank cords out by the wire; always pull from the plug.
- Avoid cheap, oversized adapters that put heavy leverage on the outlet.
- Use surge strips on a short cord rather than plugging multiple heavy devices directly into a single outlet.
- When remodeling, make sure your electrician sets box depth correctly for any new tile, paneling, or wainscoting.
- Include a quick “wiggle test” of outlets in your regular home maintenance checklist.
Real-Life Experiences and Practical Tips on Fixing Loose Outlets
If you’ve never fixed a loose outlet before, it can sound more intimidating than it really is.
In practice, most homeowners report that once they try it carefully one time, it becomes a 10–20 minute task they’re comfortable repeating throughout the house.
Imagine a typical scenario: you move into an older home and discover half the outlets in the living room are loose.
When you pull off the first cover plate (after shutting off the power, of course), you find the electrical box is set back behind
a layer of paneling that was added decades after the original wiring. The outlet “ears” are barely reaching the box, so tightening
the screws doesn’t make it any more secure. This is where box extenders really earn their keep. Once you slip an extender over the box
and set the outlet back into place, the whole assembly lines up better suddenly the cover plate sits flat, the outlet stops wiggling,
and your plugs stop trying to escape.
Another common experience: a kitchen with frequently used appliance outlets. Toasters, coffee makers, air fryers, and blenders get
plugged in and unplugged daily, often with some extra force when someone is in a morning hurry. Over the years, the outlet screws loosen
and the drywall around the box can start to crumble. Homeowners often notice cracked cover plates long before they realize the box itself
is unstable. When they finally open it up, they’re surprised to see just how much the box shifts inside the wall. In these cases,
a combination of outlet spacers and a sturdier old-work box that clamps firmly to the drywall can completely transform the feel of the outlet.
People also quickly learn how important a good non-contact voltage tester is. Many DIYers share stories about thinking a circuit was dead
because a lamp went off, only to discover thanks to the tester that a different half of the receptacle was still live or that the
lamp itself had a bad bulb. Testing each time before you touch wires becomes second nature and makes the whole process much less stressful.
There’s also the “plug-falls-out” situation, especially common in bedrooms and home offices. Laptop chargers, phone chargers, and small
power bricks slowly wear out the contact tension inside outlets. The outlet might look fine and feel solid, but nothing wants to stay plugged in.
Many homeowners initially try to “bend the prongs” of the plug or jam things into the outlet to tighten it both bad ideas. Once they learn that
a worn receptacle is inexpensive to replace and that a new, tamper-resistant outlet will grip plugs firmly again, they’re often surprised
at how much nicer their daily routine feels.
A big takeaway from these real-world experiences is that loose outlets rarely fix themselves, and they rarely stay “just a small annoyance.”
Addressing them early usually means a quick session with spacers or an extender instead of a larger repair later. Homeowners who tackle
loose outlets systematically going room by room with a tester, a bag of spacers, and a bit of patience often find that their home feels
noticeably more solid and safer when they’re done. Lights stop flickering, chargers stay put, and there’s peace of mind knowing that the outlets
you use every day are secured properly.
Finally, almost everyone who DIYs electrical work develops a healthy sense of when to stop and call a professional. If something looks odd,
if the wiring layout doesn’t match what you’ve seen in guides, or if there’s any sign of heat damage, it’s smart to pause the project.
A quick service call from a licensed electrician to check a suspicious outlet or circuit is far cheaper than dealing with fire or major electrical failure later.
Think of loose outlet repairs as part DIY skill, part safety habit and part knowing when to bring in reinforcements.
Conclusion: A Small Fix with a Big Safety Payoff
Loose electrical outlets are one of those household problems that are easy to ignore until something goes wrong.
Fortunately, in many cases, fixing them is straightforward: shut off the power, inspect the outlet, secure it with spacers or an extender,
and make sure the box is solid and up to code. Along the way, you reduce fire risk, protect your electronics, and make your home feel more put-together.
If you ever run into signs of overheating, damaged wiring, or confusing circuitry, bring in a licensed electrician.
But for a typical loose outlet that just needs a little support, a simple DIY repair can make your everyday life safer and a lot less wobbly.


