Table of Contents >> Show >> Hide
- Start With a Backyard Reality Check (Before You Buy 14 Plants Named “Low Maintenance”)
- Measure, Sketch, and Budget (The Part That Saves You Money and Mild Tears)
- The DIY Landscaping Big Three: Soil, Water, and Edges
- Hardscape That Doesn’t Shift, Sink, or Wobble
- Planting Plan: Choose Plants With Your Climate (Not Just Your Feelings)
- Mulch Like a Pro (Not Like a Volcano Enthusiast)
- Watering and Irrigation: Save Your Plants (and Your Water Bill)
- Finishing Touches That Make It Feel “Done”
- Common DIY Backyard Makeover Mistakes (So You Don’t Accidentally Invent New Problems)
- Backyard Makeover Experiences: What DIYers Commonly Learn (500+ Words of Real-World Wisdom)
- Conclusion
- SEO Tags
A backyard makeover is basically a glow-up for the part of your property that’s supposed to feel like “relaxation”
but sometimes looks like “nature is winning.” The good news: you don’t need a landscape architecture degree, a
reality-TV crew, or a mysterious cousin named “Stu with a skid steer” to pull off a DIY landscaping project that
feels polished, functional, and easy to maintain.
This guide walks you through a smart, homeowner-friendly processhow to plan, where to spend, what to DIY,
what to avoid, and how to finish with a yard that looks intentional (instead of “we moved the clutter outside”).
Start With a Backyard Reality Check (Before You Buy 14 Plants Named “Low Maintenance”)
1) Define the problem in plain English
Walk your yard with your phone camera and a notebook. Don’t start with style. Start with pain points:
puddles after rain, a muddy path to the grill, a slope that sends mulch downhill like it’s late for work, a patio
that’s too small, zero shade, or a lawn that’s basically a crabgrass daycare.
2) Create “zones” like a tiny backyard city planner
Most successful backyard makeovers use 3–5 zones, even in small yards:
- Hangout zone (patio, deck, seating circle)
- Path zone (how you move: gate to door, door to grill, door to shed)
- Green zone (lawn, groundcovers, garden beds)
- Utility zone (trash bins, AC unit clearance, storage, compost)
- Buffer zone (privacy plants, fence line, sound/visual softening)
This “zone thinking” keeps your project from becoming a random collection of good ideas that don’t work together.
3) Decide your makeover stylethen translate it into materials
Style is helpful, but materials are what actually happen. Here are easy translations:
- Modern: large pavers, gravel, clean edging, simple plant palette
- Cottage: curved beds, layered blooms, winding paths, mixed textures
- Coastal/relaxed: light gravel, grasses, weathered wood, soft lighting
- Desert/water-wise: rock mulch, drought-tolerant plants, drip irrigation
Measure, Sketch, and Budget (The Part That Saves You Money and Mild Tears)
Make a quick map you can actually use
Measure the yard roughly with a tape, pacing, or a measuring wheel. Sketch major features: house, doors,
fences, trees, slopes, downspouts, and any “do not move” items (utilities, mature trees, property lines).
Add sunlight notes: where you get full sun, part sun, and shade.
Budget like a realist, not an optimist
DIY landscaping costs can balloon fast because the “little things” (gravel delivery, edging, fasteners,
soil amendments) are never little. A practical approach:
- Spend on structure: drainage fixes, hardscape base materials, quality edging
- Save on finishes: smaller plants (they grow), DIY mulch/rock spreading, solar lighting
- Plan for surprises: reserve a buffer for broken irrigation lines, hidden roots, or the
concrete chunk you discover from the previous owner’s 1998 “vision.”
The DIY Landscaping Big Three: Soil, Water, and Edges
Soil: test first, guess less
Your soil determines whether your plants thrive or simply exist in a long, dramatic struggle. A basic soil test can
tell you pH, organic matter, and key nutrientsespecially useful if you’re planting beds, reseeding lawn areas, or
trying to stop a “why is everything yellow?” situation.
DIY shortcut that still works: amend planting areas with compost (especially if soil is compacted or low in organic
matter), and loosen planting beds rather than just digging single holes in hard clay (roots hate the “flowerpot effect”).
Water: fix drainage before you beautify
If water pools or flows toward your house, don’t cover the symptom with pretty mulch and hope it behaves.
Consider solutions that match the problem:
- Small puddles in low spots: regrade lightly, add a shallow swale, or install a dry creek bed
- Consistent soggy areas: French drain or a rain garden designed to capture and absorb runoff
- Downspout trouble: extend discharge away from the foundation and into a safe drainage area
Edges: the secret sauce of “finished”
Clean boundaries make a yard look intentional. Edging also prevents grass invasion, keeps mulch in beds, and
helps pathways hold their shape. You can DIY this with metal edging, pavers, brick, or even a crisp spade-cut edge
(classic, cheap, and surprisingly classy).
Hardscape That Doesn’t Shift, Sink, or Wobble
Pick your path and patio type
The most DIY-friendly, high-impact hardscape options:
- Paver patio: durable, looks upscale, requires careful base prep
- Gravel patio: quick, budget-friendly, excellent drainage, needs strong edging
- Stepping-stone path: easy weekend project, great for connecting zones
- Mulch path: cheapest, nicest underfoot, but needs refreshes
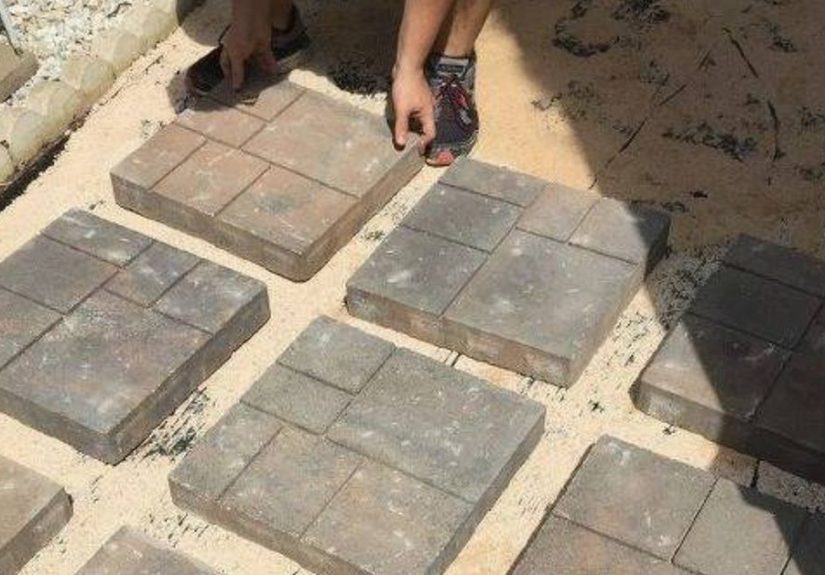
A simple, stable paver base approach
The patio’s “pretty layer” is only as good as what’s underneath. A typical pedestrian paver project involves
excavation, a compacted base layer, a leveling layer, and careful layout. If you rush the base prep, you’ll get
settling, shifting, and the classic “my patio now has a personality” problem.
Example backyard layout that works in real life
Imagine a 20′ x 30′ backyard:
- Hangout zone: a 10′ x 12′ paver or gravel patio near the back door
- Path zone: a straight or gently curving path to the shed/gate
- Green zone: a small lawn rectangle (easy to mow), plus two planting beds
- Buffer zone: taller shrubs or ornamental grasses along the fence for privacy
Notice what’s missing: complicated curves everywhere, tiny lawn islands you can’t mow, and a dozen plant types
that all want different care. Your future self appreciates this restraint.
Planting Plan: Choose Plants With Your Climate (Not Just Your Feelings)
Use your hardiness zone and your sunlight map
A plant can be “easy” and still fail if it’s not suited to your climate or exposure. Start by confirming your USDA
Plant Hardiness Zone and choosing perennials rated for that zone. Then match plants to your yard’s actual light:
full sun means 6+ hours; shade means less.
Build layers for a designer look
Landscape beds look best when they’re layered:
- Back layer: shrubs or tall grasses (structure and privacy)
- Middle layer: medium perennials (color, texture, long bloom season)
- Front layer: low perennials/groundcovers (soft edges, fewer weeds)
“Low maintenance” is a strategy, not a plant label
The lowest-maintenance landscapes usually share a few features:
- Fewer plant varieties (repeated in groups of 3, 5, or 7)
- Mulch or rock coverage to reduce weeds and stabilize moisture
- Plants chosen for the site (not “site forced to suit the plants”)
- Clear irrigation plan (drip for beds, smart scheduling for lawns)
Mulch Like a Pro (Not Like a Volcano Enthusiast)
Mulch depth matters
Mulch helps conserve moisture, moderate soil temperature, and reduce weedsif applied correctly. A moderate
layer is generally best for beds, while trees and shrubs often benefit from a deeper ring (without touching the trunk).
Keep mulch off trunks and stems
Avoid piling mulch against tree trunks or plant crowns. That “mulch mountain” can trap moisture where it doesn’t
belong and invite pests and rot. Think “donut,” not “volcano.”
Watering and Irrigation: Save Your Plants (and Your Water Bill)
Water deeply, not constantly
Frequent shallow watering trains plants and lawns to develop shallow roots, making them less resilient. A better
approach is deeper, less frequent wateringespecially during establishment.
Water at the right time
Early morning watering is often recommended because it reduces evaporation and allows foliage to dry, lowering
disease risk. If you use an irrigation controller, consider upgrading to a WaterSense-labeled smart controller so your
schedule adapts to conditions rather than watering during a rainstorm out of pure habit.
Finishing Touches That Make It Feel “Done”
Lighting (the cheapest magic trick)
Add path lights for safety and string lights or warm accent lights for ambiance. Lighting is one of the fastest ways
to make an ordinary yard feel like an outdoor room.
Seating and shade
If you have one “anchor” piecelike a simple dining set, a fire pit circle, or a hammock standthe whole yard
feels purposeful. Shade can come from a pergola, sail shade, umbrella, or well-placed tree (the long game).
Storage that doesn’t ruin the vibe
A small deck box or tidy corner for tools keeps the space functional. The goal is a yard that’s easy to live in, not
a museum where you’re afraid to sit down.
Common DIY Backyard Makeover Mistakes (So You Don’t Accidentally Invent New Problems)
- Skipping drainage fixes: pretty plants won’t solve standing water.
- Underbuilding hardscape bases: patios settle; your confidence follows.
- Planting everything as a “single”: groups look better and are easier to maintain.
- Overcomplicating the layout: mowing should not feel like a video game.
- Mulch volcanoes: trees do not enjoy being slowly dampened into misery.
Backyard Makeover Experiences: What DIYers Commonly Learn (500+ Words of Real-World Wisdom)
DIY backyard makeovers tend to teach the same lessonsusually right after the first weekend, when the excitement
is high and your arms are suddenly introduced to muscles you didn’t know existed. One of the most common
experiences is underestimating demolition and cleanup. Pulling out old edging, removing weeds, or scraping out
gravel sounds quick until you realize the yard has been quietly manufacturing roots, rocks, and random buried
debris for years. Many DIYers find it helps to schedule “ugly work” first: one full day for clearing, hauling, and
leveling before any “fun” shopping happens. It’s not glamorous, but it prevents the classic mistake of buying
plants and then leaving them in pots for three weeks while you wrestle with the ground.
Another frequent takeaway is that straight lines are emotionally calming. People love a Pinterest-perfect curvy bed,
but curves require careful layout and consistent edging, and they often add time and materials. A simple straight
path from the door to the main hangout zone tends to feel clean, modern, and surprisingly “designed.” Curves work
best when they’re intentionallike guiding you around a feature bed or creating a softer transition along a fence
not when they happen because the string line got moved by the wind and a moment of indecision.
Plant selection is also where real-life experience kicks in. Many DIYers start out wanting maximum varietyone of
everythingthen realize that repetition is what makes a landscape look cohesive. A bed with three reliable plant
types repeated in groups often looks more professional than a bed with twelve different plants each doing their own
thing. People also learn to respect mature size. That adorable shrub labeled “compact” can still become a
space-hog in a few seasons. A common strategy is to plant smaller sizes initially, space according to mature width,
and fill gaps with annuals for the first year. That way the bed looks full now, but you’re not forced into aggressive
pruning later.
DIYers also report that edging is the make-or-break detail. When edging is installed well, the yard looks tidy even
before the plants fill in. When edging is skipped, mulch creeps into the lawn, grass creeps into the beds, and the
entire space slowly returns to “soft chaos.” The experience of maintaining the yard becomes easier tootrimming,
mowing, and refreshing mulch feels straightforward because the boundaries are clear.
Finally, there’s the emotional win: once the basic structure is indrainage handled, a patio you can stand on, a path
you can walk onthe yard becomes livable even if the planting plan is still evolving. Many homeowners find that a
backyard makeover doesn’t need to be finished in one go. It just needs a functional “phase one” so the space can
be enjoyed while you refine the details over time. That’s the real Hometalk-style win: steady progress, visible
transformation, and a space that feels better every month you live with it.
Conclusion
A great DIY backyard makeover is less about doing everything and more about doing the right things in the right
order: plan your zones, fix drainage, build solid hardscape foundations, choose plants that match your climate and
light, and finish with clean edges, correct mulching, and smart watering. The result is a yard that looks intentional,
functions smoothly, and doesn’t demand constant maintenance like a needy houseplant with opinions.


