Table of Contents >> Show >> Hide
- Step 1) Map the problem (don’t guessmeasure)
- Step 2) Fix the “free” improvements first
- Step 3) Place the router like it’s the sun (centered and elevated)
- Step 4) Use the right band (2.4 GHz vs 5 GHz vs 6 GHz) on purpose
- Step 5) Reduce interference (your Wi-Fi isn’t “weak,” it’s being interrupted)
- Step 6) The best way to extend Wi-Fi: add a wired access point
- Step 7) Consider mesh Wi-Fi for whole-home coverage (especially if you can’t run Ethernet)
- Step 8) Use Ethernet backhaul whenever you can (mesh gets a turbo boost)
- Step 9) If you choose a Wi-Fi extender, place it correctly (or it will politely fail)
- Step 10) Test, tune, and lock it in (the “set it and forget it” part)
- Common “Why is it still slow?” scenarios (and what they usually mean)
- Conclusion: Extend Wi-Fi coverage the smart way
- Extra: of Real-World Experience (the stuff manuals don’t warn you about)
Your Wi-Fi has two jobs: (1) deliver internet everywhere you actually sit, and (2) avoid embarrassing you during video calls.
If it’s failing at either, don’t panic-buy “the biggest router” like it’s a monster truck. Extending a wireless network is
mostly about smart placement, smarter gear choices, and a tiny bit of detective work.
Below are 10 practical, real-world steps to extend Wi-Fi coveragewhether you’re battling a basement dead zone, a backyard camera,
or the dreaded “one bar in the bedroom” situation. We’ll cover router placement, mesh Wi-Fi, extenders, access points, backhaul,
interference, and how to test so you’re not just feeling fasteryou’re actually faster.
Step 1) Map the problem (don’t guessmeasure)
Before you buy anything, figure out where the signal drops and why. Wi-Fi issues usually come from:
distance, obstacles (brick, concrete, metal), interference, or a router that’s simply outmatched by your space.
What to do
- Walk your home with a phone or laptop and note “good,” “meh,” and “nope” zones. Pay attention to spots where you stream, game, or take calls.
- Run a few speed tests near the router and in the dead zone. If the router area is also slow, your issue might be ISP speed or modem/router limits.
- Use your router/mesh app’s signal tools if available (many systems show node quality, device connections, and health checks).
This step saves money because it tells you whether you need a small fix (better placement) or a structural solution (mesh or wired access points).
Step 2) Fix the “free” improvements first
Extending a wireless network gets easier when your existing network is healthy. Think of this as stretching before a workout:
boring, but it prevents injuries (to your patience).
Quick wins
- Update firmware on routers, extenders, or mesh nodes for stability, security, and performance improvements.
- Reboot strategically: modem first, then router, then extenders/nodes. Yes, it’s cliché. It’s also effective.
- Check for bandwidth hogs: cloud backups, game downloads, security camera uploads, and 4K streaming can saturate slower connections.
- Separate “slow legacy” devices if needed: IoT gadgets can clutter the 2.4 GHz band. A guest/IoT network can reduce chaos.
If your baseline is shaky, adding more Wi-Fi gear just spreads the shakiness fartherlike buttering burnt toast.
Step 3) Place the router like it’s the sun (centered and elevated)
Router placement is the most underrated way to improve Wi-Fi coverage. Wi-Fi signals weaken with distance and get bullied by dense materials.
If your router is hiding in a corner behind a TV and a stack of “important papers,” it’s doing its best… but its best is tragic.
Placement rules that actually work
- Centralize it: place the router near the middle of the home (or the middle of where you use Wi-Fi most).
- Elevate it: shelf height beats floor level. Avoid stuffing it in cabinets.
- Give it air: open space is better than “tucked behind electronics.” Metal and big screens can block signal.
- Avoid interference zones: keep it away from microwaves, cordless phones, and dense appliance clusters.
If you can relocate the router even 10–15 feet to a more open, central spot, you may “extend Wi-Fi range” enough to erase one or two dead zonesno new gear required.
Step 4) Use the right band (2.4 GHz vs 5 GHz vs 6 GHz) on purpose
A lot of wireless network extension problems are really “band choice” problems. Here’s the cheat sheet:
2.4 GHz travels farther and penetrates walls better, but it’s slower and more crowded.
5 GHz is faster with less interference, but range is shorter.
6 GHz (Wi-Fi 6E/7) can be very fast and clean, but has the shortest practical range and needs compatible devices.
How to apply this in real life
- If your far rooms struggle, ensure they can use 2.4 GHz (especially for smart devices and cameras).
- If you’re near the router or a wired mesh node, aim for 5 GHz (and 6 GHz if you have it) for speed-sensitive tasks.
-
For reliability in congested neighborhoods, consider conservative settings like 20 MHz channel width on 2.4 GHz.
Wider channels can be faster but may be less stable in busy environments.
Many modern systems use band steering (one SSID, it auto-selects bands). That’s convenientuntil one stubborn device picks the “wrong” band.
If you have finicky gadgets, creating separate SSIDs for 2.4 and 5 GHz can be a practical workaround (not mandatory, just useful).
Step 5) Reduce interference (your Wi-Fi isn’t “weak,” it’s being interrupted)
Wi-Fi shares space with neighbors, Bluetooth, and a bunch of household electronics. Interference can mimic range issues:
you see full bars, but performance is inconsistentlike a car with a full tank and square wheels.
What to do
- Pick cleaner channels: On 2.4 GHz, channels 1/6/11 are the usual non-overlapping options in North America.
- Prefer 5 GHz for performance devices (streaming sticks, consoles, work laptops) when signal is strong.
- Move Wi-Fi gear away from big electronics, dense wiring closets, and “kitchen appliance alley.”
- If you have multiple extenders/nodes, avoid placing them too close togetheroverlapping coverage can create more competition than improvement.
If you want a simple test: temporarily move your laptop/phone and router (if possible) to see whether performance changes dramatically.
If it does, interference or obstruction is likely the real villain.
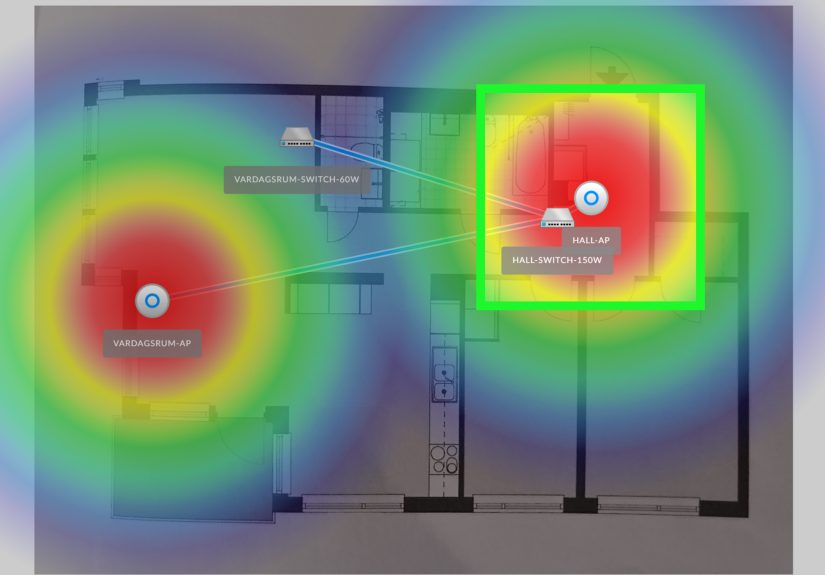
Step 6) The best way to extend Wi-Fi: add a wired access point
If you can run Ethernet (or already have Ethernet in the walls), this is the gold standard for extending a wireless network.
A wired access point creates a fresh Wi-Fi signal exactly where you need it, without the “repeat the signal and lose speed” penalty.
Common setups
- Router + 1 access point: perfect for a far wing, basement, or upstairs hallway.
- Multiple access points: best for large homes, small offices, and buildings with thick walls.
Practical tips
- Place the access point near the center of the problem area (not hidden in a closet).
- Use the same SSID/password as the main network (for smoother roaming) unless you want a dedicated network for specific devices.
- If your gear supports it, enable modern roaming assistance features (client devices ultimately decide when to switch, but the network can help).
If you’re deciding between “one more extender” and “one wired access point,” the access point wins for stability almost every time.
Step 7) Consider mesh Wi-Fi for whole-home coverage (especially if you can’t run Ethernet)
Mesh Wi-Fi is often the easiest “whole-home” fix: multiple nodes work together under one network name to improve coverage and roaming.
Mesh shines when you have multiple dead zones, multiple floors, or a home layout that laughs at single-router coverage.
Mesh placement that doesn’t sabotage itself
- Place nodes halfway toward weak areasnot directly inside dead zones where the node can’t get a good signal to begin with.
- Keep nodes in open areas and avoid cabinets, dense furniture, and behind large TVs.
- Avoid long chains of wireless hops. More wireless “relays” can reduce throughput; if possible, connect nodes with Ethernet backhaul.
Mesh is typically the better fit when you want seamless roaming and broad coverage. If you only have one stubborn room, a single extender or a wired access point may be more cost-effective.
Step 8) Use Ethernet backhaul whenever you can (mesh gets a turbo boost)
“Backhaul” is how your extender/mesh node talks back to the main router. If that backhaul is wireless, it competes with your devices for airtime.
If it’s wired (Ethernet), your Wi-Fi gets to focus on serving clients, not ferrying its own traffic around like a stressed-out waiter.
How to do it
- Mesh with Ethernet backhaul: run Ethernet to each node (or at least the farthest one).
- Easy upgrade path: start wireless today, add wired backhaul later if you can run cable or use existing wiring.
Even one wired node in the far area (like upstairs) can dramatically improve coverage and speed consistency. This is one of the highest-impact upgrades for extending Wi-Fi range in larger homes.
Step 9) If you choose a Wi-Fi extender, place it correctly (or it will politely fail)
A Wi-Fi range extender (aka repeater/booster) can be a good low-cost fix, but it has a rule:
it must receive a strong signal in order to extend a strong signal. Put it in the dead zone, and you’ve basically built a
motivational poster for your Wi-Fi instead of a solution.
Extender placement done right
- Halfway is the magic word: place the extender between the router and the dead zonewhere Wi-Fi is still decent.
- Go open and elevated: table height or higher, with breathing room.
- Watch the indicator lights (or app readings): many extenders show “good/ok/bad” connection quality.
- If possible, use an extender with an Ethernet port so you can hardwire a TV/console or convert it into a wired access point mode.
Extenders can also create separate network names (like “Network_EXT”). That can be fine for stationary devices, but mesh systems are usually smoother if you move around a lot.
Step 10) Test, tune, and lock it in (the “set it and forget it” part)
Once you’ve added a node, extender, or access point, do a quick tuning cycle. This is where good networks become great networks.
A simple tuning checklist
- Re-test speeds in the same spots you tested in Step 1 (same device, same time of day if possible).
- Check roaming: walk around during a call. If you drop, adjust node placement or consider using mesh instead of a basic extender.
- Adjust placement by 3–6 feet: tiny moves can change signal paths around walls and appliances.
- Confirm security: use WPA2/WPA3, change default admin passwords, and keep firmware updated.
- Document the setup: snap a photo of labels and note which device is where. Future-you will be grateful.
Your goal is not just “more bars,” but better real-world performance: stable video calls, smooth streaming, and consistent latency for gaming.
Common “Why is it still slow?” scenarios (and what they usually mean)
You extended coverage, but speeds got worse
This often happens when the extender/node is too far from the router, or when wireless backhaul is overloaded. Move the extender closer,
reduce the number of wireless hops, or switch to Ethernet backhaul (or a wired access point).
You have full signal, but video calls stutter
That’s frequently interference or congestion. Try 5 GHz for work devices, pick cleaner channels, and keep Wi-Fi gear away from heavy electronics.
Also check if someone is uploading huge files during your calls (your network isn’t brokenyour roommate is just enthusiastic).
Your smart devices won’t connect after upgrades
Many IoT devices prefer 2.4 GHz. If your system uses one SSID for everything, temporarily disable “band steering” (if possible),
or create a dedicated 2.4 GHz network for setup. Once connected, they usually behave.
Conclusion: Extend Wi-Fi coverage the smart way
Extending a wireless network isn’t about buying the fanciest boxit’s about building a clean signal path. Start by measuring where the problem is,
fix the basics (placement, firmware, interference), then pick the right tool:
wired access point for best performance, mesh Wi-Fi for whole-home coverage, or a properly placed extender for a targeted fix.
Do it in that order, and you’ll stop playing “Wi-Fi Whac-A-Mole” every time someone walks upstairs.
Extra: of Real-World Experience (the stuff manuals don’t warn you about)
I’ve seen more “Wi-Fi dead zones” caused by furniture choices than by bad hardware. The classic example: the router placed inside a media cabinet
because someone wanted “a clean look.” Congratulationsyour router is now living in a wooden cave next to a television, a soundbar, and twelve tangled HDMI cables.
Wi-Fi signals don’t thrive in caves. They thrive in open air, up high, and away from big electronics that behave like signal bullies.
Another greatest hit: the extender plugged into the dead zone “because that’s where the Wi-Fi is bad.” That feels logical, but it’s like putting a water pump
in the desert and expecting it to refill a swimming pool. Extenders need a decent upstream signal. When people move the extender into a hallway or adjacent room
(where the router signal is still strong), the network suddenly feels “magically fixed.” It’s not magicit’s physics with better manners.
Mesh systems add their own flavor of learning. People often place nodes where they want Wi-Fi to be perfectlike the far corner bedroomthen get confused when
the node reports a weak connection. The best mesh layouts usually look boring: a node in the hallway, one near the stairs, one near the back of the house.
You’re building a chain of strong links, not a set of lonely islands. If your mesh app says a node has a “poor” connection, believe it. That app is basically
your network’s way of saying, “I can’t hear you; please stop yelling from three rooms away.”
Here’s a sneaky one: people upgrade to blazing-fast internet and assume Wi-Fi will automatically keep up. But older devices and older Wi-Fi standards can cap
speeds, especially on 2.4 GHz. You can have gigabit service and still see “meh” speeds on a five-year-old laptop across the house. That doesn’t mean your ISP
is lyingit means your Wi-Fi link is the bottleneck. In practice, the easiest “wow” upgrade is Ethernet backhaul or a wired access point in the problem area.
It turns your far room from “survivable” into “finally dependable.”
Last story: the backyard camera. Everyone wants Wi-Fi outside, but nobody wants to think about walls. Exterior walls (brick, stucco with metal mesh, foil-backed
insulation) can be brutal. The fix is rarely “more power.” It’s usually “put an extender or mesh node near the inside wall closest to the yard” or use a proper
outdoor access point if you truly need reliable coverage outside. Once you treat walls like the Wi-Fi villains they are, your network plan gets clearer fast.
The biggest lesson: treat Wi-Fi like lighting. One bright bulb in the basement won’t light the whole house. But two or three well-placed lamps? Suddenly,
everything looks betterand you stop tripping over stuff.


