Table of Contents >> Show >> Hide
- Before You Build: The 10-Minute Plan That Saves You 10 Hours
- Way #1: Build Freestanding 2×4 Shelving (The “Move It Anytime” Workhorse)
- Way #2: Build Wall-Mounted Shelves (The “Get Your Floor Back” Space Saver)
- Way #3: Build Overhead Ceiling Storage (The “Seasonal Stuff Lives Up There Now” Solution)
- Which Garage Shelving Method Should You Choose?
- Extra: Real-World Experiences and Lessons DIYers Learn Building Garage Shelving (500+ Words)
- Experience #1: “My floor is not level… and now my shelf looks nervous.”
- Experience #2: “I built ‘big shelves’ and somehow nothing fits.”
- Experience #3: “Screws are not magical weight lifters.”
- Experience #4: “Overhead storage is awesome… until you store the wrong things up there.”
- Experience #5: “The ‘final’ version is never the final version.”
- Conclusion: Build Shelving Once, Enjoy the Benefits Every Day
If your garage has become a museum of half-finished projects, holiday decorations from three administrations ago,
and a “temporary” pile that’s old enough to votegood news: shelves are the grown-up version of “just stack it nicer.”
The even-better news? You don’t need a fancy shop or a woodworking résumé to build garage shelving that’s sturdy, practical,
and tailored to your space.
In this guide, you’ll learn three proven DIY approaches to garage shelvingeach with a different “best use”:
(1) freestanding heavy-duty shelves for maximum flexibility, (2) wall-mounted shelving to reclaim floor space,
and (3) overhead ceiling storage for seasonal items that don’t deserve prime real estate.
Pick one, mix two, or go full “garage glow-up” and do all three.
Before You Build: The 10-Minute Plan That Saves You 10 Hours
1) Decide what you’re storing (and how annoying it is to lift)
Start by sorting items into three categories: heavy (paint, toolboxes, car parts),
bulky (coolers, totes, camping gear), and awkward (ladders, folding chairs, that mystery bin labeled “CORDS”).
Heavy items should live between waist and shoulder height when possible; overhead storage is best for light-to-medium seasonal stuff.
2) Measure your space like you mean it
- Depth: 16–24 inches works for most garage items without swallowing the walkway.
- Height between shelves: 14–18 inches is a common sweet spot for totes; customize to your bins.
- Clearances: Watch for garage door tracks, openers, water heaters, and the car you still plan to park inside “someday.”
3) Choose shelf decking that matches your reality
- Plywood (3/4 inch) is strong, stable, and less sag-prone.
- OSB is budget-friendly and works well when properly supported.
- 2x lumber slats allow airflow and let dust fall through (which is either a pro or a personal attack, depending on your sweeping habits).
4) Safety basics (because gravity is undefeated)
- If you’re attaching shelves to walls or ceilings, fasten into studs/joists, not just drywall.
- For heavy loads, use appropriately rated fasteners and a sensible safety margin.
- If a shelf will be tall, consider anchoring it to a wall to prevent tippingespecially in homes with kids, pets, or clumsy adults (so… all homes).
Way #1: Build Freestanding 2×4 Shelving (The “Move It Anytime” Workhorse)
Freestanding garage shelves are the classic DIY solution because they’re sturdy, affordable, and don’t require perfect walls.
They’re also ideal for renters (or commitment-phobes) because you can reposition them as your storage needs evolve.
Best for
- Heavy bins, paint, tools, bulk supplies
- Garages where walls are already packed or too uneven for easy mounting
- People who like rearranging (or who know they’ll rearrange no matter what they say today)
Skill level, cost, and time
- Skill: Beginner to intermediate
- Cost: Often one of the cheapest options (mostly 2x4s + decking)
- Time: One weekend for a solid unit, faster if you batch-cut parts
Materials (typical)
- 2×4 lumber for legs, frames, and supports
- 3/4-inch plywood or OSB for shelf surfaces
- Wood screws (construction-grade) and wood glue (optional)
- Shims (for uneven floors) and optional diagonal bracing
Build steps (simple and strong)
-
Pick your dimensions.
A common setup is 72 inches tall, 18–24 inches deep, and 48–96 inches wide.
Use your tote size to set shelf spacing (measure the bin height, add a couple inches for your hands). -
Build shelf “frames” first.
Each shelf is basically a rectangle (front/back rails + side pieces).
Add a center support if the span is long or if you’re storing heavy items. -
Use legs that carry the load.
The strongest DIY shelves transfer weight down the vertical postswood-to-woodrather than asking screws to do all the work.
A good trick: set shelf frames so they sit on ledges/blocks or are captured in a way that the weight bears on the posts. -
Square it up and stop the wobble.
Freestanding units can “rack” side-to-side if not braced.
Add diagonal bracing on the back or sides, or anchor the top to wall studs for peace of mind. -
Add decking.
Cut plywood/OSB panels to fit, then fasten them to the shelf frames.
If the garage gets damp, consider sealing edges or using paint to reduce swelling over time. -
Level the feet.
Garages often have sloped floors toward the door. Shim under legs so the unit sits solid.
A level shelf isn’t just prettyit keeps items from slowly migrating like they’re training for an escape room.
Pro tips for freestanding shelves
- Don’t overspan. Long shelves need center supports to prevent sag.
- Put heavy stuff low. The bottom shelf is your friend. Your back is also your friendtreat it that way.
- Label zones. Give each shelf a purpose (tools, car care, seasonal, sports). Otherwise everything becomes “misc.” by Tuesday.
Way #2: Build Wall-Mounted Shelves (The “Get Your Floor Back” Space Saver)
Wall-mounted garage shelving is how you turn wasted wall space into a storage machine.
It’s also how you stop tripping over bins like you’re in an obstacle course designed by your past self.
The key is fastening into studs and using supports that match the load.
Best for
- Clearing floor space for parking, a workbench, or general sanity
- Long runs of shelving along a wall
- Organized storage where you want items visible and reachable
Two strong wall-shelf styles
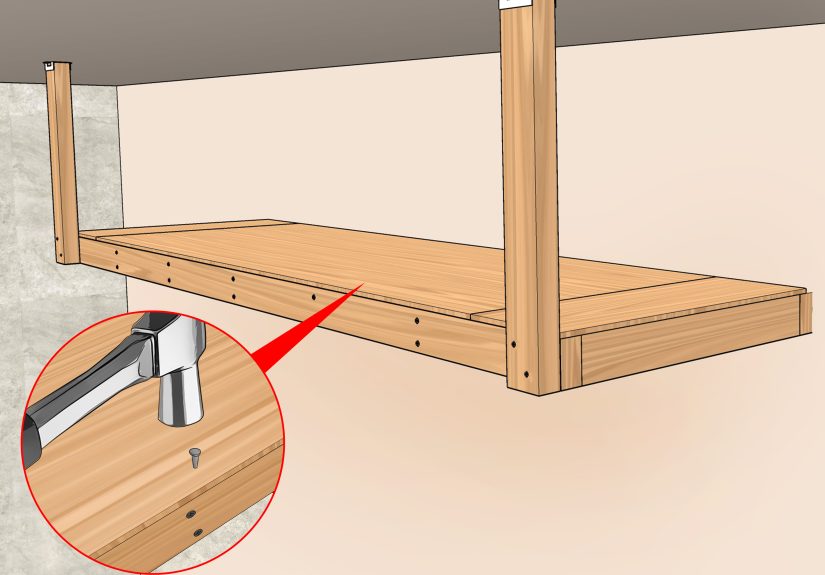
A) Ledger-and-bracket shelves (simple, sturdy, customizable)
This approach uses a horizontal ledger board fastened to studs, plus angled brackets or triangular supports
made from 2x4s. Add a front rail for stiffness, then top it with plywood/OSB.
- Find studs and mark a level line. Most garages use standard stud spacing; verify with a stud finder and/or small test holes.
- Install a ledger board into studs. Pre-drill, then use appropriate structural screws or lag fasteners for solid engagement.
- Build and install shelf brackets. Triangular brackets (a horizontal arm + diagonal brace) reduce bounce and increase capacity.
- Add a front support. A front rail tied into brackets keeps the shelf edge from sagging under load.
- Attach decking. Screw down plywood/OSB so it doesn’t shift when you slide bins on and off.
B) French cleat shelving (the “rearrange anytime” wall system)
French cleats use matching 45-degree beveled stripsone mounted to the wall, the other on the back of a shelf or holder.
The result: storage modules you can move around without constantly drilling new holes.
It’s perfect if your garage doubles as a workshop and your setup changes often.
- Create cleat strips. Rip plywood into strips and bevel them at 45 degrees (or buy pre-made cleats).
- Mount wall cleats into studs. Keep them level and evenly spaced so modules can hang wherever you need.
- Build shelf modules. Add a matching cleat piece to the back of each shelf unit so it hooks securely onto the wall cleats.
- Test and tune. Hang, check for snug fit, and add a small “keeper” screw at the bottom if you want extra security.
Pro tips for wall-mounted shelves
- Stud attachment matters most. Drywall isn’t structuraltreat it like a decorative layer, not a load-bearing hero.
- Use pilot holes for lag fasteners. Proper pilot holes help prevent splitting and improve holding strength.
- Design for what you actually own. If your bins are 27 gallons, build for 27 gallons. Don’t build “generic” shelves and then act surprised when nothing fits.
Way #3: Build Overhead Ceiling Storage (The “Seasonal Stuff Lives Up There Now” Solution)
The ceiling is the most underused storage zone in a garagemostly because it’s overhead and people understandably prefer
not to store things in a place where dropping them becomes a dramatic event. But when built and fastened correctly,
overhead storage is a game changer for lightweight seasonal bins, camping gear, and holiday decorations.
Best for
- Holiday décor, camping supplies, luggage, seasonal sports gear
- Clearing the “top shelf of doom” chaos from regular shelves
- Garages with enough ceiling height/clearance above vehicles
Two overhead approaches
A) Fixed overhead rack (simple platform)
- Map your obstructions. Identify garage door tracks, opener rails, lights, and clearance above your car.
- Locate ceiling joists. Fasten only into structural framing members, not just drywall.
- Build a rectangular frame. Use lumber sized for the span and planned load; add cross members for stiffness.
- Hang the frame securely. Use rated hardware and connections designed for overhead loads.
- Add a deck or slats. A plywood deck creates a continuous surface; slats can reduce weight and improve airflow.
B) Sliding overhead storage (totes that glide)
If you like the idea of overhead storage but hate the idea of wrestling bins down like you’re in a slow-motion action scene,
a sliding system can let totes move along rails. The concept is to create sturdy tracks mounted perpendicular to joists and
use storage bins that can slide in and out without lifting them over a lip.
Pro tips for overhead shelving
- Keep heavy items off the ceiling. Store lighter, bulkier things overhead and keep dense loads lower.
- Mind the garage door. Open and close it while you’re planningdoor tracks can steal more space than you think.
- Use help. Overhead installs are safer and easier with a second person.
Which Garage Shelving Method Should You Choose?
| Method | Best For | Main Advantage | Main Tradeoff |
|---|---|---|---|
| Freestanding 2×4 shelves | Heavy loads, flexibility | Strong, movable, low cost | Uses floor space unless tall and tight |
| Wall-mounted shelves | Open floors, long runs | Great space efficiency | Requires stud fastening and planning |
| Overhead storage | Seasonal items, totes | Uses “dead” space | Clearance + safe installation are critical |
Many garages end up using a combo: freestanding shelves for heavy tools and supplies,
wall shelves for daily-access items, and overhead storage for seasonal bins.
That mix keeps the floor clear, the heavy stuff safe, and your future self less likely to mutter,
“Why did I put that up there?”
Extra: Real-World Experiences and Lessons DIYers Learn Building Garage Shelving (500+ Words)
Garage shelving projects look simple on paperstraight lines, right angles, tidy bins. In real life, they teach you a few
humbling lessons about houses, gravity, and how many “standard” measurements are… not standard at all.
Here are some of the most common experiences DIYers run into, plus what they usually wish they’d done from the start.
Experience #1: “My floor is not level… and now my shelf looks nervous.”
Garages often slope toward the door for drainage, and older slabs can have dips or high spots.
First-time builders sometimes assemble a perfect rectangular shelving unit, stand it up, and realize it rocks like a café table
with one short leg. The fix is straightforwardshims under the legs or adjustable feetbut the lesson is bigger:
build with the real garage, not the imaginary one. Before you finalize shelf height, set the unit where it will live and check for
wobble. If you’re building wall-mounted shelves, take extra care to level your ledger boards even if the floor slopes,
otherwise your bins will slowly “walk” toward the low end over time like they’re late for a meeting.
Experience #2: “I built ‘big shelves’ and somehow nothing fits.”
This is the classic storage trap: you design shelves based on vibes (“that seems like enough depth”), then try to store your actual stuff
and discover you’re either wasting space or constantly playing bin Tetris. The DIYers who end up happiest tend to measure the biggest,
most common containers they useespecially storage totesand build around those dimensions. Many people also learn that 24-inch-deep shelves
can become “black-hole shelves” where items disappear behind the front row. If you’re storing small tool cases or car-care supplies,
a shallower shelf (16–20 inches) can be more usable because you can see everything at once. In short: design for retrieval, not just storage.
Experience #3: “Screws are not magical weight lifters.”
A shelf might look stout, but the way it carries weight matters. DIYers often discoversometimes after a noticeable sagthat a shelf relying
mainly on screws in shear (or worse, in pull-out) isn’t as strong as one where the load transfers down through posts and supports.
That’s why freestanding 2×4 shelves tend to last: when the shelf frame sits on the vertical legs, the weight bears on wood, not fasteners.
On wall shelves, the “aha” moment is similar: if you fasten into studs properly and use angled brackets or a cleat system,
the wall does the hard work. If you don’t, drywall will eventually remind you it’s basically compressed chalk with a good PR team.
Experience #4: “Overhead storage is awesome… until you store the wrong things up there.”
Overhead racks are a cheat code for space, but DIYers learn quickly that not everything belongs on the ceiling. The best overhead items are
bulky and relatively light: holiday décor, sleeping bags, inflatable pools, foam pads, and empty coolers. The worst overhead items are dense,
messy, or frequently used: paint, car fluids, heavy toolboxes, and anything you’d rather not have above your head on a hot day.
People also learn to plan for access: if you need a ladder every time, you’ll avoid using the storagethen clutter returns.
Many DIYers end up labeling overhead bins on multiple sides and grouping them by season so they’re not climbing up to hunt for one tiny item.
Experience #5: “The ‘final’ version is never the final version.”
The most realistic takeaway from garage shelving is that your storage needs change. A new hobby shows up, kids grow, tools multiply,
and suddenly your neatly planned layout feels tight. That’s why modular ideaslike French cleats or adjustable spacingoften win in the long run.
DIYers who leave themselves options (extra mounting points, a little open wall space, shelves that can be reconfigured) typically don’t have to
rip everything out to adapt. They just tweak. And that’s the real goal: not a picture-perfect garage forever, but a garage that stays usable
even when life gets messy.
Conclusion: Build Shelving Once, Enjoy the Benefits Every Day
Garage shelving is one of those rare DIY projects where the payoff is immediate: more floor space, less clutter, and way fewer
“Where did I put that?” moments. Choose freestanding 2×4 shelves if you want heavy-duty flexibility,
wall-mounted shelves if reclaiming floor space is the mission, and overhead storage for seasonal items that
shouldn’t hog everyday access. Start with the method that solves your biggest problem area, build it strong, and then enjoy the satisfying
feeling of a garage that finally works with you instead of against you.


