Table of Contents >> Show >> Hide
- What Is Meringue for Pie, Exactly?
- The Best Ingredients for Pie Meringue
- A Simple Meringue for One 9-Inch Pie
- How to Make Meringue for Pie Step by Step
- French, Swiss, or Italian: Which Meringue Works Best for Pie?
- How to Prevent Weeping, Shrinking, and Other Meringue Drama
- Best Practices for Storage and Serving
- Common Mistakes When Learning How to Make Meringue for Pie
- Which Pies Pair Best With Meringue?
- Final Thoughts
- Kitchen Experiences: What Making Meringue for Pie Really Feels Like
- SEO Metadata
If pie had a prom king, meringue would show up wearing a glossy crown and stealing the spotlight. A good pie meringue is light, swoopy, gently sweet, and just dramatic enough to make people think you attended pastry school for fun. A bad one, on the other hand, can slide, sweat, shrink, bead, weep, and generally behave like it just got dumped by a lemon filling. The good news is that making meringue for pie is not kitchen wizardry. It is technique, timing, and a little respect for egg whites.
If you want to learn how to make meringue for pie that is fluffy, stable, and beautifully bronzed on top, you do not need complicated ingredients or a secret handshake. You need egg whites, sugar, a clean bowl, and a few smart habits that keep your pie topping from turning into a sugary identity crisis. This guide walks through the process step by step, explains why meringue sometimes fails, and shows how to get that classic pie topping right without turning dessert into a science fair disaster.
What Is Meringue for Pie, Exactly?
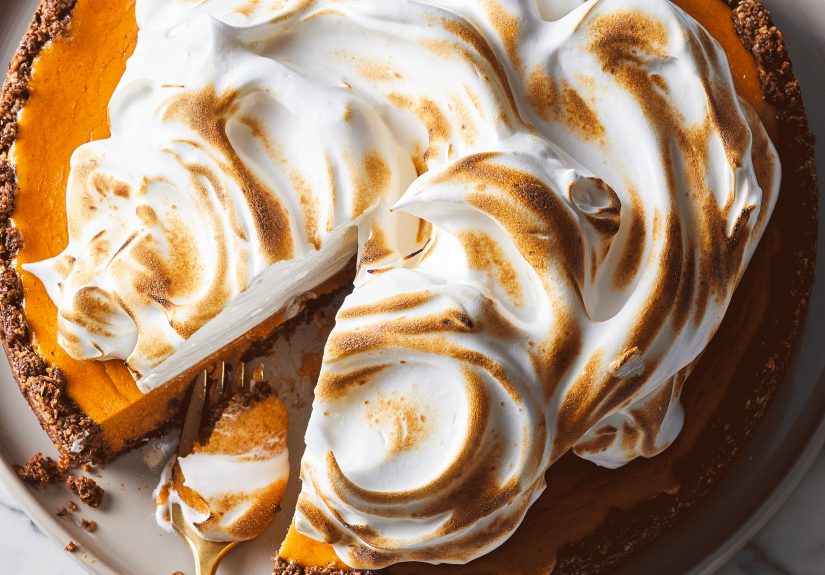
Meringue for pie is a soft meringue topping made by whipping egg whites with sugar until the mixture becomes thick, glossy, and capable of holding peaks. Unlike crisp baked meringue cookies, pie meringue is meant to stay tender and cloudlike. It is usually spread over a hot pie filling, shaped into swirls or peaks, then baked just long enough to brown and set.
Classic lemon meringue pie is the best-known example, but the technique also works for chocolate pie, coconut cream pie, butterscotch pie, banana pie, and other custard-style desserts. Once you know how to make meringue for pie, you are not learning one topping. You are learning a whole category of dessert confidence.
The Best Ingredients for Pie Meringue
Egg Whites
Egg whites are the engine of the whole operation. As they whip, they trap air and create structure. Use fresh eggs if possible, and make sure no yolk sneaks in. Even a tiny bit of fat can make whipping harder. Room-temperature whites usually whip more easily and create better volume, so letting them sit out briefly before mixing can help.
Sugar
Sugar sweetens the meringue, but it also stabilizes it. Add it gradually rather than dumping it in all at once. This gives the sugar time to dissolve and keeps the mixture glossy instead of gritty. Superfine sugar is especially handy because it dissolves faster, but regular granulated sugar works well if you add it slowly and beat patiently.
Cream of Tartar
Cream of tartar is the wingman every nervous meringue maker deserves. It helps stabilize the whipped egg whites and improves texture. You can make meringue without it, but for pie topping, it is a very useful insurance policy.
Optional Helpers
A pinch of salt can balance sweetness. A little vanilla can soften the eggy flavor. Some bakers also add a small amount of cornstarch to help absorb excess moisture and reduce the odds of weeping. It is optional, but very practical if your pie and your local weather enjoy causing trouble together.
A Simple Meringue for One 9-Inch Pie
Here is a reliable formula for soft meringue pie topping:
- 4 large egg whites, at room temperature
- 1/2 teaspoon cream of tartar
- 1/2 cup superfine sugar or granulated sugar
- 1 teaspoon cornstarch, optional
- 1/2 teaspoon vanilla extract, optional
- Pinch of salt
This amount works well for a standard 9-inch pie and gives you enough meringue to spread generously across the top without making the pie look like it is wearing a foam helmet.
How to Make Meringue for Pie Step by Step
1. Start With Clean Equipment
Your bowl and beaters should be squeaky clean and completely dry. Any grease, moisture, or trace of egg yolk can interfere with whipping. A metal or glass bowl is often preferred because plastic can hold onto residue, even after washing. In meringue world, “mostly clean” is not clean. It is sabotage.
2. Separate the Eggs Carefully
Separate the eggs while they are cold, because the yolks are less likely to break. Then let the whites come closer to room temperature before whipping. If a speck of yolk falls into the bowl, remove it before you start mixing.
3. Beat Until Foamy
Add the egg whites, cream of tartar, and salt to the bowl. Beat on medium speed until the whites become foamy. Do not rush straight to high speed at the beginning. Let the structure build steadily.
4. Add Sugar Gradually
Once the whites are foamy and beginning to thicken, add the sugar slowly, a spoonful at a time, while continuing to beat. This is one of the most important steps in learning how to make meringue for pie. If you add the sugar too fast, the meringue can become dense, grainy, or unstable.
5. Beat to Glossy Peaks
Keep beating until the meringue forms stiff, glossy peaks. When you lift the beaters, the peaks should stand up with just a slight curl at the tip. The texture should look smooth and luxurious, not dry or clumpy. Rub a bit between your fingers. If you feel sugar granules, keep beating a little longer.
6. Spread It Over Hot Filling
This is the move that separates confident pie bakers from people sadly googling “why is there a puddle under my meringue.” Spread the meringue over hot filling, not cooled filling. The heat rising from the filling starts cooking the bottom of the meringue and helps prevent separation.
7. Seal It to the Crust
Make sure the meringue touches the crust all the way around the pie. Do not leave little gaps at the edges. Those gaps invite moisture to sneak underneath, which can make the topping shrink or slide. Use the back of a spoon or spatula to create peaks and swoops for a classic finish.
8. Bake Just Until Set and Lightly Browned
Bake according to your pie recipe until the top is lightly browned and the meringue looks set. Overbaking can make it dry and encourage weeping. Underbaking can leave it unstable and soft in the wrong way. You want golden and proud, not damp and confused.
French, Swiss, or Italian: Which Meringue Works Best for Pie?
Most classic pie toppings use French meringue, which is simply raw egg whites whipped with sugar and then baked on the pie. It is traditional, light, and easy for most home bakers.
Swiss meringue and Italian meringue are more stable because they involve heat during preparation. Swiss meringue warms the egg whites and sugar together before whipping. Italian meringue streams hot sugar syrup into whipping egg whites. Both methods can be excellent for pies, especially if you want a sturdier topping or live in a humid climate. For everyday baking, though, a properly made French meringue still does the job beautifully.
How to Prevent Weeping, Shrinking, and Other Meringue Drama
Prevent Weeping
Weeping happens when liquid forms on top of the meringue or between the meringue and the filling. To reduce the risk, dissolve the sugar fully, spread the meringue over hot filling, bake it just until set, and avoid overbaking. A little cornstarch in the meringue can also help.
Prevent Shrinking
Shrinking usually happens when the meringue is not sealed to the crust or when it cools too quickly. Spread it right to the edge and let the pie cool gently away from drafts.
Avoid Graininess
Grainy meringue means the sugar did not dissolve completely. Add sugar slowly and keep beating until the texture is smooth. Superfine sugar makes life easier here.
Watch the Weather
Humidity is not the meringue’s best friend. On very damp days, sugar attracts moisture from the air, which can make the topping sticky or cause beads to form. You do not have to cancel dessert because the weather is moody, but it helps to know that a dry day gives you better odds.
Best Practices for Storage and Serving
Meringue pie is at its best the day it is made. That is when the topping still looks dramatic and the crust has not started negotiating with the filling. If you need to store it, refrigerate the pie after it cools, loosely covered. For the best texture, serve it within 24 hours. Longer storage can increase the chance of weeping and softening.
If you are serving people who are pregnant, elderly, very young, or immunocompromised, using pasteurized egg whites is a smart option. It is also a good choice for anyone who wants extra peace of mind while making a meringue-based dessert.
Common Mistakes When Learning How to Make Meringue for Pie
- Using a bowl with grease or moisture
- Letting egg yolk get into the whites
- Adding the sugar too quickly
- Spreading meringue onto cool filling
- Leaving gaps between the meringue and crust
- Overbeating until the meringue looks dry
- Overbaking in hopes that “more brown means more better”
- Making the pie too far ahead of serving time
Which Pies Pair Best With Meringue?
Lemon meringue pie is the poster child, but it is not the only pie worthy of a fluffy topping. Chocolate cream pie gains a lovely contrast from sweet meringue. Coconut pie becomes even more nostalgic. Banana cream pie turns surprisingly elegant. Even seasonal pies can benefit from a torched or lightly baked meringue finish.
The basic rule is simple: if the filling is smooth, rich, or custard-like, a soft meringue topping can add height, sweetness, and visual drama. It is the dessert equivalent of good lighting.
Final Thoughts
Learning how to make meringue for pie is one of those kitchen skills that seems fussy until you understand what the egg whites are asking from you: cleanliness, patience, and decent timing. Once you know how to build glossy peaks, seal them onto hot filling, and bake them just enough, the whole process becomes far less intimidating. In fact, it becomes fun.
The beauty of pie meringue is that it feels fancy while using simple ingredients you probably already have. That is a rare and delightful trick. So the next time your pie needs a topping, skip the fear, grab the mixer, and make the kind of meringue that rises high, browns beautifully, and refuses to weep in public.
Kitchen Experiences: What Making Meringue for Pie Really Feels Like
The first time many people make meringue for pie, they expect either instant greatness or instant disaster. The truth is much funnier. It usually lands somewhere in the middle: the filling tastes terrific, the crust behaves reasonably well, and the meringue looks amazing from one angle and slightly suspicious from another. That is normal. Meringue has a way of making home bakers feel both talented and humbled in the same hour.
One of the most common experiences is realizing that the topping changes fast. It starts as egg whites in a bowl, which feels underwhelming, and then suddenly it transforms into this glossy cloud that looks almost too pretty to touch. That moment is a confidence booster. It makes people feel like they have unlocked a secret level in baking. Then, naturally, they add it to the pie and begin staring through the oven door like sports fans in the final seconds of a championship game.
Another real-life lesson comes from sugar. New bakers often learn the hard way that impatience has consequences. Dump the sugar in too quickly, and the meringue can turn grainy or slack. Add it slowly, and everything changes. The texture gets smoother, the peaks get shinier, and suddenly the topping looks bakery-worthy. That tiny adjustment often becomes the moment when a baker stops feeling lucky and starts feeling skilled.
Then there is the hot-filling revelation. Plenty of people assume the pie should cool before the topping goes on, because cooling things sounds responsible. But when they finally spread meringue over hot filling and seal it to the crust, they notice a difference. The topping sits better, slices better, and behaves with much more dignity. It is one of those kitchen experiences that sticks with you because it feels like insider knowledge, even though it is really just smart technique.
Humidity also teaches memorable lessons. Anyone who has made meringue on a sticky summer day knows that weather can act like an uninvited co-author. The pie may taste wonderful, but the topping can get a little tacky or bead with moisture. That experience usually turns bakers into people who check the forecast before making lemon meringue pie, which is a sentence they probably never expected to say as adults.
Perhaps the best part of making meringue for pie is serving it. People react to it. They lean in. They comment on the peaks. They ask if it is homemade. Even when the topping is not perfect, it still has flair. It still says, “Someone cared enough to make this dessert extra.” And that matters. The flavor, the texture, the toasted edges, and the contrast with a tart or creamy filling make meringue pie feel celebratory in a way that plain whipped topping rarely does.
Over time, bakers build their own rhythm. Some swear by superfine sugar. Some use cornstarch for extra insurance. Some like dramatic peaks, while others prefer smooth swirls with a torched finish. That is the lovely part of experience: once you learn the rules, you get to develop style. And in the end, that is what pie meringue becomes. Not just a topping, but a small edible performance that gets better every time you make it.


