Table of Contents >> Show >> Hide
- Why a Free Vintage Dresser Is DIY Gold
- Step 1: Hunting Down the Perfect Free Dresser
- Step 2: Prepping Your Curbside Treasure
- Step 3: Choosing a Makeover Style
- Step 4: Painting Your Vintage Dresser
- Step 5: Hardware, Drawers, and Finishing Touches
- Step 6: Styling Your “New” Vintage Dresser
- Budget Breakdown: How a “Free” Makeover Stays Affordable
- Common Mistakes (and How to Avoid Them)
- Real-Life Experiences: Lessons from a Free Vintage Dresser Makeover
- Conclusion
If you’ve ever driven past a lonely old dresser on the curb and thought, “Someone should save that,”
congratulationsyou are officially someone. A free vintage dresser makeover is one of the most
satisfying DIY projects you can tackle: it’s budget-friendly, eco-conscious, and a little bit magical.
With some cleaning, a bit of paint, and a few smart tricks, that “junk” piece can look like it came
straight from a boutique.
Inspired by the kinds of projects you see on Hometalk and other DIY blogs, this guide walks you through
exactly how to turn a free dresser into a showpiece. We’ll talk about how to find a curbside treasure,
what condition is still worth saving, how to prep and paint without losing your mind (or your weekend),
and how to finish it off so it looks intentionally vintagenot just old.
Why a Free Vintage Dresser Is DIY Gold
Vintage dressers have a few big advantages over modern bargain pieces:
- Solid wood construction: Older dressers are often built from hardwood, not hollow particleboard.
- Character: Curvy legs, keyholes, dovetail joints, and unique drawer fronts add charm you can’t fake.
- Eco-friendly: Saving a piece from the landfill means less waste and fewer new materials produced.
- Budget win: “Free” leaves room in your budget for good primer, paint, and hardware.
The best part? Once you’ve done one dresser makeover, you’ll start seeing potential everywherefrom
thrift stores to Facebook Marketplace to your neighbor’s “free” pile at the curb.
Step 1: Hunting Down the Perfect Free Dresser
Where to Find Free Furniture
A “free” vintage dresser doesn’t just appear out of nowhereusually, people are trying to get rid of
bulky pieces as fast as possible. Great places to look include:
- Curbside and bulk trash days: Drive around older neighborhoods on bulk pickup days.
- Buy Nothing and local Facebook groups: People often post dressers that are “free if you haul.”
- Friends and family: Ask if anyone has a dresser collecting dust in the garage or basement.
- Free section on online marketplaces: Filter listings by price and select “$0.”
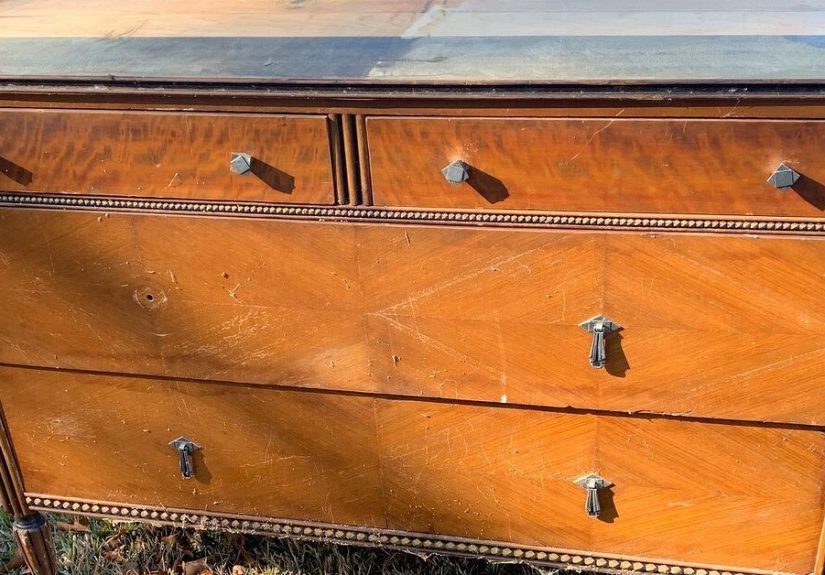
Don’t be scared off by cosmetic issues like scratches, ugly orange stain, or dated hardware. You’re
looking for good bones, not a perfect finish.
What to Look For (and What to Avoid)
Before you haul a dresser into your car and into your life, check:
- Structure: Is the frame solid? Gently rock itif the whole piece wobbles like a baby giraffe, you may need more carpentry skills than paint.
- Drawers: Open every drawer. Make sure they slide, and check that the bottoms aren’t falling out.
- Smell: A little mustiness is fixable. Strong odors (like mildew or smoke) can be tougher to eliminate.
- Water damage: Slight veneer bubbling is okay; severely swollen or crumbling wood is usually a pass.
You want a piece that’s tired and scratched, not structurally ruined. If the dresser passes the wiggle
test, you’re in business.
Step 2: Prepping Your Curbside Treasure
Prep work is the part everyone wants to skip, but it’s what separates a “Pinterest fail” from a makeover
that actually lasts. Even if you’re using chalk paint or a “no-sand” product, you still need some basic prep.
Basic Tools and Supplies
- Vacuum and microfiber cloths
- Degreaser or mild cleaner
- Screwdriver or drill (to remove hardware)
- Wood glue and clamps (for loose joints or drawer bottoms)
- Wood filler for gouges and missing veneer
- 120–220 grit sandpaper or liquid sandpaper/deglosser
- Bonding primer (especially for shiny or previously varnished surfaces)
Cleaning and Repairs
Start by removing the drawers and hardware. Label or lightly number the backs of drawers so you can put
them back in the right order later. Vacuum out cobwebs, dust, and anything mysterious living in the corners.
Wipe the entire piece down with a cleaner or degreaserespecially the top and drawer fronts, where years
of hand oils and furniture polish can prevent paint from sticking. Let it dry completely.
Next, do small repairs:
- Glue loose joints and clamp until dry.
- Re-attach or reinforce drawer bottoms with glue or small brad nails.
- Fill deep scratches, gouges, or missing veneer with wood filler; let it dry, then sand smooth.
Sanding vs. No-Sanding Options
You have two main paths:
- Light scuff-sand: Use 120–220 grit sandpaper to dull the sheen and smooth repairs. Wipe away dust.
- Liquid sandpaper/deglosser: Rub on according to the label to chemically “etch” the surface so paint can grip.
Either way, follow with a good bonding primer, especially on glossy finishes, stains that might bleed,
or laminate surfaces. A little extra prep now saves you from peeling paint later.
Step 3: Choosing a Makeover Style
Here’s the fun part: deciding what your “after” will look like. With a vintage dresser, a few classic
styles work beautifully.
Classic Cottage White
A soft white or creamy off-white instantly modernizes a dated finish while keeping the piece bright and
versatile. Distressing along the edges can hint at age without looking shabby in a bad way.
Moody Vintage Black or Navy
Deep black, charcoal, or navy paint turns a traditional dresser into a bold statement piece. Paired with
brass, gold, or matte black hardware, it gives a vintage-meets-modern vibe that works in bedrooms, entryways,
or dining rooms.
Two-Tone Wood and Paint
If the top or drawer fronts have decent wood grain, consider a two-tone look: stain some parts and paint
the rest. For example, a stained top with painted base and drawers looks upscale and intentional, not
“I got tired halfway through.”
Step 4: Painting Your Vintage Dresser
You don’t need fancy equipment, but choosing the right paint can make the job easier and more durable.
Popular options for dresser makeovers include:
- Chalk-style paint: Great adhesion, forgiving finish, and a soft, matte lookperfect for vintage vibes.
- Mineral or clay-based paints: Designed for furniture, often needing minimal prep with excellent coverage.
- Quality enamel or furniture paint: Ideal if you want a smoother, less chalky finish.
Step-by-Step Painting Process
- Prime the dresser: Use a bonding or stain-blocking primer, especially on dark stain or knots that could bleed through.
- Apply the first coat of paint: Use a good brush for details and a small roller for flat areas. Don’t worry if the first coat looks streaky.
- Let it dry fully: Follow the paint can’s dry time; rushing leads to tacky, easily damaged paint.
- Apply a second coat: This is where the magic happenscoverage becomes solid and smooth.
- Touch up details: Hit any missed corners, edges, or drawer sides for a polished look.
Sealing and Protecting the Finish
Once the paint is fully dry, seal the dresser so it can handle real life:
- Wax: Common for chalk paint; creates a soft, velvety finish. Buff it to the sheen you like.
- Water-based polycrylic: Great for high-use pieces or kids’ rooms; choose satin or matte for a softer look.
Apply thin coats, let each one dry, and avoid heavy use for a few days while everything cures.
Step 5: Hardware, Drawers, and Finishing Touches
Revamping the Hardware
Original vintage hardware is often beautiful but grimy. Try:
- Soaking metal pulls in warm water with a bit of dish soap, then scrubbing with a soft brush.
- Using metal polish or a touch of Rub ’n Buff to revive dull brass.
- Spray painting dated hardware in matte black, brushed gold, or champagne for a fresh look.
If the original hardware is missing or broken, measure the distance between screw holes and buy
replacements that fit without extra drilling.
Adding Drawer Surprises
To make your dresser feel designer-level, add a hidden “wow” factor:
- Line drawers with peel-and-stick wallpaper or pretty wrapping paper.
- Paint the sides of drawers a contrasting color for a fun peekaboo detail.
- Add felt pads to the bottoms of legs to protect your floors.
Step 6: Styling Your “New” Vintage Dresser
Once your free dresser makeover is finished, it’s time to style it so it looks right at home:
- Top with a lamp, a stack of books, and a small plant or vase of flowers.
- Hang a mirror or art piece above to visually anchor the piece.
- Use a tray to corral smaller items like jewelry, keys, or perfume bottles.
Suddenly, that roadside rescue looks like it came from a curated design shopand you get all the bragging rights.
Budget Breakdown: How a “Free” Makeover Stays Affordable
Even a free dresser comes with some costs, but they’re tiny compared to buying new furniture. A realistic
budget might look like:
- Primer: about $15–$25 (and you’ll have leftovers)
- Paint: $20–$40 depending on brand and size
- Topcoat (wax or polycrylic): $15–$25
- Optional new hardware: $15–$40 (or free if you reuse and refinish)
If you already have tools, brushes, or leftover paint, you can easily keep the makeover well under the cost
of a new dresseroften under $50. That’s a serious upgrade for the price of one nice dinner out.
Common Mistakes (and How to Avoid Them)
- Skipping cleaning: Paint won’t bond well to grease, wax, or grime. Clean first, always.
- No primer on glossy or dark finishes: This often leads to peeling or yellow bleed-through.
- Going too thick with paint: Multiple thin coats look smoother and chip less than one heavy coat.
- Rushing the cure time: Avoid dragging decor across the top for a few days while everything hardens.
- Ignoring structural issues: Fix wobbles and broken drawers before you invest time in paint.
Think of it as giving the piece a second life. The more attention you give the “boring” steps, the more you’ll
love the finished dresser.
Real-Life Experiences: Lessons from a Free Vintage Dresser Makeover
The first time you try a free vintage dresser makeover, it might feel like you’re adopting a slightly
problematic pet. It’s cute, but it definitely comes with issues. Here are some real-world lessons and
experiences that almost everyone has on their first (or third) dresser flip.
The Emotional Rollercoaster of a Free Find
The journey usually starts with excitement: you spot a vintage dresser in a “FREE” listing or on the curb,
slam on the brakes, and text someone, “I’m bringing home a projectdon’t be mad.” The adrenaline rush is real.
You get it home, haul it inside, and then you see it under real lighting. That’s when the doubts creep in:
“Was this a mistake?”
“Why do the drawers smell like an attic and crayons?”
“How many chipped corners can one dresser have?”
Here’s the good news: most of those problems are fixable. Cleaning, wood filler, and a little paint can turn
that “What have I done?” moment into “I can’t believe this is the same piece.”
Discovering the Power of Good Prep
One of the biggest mindset shifts comes when you realize prep is not punishmentit’s insurance. People who
rush straight to paint often end up with peeling, streaks, or stains bleeding through their beautiful new
color. Taking an extra day to clean, repair, and prime feels like overkill in the moment, but it pays off
every time you open a smooth drawer or set a drink on the top without worrying about rings.
Many DIYers report that their second or third dresser makeover goes much faster because they’ve learned where
to spend their energy: less obsessing over tiny dents that add character, more time making sure the structure
is solid and the surface is ready for paint.
Figuring Out Your Paint Personality
A free vintage dresser is the perfect “test subject” for figuring out what kind of paint and style you actually
like. Some people fall in love with chalk-style paint for its soft, matte, slightly rustic look. Others realize
they prefer a smoother, modern enamel finish that wipes down easily.
Because your investment in the piece is basically zero, you have room to experiment:
- Try a bold color you’d normally be scared to use.
- Test a two-tone look with a stained top and painted base.
- Play with distressing, glaze, or wax to deepen the vintage feel.
Worst-case scenario? You sand lightly, repaint, and call it “version 2.0.”
The Moment It All Comes Together
There is always a point in the project where you start to see it: the hardware goes back on, the drawers slide
in smoothly, and suddenly the dresser looks intentional instead of abandoned. That’s the moment people talk
about when they share their before-and-after photos online.
You style it with a lamp, a few framed photos, and maybe a trailing plant. That’s when you step back and realize
this “trash” is now the centerpiece of your room. Guests ask where you bought it…and it feels almost too good
to answer, “Actually, it was free.”
How One Free Project Leads to Many
The biggest “danger” of a free vintage dresser makeover is that it’s rarely your last. Once you’ve seen how far
a little paint and effort can go, you start eyeing other pieces: nightstands, side tables, buffets, even kitchen
cabinets. You gain confidence with each project, and little by little, your home fills with custom pieces that
tell a story.
You also start to see value where other people see clutter. Instead of walking past a dated dresser, you see
potential storage, a future entryway showpiece, or even a TV console in disguise. That shiftfrom consumer to
creatoris one of the most rewarding parts of the process.
Why a Free Vintage Dresser Makeover Is Worth It
In the end, a free vintage dresser makeover is about more than saving money. It’s about rescuing something with
history, teaching yourself new skills, and creating a one-of-a-kind piece that actually means something in your
space. You’re not just decoratingyou’re telling a story about creativity, resourcefulness, and what’s possible
when you’re willing to look twice at something everyone else drove past.
So the next time you see a beaten-up dresser on the curb or in a buy-nothing group, remember: underneath the
scratches and dust might be your next favorite piece of furnitureand your next great DIY success story.
Conclusion
A free vintage dresser makeover is the perfect mix of practical and creative. You save money, reduce waste,
and end up with a functional piece of furniture that fits your style and your space. With realistic prep, the
right paint, and a few thoughtful finishing touches, you can turn a curbside reject into a dresser you’re proud
to show offHometalk-worthy before-and-after photos included.


