Table of Contents >> Show >> Hide
- Why In-Wall Storage Works (Especially in Real-Life Bathrooms)
- Before You Cut Anything: A Quick “What’s In This Wall?” Reality Check
- Pick Your “In-Wall Storage” Style
- Materials and Finishes That Don’t Hate Moisture
- Project 1: Build Between-Stud Recessed Shelves (Dry Zone, Big Impact)
- Project 2: Recessed Medicine Cabinet (Storage + Mirror, Without the Bulk)
- Project 3: Shower Niche That Won’t Become a Leak (Or a Mold Museum)
- Design Tricks That Make In-Wall Storage Look Custom
- Common Mistakes (So You Don’t Have to Learn Them the Loud Way)
- Real-World Lessons: What It’s Actually Like to Create Storage Inside Bathroom Walls (Experience Notes)
- Conclusion
Bathrooms are tiny, busy rooms that somehow attract clutter like a magnet attracts… other magnets. If your countertop looks like a skincare convention and your
shower caddy is one slippery shampoo away from a dramatic fall, it’s time to recruit the most underused square footage in the room:
the space inside your bathroom walls.
Done right, in-wall bathroom storage feels like a magic trick: towels and toiletries disappear, the room looks calmer, and you didn’t even steal
an inch from the floor plan. Done wrong, it feels like a horror movie: you cut open drywall and discover a vent pipe, wiring, and your last shred of confidence.
Let’s aim for the first option.
Why In-Wall Storage Works (Especially in Real-Life Bathrooms)
Recessed storageshelves, niches, and cabinets built between studssolves three problems at once:
- More storage without “more furniture.” No extra towers, carts, or wobbly over-the-toilet racks.
- Cleaner sight lines. Flush storage makes a small bathroom feel bigger and less chaotic.
- Better daily flow. Essentials live where you actually use them: by the sink, beside the shower, near the tub.
The design bonus: recessed storage can look custom and architecturallike the house came this way and has always been smug about it.
Before You Cut Anything: A Quick “What’s In This Wall?” Reality Check
1) Stud bays are your built-in “storage slots”
Most interior bathroom walls use 2×4 framing, with studs commonly spaced 16 inches on center. That typically leaves a cavity roughly
14½ inches wide between studsperfect for a slim cabinet, a recessed shelf stack, or a medicine cabinet designed for standard framing.
Depth is usually around 3½ to 4 inches before you hit the opposite drywall. (Translation: great for toiletries, not for jumbo towel rolls
that believe in taking up emotional space.)
2) Plumbing and wiring love to ruin your plans
Bathrooms are basically utility headquarters. Supply lines, drains, vent stacks, and electrical runs can live exactly where you want your perfect niche.
Your job is to locate a “clean” stud bay before you enlarge anything. A stud finder helps, but it’s not a mind reader. The best move is to cut a
small inspection opening and look inside with a flashlight (or your phone camera).
Pro tip: areas over toilets often look tempting for an alcove, but they frequently hide a vent pipe, and exterior walls usually contain insulationboth are
reasons to be cautious and sometimes choose another spot.
3) Structural rules matter more than your Pinterest board
Cutting a neat rectangle in drywall is easy. Modifying framing is where you need to slow down. If you’re staying inside a single stud bay and not cutting
studs, you’re usually in “straightforward DIY” territory. If you want a wide horizontal niche that spans multiple bays, you may need proper framing
(headers, jack studs, and blocking) so the wall remains solid and code-compliant.
Also: load-bearing walls and exterior walls are a different game. In many jurisdictions, notching/cutting in bearing partitions is limited, and larger
openings may require engineering or a permit. When in doubt, ask your local building department or a qualified contractorbecause drywall patching is
annoying, but structural regrets are forever.
Pick Your “In-Wall Storage” Style
In-wall storage isn’t one thing. It’s a menu. Here are the most common (and best-looking) options:
Recessed medicine cabinet (the classic MVP)
A recessed medicine cabinet gives you hidden storage right where you need itabove the vanitywithout a bulky box sticking out into the room.
Many models are built to fit between studs, and the finished look is clean and intentional.
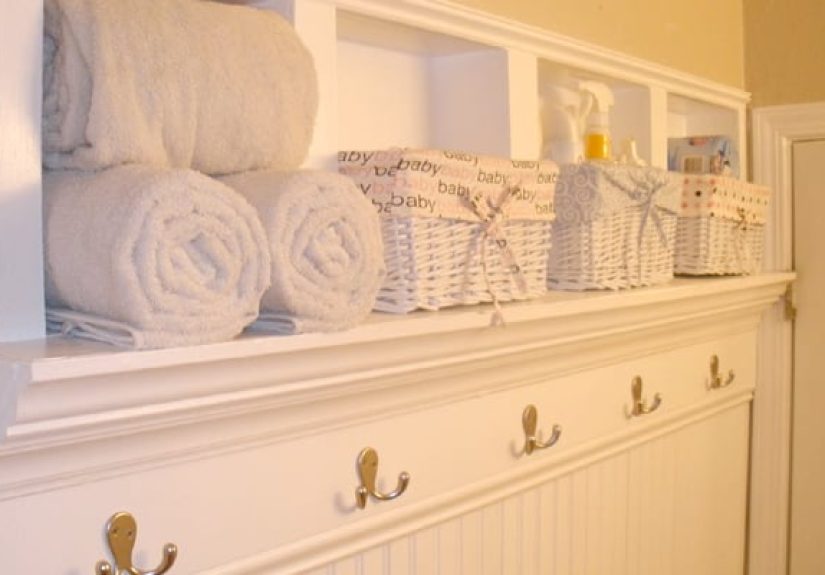
Between-stud open shelves (the “I want it pretty” option)
Recessed shelves in a dry area (not inside the shower) are great for rolled hand towels, extra soap, candles, and the one plant that bravely tries to
survive bathroom humidity. Add trim around the opening and paint the back panel for a built-in, furniture-like feel.
Closed recessed cabinet (the “I want it gone” option)
If visual calm is the goal, install a shallow between-stud cabinet with a doorespecially useful near the sink for medicine, grooming tools, and
“miscellaneous items” you don’t want on display. A mirrored door can double as a grooming mirror or brighten a dark corner.
Shower niche (wet-zone storage that looks luxe)
A shower niche is the sleek alternative to a caddy. It’s also the one type of in-wall storage that absolutely demands good waterproofing and smart
detailing (including a slight slope so water doesn’t camp out on the shelf like it pays rent).
Design-forward “dry niche” (small, stylish, surprisingly useful)
A “dry niche” is a recessed shelf outside wet areasthink near the vanity or tub deckwhere you can stash daily items and add personality:
a small sculpture, a framed print, or the fanciest hand soap you own. It’s storage that also decorates.
Materials and Finishes That Don’t Hate Moisture
Bathrooms are humid. If your materials can’t handle steam, they’ll swell, peel, or grow a science project. Here’s what tends to work best:
For dry-zone shelves and cabinets
- Plywood (sealed and painted) is more stable than standard MDF in humid conditions.
- Solid wood looks great but needs proper sealing on all sidesespecially edges.
- Moisture-resistant trim (PVC or well-sealed wood) reduces the risk of swelling near sinks and tubs.
- Paint matters. Use a quality primer plus a durable, washable bathroom paint or cabinet enamel.
For shower niches and wet areas
- Use a true tile backer (cement board or approved foam backer), not regular drywall in the wet zone.
- Waterproofing is the system. Membranes can be liquid-applied, fabric-reinforced, or sheet membranesfollow manufacturer instructions.
- Preformed niches (from reputable tile system manufacturers) can reduce waterproofing complexityif installed correctly.
Project 1: Build Between-Stud Recessed Shelves (Dry Zone, Big Impact)
This is the sweet spot for many bathrooms: a simple recessed shelf unit that looks custom and adds storage without major structural drama.
Step-by-step overview
- Choose the location wisely. Aim for a dry wall near the vanity, beside the tub (outside the splash zone), or on a blank wall that needs a purpose.
- Find studs and map the cavity. Mark stud edges, then cut a small inspection hole to check for wires, pipes, or unexpected blocking.
- Size the opening. Keep it within one stud bay for the easiest build. Use a level, and mark clean lines.
- Cut the drywall opening. A drywall saw works well. Save the cutout piece if you might patch later.
-
Add blocking (top and bottom). Install horizontal 2x blocking between studs so you have solid anchoring points for the shelf box.
Construction adhesive plus screws is a common approach. - Build the shelf box. Use a back panel and side panels sized to the cavity depth (often about 3½–4 inches). Add shelves with glue and brad nails or screws.
- Install, shim, and secure. Slide the box in, level it, and fasten through the sides into studs and blocking.
- Trim it out. A simple face frame or casing hides drywall edges and makes the niche look intentional.
- Finish for the bathroom. Prime, paint, and caulk small gaps so it looks built-in, not “built during a panic.”
A specific example
In a small guest bath with a pedestal sink, add a 48-inch-tall recessed shelf stack on the wall beside the vanity. Store folded hand towels on the lower
shelves, daily skincare on the middle shelves, and a candle plus a small plant up top. Add a simple white trim frame, then paint the niche back panel a
soft contrasting color to make it feel like a designed feature instead of an accidental hole.
Project 2: Recessed Medicine Cabinet (Storage + Mirror, Without the Bulk)
If you want the biggest functional win with the least visual clutter, this is it. Recessed cabinets sit in the wall cavity, often requiring blocking around
the opening so the cabinet mounts securely and sits flush.
What makes recessed cabinets look “high-end”
- Perfect alignment. Center it on the vanity and align with lighting fixtures.
- Flush edges. The face frame should sit tight to the finished wall plane.
- Smart interior organization. Adjustable shelves and built-in dividers keep it from becoming a tiny chaotic closet.
Installation essentials (DIY-friendly with careful planning)
- Use the manufacturer’s rough opening dimensions. Don’t “eyeball” a rectangle.
- Confirm cavity depth. Some walls hide plumbing that makes recessed installation impossible.
- Cut the opening and add blocking. Blocking supports the cabinet and keeps the opening square.
- Fit, shim, then fasten. Secure to framing per instructions; caulk edges if the wall is slightly uneven.
If the wall is packed with pipes or vents, you can still get the look by using a shallower cabinet, moving the cabinet location, or choosing a surface-mount
model with a slimmer profile and nicer trimbut recessed is the cleanest visual when the wall allows it.
Project 3: Shower Niche That Won’t Become a Leak (Or a Mold Museum)
A shower niche is both gorgeous and unforgiving. Water will find the smallest weakness, then invite its friends. The goal is a niche that drains, stays sealed,
and integrates with your waterproofing system.
Key rules for shower niches
- Slope the shelf(s) slightly toward the drain. Even a small slope helps water shed instead of pooling.
- Waterproof continuously. Your membrane must tie into the niche and surrounding wall as one system.
- Respect corners and fasteners. Corners are where leaks love to start; any punctures in waterproofing must be properly sealed.
- Plan before tile. Retrofitting a niche later means removing tile and rebuilding the waterproofingdoable, but not fun.
A practical layout example
In a family shower, use a double niche: one lower niche for kids’ products and one higher niche for taller bottles. Frame them to fit the stud bay,
then tile the niche backs with a contrasting mosaic to make the feature look intentionaland make bottles easier to spot.
Design Tricks That Make In-Wall Storage Look Custom
The difference between “beautiful built-in” and “random hole with stuff in it” is mostly the finishing details.
- Align niches with tile lines. In showers, match the niche edges to grout lines or use trim profiles made for tile edges.
- Repeat materials. Use the same tile in the niche as the shower walls for a seamless lookor deliberately contrast it for a focal point.
- Add lighting thoughtfully. A well-placed vanity light or even a discreet LED strip (in a dry niche) makes recessed storage feel upscale.
- Use trim like architecture. A simple casing or face frame around a dry niche reads like built-in millwork.
- Go symmetrical when possible. Twin niches or paired cabinets can look intentional and balanced.
Common Mistakes (So You Don’t Have to Learn Them the Loud Way)
- Skipping the inspection hole. That’s how you meet surprise plumbing.
- Putting a niche in an exterior wall without a plan. You may compromise insulation or vapor control.
- Building a shower niche without a waterproofing system. Tile and grout aren’t a waterproof plan.
- Ignoring slope in the shower niche. Flat shelves = standing water = grime party.
- Using unsealed materials. Bathrooms punish exposed edges and bargain finishes.
- Rushing trim and caulk. The last 10% is what makes it look professional.
Real-World Lessons: What It’s Actually Like to Create Storage Inside Bathroom Walls (Experience Notes)
Here’s the honest part most tutorials don’t emphasize enough: building recessed bathroom storage is less like assembling a neat kit and more like going on a
first date with your house. You’re excited, you’ve made plans, and then you discover it has secrets.
First, the stud finder confidence game. It will beep. It will beep with enthusiasm. Sometimes it will beep at a nail plate, a pipe, or a blob of
joint compound and act like you just found the Grand Canyon. The real win is the moment you cut a small inspection hole and confirm what’s actually inside.
That five-minute check can save you from the “Why is there a wire exactly where my shelf should be?” spiral.
Second, old bathrooms rarely behave like new construction. Walls can be out of plumb, studs can be slightly twisted, and drywall thickness can
varyespecially if someone layered new drywall over old plaster at some point in history. That’s why recessed cabinets sometimes look crooked until you shim
them carefully and install trim. The trim isn’t just decoration; it’s the great equalizer that hides tiny imperfections and makes the whole feature look
intentional.
Third, you may meet fire blocking (horizontal wood pieces inside stud bays). It’s there for safety, but it also means your dream “tall niche”
might turn into two shorter niches unless you reframe correctly. Many people discover blocking halfway through and decidewiselythat a smaller, cleaner niche
is better than turning the project into a full wall reconstruction. Not every recess has to be floor-to-ceiling to be useful.
Fourth, the dust is personal. Drywall dust is the glitter of home improvement: it shows up everywhere, and you will keep finding it later.
A plastic sheet, painter’s tape, and a vacuum with a hose attachment should be considered part of the project, not optional accessories. If you’re cutting tile
or cement board, upgrade your dust strategy even further. Your lungs will thank you, and so will anyone else living in the home who didn’t sign up for the
“white powder” aesthetic.
Fifth, in showers, the learning curve is all about water management. People often assume tile is waterproof because it looks like a hard shell.
But the real protection comes from what’s behind the tile: a properly installed waterproof membrane and sealed transitions. The most “experienced” lesson here
is patiencewaiting for coats to dry, following thickness requirements, treating corners like they’re the VIP section of the job, and building in a slight slope
so water drains instead of lingering. A niche that dries faster stays cleaner and looks better longer. That’s not just craftsmanship; it’s low-maintenance
strategy.
Finally, the most satisfying moment is always the same: you install the trim, run a clean bead of caulk, touch up the paint, and suddenly the recessed storage
looks like it was always meant to be there. The wall goes from “construction zone” to “custom feature” in about 30 minutes. It’s the home-improvement version
of putting on a blazer and immediately seeming more responsible.
Conclusion
Creating beautiful storage space within bathroom walls is one of the smartest upgrades you can make: it adds organization without stealing floor space, and it
can look genuinely custom with the right planning and finishing details. Start by choosing the right location, confirm what’s inside the wall, stay within a
stud bay for simpler projects, and treat waterproofing as non-negotiable in wet areas. Once you experience a clutter-free vanity and a shower without a
dangling caddy, you’ll wonder why you ever let your shampoo live on the floor like a gremlin.


