Table of Contents >> Show >> Hide
- Why Headphones Usually Go Wrong
- Before You Start: A Tiny Safety Pep Talk
- Step 1: Make Sure the Problem Is Really the Headphones
- Step 2: Fix the Easy Stuff First
- Step 3: How to Repair Wired Headphones
- Step 4: How to Repair Wireless Earbuds and Bluetooth Headphones
- Step 5: Replace the Parts That Wear Out First
- Step 6: Troubleshoot the Device, Not Just the Headphones
- A Simple Repair Kit That Is Actually Useful
- Common Mistakes That Make Headphone Problems Worse
- When Repair Is Worth It and When It Is Time to Let Go
- Final Thoughts
- Composite Repair Experiences and Lessons from Real-World Headphone Problems
Headphones do not usually die in one dramatic movie scene. They fade. One side crackles. The left earbud ghosts you. The plug only works if you hold it at a suspicious 23-degree angle like you are defusing a tiny audio bomb. Then one day, your favorite pair sounds like a haunted seashell, and suddenly you are shopping for replacements instead of fixing what you already own.
That is a shame, because a lot of dodgy or broken headphones are not actually dead. They are dirty, loose, drained, misconfigured, out of sync, or suffering from a worn part that can be replaced in minutes. In many cases, headphone repair is less about black-magic electronics and more about smart troubleshooting: test the source, clean the contacts, reset the connection, and replace the part that wears out first.
This guide walks through how to repair broken headphones safely and sensibly, whether you are dealing with wired earbuds, Bluetooth headphones, gaming headsets, or true wireless earbuds that have decided to become passive-aggressive. You will learn what to check first, which fixes are worth doing at home, when a broken headphone jack can be rescued, and when it is smarter to stop playing hero and call the manufacturer.
Why Headphones Usually Go Wrong
Most headphone failures are gloriously unglamorous. Cables fray. Ear pads crack and peel. Charging contacts get dirty. A device sends audio to the wrong output. Bluetooth earbuds lose sync with each other. A plug loosens. A jack gets pocket lint packed into it like an archaeological site. The good news is that these are the kinds of problems you can often diagnose without opening anything up.
Wired headphones tend to fail where they bend the most: near the 3.5 mm plug, the inline remote, the Y-split, or the ear cup entry point. Wireless headphones skip the cable drama but add a whole new cast of characters: battery charge issues, dirty charging pins, pairing glitches, bad firmware states, and source-device confusion. That sounds annoying because it is annoying, but it also means many issues are fixable without replacing the whole unit.
Before You Start: A Tiny Safety Pep Talk
Do not turn a simple fix into an expensive tragedy
- Unplug wired headphones before inspecting or cleaning them.
- Turn off wireless headphones before cleaning charging contacts or ear tips.
- Do not open battery-powered headphones if the battery is swollen, leaking, unusually hot, or giving off a chemical smell. That is a replacement-or-service problem, not a weekend hobby.
- If your headphones are still under warranty, check the manufacturer’s repair policy before opening anything. One brave screwdriver move can turn free service into a paid lesson.
- Use only gentle cleaning tools: a dry soft brush, microfiber cloth, cotton swab, and a small amount of isopropyl alcohol where appropriate.
In other words, fix what is fixable, but do not challenge a lithium battery to a duel.
Step 1: Make Sure the Problem Is Really the Headphones
Before you blame the headphones, test them with a second device. Plug the wired pair into another phone, laptop, tablet, controller, or audio interface. For Bluetooth models, pair them with a different device entirely. This one move can save you from fixing the wrong thing.
If the headphones work perfectly on device number two, the issue is probably your original source device, its jack, its Bluetooth settings, its audio output setting, or its software. If the headphones fail on multiple devices in the same way, congratulations, you have a real headphone problem. Not fun, but at least honest.
On computers, especially Windows machines, this step matters a lot. Headphones can be connected and still silent because the system is sending audio somewhere else, the default playback device is wrong, or audio enhancements are interfering. That means your “broken headphones” may actually be your laptop being dramatic.
Step 2: Fix the Easy Stuff First
Clean the plug, jack, mesh, and contacts
This is the least glamorous fix and one of the most effective. Debris can block a good connection in the headphone port, on the plug, in the earbud mesh, or on the charging contacts of true wireless earbuds. If one side is quiet, muffled, or dead, dirt is a prime suspect.
- Inspect the headphone plug for grime, oxidation, or bent metal.
- Look into the device’s headphone jack with good lighting. Lint loves living there rent-free.
- Brush earbud mesh gently with a small, dry, soft-bristled brush.
- For wireless earbuds, clean the charging contacts on both the earbuds and the case with a dry cloth or cotton swab. If needed, lightly dampen the swab with isopropyl alcohol and let everything dry before charging.
A dirty charging pin can make one earbud seem dead when it is really just not charging. A dirty mesh grille can make one side seem broken when it is simply clogged. This is why cleaning is step two, not step twelve.
Reseat everything like it owes you money
Reconnect wired headphones firmly. Remove thick phone cases if they prevent the plug from seating completely. Reseat detachable cables at both ends. Put true wireless earbuds fully back into the case, then remove them again. Sometimes the fix is not advanced electronics. Sometimes it is “plug it in all the way.” Humbling, yes. Effective, also yes.
Restart and reset before declaring defeat
For wireless headphones, do a full restart of both the headphones and the source device. If one earbud is not working, reset the earbuds according to the manufacturer’s instructions, forget the Bluetooth pairing on your device, and pair again from scratch. Many brands specifically recommend this for one-sided audio, unstable Bluetooth connections, or earbuds that appear connected but refuse to actually make sound.
If you are using Windows, manually select the correct output device, set it as default if needed, and disable audio enhancements if sound is distorted, missing, or weirdly inconsistent. “Connected” does not always mean “selected.” Technology is helpful like that.
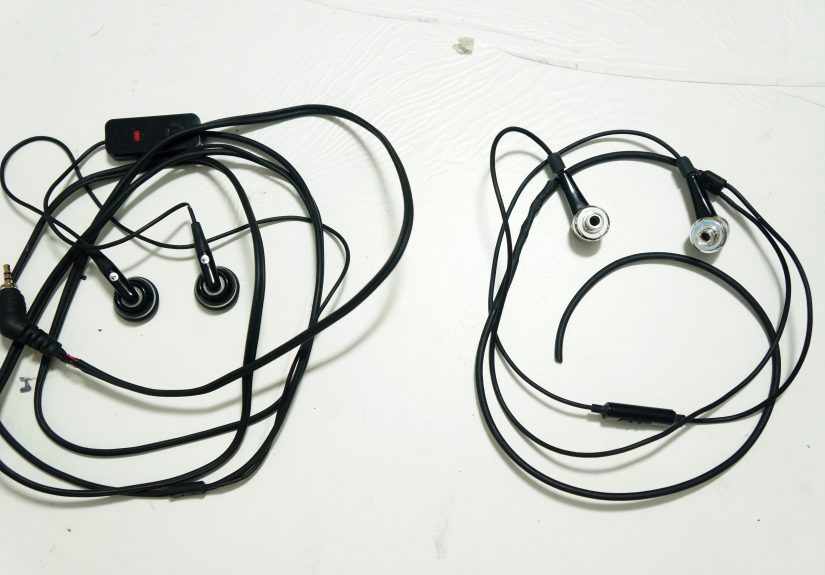
Step 3: How to Repair Wired Headphones
Problem: Sound cuts in and out when the cable moves
This is the classic broken headphone cable symptom. Wiggle the cable gently near the plug, inline controls, Y-split, and ear cup entry points. If sound returns or disappears when the cable moves, the wire inside is probably fractured.
Here is the smart order of attack:
- If the cable is detachable, replace the cable first. This is the easiest and cleanest fix.
- If the cable is not detachable and the break is near the plug, replacing the jack may save the headphones.
- If the damage is deep inside the headband, inside the ear cup, or in multiple places, repair becomes less practical unless the headphones are expensive or sentimental.
Many good headphones are designed with replaceable cables for exactly this reason. If yours has a removable cable, do not overcomplicate it. Swap the cable, test again, and enjoy feeling smarter than the average panic-buyer.
Problem: The 3.5 mm headphone jack is bent, loose, or dead
A damaged headphone jack is often repairable, but it is also the point where DIY can move from “satisfying” to “I have accidentally made modern art.” If you already have electronics repair experience, replacing a plug can be worthwhile on quality headphones. If you do not, this is a good place to stop and decide whether a repair shop or cable replacement makes more sense.
What you can do safely at home without turning your desk into a workshop disaster:
- Inspect the plug for bending, splitting, or looseness.
- Clean both the plug and the device jack.
- Test with another device to confirm the fault follows the headphones.
- If the plug is obviously damaged and the headphones are otherwise in good shape, price a replacement plug repair against the cost of a new pair.
If you do not know how to solder, do not treat this as the day to improvise. Broken plug repairs are common, but they are not beginner magic tricks.
Problem: Only one ear works
One-sided audio in wired headphones usually points to one of four things: a damaged cable, debris in the jack, a loose detachable cable, or a fault in the driver itself. Start with the noninvasive checks first. Clean the plug, try another source, reseat or replace a detachable cable, and listen for any change when the cable moves. If nothing changes and one side remains silent on every device, the driver may have failed.
Driver failure is usually not worth repairing on cheap headphones. On premium studio, audiophile, or sentimental models, it may be worth contacting the manufacturer for parts or official service.
Step 4: How to Repair Wireless Earbuds and Bluetooth Headphones
Problem: One earbud is not charging
This is incredibly common. Usually, the “dead” earbud is not dead at all. It is failing to make contact with the charging pins or sitting slightly off in the case. A tiny layer of grime can be enough to block charging.
- Clean the charging contacts on the earbud and inside the case.
- Check that the earbud sits correctly and magnetically snaps into place.
- Confirm the charging case itself has power.
- Leave the earbuds in the case for several minutes, then try again.
- Reset and re-pair the earbuds if the charging looks normal but one side still has no audio.
Some brands also recommend leaving the problem earbud in the case with the lid open for a short period to re-establish the connection between left and right buds. It sounds oddly specific because it is oddly specific, but it works often enough to earn respect.
Problem: Connected, but no sound
If Bluetooth headphones connect but stay silent, the usual culprits are low battery, an unstable connection, the wrong output device, or a software glitch. Fully charge the headphones and case, disconnect and reconnect Bluetooth, then test again. On phones, check media output settings. On computers, manually select the headphones as the output device and verify that audio is not still being sent to the laptop speakers, a monitor, or another Bluetooth device in the room.
Also check whether your headphones are connected for calls only and not media playback. Some headsets appear connected but are using the wrong profile, which makes music or game audio vanish while the connection pretends everything is fine.
Problem: Poor microphone or muffled sound
If the microphone sounds bad, check for blockage from lint, makeup, dust, or packaging film. If the sound is muffled, inspect the mesh grilles and ear tips. Replace worn ear tips if they no longer fit properly. A bad seal in earbuds can make sound thin, weak, and weirdly disappointing, like a movie trailer that showed all the good parts already.
Step 5: Replace the Parts That Wear Out First
One of the best ways to repair dodgy headphones is to stop thinking of them as a single object and start thinking of them as a set of parts. The headband, drivers, cable, ear pads, ear tips, charging case, and adapters do not all wear out at the same speed.
Ear pads and ear tips
Flaking ear pads are not just ugly. They can affect comfort, seal, sound quality, and hygiene. Replacing ear pads can make old over-ear headphones feel new again. The same goes for in-ear silicone or foam tips that no longer fit, seal, or stay clean.
Detachable cables
If your headphones allow cable removal, replacing the cable is usually the first repair worth trying. It is cheaper, faster, and less risky than opening the headphones. Many brands sell official replacement cables, and some also sell adapters, tips, headband padding, and ear pads.
Charging case
For true wireless earbuds, a failing charging case can be the real problem. If the case no longer charges correctly, replacement cases may be available from the manufacturer. Always check official support before assuming the earbuds themselves are dead.
Step 6: Troubleshoot the Device, Not Just the Headphones
Sometimes the headphone repair is really a device repair, or at least a device settings issue. If wired headphones do not work on a laptop but work on your phone, check the audio port, try another port, update drivers, and verify default playback settings. On Windows, audio enhancements, driver bugs, and incorrect default devices can all cause silent or distorted headphone output.
Likewise, if Bluetooth headphones behave badly with one phone but not another, the source device may be the problem. Restart it, update it, and remove stale Bluetooth pairings. A headphone that behaves perfectly on another device is trying very hard to tell you where the problem actually lives.
A Simple Repair Kit That Is Actually Useful
- Microfiber cloth
- Small soft-bristled brush
- Cotton swabs
- Isopropyl alcohol
- Spare ear tips or ear pads
- Replacement detachable cable, if your model uses one
- A small flashlight for inspecting ports and mesh
Notice what is not on the list: blind optimism, rage, and a butter knife. Progress.
Common Mistakes That Make Headphone Problems Worse
- Yanking cables out by the wire instead of the plug
- Using wet cleaning methods that leave moisture inside ports or earbuds
- Ignoring a dirty charging case and assuming the earbud battery is dead
- Opening a still-under-warranty product too early
- Trying to force ear pads off without checking how they attach
- Replacing the headphones before testing them on a second device
- Assuming Bluetooth connection means correct audio routing
Headphone troubleshooting is mostly a game of patience and order. Skip steps, and you spend money. Follow steps, and you usually spend five minutes and feel oddly victorious.
When Repair Is Worth It and When It Is Time to Let Go
Repair is worth it when the headphones are high quality, comfortable, expensive, modular, or simply hard to replace. If a cable, ear pad, tip, or charging case is the only failed part, the math usually favors repair. If the issue is a swollen battery, a cracked hinge with internal wiring damage, a dead driver in a bargain pair, or repeated failures across multiple components, replacement may be the wiser move.
There is no shame in retiring a pair that has served bravely. Not every headphone deserves a dramatic comeback tour. But many do, and a surprising number just need a cleaning, a reset, or one new part to stop acting possessed.
Final Thoughts
If you want the fastest path to fixing broken headphones, remember this order: test another device, clean everything, reseat connections, restart or reset, replace the simplest worn part, then decide whether deeper repair is worth the money. That sequence solves far more problems than most people expect.
So before you toss your dodgy headphones into the junk drawer graveyard beside mystery chargers and lonely USB sticks, give them a proper diagnosis. The left side may not be dead. It may just be dirty, loose, unsynced, or in desperate need of a new cable and a little respect.
Composite Repair Experiences and Lessons from Real-World Headphone Problems
One of the most common repair experiences starts with a person saying, “Only the left side works if I hold the cable just right.” That almost always points to cable strain near the plug or the split. People often assume the driver is blown, but once they test the headphones on another device and gently move the cable, the pattern becomes obvious. The lesson is simple: if motion changes the sound, suspect the cable first. Fancy theories can wait their turn.
Another very common story involves true wireless earbuds that seem broken because one side will not charge. In practice, the fix is often boring in the best possible way. The earbud was not seating correctly, the case contacts were dirty, or the charging pins were sticky. After a careful cleaning and a proper reseat, the “dead” earbud wakes up like nothing happened. This teaches a useful repair principle: charging problems often disguise themselves as audio problems.
Then there is the laptop scenario, which deserves its own tiny comedy award. The headphones are plugged in, Bluetooth is connected, the user is absolutely certain the headset is broken, and yet the sound is still blasting through the monitor or the built-in speakers. Once the correct output device is selected and the audio profile is set properly, everything suddenly works. The headphones were innocent the whole time. Technology, meanwhile, remains deeply committed to causing trust issues.
There are also comfort-related repair experiences that people underestimate. Someone keeps using peeling over-ear headphones because “they still sound fine,” but the cracked pads start affecting the seal, the bass weakens, and the headset becomes annoying to wear. Replacing the ear pads transforms the experience. The headphones sound fuller, fit better, and no longer leave little black flakes everywhere like cursed confetti. Sometimes repair is not about reviving dead gear. Sometimes it is about restoring good gear that has aged badly.
Another pattern shows up with premium earbuds and studio headphones that have detachable cables. A user assumes the whole product is failing, but a fresh cable solves the issue in under a minute. That is a great reminder to buy repair-friendly models when possible. Replaceable parts are not boring specs. They are the difference between a quick fix and a full replacement bill.
What ties all these experiences together is that the best repairs usually begin with calm troubleshooting, not random disassembly. People get the best results when they test another device, clean methodically, check settings, and replace the part most likely to fail first. The worst results happen when someone skips straight to panic-buying or, even better, starts prying open a battery-powered headset with no plan. Headphone repair rewards patience, observation, and a willingness to suspect dirt before doom.


