Table of Contents >> Show >> Hide
- Why a Nautical Trashcan Is So Genius
- Supplies You’ll Need for a Rope-Wrapped Trash Can
- Step-by-Step: How to Make a Nautical Trashcan With Rope
- Styling Ideas for Your Nautical Rope Trashcan
- Cost and Time Breakdown
- Tips, Tricks, and Common Mistakes
- Real-Life Lessons from a Nautical Trashcan Makeover
- Conclusion: A Tiny Project with Big Coastal Energy
If your bathroom trash can looks like it came free with a dorm room starter pack, don’t worryyou’re exactly the type of person a thrifty nautical makeover was invented for. With a cheap wire or plastic bin, a few rolls of rope, and a hot glue gun, you can turn a 25-cent thrift store find into a coastal-style accent that looks like it washed in from a fancy beach hotel.
The original project, often shared on Hometalk under the title “Thrifty Makeover, Nautical Trashcan With Rope”, starts with a super inexpensive trash can and ends with a chic, rope-wrapped piece of decor perfect for a beachy bathroom. DIYers have been wrapping trash cans in sisal, jute, and cotton rope for yearssome even brag that their version looks like a knockoff of $40+ coastal wastebaskets from high-end stores.
In this guide, you’ll learn exactly how to create your own nautical rope trash can, how to style it, what it actually costs, and the little tricks (and minor glue-gun injuries) real DIYers have picked up along the way.
Why a Nautical Trashcan Is So Genius
A trash can is one of those unglamorous household items we need but never want to see. Wrapping it in rope solves that problem in a surprisingly stylish way. Instead of a shiny plastic eyesore, you get a textured, coastal-inspired accent that looks intentionallike it belongs next to your striped towels and sea glass soap dispenser.
Budget-friendly coastal style
Rope-wrapped wastebaskets and storage bins in coastal catalogs and on handmade marketplaces can easily run $30–$60, especially if they include nautical motifs like anchors, starfish, or custom paint. With a thrifted bin (often under a dollar) and discount-store rope, many DIYers report finishing their own version for around $5–$10 in materials.
Hides ugly plastic and protects the bin
Rope adds a thick, durable layer around the trash can, which does two things:
- Disguises cheap plastic or dented metal
- Protects the surface from scuffs, dings, and everyday wear
Apartment decorators have praised rope trash cans for pulling bathroom decor togethereverything from the bath mat to the towel hooks feels calmer and more cohesive once that bright plastic bin disappears behind neutral rope.
Easy skill level, big payoff
This project is basically “wrap and glue.” If you can:
- Squeeze a hot glue gun
- Wrap a cord in a circle
- Resist the urge to check your phone every three minutes
…then you can make a nautical trashcan with rope in about an hour, as many DIY tutorials point out.
Supplies You’ll Need for a Rope-Wrapped Trash Can
The beauty of this makeover is how few supplies it requires. Here’s a basic list, inspired by multiple rope trash can and Dollar Tree nautical projects:
- Trash can or wastebasket – A wire bin or plain plastic can. Thrift store versions often cost around 25 cents, just like in the original Hometalk makeover.
- Rope – Sisal, jute, or cotton clothesline all work well. Sisal and jute give a rustic, beachy look; cotton is softer and cleaner-looking.
- Hot glue gun and glue sticks – Standard hot glue works for indoor bathrooms; some DIYers choose heavy-duty or Gorilla hot glue for extra durability.
- Scissors or utility knife – For trimming rope ends.
- Finger protectors (optional but highly recommended) – Silicone fingertip guards are popular among crafters who enjoy having fingerprints.
- Nautical embellishments – Shells, starfish, anchor charms, or simple knots made from extra rope.
- Spray paint or acrylic paint (optional) – To paint the bin a similar color to the rope so any tiny gaps disappear.
Pro tip: If your trash can flares outward at the top or has a thick lip, plan on using a bit more rope than you think and be ready to cut shorter pieces near the rim.
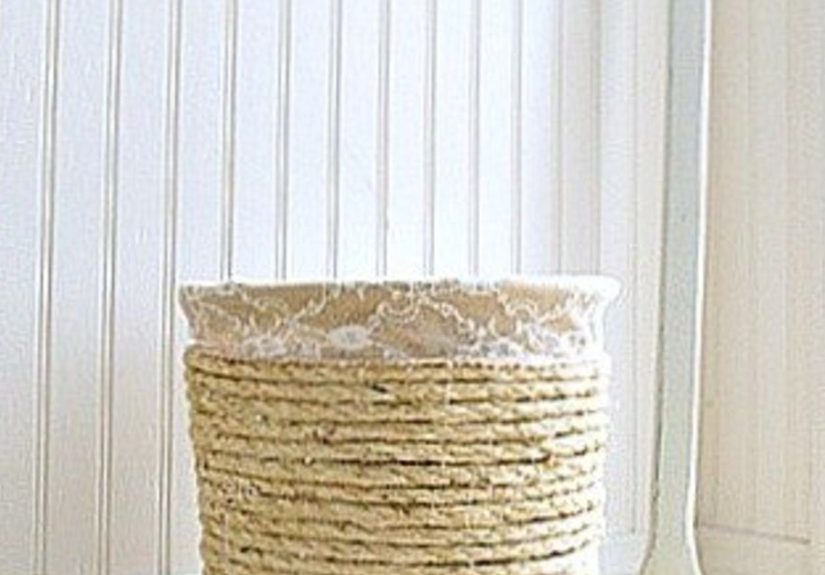
Step-by-Step: How to Make a Nautical Trashcan With Rope
1. Prep your thrifty trash can
Start by giving your bin a quick cleanno one wants last year’s dust trapped under hot glue. If it’s a bright or contrasting color, lightly spray-paint it in a shade that blends with your rope (white, beige, tan, or light gray). That way, any tiny gaps won’t scream for attention.
Let the paint dry completely before you start gluing. This is the hardest step because it requires patience.
2. Start wrapping from the bottom
Flip the trash can upside down. Add a dot of hot glue near the bottom edge and press the end of your rope into it. Hold it for a few seconds until it sets.
Begin wrapping the rope around the base, applying hot glue every few inches. DIY tutorials often suggest gluing every 3–4 inches rather than in one long linethis gives you more control and prevents messy clumps.
3. Work your way up with even tension
Wrap the rope in tight, even rows. Each new row should snuggle up against the previous one with no gaps. Keep some tension on the rope as you go; loose wrapping can lead to slack spots or bulges.
If your rope arrives in a tangled mess (which seems to be its favorite hobby), re-wrap it into a tidy ball before you start. One popular rope trash can tutorial swears this step saves time and keeps you from wrestling a knotty octopus of rope.
4. Tackle tricky edges and handles
As you approach the top edge, you may hit design “speed bumps” like:
- A flared-out rim
- Curved lip
- Handles or cutouts
DIYers often solve this by cutting the rope into shorter pieces and fitting them into place individually, especially around a curved lip. They use tools like a broken dowel or pencil to tuck rope under the rim for a polished, custom look.
When you reach the final row, tuck the rope’s end neatly under the previous coil and secure it with extra glue. The goal: no obvious starting or ending pointjust one continuous, beachy wrap.
5. Add nautical embellishments
Once the rope is fully glued and cooled, it’s time for the fun details. You can:
- Glue on a few shells or flat glass marbles for a “found-on-the-shoreline” vibe.
- Attach a small metal anchor charm or starfish near the top.
- Tie a short length of thinner rope into a sailor’s knot and glue it on as a simple, chic accent.
Keep embellishments minimal if you’re going for a more sophisticated coastal look, or go full “beach souvenir shop” if that matches your bathroom personality.
Styling Ideas for Your Nautical Rope Trashcan
Your new rope-wrapped trash can doesn’t have to live only in a bathroom (though it does look especially good next to fluffy white towels and a striped shower curtain). Here are some styling ideas inspired by coastal decor lovers:
- Beachy bathroom – Pair your trash can with rope towel holders, a jute bath mat, and glass jars wrapped in twine or nautical rope for a fully coordinated coastal look.
- Coastal entryway – Use your “trash can” as a small umbrella stand or storage for rolled-up beach towels.
- Kids’ nautical bedroom – Store stuffed animals or toys in a rope-wrapped bin to tie in a sailor or ocean theme.
- Home office – A rope bin looks surprisingly refined under a desk, especially if you pair it with woven baskets or a rope-wrapped pencil cup.
- Plant holder – Slip a potted plant inside (with a drip tray). The rope exterior reads more like a decorative basket than a trash can.
Think of it as a small but mighty piece of rope bathroom decor that can migrate to other rooms as your style evolves.
Cost and Time Breakdown
While every project is a little different, most rope trash can tutorials fall into the same general range for budget and time:
- Trash can: $0.25–$2.00 (thrift store, Dollar Tree, or discount store)
- Rope: $3–$6 depending on type and length needed. Sisal/jute from dollar stores is budget-friendly; cotton clothesline can cost a bit more.
- Glue sticks: A couple of standard sticks, usually less than $1 worth.
- Optional embellishments: Shells, starfish, or charms can often be sourced cheaply from craft stores or leftover decor stashes.
Most DIYers report finishing the actual wrapping and gluing in about an hour, not including paint-drying time. That means you can start this project after lunch and still have time to admire your handiwork before dinner.
Tips, Tricks, and Common Mistakes
Choose the right rope
- Sisal or jute: Great for a rustic, beachy look. They’re a bit rougher and have more texture.
- Cotton: Softer, smoother, and ideal if your style leans toward clean, modern coastal.
For a steamy bathroom, natural fibers hold up surprisingly well when kept dry on the exterior of a trash can, especially with strong hot glue.
Deal with rope tangles early
Rope loves to tangle itself the second you look away. One DIY blogger recommends rewinding the rope into a smooth, compact ball before you begin wrapping; this makes it easier to feed around the bin without snagging on everything on your table.
Protect your fingers
This project involves a lot of pressing rope into hot glue. Silicone finger guards, a wooden dowel, or even the side of a pencil can save you from accidental burns, especially near the top where the angles get tricky.
Don’t overdo the embellishments
It’s tempting to glue on every shell you’ve ever collected, but the most expensive-looking pieces are usually the simplest. One or two small detailsa starfish, a knot, a subtle anchor charmkeep the look fresh, airy, and not overly “theme-park nautical.”
Real-Life Lessons from a Nautical Trashcan Makeover
Beyond the step-by-step tutorial, there’s a whole experience wrapped (literally) into a project like this. If you’ve ever tackled a DIY makeover from a Hometalk post or Pinterest pin, you know the journey is part crafting, part problem-solving, and part “why is there hot glue on my elbow?”
Lesson 1: The thrift store aisle is your best friend
The original “Thrifty Makeover, Nautical Trashcan With Rope” started with a wire trash can found for 25 cents at a thrift store. That kind of find changes the way you look at secondhand shopping. Suddenly, every slightly dented bin or oddly colored plastic container looks like potential, not junk.
Once you make one rope trash can, you’re likely to start spotting other makeover candidates: a little side table that could use a rope-wrapped base, a tray that could be lined with nautical paper and edging, a vase that would look great with a coil of rope and some driftwood accents.
Lesson 2: Simple projects build DIY confidence
This isn’t a complicated build. There are no power tools, no complex measurements, and no one will ask you if you own a miter saw. But that’s exactly why it’s powerful. When you finish your nautical trash can and see how polished it looks, it gently upgrades your sense of what you’re capable of making.
Many coastal DIY projectswreaths, rope trays, candle holders, or Dollar Tree rope decoruse the same basic skills: wrapping, gluing, and layering textures. Master this little trash can, and suddenly half the rope crafts you’ve saved to your idea boards feel doable.
Lesson 3: The details really do matter
At first, wrapping rope around a trash can sounds almost too simple. But the details make the difference between “cute DIY” and “wait, you bought that where?”
- Starting neatly at the bottom creates a clean foundation.
- Keeping rows tight and straight makes the sides look high-end.
- Finishing the top edge thoughtfully – by tucking the rope under the lip or trimming in small segments – makes the bin look custom-made.
You learn to slow down, adjust, and redo a section if needed. That patience carries over to other projects: painting furniture, hanging wallpaper, or installing peel-and-stick tile. Good results are usually just careful details repeated again and again.
Lesson 4: Small changes can transform a whole room
It’s surprising how much impact a trash can can have. Before, it was something you tried to hide behind the toilet. After the makeover, you don’t mind if it’s visible. It ties in with the towels, the mat, and the artwork, making the space feel curated instead of thrown together.
That’s the real magic of thrifty decor: you don’t need a total renovation to get a fresh look. One rope-wrapped trash can might lead to a matching rope-framed mirror, a rope wreath on the door, or a few mason jars decked out in twine and shells. Bit by bit, your bathroom shifts from “generic rental” to “cozy coastal retreat.”
Lesson 5: There’s joy in using something you made
Every time you toss a tissue or a cotton pad into your nautical trash can, there’s a tiny hit of satisfaction. You remember the afternoon you spent turning a quarter-bin into something that looks boutique-worthy. You remember the ropes, the glue, the mild chaos, and the moment you flipped it upright and thought, “Okay, that actually looks really good.”
That feelingseeing your creativity in everyday objectsis exactly why thrifty makeovers like this keep showing up on Hometalk, Pinterest, and DIY blogs year after year. They’re affordable, approachable, and endlessly customizable. And if you ever get tired of the look? Cut the rope off, reuse the bin for another experiment, and start again.
Conclusion: A Tiny Project with Big Coastal Energy
A Thrifty Makeover, Nautical Trashcan With Rope is the definition of smart DIY: low-cost materials, simple steps, and high-impact results. With a thrifted bin, a few coils of rope, and an hour of focused wrapping and gluing, you can turn a forgettable piece of bathroom hardware into a mini statement of coastal style.
Whether you keep it strictly functional as a wastebasket or repurpose it as storage or decor, this rope-wrapped beauty proves that thoughtful detailsand a little creativitycan give even the humblest item a stylish, beachy upgrade.


