Table of Contents >> Show >> Hide
- Why a Magnetic Chip Clip Holder Is a Genius Dollar Store Hack
- Dollar Store Supplies You’ll Need
- Step-by-Step: How to Make Your Magnetic Chip Clip Holder
- Style Ideas & Easy Customizations
- Smart Organization Tips Backed by Real-World Kitchens
- Common Mistakes (and How to Avoid Them)
- FAQ: Magnetic Chip Clip Holders & Dollar Store Supplies
- Real-Life Experiences & Extra Tips With This DIY
- Conclusion: A Small Project That Makes a Big Difference
If your snack shelf currently looks like a crime scene of half-open chip bags, mystery crackers, and pasta spilling out of torn plastic, this tiny DIY is about to be the hero of your pantry. A magnetic chip clip holder made almost entirely from dollar store supplies is cheap, fast, renter-friendly, and surprisingly stylish. Think of it as a mini command center for your snacks and bag clipsone that finally stops the “Where did all the chip clips go?” interrogation.
Inspired by the creative spirit of Hometalk-style projects and backed by practical organizing principles used by top home and kitchen experts, this guide walks you through exactly how to turn a few low-cost items into a functional, hangable, magnetic chip clip holder. No power tools, no fancy craft room, no stressjust smart design, strong magnets, and a little personality.
Let’s turn your cluttered cabinet into a snack zone that actually makes sense.
Why a Magnetic Chip Clip Holder Is a Genius Dollar Store Hack
A magnetic chip clip holder solves three everyday kitchen problems in one:
- It keeps bags sealed. Chips, cereal, nuts, frozen veggiesclips help keep everything fresher longer.
- It stops clip disappearance. Instead of clips migrating to random drawers, they live in one obvious, visible place.
- It uses vertical space. Mounting your holder on a wall, pantry door, or fridge frees up shelf and drawer space.
Professional organizers love vertical and magnetic storage because it keeps everyday tools visible and accessible while decluttering horizontal surfaces. A DIY chip clip holder hits that sweet spot: low budget, high function, and fully customizable to your kitchen’s style.
Dollar Store Supplies You’ll Need
One of the best parts of this project is that you can walk into almost any dollar store and walk out with nearly everything you need. Look for:
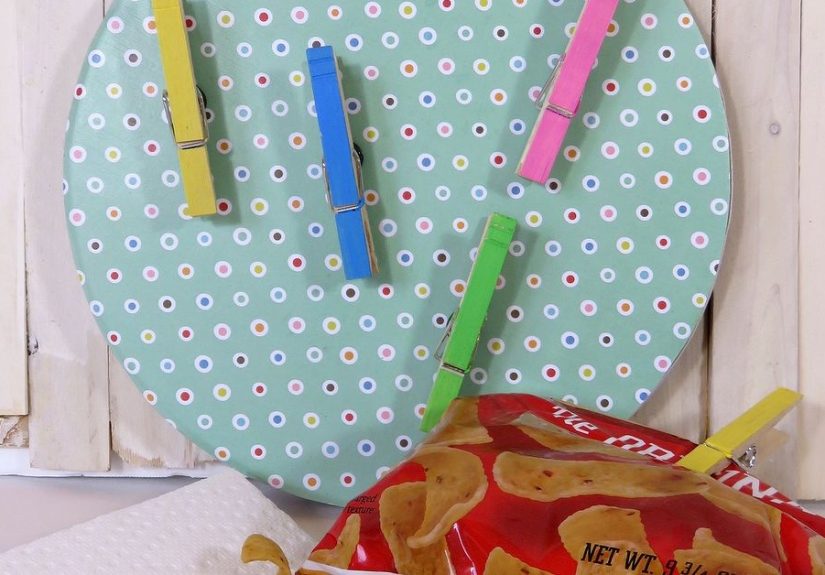
- Metal stove burner cover (round or rectangular) – lightweight, decorative, and magnetic-receptive.
- Wooden clothespins or basic bag clips – go plain, colored, or paint them yourself.
- Small round magnets – look for strong ones; “craft” or “button” magnets work well.
- Hot glue gun or strong craft glue – for attaching magnets and embellishments.
- Scrapbook paper, contact paper, or peel-and-stick vinyl – to cover and decorate the burner cover.
- Ribbon, jute, twine, or a metal loop – for hanging your holder.
- Optional: clear sealer or Mod Podge, label stickers, vinyl letters, stencils, washi tape, or small hooks.
Total estimated cost? Usually under $8–$12, depending on how fancy you getand still less than a single premade organizer from many home stores.
Step-by-Step: How to Make Your Magnetic Chip Clip Holder
Step 1: Choose the Perfect Spot
Before you glue anything, decide where your chip clip holder will live:
- Inside your pantry door.
- On the side of the fridge (great for quick grab-and-go snacks).
- Above a snack drawer as a mini snack station.
This helps you choose the right size burner cover and how many clips you’ll realistically use.
Step 2: Prep and Decorate the Base
- Clean the burner cover with a bit of mild soap and water and dry completely.
- Lay scrapbook paper or vinyl face down, place the cover on top, and trace the shape.
- Cut just inside the line so the paper fits neatly without overhanging edges.
- Apply a thin, even coat of Mod Podge or glue to the front of the burner cover, press the paper down, and smooth out bubbles.
- Seal the top with another light coat if you want extra durability (especially in humid kitchens).
You’ve just turned a $1 burner cover into a customized backdrop that looks boutique-level instead of bargain bin.
Step 3: Create Strong Magnetic Clips
- Flip your clothespins or clips over so the back side faces up.
- Glue one magnet near the top (jaw end) of each clip. Let it set fully.
- Test on the burner cover: the clip should snap on firmly and support a full chip bag without sliding.
If a clip feels weak, double up magnets or swap for stronger ones. Underpowered magnets are the #1 cause of sad chip avalanches.
Step 4: Assemble & Add Hanging Hardware
- Attach a loop of ribbon, twine, or a sawtooth hanger to the back of the burner cover with hot glue or strong adhesive.
- Arrange your clips on the front in one or two rows. Space them so full-size chip bags don’t overlap too much.
- Add labels like “Chips,” “Snacks,” or “Lunch Stuff” to keep your household on the same page.
Step 5: Hang & Put Your Holder to Work
Mount your new chip clip holder using:
- A removable hook (perfect for renters).
- A nail or screw if you prefer a more permanent setup.
- Or simply let magnets on the back grab onto the fridge if your hanger system is magnetic-ready.
Clip your bags, step back, and enjoy that oddly satisfying feeling of instant order.
Style Ideas & Easy Customizations
This is where the project goes from “functional” to “I made that and I’m kind of proud of it.”
Farmhouse Pantry Look
- Buffalo plaid or faux wood scrapbook paper.
- Jute twine for hanging.
- White-painted clothespins with hand-lettered labels.
Modern Minimalist
- Solid black, white, or neutral vinyl backing.
- Matte black clips and simple sans-serif labels.
- No extra decorjust clean lines and high function.
Family Command Center
- Divide the holder into zones: “Snacks,” “School,” “Coupons,” “Reminders.”
- Use different clip colors for kids, lunches, or days of the week.
- Add one or two mini hooks at the bottom for scissors or bag ties.
Rental- & Dorm-Friendly
- Use removable adhesive hooks only.
- Keep it lightweight with fewer clips.
- Choose fun patterns or pop colors to dress up small spaces.
Smart Organization Tips Backed by Real-World Kitchens
A single DIY won’t fix an entire pantry, but it can anchor better habits. To get the most out of your magnetic chip clip holder:
- Designate a “snack zone.” Store all chips and bagged snacks near the holder so clipping becomes automatic.
- Go vertical. Mount the holder at eye level so open bags are obvious (and easier to finish before they go stale).
- Label, but keep it simple. Clear labels reduce “I didn’t know where it goes” excuses from the household.
- Rotate often-used clips to the front. Just like pros rotate pantry staples, keep go-to clips easy to grab.
- Pair with clear bins. Clipped bags stored upright in a bin look neat and are less likely to tip.
These ideas mirror what professional organizers and home magazines preach: visibility + accessibility = things actually get put away.
Common Mistakes (and How to Avoid Them)
- Using weak magnets. If a magnet can’t hold a full chip bag, upgrade. Rare earth or higher-strength craft magnets work best.
- Skipping surface prep. Dusty or greasy burner covers cause paper and glue to peel. Clean first.
- Overloading one clip. Use one clip per bag edge; don’t stack multiple heavy bags on a single clip.
- Mounting too low or too high. If you can’t comfortably reach it, you won’t use it. Aim for eye to shoulder height.
- Ignoring humidity. In steamy kitchens, seal paper surfaces so they don’t bubble or warp.
FAQ: Magnetic Chip Clip Holders & Dollar Store Supplies
Will dollar store magnets really hold full-size chip bags?
Yesif you choose stronger craft magnets and glue them securely. Test one bag before committing. If it slides, double the magnet or switch to higher-strength versions.
Can this damage my fridge or pantry door?
The burner cover itself is usually lightweight. If you’re hanging on a wall or door, use removable hooks or a small screw. For the fridge, make sure any backing is smooth so it doesn’t scratch.
Is this safe for kids to use?
Absolutely, as long as magnets are firmly attached and not accessible as loose pieces. Use non-toxic glue, supervise crafting, and check clips occasionally.
Can I use this for more than just chips?
Definitely. Use it to hold produce bags, salad toppings, frozen food, coffee bags, pet treats, or even notes and recipes. The more multipurpose it is, the more valuable it becomes.
Real-Life Experiences & Extra Tips With This DIY
After this simple project has lived in multiple busy kitchensthink snack-loving families, small apartments, shared houses, and “I cook twice a day” home chefsa few patterns stand out that can help your version perform better in real life.
First, people actually use what they can see. When the chip clip holder is tucked behind cereal boxes or hung too low, clips wander back into junk drawers. Mounted front-and-center on a pantry door or the side of the fridge, it quietly trains everyone in the house: finish pouring, clip the bag, hang it back up. That visual cue alone cuts down on stale snacks and spills more than any lecture about “closing things properly.”
Second, strength matters more than aestheticsat least at first. In several trial setups, pretty but weak magnets lost the battle against party-size tortilla chip bags. Once stronger magnets were swapped in, the same cute clothespins became reliable workhorses. A good rule: if one magnet barely holds, add a second or upgrade. Form should follow function, especially when salsa is at stake.
Third, customization keeps the holder relevant. One busy household labeled their clips “Chips,” “Baking,” “Breakfast,” and “Kids’ Snacks.” Another used color coding: blue for freezer bags, green for pantry, yellow for school lunches. Over time, these tiny systems made restocking easier (“We’re out of ‘Kids’ Snacks’ clips because we’re out of snacks”) and cut down morning chaos.
Another real-world win: pairing the magnetic holder with a single clear bin right below it. Open bags get clipped and popped upright in the bin, rather than crammed on random shelves. In small kitchens, this combo looks intentionalalmost like a built-in storage feature. It also makes grocery checks fast: one glance at the “snack bin wall” tells you if you’re good for movie night or one family argument away from disaster.
Common long-term feedback? Durability holds up surprisingly well if you:
- Seal decorative paper so pasta sauce splatters wipe off easily.
- Choose neutral designs that won’t feel dated or kiddie in six months.
- Check magnets and glue once in a while, especially in humid climates.
Finally, there’s the psychological bonus: a tiny DIY win that you see every day. Opening your pantry to a neat row of clipped, labeled bags feels satisfying in a way that’s wildly disproportionate to the few dollars and minutes you spent. It’s a reminder that small, smart fixes can make your whole kitchen feel more under controland that’s exactly the kind of energy a good Hometalk-style project should bring.
Conclusion: A Small Project That Makes a Big Difference
A Magnetic Chip Clip Holder made with dollar store supplies is the perfect blend of practical, affordable, and fun. You repurpose simple materials, claim wasted vertical space, keep food fresher, and give your pantry or fridge a custom, pulled-together look.
Whether you lean farmhouse, modern, playful, or minimalist, this DIY is easy to tailor to your style and your family’s habits. And once those clips finally have a home, you’ll wonder how your kitchen ever functioned without it.
SEO Summary
sapo:
Turn a simple dollar store burner cover, a few magnets, and basic clips into a magnetic chip clip holder that looks custom, costs just a few dollars, and instantly upgrades your pantry or fridge organization. This Hometalk-style DIY walks you through each step with practical tips, styling ideas, real-life-tested tricks, and smart storage strategies so your bags stay sealed, your snacks stay fresh, and your kitchen finally feels as organized as it deserves.


