Table of Contents >> Show >> Hide
- What “Best Pot Roast” Actually Means
- Choose the Right Cut (Because Pot Roast Is a Science Project)
- Tools and Ingredients That Make Pot Roast Easier
- Step-by-Step: The Classic Dutch Oven Pot Roast
- 1) Season smart (and a little early if you can)
- 2) Sear like you mean it
- 3) Build the flavor base (a.k.a. don’t waste the browned bits)
- 4) Add the braising liquid (not a swimming pool)
- 5) Braise low and slow in the oven
- 6) Add vegetables at the right time (so they don’t turn into baby food)
- 7) Rest the meat before slicing or shredding
- 8) Turn the braising liquid into a “how is this so good?” gravy
- Pot Roast Doneness: Safe vs. Tender (They’re Not the Same)
- Common Pot Roast Problems (and Fixes)
- Flavor Upgrades That Don’t Require a Culinary Degree
- Slow Cooker Pot Roast and Instant Pot Options
- Serving Ideas and Leftovers That Don’t Feel Like Leftovers
- Kitchen Lessons and Pot Roast “Experiences” From Real Homes
- Conclusion
Pot roast is the dinner equivalent of a warm hoodie: dependable, comforting, and somehow always appropriate.
It’s also one of the easiest ways to turn a “tough” cut of beef into something so tender you could spread it on toast
(please don’tunless it’s a very sturdy toast).
This guide shows you how to cook the best pot roastthe kind with deep, beefy flavor, a glossy gravy,
and vegetables that taste like they meant to be there (not like they accidentally fell into a hot tub).
We’ll go step-by-step, explain the “why” behind each move, and give you options for the oven, slow cooker, and pressure cooker.
What “Best Pot Roast” Actually Means
A great pot roast recipe isn’t complicated. It’s just a few smart choices repeated with confidence:
- Big flavor from browning the meat and building a real sauce.
- Fork-tender texture from low-and-slow braising until collagen melts.
- Balanced gravy that tastes like beef, not like “salt with vibes.”
- Vegetables with integritytender, not mushy, and actually seasoned.
Choose the Right Cut (Because Pot Roast Is a Science Project)
Pot roast is a braise: meat + gentle heat + time + a little liquid. The magic happens when connective tissue breaks down into gelatin.
That’s why the best cuts are the ones that look a little intimidating in the raw state.
Best beef cuts for pot roast
- Chuck roast (shoulder): the classic choicemarbled, flavorful, and built for braising.
- Brisket: rich and beefy; slices beautifully when cooked right.
- Bottom round / rump roast: leaner, can be excellent with careful cooking and plenty of sauce.
If you want that “pull-apart” tenderness, beef chuck roast is the usual winner. It has enough fat and collagen to stay juicy,
and enough structure to become silky instead of stringy.
Tools and Ingredients That Make Pot Roast Easier
Tools
- Dutch oven (or heavy oven-safe pot with a lid): best heat retention and steady braise.
- Tongs + a sturdy spoon: for flipping and scraping browned bits.
- Instant-read thermometer (optional but helpful).
Core ingredients
- 3–4 lb chuck roast (or brisket/bottom round)
- Salt + black pepper
- Onion, carrots, celery (classic aromatic base)
- Garlic (because we’re adults)
- Beef broth/stock (and/or wine)
- Tomato paste (tiny amount, huge payoff)
- Bay leaf + thyme/rosemary
- Potatoes (optional; great if timed right)
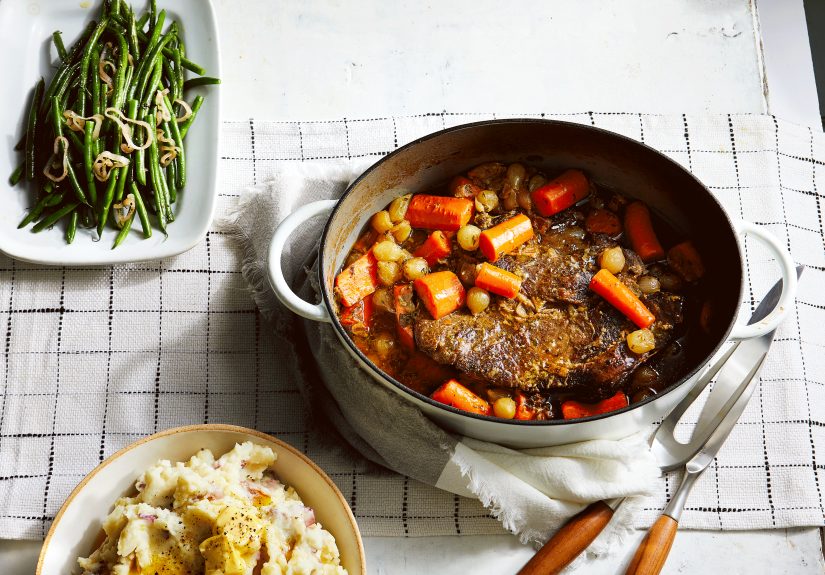
Step-by-Step: The Classic Dutch Oven Pot Roast
This method makes a Dutch oven pot roast with deep flavor and a sauce you’ll want to bottle.
The oven is your best friend here: steady heat, no babysitting, no “why is it boiling on one side?” drama.
1) Season smart (and a little early if you can)
Pat the roast dry. Season generously with salt and pepper on all sides. If you have time, salt it 8–24 hours ahead and refrigerate uncovered.
That “dry brine” helps the meat season more evenly and improves browning.
If you don’t have time, season right before searingyour pot roast will still be excellent and your future self will still respect you.
2) Sear like you mean it
Heat 1–2 tablespoons of oil in a Dutch oven over medium-high until shimmering.
Sear the roast 3–5 minutes per side (including edges) until deeply browned.
Browning isn’t just colorit’s flavor. You’re building the foundation of your pot roast gravy.
Tip: Don’t move it around. Let it develop a crust. If it’s sticking, it may not be ready to flip yet.
And if your smoke alarm starts offering commentary, turn down the heat slightly. We want “golden mahogany,” not “campfire memoir.”
3) Build the flavor base (a.k.a. don’t waste the browned bits)
Move the roast to a plate. Add onions, carrots, and celery to the pot with a pinch of salt.
Cook 5–8 minutes until the onions soften and pick up some color.
Stir in garlic for 30 seconds, then add 1–2 tablespoons tomato paste and cook 1 minute to caramelize it slightly.
Now deglaze: pour in about 1/2 to 1 cup wine (red is classic) or a splash of broth.
Scrape the bottom of the pot to dissolve the browned bitsthis is where “restaurant flavor” lives.
4) Add the braising liquid (not a swimming pool)
Return the roast to the pot. Add beef broth until the liquid comes about 1/3 to 1/2 of the way up the meat.
Pot roast is a braise, not a boiltoo much liquid dilutes flavor and can make the meat taste like it took a bath and forgot its personality.
Add herbs (thyme/rosemary), a bay leaf, and optional umami boosters like a teaspoon of Worcestershire or soy sauce.
Bring the liquid to a simmer, then cover with a lid.
5) Braise low and slow in the oven
Oven temperature sweet spot: 275°F to 325°F. Many cooks love around 300°F for steady, gentle braising.
Put the covered pot in the oven and cook about 3 to 4 hours for a 3–4 lb roast.
What you’re waiting for: collagen to melt. The roast may be “safe” earlier, but it won’t be tender earlier.
When it’s ready, a fork twists easily and the meat yields without a fight.
6) Add vegetables at the right time (so they don’t turn into baby food)
If you want carrots and potatoes in the pot, add them laterusually during the last 60–90 minutes of cooking.
This timing keeps them tender but intact. If you prefer ultra-soft vegetables that thicken the sauce naturally, add them earlier.
Just know what you’re signing up for.
7) Rest the meat before slicing or shredding
Transfer the roast to a cutting board and rest 15–20 minutes. This helps juices redistribute.
Slice against the grain for neat portions, or shred for a more rustic “fall-apart” vibe.
8) Turn the braising liquid into a “how is this so good?” gravy
Skim excess fat from the surface (a spoon works, or chill the liquid briefly and lift off the solid fat).
Then choose your adventure:
- Reduce: simmer the liquid uncovered to concentrate flavor.
- Thicken: whisk in a cornstarch slurry (1 tbsp cornstarch + 1 tbsp cold water) and simmer 1–2 minutes.
- Blend: blend some cooked onions/carrots into the liquid for a naturally thick, velvety sauce.
Pot Roast Doneness: Safe vs. Tender (They’re Not the Same)
For food safety, beef roasts have a minimum safe internal temperature. For pot roast tenderness, you’re usually aiming higher.
Practically speaking:
- Safe: the roast can be safe before it’s tender.
- Tender: many pot roasts become truly fork-tender around 190°F–205°F internal, depending on the cut.
The easiest “thermometer” is still the fork test: if it twists easily and the meat yields, you’re there.
If it’s tough, it needs more timenot a pep talk.
Common Pot Roast Problems (and Fixes)
“My pot roast is tough!”
This is almost always undercooked for tenderness. Keep braising. Collagen needs time.
If the liquid is bubbling aggressively, lower the oven temperature and continue until the roast relaxes.
“My sauce is bland.”
Reduce it uncovered to concentrate flavor, then season with salt.
Add a small splash of vinegar or lemon juice at the end to brighten it.
A teaspoon of Worcestershire or soy sauce can deepen savoriness without screaming “I added soy sauce.”
“My vegetables are mush.”
Add them later next time, or cut them larger.
Potatoes and carrots can handle an hour-ish of braising beautifully; three hours is a different lifestyle choice.
Flavor Upgrades That Don’t Require a Culinary Degree
Want to make your braised beef taste more complex without turning it into a science fair?
Try one or two of these:
- Wine or beer: adds depth; cook it briefly after deglazing to tame harsh alcohol notes.
- Tomato paste: boosts savoriness and rounds the sauce.
- Mushrooms: add earthy umami (fresh or dried).
- Balsamic or red wine vinegar: a small splash at the end makes flavors pop.
- Herb bundle: tie thyme/rosemary with twine for easy removal.
- Pickled onions: serve on top for acidity and crunch.
If you like creative twists, cocktail-inspired braises (think ginger, rum, citrus) can be surprisingly goodas long as you keep the foundation solid:
sear, deglaze, braise gently, season at the end.
Slow Cooker Pot Roast and Instant Pot Options
Slow cooker pot roast (set-it-and-forget-it, with one important step)
Yes, you can make a great slow cooker pot roast. The key is still browning:
sear the roast in a skillet first, then transfer it to the slow cooker.
Add sautéed onions (optional), broth to about 1/3 up the roast, herbs, and aromatics.
- Cook: Low for 8–10 hours, or High for 4–6 hours (Low usually gives better texture).
- Add veggies: halfway through if you don’t want them extremely soft.
- Finish sauce: reduce or thicken on the stove for a richer gravy.
Instant Pot pot roast (fast, but still needs strategy)
Pressure cooking is great when time is tight, but you still want browning and proper sizing:
cut a large roast into 2–3 big chunks for more even cooking.
- Sear: using sauté mode in batches.
- Pressure cook: about 60–75 minutes (depending on size), then natural release 10–15 minutes.
- Add veggies: cook them separately or pressure for a short time after the meat is done to avoid mush.
Serving Ideas and Leftovers That Don’t Feel Like Leftovers
Pot roast loves classic sides: mashed potatoes, buttered egg noodles, rice, polenta, or crusty bread.
But leftovers are where pot roast becomes an overachiever:
- Sandwiches: warm beef + gravy + toasted roll.
- Tacos: shredded pot roast, onions, cilantro, a squeeze of lime.
- Shepherd’s pie: chop beef, thicken gravy, top with mashed potatoes, bake.
- Beef & gravy poutine: fries + cheese curds + pot roast gravy (no further questions).
Storage tip: keep meat in some of the sauce so it stays moist. Pot roast often tastes even better the next day.
Kitchen Lessons and Pot Roast “Experiences” From Real Homes
Ask ten people about pot roast and you’ll get twelve opinions, one family argument, and at least one story involving a broken wooden spoon.
Here are some common, very real pot roast experiencesaka the stuff home cooks learn the fun way (which is usually the hard way).
First: the classic beginner movenot searing. Someone will say, “It’s all going to cook for hours anyway, why bother?”
Because the sear is where flavor is born. Plenty of cooks remember their first “gray roast” with a watery broth that tasted like
it had once met a cow in passing. The next time they seared properly, the difference felt unfairlike they’d been lied to by blandness.
The lesson sticks: browning isn’t optional if you want the best pot roast. It’s the opening act, not an extra credit assignment.
Second: the patience test. Pot roast has a cruel phase where it’s cooked but not tender.
You check it at 2 hours, it’s tough, you panic, you contemplate chewing as a hobby. But the fix is almost always time.
Many home kitchens have a story of someone declaring, “It’s done!” only for the roast to prove otherwise with the texture of a running shoe.
Then it goes back in for another hour, and suddenly it turns fork-tender like it remembered it had a reputation to uphold.
That’s collagen doing its slow, glorious work. Pot roast teaches patience better than a meditation app.
Third: the vegetable timing debate. One household loves carrots that are practically spoonable and melt into the gravy.
Another wants carrots with a tiny bit of bite. This is where pot roast becomes personal.
Many cooks learn (after one too many batches of “potato pudding”) that if you add potatoes at the beginning,
they may disintegrate into the saucesometimes delicious, sometimes tragic.
The “aha” moment is adding vegetables later, or cutting them larger, or choosing waxier potatoes that hold up better.
Once you figure out your ideal texture, your pot roast stops being random and starts being a signature.
Fourth: the seasoning reality check. Some people salt early and taste at the end. Others forget to taste until it hits the table.
Pot roast gravy is sneakyit can smell incredible and still need salt, acid, or reduction.
A common win: finishing with a tiny splash of vinegar or lemon juice.
That little bit of brightness can make the whole dish taste “bigger,” like someone turned up the lights in the flavor room.
Another common upgrade: a teaspoon of Worcestershire or soy sauce for depth. The roast doesn’t taste like “Worcestershire roast.”
It just tastes more like itself, in a flattering way.
Fifth: the leftovers miracle. Many people swear pot roast is better on day two.
The sauce thickens slightly, flavors mingle, and the beef becomes even more tender.
Real households turn leftovers into sandwiches, tacos, pot pie, shepherd’s pie, or “eat it straight from the container while the fridge light judges you.”
Pot roast is forgiving like that. It doesn’t demand perfectionjust a few good decisions, a steady oven, and enough time for magic to happen.
Conclusion
The best pot roast comes down to a simple rhythm: choose a braise-friendly cut, sear deeply, build a flavorful liquid,
and cook gently until the meat turns tender on its own schedule. Do thatand your kitchen will smell like you’ve got your life together
(even if the laundry pile says otherwise).


