Table of Contents >> Show >> Hide
- Why Export an iTunes Playlist in the First Place?
- Before You Export: Understand What “Export” Actually Means
- How to Export an iTunes Playlist on Windows
- How to Export an iTunes Playlist on Mac
- How to Import the Playlist Later
- What If You Need the Actual Songs Too?
- Common Problems When Exporting an iTunes Playlist
- Export vs. Share vs. Transfer: Three Different Things
- Best Practices Before You Export
- Real-World Examples of When Playlist Export Helps
- Experience Section: What Exporting a Playlist Feels Like in Real Life
- Conclusion
If you have ever built the perfect iTunes playlist for a road trip, a workout streak, a wedding reception, or one deeply dramatic rainy Tuesday, you already know the truth: playlists are not just lists. They are tiny time capsules with better shuffle settings. That is exactly why learning how to export an iTunes playlist matters.
Maybe you want to move your playlist to another computer. Maybe you want a clean backup before you upgrade machines. Maybe you need a readable song list for a client, an event, or your own obsessive need to organize everything down to the last semicolon. Whatever the reason, exporting a playlist is easier than most people think once you know which format to choose and what Apple actually means by the word export.
In this guide, you will learn how to export an iTunes playlist on Windows, how the process works in the Music app on Mac, what file type to choose, how to import the playlist later, and what to do if you also need the actual music files. We will also cover the common gotchas, because no tech tutorial is complete without at least one “Wait, why is this menu item grayed out?” moment.
Why Export an iTunes Playlist in the First Place?
Exporting a playlist is useful for more than just moving songs around. In real life, people usually export playlists for five practical reasons.
First, it is a smart backup move. If you spent months building a carefully ordered playlist, exporting it gives you a copy of the playlist structure before anything goes sideways. Second, it helps when switching to a new computer. Third, it creates a text-based song list you can open in another app, send to someone, or keep as an archive. Fourth, it helps with sharing or recreating playlists in another Apple library. Fifth, it makes your music life feel slightly less like a mystery novel and more like a system.
That last one is underrated. A playlist can look permanent until a sync issue, a new laptop, or a missing library path suddenly reminds you that computers are loyal right up until they are not.
Before You Export: Understand What “Export” Actually Means
This is the part that saves people from disappointment. When you export an iTunes playlist, you are usually exporting playlist information, not the actual song files. In plain English, that means you are exporting the map, not the whole city.
Here is the simple breakdown:
- XML export is best if you want to import the playlist into iTunes or the Music app on another computer.
- Text export is best if you want a readable list of tracks and metadata for reference, spreadsheets, databases, or sharing.
- Export Library is best if you want to export all playlists and broader library information in one XML file.
So if your goal is, “I want the playlist structure on another computer,” use XML. If your goal is, “I just want a document listing all the songs,” use text. If your goal is, “I want the actual music files too,” playlist export alone is not enough. You will need to back up or copy the library media separately.
How to Export an iTunes Playlist on Windows
If you are using iTunes on a Windows PC, the export process is straightforward. Apple still supports playlist export in iTunes on Windows, which is excellent news for anyone keeping a carefully maintained local music library alive and well.
Option 1: Export One Playlist as XML
Choose this option when you want to reuse the playlist in iTunes on another computer.
- Open iTunes.
- In the sidebar, click the playlist you want to export.
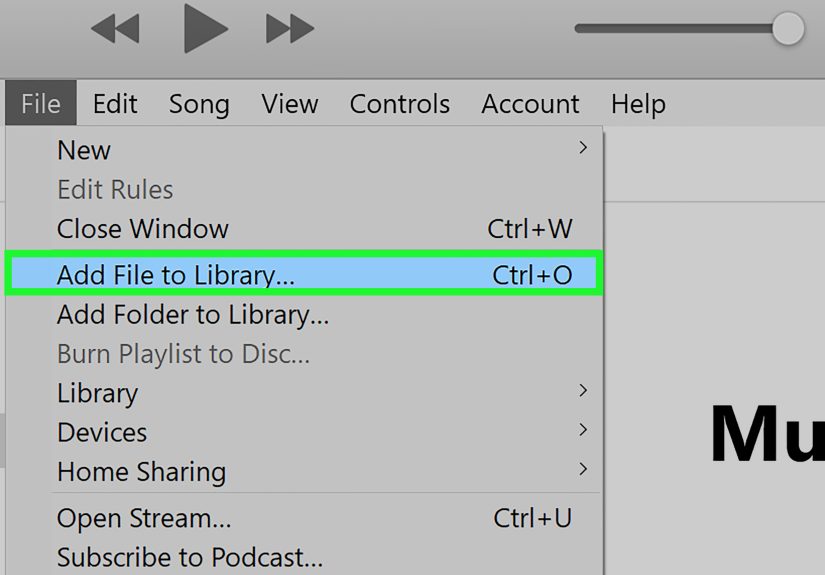
- Go to
File > Library > Export Playlist. - In the format menu, choose XML.
- Name the file and save it somewhere easy to find, such as your desktop or a backup folder.
That XML file stores playlist information, including the song references, order, and related metadata. It does not pack the music files into the export like a suitcase with a built-in zip code. It is more like a well-organized guest list.
Option 2: Export a Playlist as a Text File
Choose this option when you want a readable list of tracks for documentation, planning, or importing into another app that accepts text-based song data.
- Open the playlist in iTunes.
- Go to
File > Library > Export Playlist. - In the save options, choose Text files.
- Save the file.
This text export includes song information from the Info window for each item, not just whatever columns happen to be visible in your playlist view. That makes it surprisingly handy if you need a fuller song inventory for reference.
Option 3: Export All Playlists and Library Data
If you want a broader backup of playlist and library information, not just one playlist, do this:
- Open iTunes.
- Go to
File > Library > Export Library. - Save the XML file.
This exports all playlist and library metadata in XML format. It is a good move when you are migrating to another machine and want a fuller record of your setup.
How to Export an iTunes Playlist on Mac
On modern Macs, iTunes has been replaced by the Music app. Same mission, new outfit. If you are on macOS Catalina or later, use the Music app for playlist export.
Export One Playlist as XML in Music on Mac
- Open the Music app.
- Select the playlist in the sidebar.
- Go to
File > Library > Export Playlist. - From the format menu, choose XML.
- Save the file.
This is the best option when you want to recreate the playlist in Music on another Mac or in iTunes on a PC that has the same songs available in its library.
Export a Playlist as Text on Mac
- Open the Music app.
- Select the playlist.
- Go to
File > Library > Export Playlist. - Choose Text files in the save type menu.
- Save the file.
This option is useful if you want a plain list of song information for planning, records, or sharing with someone who does not need the actual Apple library structure.
Export All Playlists on Mac
- Open Music.
- Go to
File > Library > Export Library. - Save the XML file.
That creates a broader XML export of your library and playlist information. Think of it as the “whole filing cabinet” option instead of the “one folder” option.
How to Import the Playlist Later
Exporting is only half the story. If you want to use the playlist on another computer, you need to import it properly.
- Open iTunes on Windows or the Music app on Mac.
- Go to
File > Library > Import Playlist. - Select the exported XML file.
- Let the app recreate the playlist.
There is one big catch: the imported playlist only keeps songs that already exist in the destination library. If some tracks are missing, unavailable, or stored in a place the new computer cannot access, those entries will not come along for the ride. In other words, the playlist can only call names from a class roster that actually exists.
What If You Need the Actual Songs Too?
This is where many people take a wrong turn. Exporting a playlist does not export the media files. If you are moving to a new computer or want a complete backup, you should also back up your music library itself.
A smart way to prepare is to consolidate your library so your music files live in one organized location.
- Open iTunes or Music.
- Go to
Preferences. - Make sure the option to copy added files into the iTunes or Music Media folder is enabled.
- Then go to
File > Library > Organize Library. - Turn on Consolidate Files.
- After that, copy the full Music or iTunes folder to an external drive or backup location.
That way, you are not just saving the playlist recipe. You are saving the pantry too.
Common Problems When Exporting an iTunes Playlist
The Export Playlist Command Is Grayed Out
This usually happens when you are not selecting an actual playlist. Click a real playlist in the sidebar first, then try again. Library views and some special sections do not behave the same way.
The Imported Playlist Is Missing Songs
This is usually a library issue, not an export failure. The XML file may be fine, but the destination computer needs access to the same songs. If the music files are missing, moved, or not imported into the new library, the playlist will come in with holes like Swiss cheese at a metadata convention.
You Wanted CSV, M3U, or a Spotify-Ready File
Apple’s built-in export tools are mostly geared toward XML and text. If you need another format or want to move playlists between streaming services, you will usually need a separate transfer or conversion tool. That is a different job from classic iTunes playlist export.
You Are Using Apple Music on the Web or Mobile
Traditional file export is mainly a desktop workflow. Apple now also offers transfer options for some cross-service moves, but those are transfer tools, not the same thing as exporting a reusable local playlist file.
Export vs. Share vs. Transfer: Three Different Things
These terms get mixed up all the time, so let’s separate them cleanly.
Export means saving playlist information to a file, usually XML or text.
Share means sending someone access to a playlist within an ecosystem or through a link, where supported.
Transfer means moving playlist data between music services, such as from Apple Music to YouTube Music or from supported services into Apple Music.
If you only need a backup or a way to import the playlist into another Apple library, export is the right move. If you are changing streaming platforms, transfer is the better word and usually the better workflow.
Best Practices Before You Export
- Name playlists clearly so exported files are easy to identify later.
- Back up your library before major changes.
- Consolidate files if your music is scattered across multiple folders or drives.
- Save XML exports with a date in the filename, such as
RoadTripMix-2026-03-11.xml. - Keep both the XML file and a copy of the media library if the playlist matters long term.
- Use text export when you want a human-readable list, not a reimportable playlist structure.
These tiny habits save ridiculous amounts of frustration later. Future-you will be smug, organized, and maybe just a little insufferable. That is the dream.
Real-World Examples of When Playlist Export Helps
A wedding DJ may export a playlist as text to confirm the final running order with a couple before the event. A teacher may export a study playlist to document tracks used for a class project. A longtime iTunes user moving from an old Windows laptop to a new desktop may export the playlist as XML, copy the library files, and then import the playlist on the new machine. A music fan switching services may realize that export and transfer are not the same thing and use the right workflow instead of trying to force an XML file into a streaming app that just stares back blankly.
That is really the secret here: once you know what outcome you want, the process gets much easier.
Experience Section: What Exporting a Playlist Feels Like in Real Life
In theory, exporting an iTunes playlist sounds like a tiny administrative task. In practice, it often happens at a very specific moment in someone’s life: right before a device upgrade, right before a big event, right after a hard drive scare, or right when a person realizes that a playlist they built over ten years has somehow become emotionally significant. Nobody sits down on a random Tuesday and says, “Today I will celebrate metadata.” Exporting usually begins with urgency.
One common experience is the “new computer panic.” You get a fresh laptop, everything feels fast and shiny, and then you realize your old machine contains years of playlists with names like Focus But Make It Dramatic and Summer Drive 2018 Final Final Actually Final. At that point, exporting the playlist feels less like a technical step and more like preserving a scrapbook. The XML file becomes a safety net. It is small, simple, and oddly reassuring.
Another real-world experience is discovering the difference between a playlist and the songs inside it. This is where people learn, sometimes with a theatrical sigh, that exporting a playlist does not automatically move all the music files. The playlist imports beautifully, but half the tracks are missing because the new computer does not have the media yet. It is an incredibly common lesson, and honestly, it is the moment when many casual users become unexpectedly competent about backups. Nothing teaches file management like a beloved playlist with missing songs.
There is also the event-planning version of this experience. Someone curates music for a wedding cocktail hour, a school showcase, a yoga class, or a family reunion. In that situation, a text export is surprisingly useful because it creates a clean song list that can be reviewed, printed, shared, or approved by someone else. Suddenly, the playlist is not just for listening. It is part of a workflow. It becomes paperwork, but the fun kind.
Then there is the collector mindset. Some people export playlists because they simply do not trust the cloud with their taste. That is fair. Music libraries reflect years of moods, phases, discoveries, and accidental obsessions. A playlist can document what you listened to during college, during a breakup, during marathon training, or during that month when you insisted jazz fusion was your entire personality. Exporting those lists feels practical, but it also feels archival. You are preserving context, not just content.
What most people find after doing this once is that the process is much less intimidating than expected. The menu path is short. The file is small. The logic is clear once you understand XML versus text. The bigger challenge is usually deciding what you are trying to preserve: the playlist structure, the song list, or the entire media library. Once that decision is made, the rest becomes almost boringly simple, which is exactly what you want from a backup task.
And that may be the best takeaway of all. Exporting an iTunes playlist is not glamorous. It will not change your life, improve your cardio, or make your computer suddenly understand your cable drawer. But it will protect something you built. In the world of digital organization, that is a small win worth taking.
Conclusion
If you want to export an iTunes playlist, the process is simple once you match the method to the goal. Use XML when you want to import the playlist into iTunes or the Music app later. Use Text when you want a readable song list. Use Export Library when you want a broader XML backup of playlist and library data. And if you also need the actual music files, back up the full library separately after consolidating it.
The short version is this: exporting a playlist is easy, but exporting the right kind of playlist file is what saves time, confusion, and future muttering at your screen. Once you know the difference, you can back up, move, archive, or reuse your playlists without drama. Or at least with less drama than the playlist itself.


