Table of Contents >> Show >> Hide
- What Makes a Great Cherry Pie (Beyond Sheer Confidence)
- Ingredients
- Choosing Your Cherries (Fresh, Frozen, or Canned)
- Equipment You’ll Actually Use
- Step 1: Make the Pie Dough (Flaky Crust, Not a Workout)
- Step 2: Prep the Cherry Filling (Thick, Glossy, and Not Gloopy)
- Which Thickener Should You Use?
- Step 3: Roll Out the Crust
- Step 4: Make the Lattice Crust (It’s Weaving, Not Wizardry)
- Step 5: Assemble the Pie
- Step 6: Egg Wash + Sugar (The Pie’s “Glow Up”)
- Step 7: Bake Like You Mean It
- Step 8: Cool (Yes, Really)
- Serving Ideas
- Storage and Make-Ahead Tips
- Troubleshooting: Cherry Pie Problems (And How to Win)
- Variations You’ll Want to Try
- FAQ
- Cherry Pie with a Lattice Crust Recipe (Quick Printable Version)
- Cherry Pie Experiences: The 500-Word “Real Life” Add-On
If there’s a dessert that can make a grown adult forget their email password, it’s a homemade cherry pie with a lattice crust. It’s glossy. It’s ruby-red. It’s the kind of bake that makes your kitchen smell like you’ve got your life togethereven if you’re wearing socks that don’t match and you used the same spoon to “taste test” six times.
This guide gives you a foolproof cherry pie recipe with an easy, classic lattice top, plus the why behind each step (so you can fix problems before they become “rustic design choices”). You’ll learn how to pick the right cherries, keep your crust flaky, thicken the filling without turning it gummy, and bake until the fruit is bubbling like it’s gossiping.
What Makes a Great Cherry Pie (Beyond Sheer Confidence)
A truly great cherry pie filling hits three goals:
- Bright flavor: cherries taste like cherries (not just sugar with red dye energy).
- Sliceable texture: the filling sets, so your first cut doesn’t become cherry soup with a crust raft.
- Flaky, browned crust: crisp edges, tender layers, and a golden lattice that looks fancy without requiring a pastry degree.
Ingredients
For the Flaky Pie Crust (Double Crust)
- 2 1/2 cups (300g) all-purpose flour
- 1 tablespoon granulated sugar
- 1 teaspoon kosher salt (or 1/2 teaspoon fine salt)
- 1 cup (2 sticks / 226g) unsalted butter, very cold, cut into cubes
- 6 to 8 tablespoons ice water (add gradually)
- Optional: 1 to 2 teaspoons apple cider vinegar or lemon juice (helps tenderize)
For the Cherry Filling
- 6 cups pitted cherries (about 2 to 2 1/2 pounds whole cherries)
- 3/4 to 1 cup granulated sugar (use less for sweet cherries, more for tart cherries)
- 1/4 cup cornstarch or 1/3 cup tapioca starch (see thickener notes below)
- 2 tablespoons lemon juice
- 1 teaspoon vanilla extract
- 1/4 teaspoon almond extract (optional but highly recommended for “bakery flavor”)
- 1/4 teaspoon cinnamon (optional; keep it subtle)
- Pinch of salt
- 1 tablespoon butter (to dot on top of filling; optional)
For the Finish
- 1 egg + 1 tablespoon milk or water (egg wash)
- 1 to 2 tablespoons coarse sugar (sparkle = joy)
Choosing Your Cherries (Fresh, Frozen, or Canned)
Fresh Cherries
Sweet cherries (like Bing) are easier to find and taste like summer. They’re less tangy, so keep the sugar closer to 3/4 cup and don’t skip the lemon juice. Tart/sour cherries (like Montmorency) make the most classic American cherry pie flavorpunchy, bright, and not cloyingbut they’re seasonal and harder to track down.
Frozen Cherries
Frozen cherries are the weeknight hero. Thaw them in a colander over a bowl and save the juices. You can simmer the juices for a few minutes to reduce and concentrate flavor, then cool and add back to the filling. This helps avoid a watery pie without adding extra starch.
Canned Tart Cherries
Canned tart cherries (often packed in water) can make a legitimately good pie. Drain them, reserve some liquid, and use it to create a quick stovetop sauce with sugar and cornstarch before folding the cherries back in. It’s old-school, reliable, and very “church basement bake sale” in the best way.
Equipment You’ll Actually Use
- 9-inch pie dish (glass or metal both work)
- Rolling pin
- Bench scraper (helpful for moving dough)
- Pizza cutter or sharp knife (for lattice strips)
- Cherry pitter (optional, but it will save your sanity)
- Sheet pan (to catch drips and help the bottom crust bake)
- Foil (for shielding edges if browning too fast)
Step 1: Make the Pie Dough (Flaky Crust, Not a Workout)
- Mix dry ingredients: In a large bowl, whisk flour, sugar, and salt.
- Cut in the butter: Add cold butter cubes. Use your fingers or a pastry cutter to work the butter into the flour until you have a mix of pea-size pieces and a few flatter, almond-size shards. Those shards = flakes.
- Add ice water gradually: Drizzle in 6 tablespoons ice water, tossing with a fork. Add more water 1 tablespoon at a time until the dough holds together when you squeeze it. It should look a little shaggy, not smooth.
- Divide and chill: Form into two disks (make one slightly larger for the bottom). Wrap well and chill at least 2 hours (or up to 3 days). Cold dough is the secret sauce.
Why chilling matters: Cold butter hits the oven and creates steam pockets, which creates flaky layers. Warm butter melts early and turns your crust into a sad cookie.
Step 2: Prep the Cherry Filling (Thick, Glossy, and Not Gloopy)
Option A: Classic “Mix-and-Bake” Filling
- In a large bowl, combine cherries, sugar, cornstarch (or tapioca starch), lemon juice, vanilla, almond extract (if using), cinnamon (if using), and salt.
- Stir gently until the cherries look evenly coated.
- If using tapioca starch, let the filling sit 15–30 minutes before assembling the pie. This helps the starch hydrate and avoids gritty bits.
Option B: Concentrated Filling for Extra Sliceability
If your cherries are extremely juicy (hello, frozen or super-ripe fresh cherries), try this:
- After mixing, pour off about 1/2 cup of cherry juice (or use thawed juices) into a small saucepan.
- Simmer 3–5 minutes until reduced and slightly syrupy. Cool to room temp.
- Stir the cooled reduction back into the cherries before filling the pie.
Which Thickener Should You Use?
This is where pie people become sports fans. Here’s the practical breakdown:
- Cornstarch: common, easy, sets well. Can turn slightly cloudy, but nobody’s mad about it.
- Tapioca starch: sets clear and glossy and plays beautifully with fruit. Needs a short rest and can sometimes feel a bit “bouncy” if overused.
- Flour: works in a pinch but can taste starchy and needs more volume.
- Specialty starches (like ClearJel): great stability, especially for make-ahead pies, but not everyone keeps it in the pantry.
Step 3: Roll Out the Crust
- Let one disk sit at room temp for 5–10 minutes (just enough to roll without cracking).
- On a lightly floured surface, roll into a 12–13 inch circle.
- Transfer to your pie dish, gently pressing into the corners without stretching.
- Trim overhang to about 1 inch.
- Refrigerate the lined pie dish while you prep the top crust.
Step 4: Make the Lattice Crust (It’s Weaving, Not Wizardry)
Roll the second disk into a 12-inch circle. Cut into 10–12 strips, about 3/4 inch wide (wider strips = easier weaving and less tearing).
Easy Lattice Method (Classic Over-Under)
- Lay half the strips horizontally across the filled pie, evenly spaced.
- Fold back every other strip halfway.
- Place one vertical strip down the center.
- Unfold the folded strips over the vertical strip.
- Now fold back the opposite set of strips and place the next vertical strip.
- Repeat until you’ve woven the full lattice.
Pro tip: If the dough gets sticky or soft while weaving, slide the whole pie into the fridge for 10 minutes. Cold dough is cooperative dough.
Step 5: Assemble the Pie
- Add filling: Spoon cherry filling into the chilled bottom crust. If the bowl has juices, pour them in too (unless it’s an oceanthen reduce some as described).
- Dot with butter: Scatter small pieces over the filling (optional, but it adds richness).
- Weave lattice: Place and weave the strips.
- Seal edges: Fold the bottom crust up and over the lattice ends. Crimp with fingers or a fork.
- Chill again: Refrigerate the assembled pie 20–30 minutes. This helps the lattice hold its shape and reduces shrinkage.
Step 6: Egg Wash + Sugar (The Pie’s “Glow Up”)
- Whisk egg with milk or water.
- Brush lightly over the lattice and edges (not pooling).
- Sprinkle with coarse sugar for crunch and sparkle.
Step 7: Bake Like You Mean It
A cherry pie needs enough heat and time to do two things: brown the crust and fully activate the starch in the filling. Underbaked pie is the #1 reason filling turns runny.
Recommended Baking Schedule
- Place a sheet pan on the middle rack while the oven preheats to 425°F.
- Set the chilled pie on the hot sheet pan.
- Bake at 425°F for 20–25 minutes to set the crust.
- Reduce heat to 375°F and bake 35–45 minutes more, until the crust is deep golden and the filling bubbles thickly through the lattice.
What “done” looks like: You want slow, thick bubbles in multiple spotsnot just one tiny lava burp. Bubbling means the filling reached the temperature needed for starch to gel properly.
Prevent Over-Browning
- If edges brown too fast, cover them with foil or a pie shield after the first 25–30 minutes.
- If the top is browning faster than the bottom, move the pie down a rack.
- If juices spill, don’t panicthe sheet pan is there to save your oven from becoming a cherry smoke machine.
Step 8: Cool (Yes, Really)
Let the pie cool on a rack for at least 3 hours (4 is even better). Cutting early is like opening a present while the tape is still wet: messy and emotionally complicated. The filling continues to set as it cools.
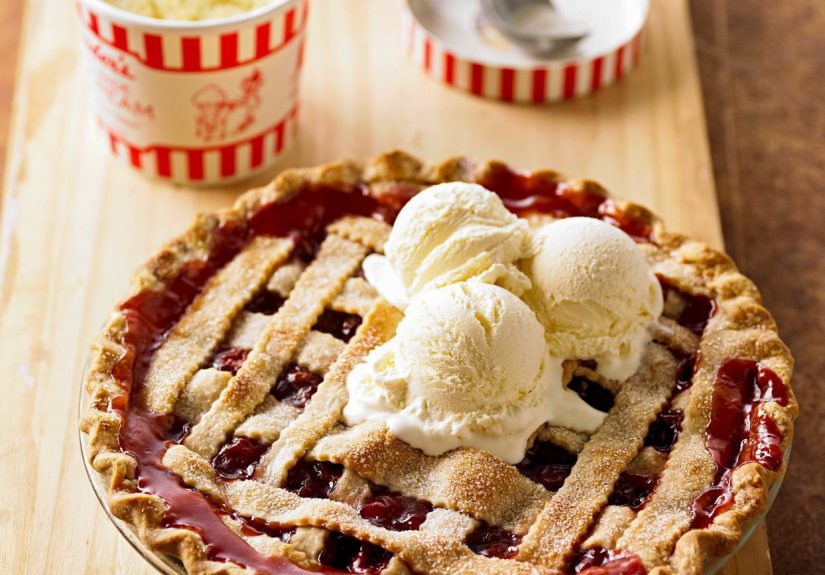
Serving Ideas
- Classic: warm slice + vanilla ice cream (because America)
- Low drama: room temp slice + lightly sweetened whipped cream
- Extra: a pinch of flaky salt on the ice cream (trust the process)
- Brunch energy: coffee + cherry pie for breakfast (no judgment; only applause)
Storage and Make-Ahead Tips
Storing
- Room temp: best the day it’s baked (loosely covered).
- Refrigerator: 3–4 days, wrapped well.
- Freezer: freeze whole pie or slices (wrap tightly). Thaw in the fridge overnight.
Reheating
Warm slices in a 325°F oven for about 10–15 minutes or until just warmed through. Microwaving works, but the crust will lose crispness (still delicious, just less “shattering pastry drama”).
Troubleshooting: Cherry Pie Problems (And How to Win)
“My filling is runny.”
- Most common cause: underbaking. Make sure the filling bubbles thickly.
- Next suspect: too much liquid from frozen cherries. Thaw, drain, and reduce juices.
- Also: slicing too soon. Cool at least 3 hours.
“My bottom crust is soggy.”
- Bake on a preheated sheet pan to blast heat upward.
- Use glass or metal (they conduct heat better than thick ceramic).
- Don’t skimp on total bake timepale pie is often underbaked pie.
“My lattice melted or slid around.”
- Dough got too warm. Chill before baking.
- Butter wasn’t cold enough at the start. Keep everything chilly, including your confidence.
“My pie leaked everywhere.”
- Some bubbling and drips are normal. The sheet pan is your friend.
- Make sure the edges are sealed and crimped; avoid big gaps where syrup can escape.
Variations You’ll Want to Try
Cherry-Almond
Use almond extract and sprinkle sliced almonds on top (press gently into egg-washed lattice). This tastes like a bakery case decided to be your best friend.
Cherry-Lemon
Add 1 teaspoon lemon zest to the filling for extra brightness, especially with sweet cherries.
Cherry with a Hint of Spice
Add a tiny pinch of cinnamon or a pinch of cardamom. Keep it subtlethis is cherry pie, not a holiday candle aisle.
FAQ
Do I need to blind bake the crust?
Not usually for this style. The hot oven start, preheated sheet pan, and full bake time are typically enough to cook the bottom crust properly.
Can I use store-bought pie crust?
Yes. You’ll still get a gorgeous lattice and a great pie. If you want the full homemade experience, make your own crust. If you want dessert tonight and sanity tomorrow, store-bought is totally valid.
How many cherries do I need?
Plan on about 2 to 2 1/2 pounds whole cherries to yield roughly 6 cups pitted. Your cherry pitter will earn its keep.
Cherry Pie with a Lattice Crust Recipe (Quick Printable Version)
Summary
Prep: 45 minutes (plus chilling) | Bake: 60–70 minutes | Cool: 3–4 hours | Makes: 1 (9-inch) pie
Instructions
- Make dough: Mix flour, sugar, salt. Cut in cold butter. Add ice water until dough forms. Divide into 2 disks and chill 2 hours.
- Make filling: Toss cherries with sugar, thickener, lemon juice, vanilla, optional almond extract, salt. Rest 15–30 minutes if using tapioca starch.
- Roll bottom crust: Roll to 12–13 inches, fit into pie dish, chill.
- Make lattice strips: Roll top dough to ~12 inches, cut into 10–12 strips.
- Assemble: Add filling to crust, weave lattice, fold and crimp edges, chill 20–30 minutes.
- Finish: Brush egg wash, sprinkle coarse sugar.
- Bake: 425°F for 20–25 min, then 375°F for 35–45 min until deeply golden and bubbling.
- Cool: 3–4 hours before slicing.
Cherry Pie Experiences: The 500-Word “Real Life” Add-On
There are two types of people in this world: those who think cherry pie is “just a dessert,” and those who have stood over a sink with cherry juice up to their elbows wondering if the stains are permanent. Making a cherry pie with a lattice crust tends to turn you into the second typefast.
For many home bakers, the first memorable moment happens before the oven even turns on: pitting cherries. It’s oddly soothing at firstpop, pop, popuntil you realize you’ve eaten enough “quality control” cherries to qualify as dinner. Then comes the surprise: cherries have opinions. Some are sweet and mellow; some are tart enough to make your eyebrows file a complaint. That’s why pie baking feels less like following instructions and more like negotiating with fruit. You taste, you adjust sugar, you add lemon, and suddenly you understand why people get dramatic about “balancing flavors.” It’s not dramait’s survival.
Then there’s the lattice. The lattice is where confidence goes to either glow up or take a quick nap. You roll the dough, cut strips, and think, “This is going great.” Two minutes later, you’re folding strips back like you’re playing a complicated card game you don’t fully understand. The best part? Even when the weave isn’t perfect, it usually looks impressive anyway. Lattice crust is basically the baking equivalent of wearing sunglasses: it makes everything look cooler, even if you’re not entirely sure what you’re doing.
One of the most relatable cherry-pie experiences is the “bubble watch.” You lean toward the oven door like you’re checking if the pie is texting you back. You want those thick cherry bubbles because you’ve heard the warnings: underbaked filling is runny filling. And when the pie finally bubbles in several spots, it feels oddly triumphantlike you’ve just won a small, delicious court case against physics.
Cooling is the emotional test. The pie sits theregolden, shiny, smelling like a summer fairwhile you’re told to wait hours. Many people don’t. They slice early, the filling runs, and they learn an important truth: cherry pie will forgive you, but it will also expose you. That first warm, messy slice is still wonderful, though, especially with vanilla ice cream melting into the cherry juices like it’s meant to be there (because it is).
And maybe that’s the heart of it: cherry pie isn’t just about perfection. It’s about the ritualthe stained fingers, the buttery dough, the little decisions that add up to something unmistakably homemade. Whether your lattice is ruler-straight or charmingly wobbly, the experience tends to end the same way: someone asks for seconds, and you quietly feel like a pastry wizard… even if you still can’t find your rolling pin because it’s in the dishwasher for reasons nobody can explain.


