Table of Contents >> Show >> Hide
- What Makes a Keyboard “Cyberpunk”?
- Choosing the Right Modular Keyboard Platform
- Parts You Need for a Cyberpunk Modular Keyboard
- Designing the Cyberpunk Look Without Overdoing It
- Step-by-Step Build Process
- Cyberpunk Modular Add-Ons Worth Considering
- Common Mistakes to Avoid
- Budget Planning: Where to Spend and Where to Save
- Experience Notes: What Building a Cyberpunk Modular Keyboard Actually Feels Like
- Conclusion
Building a cyberpunk modular keyboard is where desk setup obsession meets tiny-scale science fiction. It is not just about making a keyboard that types. Any plastic rectangle can do that, even the sad one sitting in an office supply aisle under fluorescent lights. A cyberpunk modular keyboard should feel like it was pulled from a neon-lit repair bench in a back-alley tech district: hot-swappable switches, glowing RGB, programmable layers, exposed accents, custom keycaps, a rotary knob, maybe a tiny OLED screen, and enough attitude to make your laptop look like it came from a school computer lab in 2009.
The good news is that you do not need to be an electrical engineer, soldering wizard, or mysterious hoodie-wearing hacker to build one. Modern keyboard kits, hot-swap PCBs, QMK/VIA firmware, 3D-printed cases, macropads, and modular accessories have made custom keyboard building far more approachable. The trick is planning the build before buying shiny parts at 1:13 a.m. while whispering, “This one has purple underglow.” We have all been there. The cart remembers.
This guide walks through how to design, assemble, customize, and tune a cyberpunk modular keyboard that looks cinematic, feels excellent, and works as a real daily driver for gaming, writing, coding, editing, streaming, or pretending your spreadsheet is classified intelligence.
What Makes a Keyboard “Cyberpunk”?
A cyberpunk keyboard is less about one exact layout and more about a design language: high-tech, slightly rebellious, and visually dramatic. Think translucent materials, black or gunmetal cases, neon legends, magenta and cyan lighting, exposed screws, industrial cables, modular macro clusters, programmable layers, and small functional details that make the board feel like a control deck.
The style works best when the keyboard is not only loud visually but smart functionally. A board with RGB slapped underneath every key can look cyberpunk for five minutes, but a board with carefully mapped layers, shortcut keys, a rotary encoder, OLED feedback, custom lighting zones, and swappable modules feels cyberpunk every time you use it.
Core Cyberpunk Design Elements
Start with a dark base: black aluminum, smoky acrylic, graphite plastic, transparent polycarbonate, or a painted 3D-printed shell. Add contrast through keycaps and lighting. Cyan, violet, red, amber, acid green, and electric pink all work, but avoid turning the board into a carnival ride unless “haunted arcade cabinet” is your target aesthetic.
Texture matters too. Cyberpunk looks great with matte surfaces, visible fasteners, layered plates, metal knobs, braided cables, and labeled function keys. You can also add decals, laser-etched plates, custom badges, translucent keycaps, or artisan keys that look like tiny warning lights. The best builds feel intentional, not like a robot sneezed LEDs onto your desk.
Choosing the Right Modular Keyboard Platform
The foundation of your build is the keyboard platform. For a cyberpunk modular keyboard, focus on three things: layout, hot-swap support, and programmability.
Layout: 65%, 75%, TKL, Split, or Macropad?
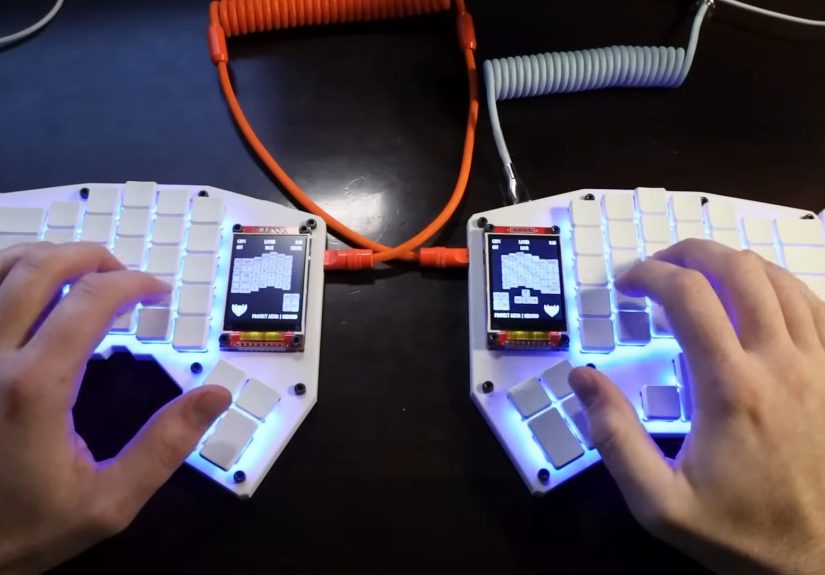
A 65% layout is compact and futuristic, keeping arrows while trimming the function row and numpad. It is excellent for gaming desks and minimal workstations. A 75% layout adds the function row and more navigation keys while still looking compact. Tenkeyless, or TKL, gives you a familiar layout minus the numpad. Split keyboards look the most “cyberdeck,” especially if you angle the halves and run a coiled or TRRS-style cable between them.
If you want true modular flavor, add a separate macropad. A macropad can handle media controls, app shortcuts, streaming commands, brush sizes in Photoshop, video editing actions, or game-specific macros. It also adds that delicious “mission control” feeling. Nothing says “I know what I’m doing” like a dedicated key labeled PANIC that actually just mutes Discord.
Hot-Swap Support Is Your Best Friend
Hot-swappable PCBs let you change switches without soldering. This is ideal for modular keyboard building because your preferences may change. You might start with smooth linear switches for gaming, then discover tactile switches make writing feel more satisfying. Or you may realize that clicky switches are fun until everyone in the house knows you typed the word “banana.”
Hot-swap sockets also make maintenance easier. If one switch feels scratchy or fails, you can pull it and replace it. For a cyberpunk build, hot-swap support lets you experiment with different switch colors, clear housings for RGB shine-through, and mixed switch layouts. For example, you might use fast linear switches on WASD, heavier tactile switches on modifiers, and a clicky switch on Escape because drama deserves a sound effect.
Programmability: QMK, VIA, and Custom Layers
Programmable firmware is what turns a pretty keyboard into a real tool. QMK is a popular open-source keyboard firmware used across many custom boards. VIA-compatible keyboards allow easier visual remapping, macro creation, and layer control without constantly recompiling firmware. For most builders, QMK/VIA support is the sweet spot: powerful enough for advanced layouts, friendly enough that you do not need to become a firmware goblin.
With layers, one physical key can do different things depending on the active mode. Your normal layer can handle typing. A function layer can control brightness, volume, Bluetooth profiles, screenshots, and media. A creative layer can launch apps, trigger macros, or control editing software. A gaming layer can disable Windows keys, move function keys closer, or create game-specific shortcuts. That is modularity at the software level.
Parts You Need for a Cyberpunk Modular Keyboard
A custom keyboard build usually starts with several core parts: case, PCB, plate, switches, stabilizers, keycaps, cable, and firmware tools. A cyberpunk build adds optional accessories like a rotary encoder, OLED screen, underglow LEDs, modular macro pad, metal badge, or custom printed case components.
Case
The case defines the silhouette. Aluminum feels premium and heavy. Acrylic and polycarbonate let light pass through, creating that neon underglow effect. Plastic is affordable and easy to modify. 3D-printed cases are excellent for experimental shapes, angled profiles, vents, fake access panels, and other cyberpunk details.
If you plan to carry the keyboard, avoid making it so heavy it qualifies as gym equipment. If it will stay on a desk, weight can be a feature. A heavy case reduces movement and often improves sound. It also makes the board feel like serious equipment, which is important when your keyboard looks like it could unlock a space elevator.
PCB
The PCB is the electronic heart of the keyboard. Choose a PCB that supports your desired layout, switch type, stabilizer style, lighting, and firmware. For a modular keyboard, hot-swap sockets and QMK/VIA compatibility are major advantages. If you want per-key RGB, check that the PCB supports it. If you want underglow, check for bottom-facing LEDs or headers.
For more advanced builders, hand-wired keyboards or custom PCBs can create unusual layouts. However, beginners should start with a proven hot-swap PCB or barebones kit. The cyberpunk future is fun, but troubleshooting a dead matrix at midnight is less “neon hacker” and more “why did I do this to myself?”
Plate
The plate holds switches in place and influences typing feel. Aluminum plates feel crisp and firm. Polycarbonate plates feel softer and can deepen the sound. FR4, the material often used for circuit boards, is a balanced choice. Brass adds weight and a sharper sound. For a cyberpunk board, a black FR4 plate, smoky polycarbonate plate, or brushed metal plate can all look excellent.
Switches
Switches determine most of the typing feel. Linear switches are smooth from top to bottom and are popular for gaming. Tactile switches have a bump that gives feedback while typing. Clicky switches add audible feedback, which is delightful to some people and a tiny thunderstorm to everyone else.
For a cyberpunk modular keyboard, consider clear or translucent switch housings if RGB matters. If sound is more important, look for switches known for deeper acoustic profiles. If speed matters, choose lighter linear switches. If accuracy matters, tactile switches can help your fingers know when a key actuates. The best switch is not the one with the fanciest name. It is the one you can type on for hours without wanting to throw your keyboard into a digital dumpster.
Stabilizers
Stabilizers support larger keys like Spacebar, Enter, Shift, and Backspace. Bad stabilizers rattle. Good stabilizers make a board sound polished. Screw-in stabilizers are common in custom keyboards and usually feel more secure than clip-in models. Lubing stabilizers carefully can reduce ticking and rattling, but do not drown them. A little grease is tuning. Too much grease is keyboard soup.
Keycaps
Keycaps create the visual identity. PBT keycaps are durable and resist shine better than many ABS caps. ABS keycaps can look vivid and sound bright, especially in high-quality double-shot sets. For cyberpunk style, look for dark bases with neon legends, translucent legends for RGB shine-through, side-printed caps, katakana-inspired legends, industrial warning-label designs, or custom accent keys.
Profile matters too. Cherry profile is comfortable and familiar. OEM is taller and common. MT3 or SA can feel sculpted and dramatic. Low-profile caps can look sleek and futuristic. Just make sure your keycaps match your layout. Nothing ruins a build faster than discovering your right Shift is the wrong size while the keyboard stares at you like it knew all along.
Designing the Cyberpunk Look Without Overdoing It
The best cyberpunk builds use restraint. Choose one main color, one accent color, and one lighting mood. Black with cyan and magenta is classic. Charcoal with amber looks industrial. Transparent smoke with violet lighting feels futuristic. White with red accents can look like medical-lab dystopia, which is oddly specific but extremely cool.
Lighting Strategy
RGB should support the design, not scream over it. Try a low-brightness static color, slow reactive ripple, or layered underglow. Per-key RGB can highlight function zones: cyan for typing, pink for macros, red for system controls, yellow for media. If your board supports lighting layers, create a “night city” mode with dim blue underglow and a few brighter accent keys.
For daily use, avoid maximum brightness unless your goal is to signal aircraft. Subtle lighting looks more premium and is easier on the eyes. A cyberpunk keyboard should look like a tool from the future, not a gaming mouse convention trapped under glass.
Labels, Icons, and Storytelling
Cyberpunk design works because it suggests a world. Add small labels: SYS, NET, RUN, AUX, FLUX, DECK, SCAN, LOCK, MUTE, BURN, or WAKE. Use custom keycaps for Escape, Enter, and macro keys. A tiny caution symbol on Backspace is funny and practical. A rotary knob labeled SIGNAL or VOLUME adds character. The board becomes more interesting when every detail feels like it belongs.
Step-by-Step Build Process
Step 1: Test the PCB Before Assembly
Before installing switches, connect the PCB to your computer and test every socket using keyboard testing software. Tweezers can carefully bridge switch contacts to confirm inputs. This step feels boring until it saves you from fully assembling a board with a dead key. Future-you will send present-you a thank-you note written entirely with functioning letters.
Step 2: Install and Tune Stabilizers
Install stabilizers before adding switches. Make sure wires are seated correctly and housings are secure. Apply a small amount of appropriate lubricant to reduce rattle. Test the stabilized keys by tapping them lightly. If the Spacebar sounds like a shopping cart, tune it before moving on.
Step 3: Add Plate and Switches
Place the plate over the PCB, align everything carefully, and begin installing switches. Start with corner switches to hold the plate and PCB together. Make sure every switch pin is straight before pressing it in. Bent pins are common, and they are sneaky. If a switch does not sit flush, remove it and check the pins rather than forcing it like a villain opening an elevator door.
Step 4: Mount the Assembly in the Case
Depending on your kit, the board may use tray mount, top mount, gasket mount, or another structure. Gasket mount designs often feel softer and sound more isolated because the plate assembly rests on flexible material. Tray mount boards are simpler and common in budget cases. Top mount boards can feel firm and consistent. For a cyberpunk build, gasket mount plus a polycarbonate or FR4 plate is a strong choice if you want a softer, deeper typing character.
Step 5: Add Foam Carefully
Case foam, plate foam, and switch pads can change the sound. Foam can reduce hollowness and make the board sound cleaner, but too much can make it feel muted. Start with the stock configuration. Test the sound. Then add foam one layer at a time. Keyboard tuning is a recipe, not a foam-eating contest.
Step 6: Install Keycaps
Install keycaps according to your layout. Watch row profiles carefully if your keycap set is sculpted. A misplaced key may still fit but feel strange. Put accent keys in high-impact spots: Escape, Enter, Spacebar, arrows, and macro cluster. For cyberpunk flair, use translucent or novelty caps sparingly so they feel special.
Step 7: Program Layers and Macros
Open your keyboard configuration tool and create useful layers. A practical setup might include a base typing layer, a media layer, a lighting layer, and an app shortcut layer. Map the rotary encoder to volume, timeline scrubbing, brush size, zoom, or tab switching. If you use a macropad, assign common tasks: copy, paste, undo, screenshot, mute, launch terminal, open browser, start recording, or switch scenes.
Step 8: Test Real Workflows
Do not judge the build only by a typing test. Use it for a full day. Write, game, edit, browse, and message. Notice what feels awkward. Move keys. Adjust layers. Change switches if needed. The point of a modular keyboard is not to get everything perfect immediately. The point is that you can keep refining it until it feels like an extension of your hands.
Cyberpunk Modular Add-Ons Worth Considering
OLED Display
A small OLED screen can show layer status, current mode, logo art, words per minute, connection state, or just a tiny animated face judging your typing. Is it necessary? Not usually. Is it deeply satisfying? Absolutely.
Rotary Encoder
A rotary encoder is one of the most useful add-ons. It can control volume, scrolling, zoom, brush size, timeline movement, or lighting brightness. It also gives the board a tactile control-panel feeling. Turning a metal knob to adjust volume is simply cooler than tapping a function key. This is not science; it is desk law.
Detachable Macropad
A detachable macropad is the easiest way to make a keyboard modular without designing a custom PCB. Place it on the left for gaming, on the right for editing, or above the keyboard for media controls. You can swap keycaps, switches, and profiles independently from the main board.
Custom Cable
A coiled cable with an aviator-style connector or clean USB-C cable can complete the look. Choose colors that match your build. Just remember that the cable is decoration and utility, not a personality replacement. A beautiful cable attached to a poorly tuned keyboard is like putting neon rims on a shopping cart.
Common Mistakes to Avoid
The first mistake is buying parts before checking compatibility. Confirm PCB layout, case fit, plate support, stabilizer type, switch pin style, keycap sizes, and firmware support. The second mistake is chasing trends instead of comfort. A board can look amazing and still be terrible to use if the layout fights your habits.
The third mistake is over-modding. Tape mod, foam mod, force break mod, switch films, spring swaps, and lube can all help in the right situation, but do not apply every mod just because someone online said “thock” with authority. Build, test, change one variable, then test again.
The fourth mistake is ignoring ergonomics. Cyberpunk style is fun, but wrist pain is not futuristic. Choose a comfortable typing angle, consider a wrist rest if needed, and position your mouse so your shoulders stay relaxed. Your keyboard should make you feel powerful, not like you lost a duel with a spreadsheet.
Budget Planning: Where to Spend and Where to Save
Spend money on the parts you touch and use most: switches, stabilizers, keycaps, and case quality. Save money by starting with a barebones kit instead of designing from scratch. You can also upgrade in stages. Build the board first, then add artisan caps, a custom cable, or macropad later.
A practical beginner-friendly cyberpunk build might use a 75% hot-swap barebones keyboard, tactile or linear switches, dark PBT keycaps with neon accents, a simple rotary knob, and custom lighting. A more advanced build might use a split layout, 3D-printed case, OLED displays, per-key RGB, QMK layers, and a matching macropad.
Experience Notes: What Building a Cyberpunk Modular Keyboard Actually Feels Like
The first thing you learn while building a cyberpunk modular keyboard is that the project looks simple until all the tiny parts arrive. Suddenly your desk is covered with switches, keycaps, stabilizer wires, foam sheets, screws, pullers, cables, and one mysterious extra washer that immediately becomes the most emotionally powerful object in the room. You do not know where it goes. It knows where it goes. It refuses to tell you.
The second thing you learn is that sound is personal. Before building, you may think “a keyboard is a keyboard.” After building, you will have opinions about hollowness, pitch, spring ping, bottom-out softness, and whether your Spacebar sounds “marbly” or “like a damp raccoon knocking on a lunchbox.” This is normal. The hobby changes your ears. You may never hear office keyboards the same way again.
During the build, the most satisfying moment is usually installing the first few switches and feeling the plate and PCB lock together. The board changes from a pile of parts into an object with purpose. Then the keycaps go on, and personality arrives. A black case with plain caps looks clean. Add translucent legends, neon accents, and a glowing macro cluster, and suddenly the keyboard looks like it belongs beside a rain-slick window overlooking a city full of questionable corporations.
Programming the layers is where the modular concept becomes practical. At first, you may add too many macros. You will think every possible action deserves its own key. Then you use the keyboard for a few days and realize you only need the shortcuts that reduce friction. A good macro layer should feel invisible. Screenshot, mute, volume, app switching, terminal, media controls, lighting modes, and a few creative tools are usually more useful than twenty dramatic buttons you never press.
The macropad is often the secret hero. A separate pad lets you keep the main keyboard clean while moving specialized controls wherever they make sense. For gaming, it can sit on the left with movement or ability keys. For video editing, it can sit near your mouse for timeline controls. For writing, it can hold formatting shortcuts, research tools, and music controls. The cyberpunk look is a bonus; the real win is reducing repetitive hand movement.
There is also a patience lesson. The first version of the build will probably not be final. One switch may feel too light. One lighting effect may look amazing at night and ridiculous during the day. One keycap color may clash. The knob may need a different function. That is not failure. That is the point of a modular keyboard. It evolves with your workflow.
The best final result is not the most expensive keyboard or the one with the wildest RGB. It is the board you keep wanting to use. It makes typing feel deliberate. It makes your desk feel personal. It turns ordinary work into a small ritual: plug in, lights wake, layers load, fingers settle, and the machine feels ready. That is the real cyberpunk magic. Not just neon. Not just noise. A tool that looks like fiction but works beautifully in real life.
Conclusion
Building a cyberpunk modular keyboard is a perfect project for anyone who wants a desk tool with personality, performance, and upgrade potential. Start with a layout that fits your daily work, choose a hot-swap PCB, select switches that match your typing style, tune the stabilizers, add keycaps with a strong visual theme, and use firmware layers to make the board genuinely useful. Then add cyberpunk details with restraint: underglow, accent keys, a rotary encoder, OLED display, custom cable, or detachable macropad.
The final keyboard should not just look like it belongs in a neon future. It should make today’s work faster, smoother, and more enjoyable. Build it carefully, test it honestly, and let it evolve. The best modular keyboard is never truly finished; it just keeps getting cooler.


