Table of Contents >> Show >> Hide
If you’ve ever lifted a sweaty glass or a dripping plant pot and found a ghostly white ring staring back at you, congratulations: you’ve met one of wood’s greatest enemieswater stains. The good news? In many cases, those marks are fixable. The better news? You probably already own half the “cleaning products” in your pantry or bathroom cabinet.
In this guide, we’ll break down what those water stains actually are, how to remove them from wood furniture and wood floors, and when it’s time to stop DIY-ing and call in the pros. We’ll also cover how to keep your surfaces protected going forward, so your coffee table doesn’t become a permanent ring collection.
First Things First: What Kind of Water Stain Is It?
Before you grab the mayo (yes, really) or the sandpaper, you need to know what you’re dealing with. Water stains on wood typically fall into two broad categories:
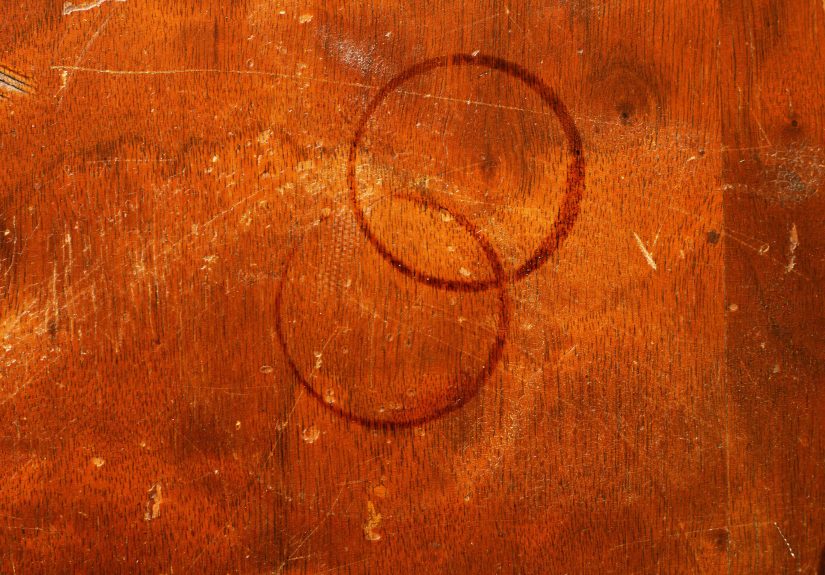
1. White or Light Water Stains
These cloudy rings or hazy spots usually mean moisture is trapped in the finish, not deep in the wood itself. Think of it as condensation that sneaked under your polyurethane or varnish but hasn’t reached the bare wood. These are the “good” stains, because they’re often reversible with mild methods like heat, oil, or gentle abrasives.
2. Dark or Black Water Stains
Dark stains usually signal that water has penetrated through the finish and reacted with the tannins in the wood. These are common around pet accidents, plant pots, persistent leaks, or long-standing spillsespecially on hardwood floors. Getting rid of these often requires bleaching, sanding, refinishing, or even board replacement.
So, quick recap: white stain = finish problem; dark stain = wood problem. Now let’s talk solutions.
How to Remove Water Stains From Wood Furniture
We’ll start with furniturecoffee tables, dining tables, nightstands, and any other wood surface that’s been personally victimized by condensation and carelessness.
Method 1: Mayonnaise (or Petroleum Jelly) for White Rings
It sounds like a prank, but it’s a classic trick: the oils in mayonnaise or petroleum jelly can help displace the moisture trapped in the finish, reducing those white rings.
- Blot the area first so it’s clean and dry.
- Dab a small amount of full-fat mayonnaise or petroleum jelly onto the ring.
- Cover with plastic wrap or a paper towel and let it sit for at least an hour (overnight for stubborn stains).
- Wipe away and buff with a soft cloth.
If the ring looks lighter or disappears, you’re done. If it only fades a little, you can repeat the process.
Method 2: Toothpaste and Baking Soda
For slightly more stubborn white stains, a mild abrasive can help. Several cleaning and furniture-care guides recommend using non-gel, non-whitening white toothpasteoften combined with a bit of baking sodato gently polish out the mark.
- Mix equal parts white toothpaste and baking soda into a smooth paste.
- Apply a pea-sized amount to a soft cloth.
- Rub gently over the stain in the direction of the grain for 30–60 seconds.
- Wipe clean with a damp cloth, then dry and buff.
Important: this method is slightly abrasive. It’s generally fine for modern, durable finishes, but you should always test in an inconspicuous area firstespecially on antiques or very delicate finishes. Some cleaning experts warn that baking soda can scratch wood and dull finishes if overused, so go slow and don’t scrub aggressively.
Method 3: Vinegar and Water (Plus Optional Baking Soda)
For light surface stains and haze, distilled white vinegar diluted with water can help dissolve mineral deposits or cloudy residue without being too harsh.
- Mix equal parts distilled white vinegar and water.
- Dampen (don’t soak) a microfiber cloth with the solution.
- Lay the cloth on the stain for up to an hour, or gently rub in small circles.
- Wipe dry and buff with a clean cloth.
If a faint ring remains, you can sprinkle a pinch of baking soda over the spot and buff gently, then wipe clean and dry completely.
Method 4: The Heat-Iron Trick
Because white water stains are basically trapped moisture, controlled heat can sometimes coax that moisture back out of the finish.
- Place a thin cotton cloth or paper towel over the stain.
- Set an iron to low or medium heat with no steam.
- Press it lightly over the cloth for a few seconds at a time, lifting and checking frequently.
- Stop once the haze fades, then buff the area.
This method can work surprisingly well, but it’s also easy to overdo it and damage the finishso keep the iron moving, go in short bursts, and always use a barrier cloth.
Method 5: The Walnut Trick for Light Stains
Some wood-care experts recommend rubbing a raw English walnut over light, surface-level white stains, especially on lightly finished or unfinished wood. The natural oils from the nut can help blend the stain into the surrounding grain while conditioning the wood.
- Crack a walnut and rub the meat of the nut over the stain in the direction of the grain.
- Let the oil sit for several minutes.
- Buff with a soft cloth.
Think of this more as a camouflaging and conditioning method than a full-on stain eraserbut on light marks, it can make a big cosmetic difference.
Tackling Dark Water Stains on Wood Furniture
Dark rings or spots on furniture are more serious. Moisture has traveled past the finish and into the wood fibers, and that often means you’ll need something stronger than mayo.
Option 1: Hydrogen Peroxide (Used Carefully)
On some dark water stains, a 3% hydrogen peroxide solution can act as a mild bleach to lift discoloration. DIYers and flooring pros have used it on both wood furniture and floors, often with decent success.
- Test in a hidden area first to see how the finish reacts.
- Dampen a cloth with 3% hydrogen peroxide and lay it over the stain.
- Let it sit for a few hours or overnight, checking periodically.
- Remove, allow to dry, and reassess the color.
That said, more recent cleaning guidance warns that hydrogen peroxide can be harsh on some wood finishes and may cause lightening or damage if overused, especially on floors. If your wood is expensive, antique, or sentimental, talk to a professional refinisher before going all in on bleach-based methods.
Option 2: Oxalic Acid and Wood Bleach
For truly deep, black stains that have penetrated through the finishoften around pet accidents or heavy leaksoxalic acid (wood bleach) is sometimes recommended. It’s strong stuff, commonly used to lighten dark patches in hardwood floors or water-damaged furniture.
The typical process looks like this:
- Strip or sand off the finish over the stained area.
- Mix oxalic acid crystals with water according to the product’s directions.
- Apply to the stain and let it sit for several hours.
- Neutralize and rinse (as directed), let dry, then sand lightly and refinish.
This is not a beginner-level project. You’ll need gloves, eye protection, ventilation, and patience. If you’re not comfortable with chemical bleaches and refinishing, this is an excellent time to call a pro.
How to Remove Water Stains From Wood Floors
Water on wood flooring is a whole different level of stress. Whether it’s from a potted plant, a dishwasher leak, or your dog’s “oops” moment, acting quickly is key. Experts consistently stress that prompt cleanup and thorough drying are the best defense against permanent stains.
Step 1: Assess the Stain
- White or light haze: likely in the finish only; treat similarly to furniture (light cleaning, gentle abrasives, or specialty floor cleaners).
- Dark or black areas: moisture has reached the wood, and you may need bleaching, sanding, or replacement of boards.
Method 1: Gentle Cleaning and Baking Soda Paste
For mild surface stains, some flooring specialists recommend starting with a mild cleaner or a baking-soda-based approach before jumping to sanding.
- Vacuum or sweep to remove grit.
- Spot clean the area with a wood-floor-safe cleaner.
- For light stains, you can try a thin paste of baking soda and water on a soft cloth, gently rubbing in the direction of the grain.
- Immediately wipe away residue and dry thoroughly.
Again, because baking soda is mildly abrasive and some experts caution against using it on certain wood finishes, always test in a closet or behind a piece of furniture first.
Method 2: Oxygen or Wood Bleach for Dark Spots
On darker water stains, especially those caused by pet urine, wood-care pros often use oxygen-based bleach, oxalic acid, or specialized wood bleaches after sanding down the affected finish.
The general process:
- Remove the finish over the stained area (careful, controlled sanding).
- Apply the recommended bleach (following product directions exactly).
- Allow it to dry completely and evaluate.
- Repeat if necessary until the color is acceptable.
- Neutralize, sand lightly for smoothness, then restain and refinish to match the surrounding floor.
This is often the best option to salvage boards with deep staining, but if the wood is structurally compromised (cupped, warped, or soft), replacement may be more practical.
Method 3: When to Avoid Hydrogen Peroxide on Floors
Hydrogen peroxide used to be a go-to suggestion for dark water stains on hardwood floors. Some flooring blogs still recommend a 3% solution applied with a cloth to gradually lift stains. However, more recent expert guidance warns that hydrogen peroxide can be too aggressive for many wood floor finishes, potentially lightening areas unevenly, damaging the protective coat, or even affecting the wood fibers over time.
If you’re considering peroxide on floors you care about (which, let’s be honest, is all of them), treat it as a last resort, always dilute according to reliable instructions, and spot-test in a hidden areaor better yet, consult a flooring professional first.
Method 4: Sanding and Refinishing
When stains are widespread, deep, or combined with other damage like scratches or dull finish, full sanding and refinishing may be the most efficient long-term fix. Flooring experts note that sanding lets you remove the stained surface, even out color, and apply a fresh protective finish over the entire floor or room.
This is a bigger projectusually involving drum sanders, edgers, multiple grits of sandpaper, stain, and a topcoat like polyurethane. Many homeowners hire professionals for this step, especially in large or high-value spaces.
How to Prevent Water Stains on Wood Furniture & Floors
The best water stain is the one that never happens. Furniture-care and floor-care pros all come back to a few key habits:
- Use coasters and placemats: Put them everywhere people set drinks. Think of them as tiny shields for your tabletops.
- Wipe up spills immediately: Water, wine, coffee, pet accidentsdon’t let any of it “sit and think about what it’s done.”
- Protect under plants: Use waterproof saucers under every plant pot sitting on wood.
- Control humidity: Use a humidifier or dehumidifier to keep indoor humidity in a stable range so wood doesn’t swell, crack, or attract condensation.
- Apply a protective finish: Seal bare or lightly finished wood with a suitable product (e.g., polyurethane, lacquer, or hardwax oil, depending on the piece and look you want).
- Use pads and mats: Felt pads under furniture legs, doormats at entries, and rugs in high-traffic areas help prevent scratches and moisture tracking.
Good maintenance doesn’t just prevent stainsit also makes your future cleaning efforts much easier and safer.
When to Call a Professional
DIY fixes are great for one or two rings on the coffee table, but they’re not always the best answer. Consider professional help if:
- The wood is antique, high-value, or sentimental.
- The stain covers a large area or multiple boards.
- The wood is warped, soft, or smells musty (possible hidden moisture damage).
- You’ve tried gentle methods and the stain hasn’t budgedor it’s getting worse.
Pros can evaluate what’s cosmetic and what’s structural, then suggest the right combination of bleaching, sanding, refinishing, or board replacement so you don’t accidentally turn a small problem into a bigger one.
Real-Life Lessons: Experiences With Removing Water Stains
Theory is great, but nothing beats real-world “I actually tried this” wisdom. Here are some practical takeaways drawn from homeowners, DIY enthusiasts, and wood-care pros who’ve battled water stains in the wild.
The Nightstand Water Ring That Wouldn’t Quit
One common story goes like this: someone leaves a sweating iced coffee on a wooden nightstand, wakes up to a bright white ring, panics, Googles frantically, and tries three methods in a row. The biggest lesson from these cases is patience. The mayo method or the toothpaste-and-baking-soda trick doesn’t always erase the stain in a single pass. Many people report better results after letting the mayo sit overnight or doing two or three very gentle rounds of rubbing with toothpaste paste, rather than scrubbing hard once and risking damage to the finish.
In other words, if something is “almost gone,” don’t jump immediately to sandpaper. Repeat the mild technique first and give the finish a chance to recover.
The Pet Accident on the Hardwood Floor
Pet owners know this pain: you move a rug and discover a dark, irregular stain where the dog or cat had a secret bathroom spot. By the time you see it, the damage is often deep. Many DIYers share that they tried cleaning products, stain removers, and even strong oxidizing agents, only to end up with a patch that was cleaner but still darkand sometimes lighter in odd ways.
The real-world takeaway is that once urine or standing water has soaked into the wood fibers and reacted with tannins, you’re often looking at a refinishing or board-replacement project. Spot bleaching can help, but matching color perfectly is a challenge. Homeowners who are happiest with the outcome tend to do one of two things: either accept a “character mark” and blend it as best they can, or commit to a broader sanding and refinishing project so the whole floor looks uniform again.
The “Oops, I Used the Wrong Cleaner” Scenario
Another common story: someone uses whatever cleaner is under the sinklike an all-purpose spray or undiluted vinegaron their wood furniture or floor. Initially, it looks great. Then, over time, they notice cloudiness, dull spots, or sticky residue that seems to attract more dirt.
People who’ve been through this learn to treat wood more like skin than like tile: you wouldn’t wash your face with oven cleaner, and you probably shouldn’t wash your oak dining table with it either. The best experiences come from sticking to cleaners made specifically for wood, or using gentle, diluted solutions and wiping dry immediately. Heavy-duty products and abrasive powders might fix one problem but create three new ones, especially on delicate finishes.
The “I Waited Too Long” Lesson
Floods, leaks, and large spills are in a category of their own. Homeowners who’ve dealt with dishwasher leaks or washing machine failures over wood floors almost always say the same thing in hindsight: “I wish I’d pulled everything up and dried it out faster.” Once water finds its way under planks or into subflooring, you move from superficial staining to large-scale warping and buckling, which can mean full replacement.
The practical lesson: if you ever have a major water event over wood, act like a professional restoration company would. Remove water immediately, pull up rugs or mats, run fans and dehumidifiers, and check underneath if possible. The faster everything dries, the better your odds of limiting stains and structural damage.
What People Are Glad They Didn’t Do
Interestingly, many people say they’re most relieved about the things they decided not to try. Common near-misses include:
- Using steel wool or very rough sandpaper on a small stain (which can leave a visible depression or swirl marks).
- Pouring straight bleach or strong chemicals directly on the stain “just to see what happens.”
- Scrubbing aggressively with baking soda on an antique or fragile piece.
- Trying five experimental methods in one day, making it hard to reverse damage or know what actually worked.
The people with the best outcomes usually do three things: they correctly identify the type of stain, start with the gentlest reasonable method, and give each method enough time to work before escalating. They also respect the limits of DIYcalling in pros when the piece is irreplaceable or the floor is such a big investment that experimenting feels risky.
Water stains on wood are annoying, but they’re not always permanent. With the right diagnosis, gentle techniques, and a bit of patience, you can often erase or soften those marksand with a few preventive habits, you can keep new ones from showing up in the first place.


