Table of Contents >> Show >> Hide
- Why Vinyl Fences Usually Fail
- Before You Start: What to Check First
- Way 1: Patch Small Cracks, Holes, and Surface Damage
- Way 2: Replace a Damaged Panel, Rail, or Picket
- Way 3: Fix the Structure by Resetting a Post or Repairing a Sagging Gate
- When to Repair a Vinyl Fence and When to Replace It
- Real-World Repair Experiences: Lessons Homeowners Learn the Hard Way
- Conclusion
A vinyl fence is supposed to be the low-maintenance hero of the backyard. It does not beg for paint, it does not rot like wood, and it usually stands there looking crisp and innocent while the rest of the yard starts plotting chaos. But even vinyl has its limits. A runaway mower, a slammed gate, shifting soil, or one spectacular storm can leave you staring at a crack, a loose panel, or a fence post that now leans like it has had a long week.
The good news is that most vinyl fence repair jobs fall into three practical categories. You either patch minor surface damage, replace a broken section, or fix the structure that is causing the problem in the first place. Knowing which repair fits your situation saves time, money, and a lot of muttering in the yard. It also helps you avoid the classic DIY mistake of “repairing” the symptom while the real problem keeps getting worse behind the scenes.
In this guide, you will learn the three best ways to repair a vinyl fence, how to tell which method makes sense, what tools you may need, and how to keep the repair from turning into a full fence replacement. Whether you are dealing with one cracked picket or a gate that now closes only if you sweet-talk it, this article will help you fix the problem with confidence.
Why Vinyl Fences Usually Fail
Before you grab tools, it helps to know what went wrong. Vinyl fencing is durable, but it is not magical. Most failures come from impact, poor support, hardware issues, or movement in the ground. A baseball, weed trimmer, mower, or heavy object can crack a panel. Heat and seasonal expansion can stress a tight installation. Loose hinges can make a gate sag. Poor drainage or shallow post setting can cause leaning posts over time.
That is why a smart vinyl fence repair starts with a quick inspection. Do not just look at the damage itself. Check the surrounding rails, the nearest post, the brackets, the gate latch, and the soil around the base. A cracked panel might be a one-off accident. A cracked panel plus a leaning post is a different story entirely.
Before You Start: What to Check First
Take ten minutes and inspect the fence like a detective instead of a person fueled by weekend confidence. Ask these questions:
- Is the damage cosmetic, partial, or structural?
- Is only one piece broken, or is the post out of alignment too?
- Does the fence use routed posts or bracket-mounted panels?
- Can you still buy matching replacement parts from the same brand or style line?
- Will the repair require digging near utilities or property lines?
For minor repairs, you may only need a vinyl repair kit, sandpaper, a clean cloth, and a putty knife. For section replacement, you may need a drill, screws, brackets, vinyl adhesive, a level, and replacement rails or panels. For post or gate repairs, expect heavier work: shovels, gravel, concrete, braces, a level, and possibly helper-level friendship.
One more tip that matters more than people think: try to match the exact fence brand, profile, and color. “Close enough” can look very far away from close enough once the sun hits the fence at 4 p.m.
Way 1: Patch Small Cracks, Holes, and Surface Damage
When this method works
This is the right fix when the fence has minor cosmetic damage but the panel is still solid and the surrounding structure is fine. Think small cracks, shallow gouges, little punctures, or chips that do not affect the strength of the section. If the vinyl is still holding shape and the post is not leaning, a patch is usually the fastest repair.
How to do it
Start by cleaning the damaged area thoroughly. Dirt, chalky residue, and lawn grime are not your repair kit’s best friends. Use mild soap and water, let the area dry fully, and inspect the crack again. If the damage is truly minor, apply a vinyl fence repair compound or patch material according to the product instructions. Some kits use a UV-resistant patch material, while others rely on filler that hardens and blends into the surface.
Apply the material carefully and avoid globbing it on like frosting a birthday cake. Smooth it out, let it cure, and lightly sand only if the instructions allow it. The goal is to create a clean, discreet repair that restores the appearance of the fence without weakening the surrounding vinyl.
When not to patch
If the crack runs through a rail connection, crosses a bracket point, or appears next to a post under stress, skip the patch and move to replacement. A patch is not a miracle. It is more like a bandage for a fence that otherwise still has good bones.
Best uses for this repair
- Small impact cracks from yard tools
- Tiny holes or chips
- Minor blemishes on visible fence surfaces
- Quick aesthetic repair before selling a home or hosting an event
This method is budget-friendly and beginner-friendly, but it works only when the problem is genuinely small. If the fence is broken through, popping apart, or bowing, do not waste a Saturday pretending a patch is enough.
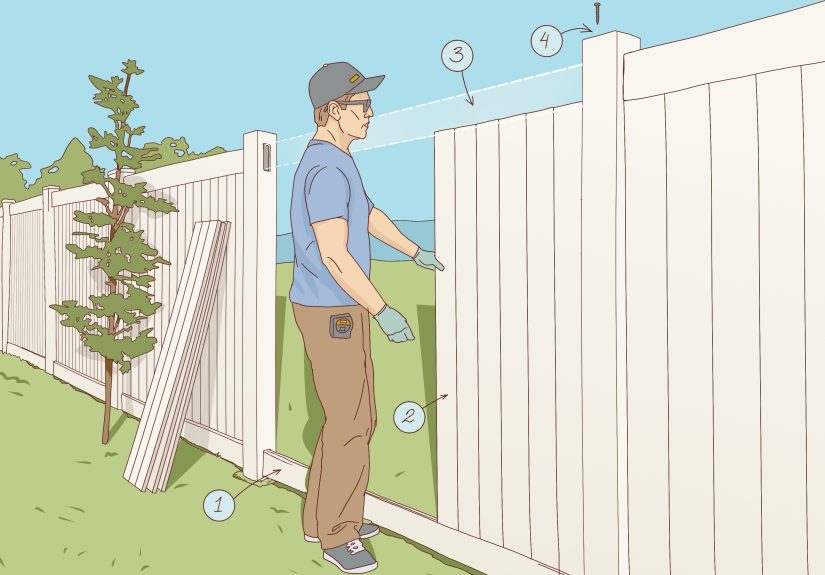
Way 2: Replace a Damaged Panel, Rail, or Picket
When this method makes sense
If one section of the fence is cracked beyond a simple patch, replacing the damaged component is usually the best repair. This is the sweet spot of vinyl fence repair: more serious than a cosmetic fix, but still manageable without rebuilding the entire fence line.
You may need this method when a privacy panel is split, a rail has snapped, a picket is broken, or a section has pulled loose from its post. In many vinyl systems, the individual parts lock together or slide into routed openings, so the basic job is to remove the damaged piece, install a matching replacement, and secure everything properly again.
How to replace the damaged section
Begin by removing the post caps if your system requires access from the top. On many fences, the top rail must come off first. If screws hold it in place, remove them with a drill. Then slide or lift out the damaged slats, pickets, or rail. Keep the surrounding pieces in order if they are custom cut or interlocking, because vinyl systems love making life easier right up until the moment they do not.
Once the broken part is removed, inspect the posts and connection points. If the post holes, brackets, or routed openings look cracked or stretched, replace those pieces too. Installing a new panel into worn-out hardware is like buying new shoes and then walking into a swamp.
Fit the replacement part carefully, making sure it sits flush, level, and square. Reinstall the top rail, secure screws where required, and glue post caps back on if your system uses adhesive. Step back and make sure the repaired section lines up with the rest of the fence. A fence can be technically repaired and still look like it made a bad decision. Aim for both function and appearance.
Why matching parts matter
Vinyl fence systems vary by profile, thickness, locking style, bracket design, and color tone. A replacement piece from the wrong line can fit badly or stand out visually. Even white is not always the same white. Bright white, warm white, and slightly aged-in-the-sun white are not identical, and your backyard will absolutely notice.
Common mistakes to avoid
- Forcing a piece into place instead of checking alignment
- Using substitute screws or random hardware
- Ignoring a loose bracket or cracked post opening
- Replacing only the visible part when a rail connection is also damaged
This method is ideal when the fence is mostly sound and only one section failed. It preserves the rest of the installation, costs less than full replacement, and keeps your project from snowballing into a whole-yard renovation you never asked for.
Way 3: Fix the Structure by Resetting a Post or Repairing a Sagging Gate
When this is the real problem
If your vinyl fence leans, wobbles, drags, or opens with the grace of a stubborn refrigerator door, the issue is probably structural. In that case, patches and panel swaps will not solve the real problem. You need to fix the support system.
Structural vinyl fence repair usually falls into two buckets: a leaning or loose post, or a gate with bad alignment, sagging hardware, or weak support. These repairs take more effort, but they are often the difference between a fence that lasts and a fence that keeps inventing new problems every season.
How to reset or replace a leaning vinyl fence post
First, remove any connected panel pieces so you can access the damaged post. Brace nearby sections if needed so you do not create a domino effect across the fence line. Then dig around the post and remove the old footing material if necessary. If the original post was set too shallow, placed in unstable soil, or installed without adequate drainage, now is your chance to correct that.
Add a gravel base for drainage, set the new or reset post plumb, and pour concrete around it according to the product instructions. Do not rush the curing time. A post that moves while the concrete sets can throw off the whole section. Once the post is solid, reinstall the panels or rails and check the fence line with a level.
If the post supports a gate, take extra care. Gate posts carry more stress than regular line posts because they deal with weight, motion, and constant use. That extra stress is why gate trouble often starts at the post, not the latch.
How to fix a sagging vinyl fence gate
A sagging gate usually comes from loose hinges, improper spacing, weak support, or a post that has shifted. Start with the easy stuff. Tighten the hardware, inspect the screws, and check whether the gate is out of square. If the latch no longer meets the receiver, measure the gap and look for a post that has drifted out of plumb.
If the gate itself is heavy or the ground is uneven, you may need a better support setup. A framed gate kit, cross-bracing system, upgraded hinges, or even a gate wheel can help reduce ongoing sag. The key is not just to make the gate close today. The key is to stop it from sagging again next month.
Signs you should choose structural repair instead of a shortcut
- The fence moves when you push it
- The post base looks loose or cracked
- The gate latch no longer lines up
- The top of the fence line looks uneven
- Repairs keep failing in the same area
This is the most labor-intensive of the three repair methods, but it is also the one that solves the deepest problems. When the structure is fixed correctly, everything else behaves better too.
When to Repair a Vinyl Fence and When to Replace It
Repairing a vinyl fence makes sense when the damage is isolated. One cracked section, one loose rail, one sagging gate, or one bad post does not usually justify tearing out the whole fence. But if you see repeated cracking, multiple leaning posts, severe discoloration, brittle material, or mismatched earlier repairs all over the yard, replacement may be the smarter long-term move.
A useful rule of thumb is this: if the fence has one clear problem, repair it. If the fence seems to have developed a personality disorder and every section is acting differently, replacement deserves serious consideration.
Real-World Repair Experiences: Lessons Homeowners Learn the Hard Way
In real-life vinyl fence repair, the same stories show up again and again. A homeowner sees one cracked panel and assumes the fix will take twenty minutes. Then they realize the top rail has to come off, the post cap is glued tighter than expected, and the replacement panel is not the same profile as the original one bought years ago. The lesson? The visible damage is usually only half the job. The other half is understanding how your fence system actually comes apart and goes back together.
Another common experience happens with gates. People often blame the latch because it is the part that refuses to cooperate. But after a closer look, the real issue turns out to be the hinge side post shifting slightly over time. It might only be a small change, but on a gate, a small change becomes a big annoyance fast. The gate drags. The latch misses. You lift the gate with one hand while closing it with the other, and suddenly every trip to the backyard feels like a tiny upper-body workout nobody requested.
There is also the classic “I can fix this with leftover hardware” moment. Someone uses substitute screws, a random bracket, or a repair piece from a different product line because it seems close enough. The repair may hold for a while, but vinyl fence systems are picky. Hardware that does not fit quite right can stress the vinyl, create wobble, or make the panel sit unevenly. What looked like a clever shortcut turns into a second repair later.
Homeowners also learn quickly that yard equipment is one of the biggest enemies of a vinyl fence. String trimmers scuff and crack thinner sections. Mowers can throw stones. Even routine yard work can stain the lower part of the fence if wet clippings keep hitting it. Many people only realize this after fixing one panel and then damaging another nearby while cleaning up. It is almost impressive, in a tragic sort of way.
Then there is the weather factor. A fence may look perfect in one season and start showing issues in another, especially if the ground shifts after long rain, intense heat, or freeze-thaw cycles. A repair that seemed cosmetic in spring can reveal a deeper support problem by late summer. That is why experienced DIYers often check plumb, spacing, and soil stability before deciding on a simple patch.
Perhaps the most useful lesson is this: patience matters more than strength. The best vinyl fence repair jobs usually come from careful measuring, proper leveling, and following the fence system as designed. The worst repairs usually come from forcing pieces, rushing cure times, or deciding that “good enough” is close enough. With vinyl, finesse beats brute force almost every time.
So if you are standing in the yard with a cracked panel, a tilted post, or a gate that now behaves like a diva, you are not alone. Most vinyl fence problems are fixable. The trick is choosing the right repair, respecting the structure, and resisting the urge to improvise like a reality-show contractor with five minutes left on the clock.
Conclusion
If you want to repair a vinyl fence the right way, match the method to the damage. Patch small cosmetic flaws. Replace broken panels, rails, or pickets when the damage is localized. Reset posts or repair gate support when the issue is structural. That simple framework keeps you from overreacting to a tiny crack or underreacting to a fence that is clearly asking for help.
The best vinyl fence repair is not just the one that looks decent on day one. It is the one that still looks straight, secure, and intentional months later. Take the time to inspect carefully, use the right parts, and fix the real cause. Your fence will look better, work better, and stop trying to become the most dramatic thing in your backyard.


