Table of Contents >> Show >> Hide
- Understanding Hair Dye Before You Start
- How to Choose the Right Hair Color
- What You Need to Dye Hair at Home
- Safety First: Patch Test and Strand Test
- How to Dye Hair Step by Step
- How to Dye Roots
- How to Cover Gray Hair
- Common Hair Dye Mistakes to Avoid
- Aftercare: How to Make Hair Color Last
- When to See a Professional Colorist
- Real-World Experiences: What Dyeing Hair Teaches You
- Conclusion
Dyeing your hair at home can feel like a tiny personal revolution. One minute you are standing in your bathroom wearing an old T-shirt, and the next you are imagining yourself as a glossy brunette, a glowing copper queen, a soft blond angel, or someone who finally defeated those sneaky gray hairs around the hairline. The good news? Learning how to dye hair is absolutely possible when you prepare well, choose the right color, and respect the instructions like they are the final boss in a video game.
The not-so-good news? Hair dye is not magic soup. It is chemistry. That means the best results come from planning, patience, allergy testing, proper sectioning, and realistic expectations. If your hair is naturally dark brown and you want icy platinum in one afternoon, your bathroom is not a salon and your sink is not a licensed colorist. But if your goal is to refresh your color, cover grays, deepen your shade, add warmth, or try a subtle change, home hair dye can be affordable, convenient, and surprisingly satisfying.
This guide breaks down how to dye hair safely and beautifully, from choosing the right formula to avoiding common mistakes. Think of it as your friendly roadmap to better color, fewer stains, and less panic-rinsing at midnight.
Understanding Hair Dye Before You Start
Before you grab the first box with a smiling model on the front, it helps to understand what different types of hair dye actually do. The right product depends on your goal, your current color, your hair condition, and how much commitment you are ready for.
Temporary Hair Color
Temporary hair color sits mostly on the surface of the hair and usually washes out quickly. It is ideal for parties, costumes, root touch-ups, or testing a fantasy shade without marrying it. The color may show up better on lighter hair than darker hair.
Semi-Permanent Hair Dye
Semi-permanent dye deposits color without making a major structural change to the hair. It can enhance tone, refresh faded color, or add a fun tint. It usually fades gradually after several washes. It is a friendly option for beginners because it is less permanent and generally less dramatic.
Demi-Permanent Hair Dye
Demi-permanent color lasts longer than semi-permanent dye and can blend grays, deepen your shade, or refresh dull color. It does not usually lighten hair significantly, so do not expect it to turn dark brown hair into honey blond.
Permanent Hair Dye
Permanent hair dye changes the hair more deeply and lasts until it grows out or is recolored. It is useful for full gray coverage, long-lasting color, or noticeable shade changes. Because permanent color often uses developer, it requires careful timing and application.
Bleach and Lightener
Bleach removes pigment from the hair. It is powerful, but it can also be damaging when used incorrectly. Major blonding, vivid fashion colors, color correction, or going several levels lighter is best handled by a professional colorist. Your hair deserves ambition, not a chemical cliff dive.
How to Choose the Right Hair Color
Choosing a shade is where many DIY hair color dreams either blossom or quietly pack a suitcase and leave. The safest rule for at-home hair dye is to stay close to your current color, usually within one or two levels lighter or darker. This gives you a more predictable result and lowers the risk of uneven color.
If you are torn between two shades, choose the lighter one only if your hair is already light enough to support it. Box dye cannot reliably lift previously colored dark hair to a much lighter shade. If your hair has old dye, highlights, henna, or damage, the final color may grab unevenly.
Also think about undertone. Warm shades include golden blond, caramel brown, copper, auburn, and chestnut. Cool shades include ash blond, cool brown, mushroom brown, and icy tones. Neutral shades sit in the middle and are often a safer first choice. If your skin looks great in gold jewelry, warm shades may flatter you. If silver jewelry makes you glow, cool shades may suit you. If both work, congratulations, your hair color options just got bigger.
What You Need to Dye Hair at Home
Having everything ready before you mix dye is essential. Once color and developer meet, the clock starts ticking. You do not want to discover halfway through that your clips are missing, your towel is white, and your dog has decided to supervise.
Basic Hair Dye Supplies
- Hair dye kit or professional color and developer
- Disposable gloves
- Old button-up shirt or robe
- Dark towel
- Plastic clips for sectioning
- Wide-tooth comb
- Timer
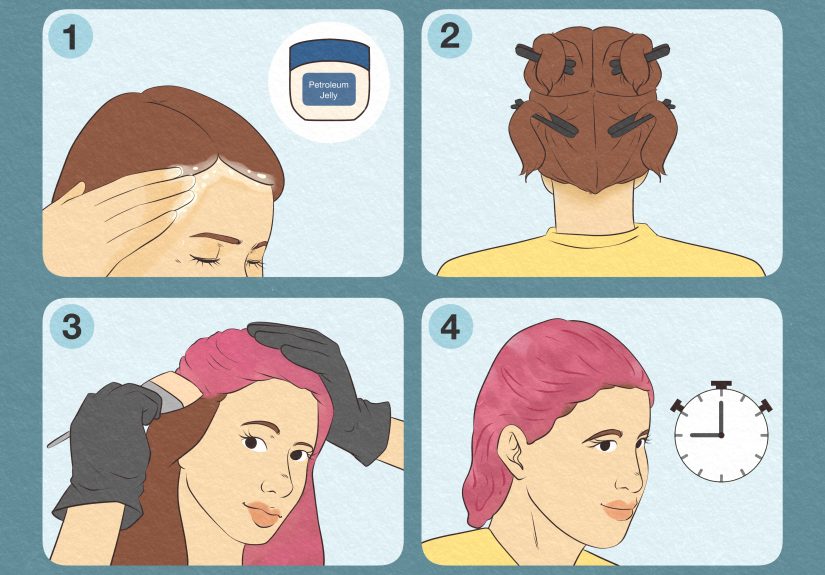
- Petroleum jelly or thick conditioner for the hairline
- Damp paper towels for quick cleanup
- Color-safe shampoo and conditioner
- Mirror, plus a second mirror for the back of your head
If your hair is thick, long, or very dense, buy two boxes of dye. Running out halfway through is the hair-color version of running out of gas on a bridge. Technically survivable, emotionally unnecessary.
Safety First: Patch Test and Strand Test
A patch test is not glamorous, but neither is an itchy, swollen scalp. Hair dye can cause allergic reactions, especially formulas containing ingredients such as PPD. Always follow the product’s allergy test instructions, usually 48 hours before coloring. Apply a small amount of mixed dye to the recommended area, such as behind the ear or inside the elbow, and watch for redness, itching, burning, swelling, or irritation. If any reaction appears, do not use the dye.
A strand test is also worth doing, especially if you are trying a new shade. Apply dye to a small hidden section of hair and process it according to the instructions. This preview helps you see how your hair reacts, how long it needs, and whether the shade is heading toward “expensive brunette” or “pumpkin spice emergency.”
How to Dye Hair Step by Step
Step 1: Start With Dry, Detangled Hair
Most permanent and demi-permanent dyes are applied to dry hair. Avoid washing your hair right before dyeing unless the product instructions say otherwise. Natural oils can help protect the scalp from irritation. Wash your hair one or two days before coloring, and skip heavy styling products that could block even color absorption.
Step 2: Protect Your Skin and Clothes
Wear an old button-up shirt or robe so you do not have to pull clothing over freshly dyed hair. Apply petroleum jelly or thick conditioner around your hairline, ears, and neck to reduce staining. Do not apply it directly onto the hair you want to color, because it can block dye.
Step 3: Section Your Hair
Divide your hair into four sections: down the middle from forehead to nape, then from ear to ear. Clip each section separately. Sectioning gives you control and helps prevent missed patches, especially at the crown and back of the head.
Step 4: Mix the Dye Correctly
Read the instructions before mixing. Yes, all of them. Even the tiny folded sheet that looks like it was designed by a furniture assembly manual committee. Mix the color and developer exactly as directed. Do not save leftover mixed dye for later, because the chemical reaction changes once mixed.
Step 5: Apply Color Where You Need It Most
If you are covering grays, start where your gray hair is most visible, often around the hairline, temples, and part. Gray hair can be more resistant, so giving those areas the first attention helps coverage. If you are refreshing previously colored hair, apply dye to the roots first and pull color through the ends only when the instructions recommend it. Ends are older and more porous, so they can turn too dark if overprocessed.
Step 6: Work in Small Subsections
Unclip one section at a time. Take small slices of hair, apply dye at the roots, and fully saturate each area. Use your gloved fingers or a tint brush to distribute the product evenly. Thick hair needs smaller subsections. If you slap dye on the outside and hope for the best, the inside layers may remain untouched, like they were not invited to the makeover.
Step 7: Set a Timer
Processing time matters. Leaving dye on longer than directed does not always make the color better. It may increase irritation or make ends too dark. Set a timer as soon as the application is complete, or follow the timing instructions for root applications if your product specifies a different method.
Step 8: Rinse Thoroughly
When time is up, rinse with lukewarm water until the water runs mostly clear. Many kits include a conditioning treatment; use it. Avoid hot water, which can encourage fading and dryness. Follow the package directions about shampooing. Some products recommend rinsing and conditioning only, while others include shampoo.
Step 9: Dry and Inspect in Natural Light
Hair color can look different under bathroom lights. Once your hair is dry, check the shade in natural light. Do not panic if it looks slightly intense on day one. Many colors soften after the first wash or two. If something looks uneven, wait before rushing into a second chemical process. Hair color correction is where professionals earn their capes.
How to Dye Roots
Root touch-ups are one of the most common reasons people dye hair at home. For the best result, apply color only to the new growth unless the instructions say to refresh the lengths. Overlapping permanent dye again and again onto already colored hair can create dark bands, dryness, and dullness.
Use a tail comb or applicator tip to part thin rows of hair. Apply dye directly to the root area, then move to the next row. Focus on the hairline, temples, and part first if those areas are most visible. For the back of your head, use a second mirror or ask someone you trust. Choose someone patient, not someone who thinks “close enough” is a hair philosophy.
How to Cover Gray Hair
Gray hair can be stubborn because it may have a different texture and lower porosity than pigmented hair. Permanent hair dye is often the most effective option for full gray coverage. Choose a shade close to your natural color if you want low-maintenance results.
For scattered grays, demi-permanent color may blend them softly rather than fully cover them. For a natural look, avoid going too dark. Very dark dye can make regrowth more obvious and create a harsh line at the roots. Medium brown, soft black, dark blond, warm brown, or neutral brown shades often look more forgiving than flat black.
Common Hair Dye Mistakes to Avoid
Choosing a Shade Based Only on the Box Photo
The model on the box is a suggestion, not a prophecy. Your starting color, hair history, and porosity affect the final result. Always check the shade chart on the side or back of the box.
Trying a Huge Color Change at Home
Going from dark brown to platinum blond, black to pastel pink, or red to ash blond usually requires multiple steps and professional skill. Attempting it at home can lead to breakage, orange tones, patchiness, or a color correction bill that makes your wallet whimper.
Skipping the Patch Test
Even if you have dyed your hair before, allergies can develop over time. A patch test before each coloring session is a simple safety step.
Not Using Enough Product
Long or thick hair needs more dye. Uneven saturation leads to uneven color. When in doubt, have an extra box ready.
Overlapping Dye on the Ends
Previously colored ends can absorb more pigment and become too dark. Apply permanent color to the roots first, and refresh the ends only as directed.
Aftercare: How to Make Hair Color Last
Once your hair is dyed, aftercare keeps the color vibrant and the hair feeling soft. Use shampoo and conditioner designed for color-treated hair. Wash less often when possible, and use lukewarm water instead of hot water. Heat styling can speed up fading and dryness, so apply a heat protectant before blow-drying, curling, or straightening.
Sun exposure can fade color, especially red, copper, and fashion shades. Wear a hat outside or use hair products with UV protection. If your blond or highlighted hair turns yellow or brassy, purple shampoo may help neutralize warm tones. Use it carefully, because too much can make hair look dull or slightly violet.
Deep conditioning treatments can help maintain softness, especially after permanent dye or lightening. Hair that feels dry, stretchy, brittle, or rough needs a break from chemical services. Sometimes the best beauty move is not another dye job, but a mask, a trim, and a peaceful evening away from developer.
When to See a Professional Colorist
DIY hair dye works best for simple changes. You should consider a salon if you want to go more than two shades lighter, bleach your whole head, correct a bad color result, remove black dye, dye over henna, create balayage, add complex highlights, or fix banding. A professional colorist can evaluate your hair history, condition, and realistic options.
Also see a healthcare provider if you experience severe itching, swelling, blistering, burning, trouble breathing, or a widespread rash after using hair dye. Stop using the product immediately if irritation occurs. Your scalp is not supposed to feel like it is auditioning for a disaster movie.
Real-World Experiences: What Dyeing Hair Teaches You
The first experience many people have with hair dye is not a dramatic salon transformation. It is usually a bathroom experiment involving nervous excitement, a towel that has seen better days, and the sudden realization that hair is much thicker in the back than it looks from the front. That first attempt teaches one important lesson: preparation is everything. The people who get the best at-home results are not necessarily the bravest. They are the ones who lay out their tools, read the instructions, section carefully, and keep damp paper towels nearby like tiny emergency workers.
Another common experience is learning that hair color has memory. If you dyed your hair dark last season, added highlights six months ago, or used a red gloss that “totally faded,” your hair may still remember. Color can grab differently on old highlights, dry ends, or previously dyed sections. This is why strand tests matter. They are not just cautious; they are little previews of the future. A five-minute hidden test can save you from a full-head surprise that requires hats, confidence, and possibly professional help.
People also learn quickly that the hairline is both the most visible area and the easiest place to stain. Applying a barrier cream around the forehead and ears feels like a small step until you skip it once and spend the evening scrubbing your skin like you are trying to erase a fake mustache. A little petroleum jelly, careful application, and fast cleanup can make the difference between “fresh color” and “I lost a fight with a chocolate fountain.”
Gray coverage brings its own lessons. Many people discover that resistant grays need patience and full saturation. A light swipe of color over the temples may not be enough. Starting with the grayest areas, using enough product, and respecting the full processing time can improve results. Still, gray hair can be unpredictable. Some people prefer full coverage, while others like a softer blend because it grows out more gracefully.
One of the biggest emotional lessons of dyeing hair is that subtle changes can be powerful. You do not always need a dramatic transformation to feel refreshed. A richer brown, a warmer copper, a softer black, or a gloss that revives dull ends can make hair look healthier and more intentional. Sometimes the best color is not the loudest one; it is the one that makes you look rested, polished, and slightly mysterious in grocery store lighting.
Finally, at-home hair dye teaches humility. Even careful people make mistakes: a missed spot near the crown, ends that go too dark, a shade that looks warmer than expected, or a shower wall that now has “modern art” splashes. The trick is not to panic. Wait until the hair is dry, look at it in daylight, and avoid immediately piling on more dye. Hair color can often be adjusted, but rushed corrections can make the problem worse. The best experience comes from treating hair dye as a process, not a one-box miracle. With practice, patience, and realistic expectations, dyeing hair at home can become less scary and much more fun.
Conclusion
Learning how to dye hair is part beauty skill, part science project, and part patience test. The formula for success is simple: choose a realistic shade, do a patch test, perform a strand test, section your hair, apply enough product, follow the timer, and take care of your color afterward. At-home hair dye can refresh your look, cover grays, and boost your confidence without a salon appointment. Just remember that big transformations, bleach work, and color corrections are usually best left to professionals.
When done carefully, hair dyeing can be creative, affordable, and genuinely satisfying. Your bathroom may not have salon lighting or a cappuccino machine, but with the right approach, it can still deliver a color result you are proud to show off.
Note: This article is for general educational and beauty guidance. Always follow the instructions on your specific hair dye product, complete the recommended allergy test, work in a ventilated space, and consult a licensed colorist or healthcare professional when needed.


