Table of Contents >> Show >> Hide
- Why DIY Wall Ledges Are Worth Making
- What You Need Before You Start
- Choosing the Best Wood for DIY Wall Ledges
- Easy DIY Wall Ledge Dimensions to Try
- How To Make DIY Wall Ledges: Step-by-Step
- How To Hang DIY Wall Ledges Securely
- Best Places To Use DIY Wall Ledges
- Common DIY Wall Ledge Mistakes To Avoid
- How To Style DIY Wall Ledges So They Look Good
- Final Thoughts
- Experience: What Building DIY Wall Ledges Actually Teaches You
- SEO Tags
Blank walls are a little like awkward party guests: full of potential, but not doing much until someone gives them a job. That is exactly where DIY wall ledges shine. They are easy to build, easier to customize, and wildly useful once they are up. A wall ledge can hold framed art, children’s books, cookbooks, small plants, records, or the random candle you bought because it smelled like “coastal cedar dreams.” Unlike a traditional gallery wall, a ledge lets you swap things in and out without turning your drywall into Swiss cheese.
If you have been wondering how to make DIY wall ledges without turning your weekend into a carpenter-themed survival show, the good news is this project is very doable for beginners. You do not need a full woodshop. You do not need a dramatic soundtrack. You just need a smart plan, a few basic tools, and enough patience to measure twice instead of once with confidence and once with regret.
In this guide, you will learn how to choose materials, cut and assemble a simple ledge, mount it securely, finish it cleanly, and style it so it looks intentional instead of “I found three frames and panicked.” Whether you want a sleek picture ledge for a hallway or a deeper wall shelf for a nursery or reading nook, this step-by-step approach will help you build something practical, attractive, and sturdy.
Why DIY Wall Ledges Are Worth Making
A good wall ledge sits in that sweet spot between décor and storage. It takes up very little room, makes vertical space useful, and gives you flexibility that standard wall art does not. If your style changes with the seasons, your children outgrow their book obsession, or you suddenly decide your living room needs more pottery and fewer motivational quotes, a ledge makes updates easy.
DIY wall ledges also win points for affordability. You can build them with common boards from a home center, keep the design simple, and make multiple shelves in one batch. That means better value, cleaner visual consistency, and far fewer “why does this shelf look nothing like the other shelf?” moments.
Another big advantage is customization. You choose the length, depth, color, finish, and mounting height. Want a narrow ledge above a desk? Done. Need a long gallery ledge over a sofa? Also done. Prefer a rustic stained look, a crisp painted finish, or a natural wood tone? Your shelf, your rules.
What You Need Before You Start
Basic Materials
- One 1×4 board for the shelf base
- Two 1×2 boards for the front lip and back support
- Wood screws
- Wood glue
- Wood filler
- Sandpaper in medium and fine grits
- Primer and paint, or stain and clear topcoat
- Wall screws and anchors rated for your wall type and shelf load
Basic Tools
- Tape measure
- Pencil
- Level
- Stud finder
- Miter saw, circular saw, or handsaw
- Drill or driver
- Clamps
- Sanding sponge or orbital sander
- Paintbrush or foam brush
If you are a beginner, keep the design simple and use pre-cut boards when possible. Many home centers will cut boards for you, which is lovely because it lets you skip the part where you stare at a saw wondering who really holds the power in the relationship.
Choosing the Best Wood for DIY Wall Ledges
If the shelf will be visible, pick boards that look clean and straight. Appearance matters here. A beautiful stain will not magically distract from a warped board that looks like it has lived a hard life. Pine is one of the most popular choices for DIY wall ledges because it is affordable, easy to cut, and easy to finish. Poplar is another strong option if you want a smoother painted result. Oak gives you a more premium look, but it costs more and takes a bit more effort to work with.
For most indoor wall ledges, common softwood boards are perfectly fine. The key is to avoid twisted, cracked, or badly cupped pieces. Sight down the length of the board before buying it. If it curves like a banana, leave it for someone who enjoys unnecessary challenges.
As a general rule, shallow picture ledges do well with a 1×4 base and 1×2 trim pieces. If you want deeper wall-mounted ledges for books or decorative objects, move up to a 1×6 or 1×8 base and keep the lip proportional. Larger shelves can still look clean, but they need more thoughtful support and more respect for weight.
Easy DIY Wall Ledge Dimensions to Try
Not every room needs the same shelf. These common sizes work well for most homes:
- Picture ledge: 24 to 48 inches long, about 3.5 to 4 inches deep
- Book ledge for kids’ rooms: 24 to 36 inches long, about 5.5 to 6 inches deep
- Display ledge for living rooms: 36 to 60 inches long, about 4 to 6 inches deep
If you are unsure where to start, a 36-inch shelf is a friendly middle ground. It looks substantial without being awkward to cut, finish, or install.
How To Make DIY Wall Ledges: Step-by-Step
Step 1: Measure Your Space
Decide where the ledge will go and what it needs to hold. Art prints and photos need less depth than books, and a nursery shelf full of board books has a very different personality than a hallway shelf holding one tiny vase and a lot of ambition. Measure the available wall area and mark your target shelf length.
Step 2: Cut the Boards
For one simple wall ledge, cut your 1×4 base to your desired length. Then cut two 1×2 pieces to the same length. One 1×2 becomes the front lip that keeps items from sliding forward. The other becomes the back rail that helps create structure and gives you a solid mounting area.
If you want a cleaner, more custom look, lightly sand the cut edges right away so you are not dealing with splinters later. Future you will be grateful.
Step 3: Dry Fit the Shelf
Lay the base board flat. Position one 1×2 along the back long edge and the other along the front long edge. The front piece should sit upright to form a lip, while the back piece creates height and support. Check that all edges are flush and square before attaching anything.
Step 4: Glue and Screw the Pieces Together
Apply wood glue where the boards meet. Clamp the assembly if you can. Then predrill pilot holes to help prevent splitting, especially near the ends. Drive screws through the base into both the front lip and the back rail. Wipe off excess glue before it dries, because dried glue likes to ruin good finishes and good moods.
If you prefer a cleaner face, you can use brad nails in addition to glue, then reinforce from underneath with screws. Either way, the goal is a rigid shelf that does not wobble when handled.
Step 5: Fill, Sand, and Smooth
Fill visible screw holes or minor gaps with wood filler. Once dry, sand the whole shelf until it feels smooth. Start with a medium grit if needed, then move to a finer grit for the finish pass. Always sand with the grain. This is one of those little details that separates “homemade” from “made on purpose.”
Step 6: Prime, Paint, or Stain
Now for the personality stage. If you are painting the ledge, prime bare wood first, especially patched spots. After the primer dries, sand lightly, remove dust, and apply thin, even coats of paint. If you are staining, make sure the wood is bare and properly sanded so it absorbs color evenly. For either finish, patience matters more than speed. Rushing usually creates drips, fingerprints, and a sudden need for very creative vocabulary.
For extra durability, especially in busy rooms, finish the shelf with a protective clear coat. Let everything cure properly before installation. A shelf that feels dry is not always fully hardened, so give it time.
How To Hang DIY Wall Ledges Securely
Find Studs First
If at all possible, mount the ledge into wall studs. This gives the best support and is especially important if the ledge will hold books, layered frames, or heavier décor. Use a stud finder, mark the stud centers, and plan your screw placement before you lift the shelf.
Use Anchors When Necessary
No stud where you want the shelf? That is common, not tragic. You can use drywall anchors that are rated for the total weight of the shelf and its contents. Read the anchor packaging carefully and do not guess. The wall is not the place for optimism without math.
Mark a Level Line
Use painter’s tape or pencil marks to map out the top or bottom of the ledge. Double-check with a level. Nothing reveals itself faster than a crooked shelf holding straight picture frames.
Mount Through the Back Rail
Drive mounting screws through the back rail into the wall. If the ledge is long, use multiple fasteners spaced appropriately. If the shelf will hold heavier items, choose longer screws for stud locations and match anchor type to your wall material where studs are unavailable.
Before you fully tighten everything, step back and recheck for level. This is your last easy moment to fix it.
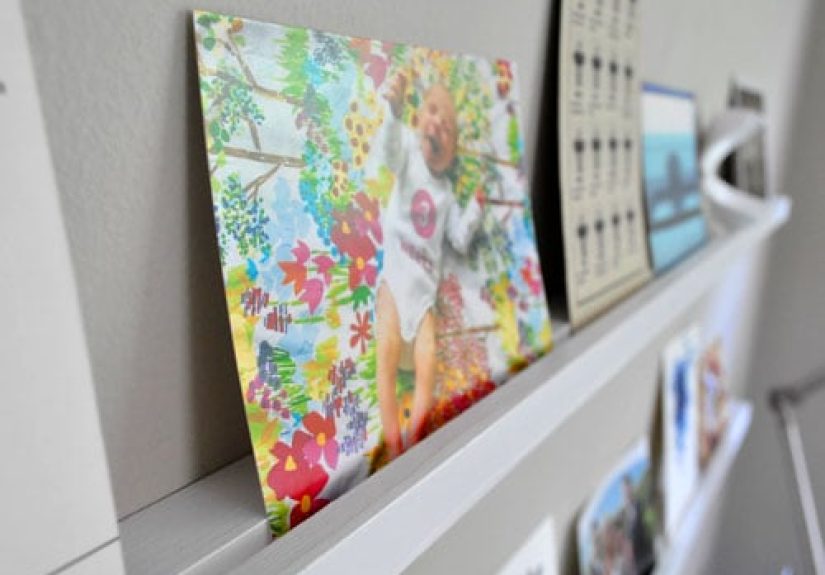
Best Places To Use DIY Wall Ledges
- Living room: Layer framed art, books, and a few sculptural pieces
- Nursery: Display children’s books with covers facing out
- Kitchen: Hold cookbooks, small art, or lightweight jars
- Entryway: Create a rotating gallery with seasonal prints
- Bathroom: Add storage above the toilet or beside a vanity
- Hallway: Use a narrow ledge to make a forgotten wall feel styled
If you are decorating a small room, wall ledges are especially useful because they add display space without taking up floor area. That is a design win and a toe-saving win.
Common DIY Wall Ledge Mistakes To Avoid
Using Crooked Lumber
If the boards are bent at the store, they will not become straighter at home out of gratitude. Choose the straightest pieces you can find.
Ignoring Weight
Picture ledges are not tiny bridges. They are shelves. Know what you plan to place on them and install accordingly.
Skipping Surface Prep
Good finishing starts before paint or stain ever opens. Clean, sand, and prep properly or the final look will suffer.
Forgetting the Wall Type
Drywall, plaster, tile, and masonry all behave differently. Choose hardware for your actual wall, not your dream wall.
Making the Lip Too Short
A decorative ledge needs a front lip tall enough to keep items stable. Too low, and the shelf becomes a confidence exercise for your frames.
How To Style DIY Wall Ledges So They Look Good
The easiest styling trick is layering. Put the largest frame or object in the back, medium pieces in front, and one or two smaller accents off to the side. Do not line up everything like it is waiting for school pictures. Overlap a little. Vary heights. Leave some breathing room.
Color helps too. If the shelf is stained wood, repeat that wood tone elsewhere in the room so it feels intentional. If it is painted to match the trim or wall, the ledge can disappear visually and let the objects on it do the talking.
For kids’ rooms, outward-facing books are both decorative and functional. For living rooms, mix art with a candle, a ceramic piece, or a small plant. For entryways, use one ledge for art and another for seasonal swaps. A ledge is not just a shelf. It is a low-commitment stage for the cast of characters living in your house.
Final Thoughts
Learning how to make DIY wall ledges is one of those home projects that pays off far beyond the time and money you put into it. The build is simple, the materials are accessible, and the end result is both practical and stylish. Better yet, the project scales beautifully. Build one shelf today, then make a matching set next month when you realize every other wall in the house has started looking suspiciously empty.
The smartest approach is to keep the construction straightforward, choose decent lumber, finish it carefully, and mount it securely. Do that, and your DIY wall ledges will look polished, work hard, and hold up well over time. That is the sweet spot in home improvement: something you made yourself that actually looks like you knew what you were doing all along.
Experience: What Building DIY Wall Ledges Actually Teaches You
The funny thing about making DIY wall ledges is that the first one usually starts as a practical project and ends as a life lesson in patience, measuring, and humility. On paper, it sounds absurdly simple: cut a few boards, screw them together, slap on paint, hang them up, and bask in the applause of your own excellent taste. In reality, the experience has a way of teaching you the tiny details that matter more than you expect.
The first lesson is that wood has opinions. You can walk into a store thinking you are just buying boards, but the boards are quietly auditioning you. Some are straight, cooperative, and ready for greatness. Others look innocent until you get home and realize they are twisted like they have been storing emotional baggage in aisle twelve. Once you have built even one ledge, you never shop for lumber the same way again. You sight down each board like a detective in a crime drama.
The second lesson is that wall ledges reward restraint. At first, there is a temptation to overbuild everything. Thicker wood, more screws, extra trim, a finish schedule worthy of a museum conservator. Then experience kicks in and you realize the beauty of the ledge is its simplicity. A clean profile, solid joinery, a smooth finish, and careful installation do more than unnecessary complexity ever could. In other words, the shelf does not need to prove itself. It just needs to hold your frames without drama.
Then there is the installation moment, which is where confidence goes to take a quick nap. Finding studs sounds easy until the stud finder starts beeping like it is receiving messages from another dimension. You mark the wall, check the level, step back, recheck the level, and somehow still wonder whether the shelf will look crooked forever. But the rewarding part comes when you finally tighten the screws, let go, and the shelf just sits there looking stable and intentional. It is one of those small homeowner victories that feels disproportionately satisfying.
Another real experience people have with DIY wall ledges is realizing how much these simple shelves change the mood of a room. A blank wall can feel unfinished or cold. Add one ledge with layered art and suddenly the space feels lived in. Add a few children’s books in a nursery and the room feels warmer. Add a long ledge in a hallway and the area turns from pass-through space into something with personality. It is a reminder that good DIY is not always about building giant statement pieces. Sometimes the quieter projects do the most work.
Most of all, building wall ledges teaches you confidence. Not fake confidence, the kind that says, “I watched half a tutorial and now I fear nothing.” Real confidence. The kind that comes from making mistakes, fixing them, and ending up with something useful anyway. Maybe your first coat of paint was too thick. Maybe one board needed more sanding than expected. Maybe you installed the first ledge a quarter inch too high and had to redo it while pretending that was always part of the plan. That is still progress.
By the time you finish, you usually start seeing other possibilities. A longer ledge in the living room. A pair above the desk. A mini version in the bathroom. One project turns into three because the process becomes familiar and the results are genuinely worth repeating. That is the magic of DIY wall ledges: they are simple enough to start, forgiving enough to learn on, and useful enough that once you build one, the rest of your walls start volunteering for service.


