Table of Contents >> Show >> Hide
- What Is a Magnetic Screen Door?
- Before You Start: Choose the Right Magnetic Screen Door
- Tools and Materials You’ll Need
- How to Install a Magnetic Screen Door: 10 Steps
- Step 1: Measure the Door Opening
- Step 2: Decide Which Side of the Frame to Install It On
- Step 3: Clean the Door Frame Thoroughly
- Step 4: Lay the Screen Flat and Find the Top
- Step 5: Attach the Hook-and-Loop Strips to the Screen
- Step 6: Mark the Center of the Doorway
- Step 7: Attach the Top Center First
- Step 8: Attach the Side Strips from Top to Bottom
- Step 9: Test the Magnetic Closure
- Step 10: Reinforce the Screen if Needed
- Common Magnetic Screen Door Installation Mistakes
- How to Install a Magnetic Screen Door on a Sliding Glass Door
- Maintenance Tips After Installation
- When a Magnetic Screen Door Is a Great Choice
- Real-World Experience: What Installing a Magnetic Screen Door Teaches You
- Conclusion
- SEO Tags
A magnetic screen door is one of those home upgrades that feels almost suspiciously simple. No hinges to wrestle with. No fancy carpentry. No dramatic toolbox entrance required. You attach a mesh screen around your doorway, walk through the middle, and the magnets pull the panels closed behind you like a tiny, polite doorman who works for bugs, breezes, pets, and people carrying groceries.
But while installing a magnetic screen door is beginner-friendly, it is not completely foolproof. Hang it too low and it drags like a tired curtain. Stretch it too tight and the magnets sulk in opposite corners. Stick it to a dusty frame and the adhesive gives up before your first barbecue. The good news? With the right measuring, cleaning, alignment, and a little patience, you can install a magnetic mesh screen door in about 30 minutes and enjoy fresh air without turning your kitchen into a mosquito networking event.
This guide explains how to install a magnetic screen door in 10 clear steps, including what tools you need, where to mount it, how to adjust the magnets, and how to avoid the common mistakes that make screens sag, gap, or refuse to close.
What Is a Magnetic Screen Door?
A magnetic screen door is a flexible mesh barrier that attaches to the top and sides of a door frame. Instead of swinging on hinges, it has two mesh panels that meet in the center. Magnets sewn or sealed into the center seam pull the panels together after you walk through.
Most magnetic screen doors use adhesive hook-and-loop strips, similar to Velcro, plus optional thumbtacks or push pins for wooden frames. They are popular for back doors, patio doors, sliding glass doors, French doors, RV doors, garage entries, balconies, and apartments where a permanent screen door is too expensive, too bulky, or simply not allowed by the landlord.
Before You Start: Choose the Right Magnetic Screen Door
The biggest installation mistake happens before the package is even opened: buying the wrong size. Measure your actual door opening, not just the door slab. You need the width and height of the area you want the screen to cover. Many magnetic screen doors are labeled by the door size they fit, while the actual screen may be slightly wider and taller to overlap the frame.
For example, a screen listed for a 36-by-80-inch door may have mesh dimensions around 38 by 82 inches. That overlap matters because the adhesive strips need a flat surface on the frame. If your trim is narrow, uneven, textured, oily, or crowded by blinds, handles, locks, or decorative molding, measure twice. Then measure again, because door frames enjoy being weird when nobody is looking.
Tools and Materials You’ll Need
- Magnetic screen door kit
- Tape measure
- Pencil or removable painter’s tape
- Clean cloth or paper towels
- Rubbing alcohol or mild cleaner
- Step stool, if needed
- Scissors, only if your kit allows trimming
- Thumbtacks or push pins, for wood frames only
- A helper, optional but very useful
How to Install a Magnetic Screen Door: 10 Steps
Step 1: Measure the Door Opening
Measure the width across the doorway at the top, middle, and bottom. Then measure the height from the top of the frame to the threshold. Use the largest practical opening measurement, but also check the flat mounting space around the frame. A magnetic screen door needs enough surface for the hook-and-loop tape to stick securely.
If the screen is too narrow, insects will treat the side gaps like VIP entrances. If it is too short, the bottom will not cover the opening. If it is too long, it may drag and stop the magnets from closing. Ideally, the screen should hang just above the floor or threshold, leaving a small gap so it does not scrape every time someone walks through.
Step 2: Decide Which Side of the Frame to Install It On
Door swing matters. A common rule is simple: if your main door opens inward, mount the magnetic screen door on the outside of the frame. If your main door opens outward, mount the screen on the inside. This prevents the regular door from pushing into the mesh every time it opens.
For sliding glass doors, the screen usually mounts on the outside or over the stationary side, depending on your frame and the kit instructions. Make sure the sliding panel, existing screen track, blinds, handles, and locks do not interfere with the magnetic seam.
Step 3: Clean the Door Frame Thoroughly
Adhesive strips hate dirt, dust, grease, pollen, sunscreen, old paint flakes, and mysterious porch grime. Wipe the mounting area with rubbing alcohol or a mild cleaner, then let it dry completely. Do not rush this step. A clean, dry frame helps the adhesive bond properly and keeps the screen from peeling off during humid weather or heavy use.
If your frame was recently painted, give the paint time to cure before applying adhesive. Fresh paint may feel dry to the touch but still be soft underneath. Attaching strong tape too soon can damage the finish when you remove or adjust the screen later.
Step 4: Lay the Screen Flat and Find the Top
Unpack the magnetic screen door and lay it flat on the floor with the magnets lined up in the center. Smooth out wrinkles and check which edge is the top. Most kits have a wider strip or reinforced header at the top and narrower strips along the sides.
Let the two magnetic panels close naturally while the screen is flat. This helps you see whether the magnets are aligned before you put anything on the frame. If the magnets do not meet cleanly on the floor, they will not magically behave better while hanging. They are magnets, not motivational speakers.
Step 5: Attach the Hook-and-Loop Strips to the Screen
Many kits come with adhesive-backed hook-and-loop strips. Some pieces attach to the screen first, while others attach directly to the door frame. Follow the arrangement included with your kit. Typically, a wider strip goes across the top, while longer or smaller strips run down the sides.
Press the strips firmly into place. If the screen has sewn-in loop fabric, line the adhesive hook pieces up evenly. Avoid bunching the fabric or pulling it sideways. Uneven tension now can create annoying gaps later.
Step 6: Mark the Center of the Doorway
Use a pencil or painter’s tape to mark the center point at the top of the door frame. Then find the center of the screen’s top edge. This center-to-center alignment is the secret to a magnetic screen door that closes smoothly.
Start at the top center rather than one corner. If you begin on the left or right, the whole screen may creep out of alignment by the time you reach the other side. That is how you get a screen that looks like it was installed during an earthquake.
Step 7: Attach the Top Center First
Peel back a small section of the adhesive backing at the top center of the screen. Line it up with your center mark and press it firmly to the frame. Some installers like to set the top center very slightly higher than the corners, which can help the panels fall inward and encourage the magnets to close.
Once the center is secure, work outward toward the top corners. Press the adhesive firmly as you go. Do not pull the screen tight like a trampoline. The mesh should hang smoothly, with enough natural slack for the center magnets to meet.
Step 8: Attach the Side Strips from Top to Bottom
Now attach the left and right sides. Start near the top and move downward, pressing the hook-and-loop tape to the frame in small sections. Keep stepping back to check that the center seam remains vertical and that the bottom edge stays slightly above the threshold.
If the side strips are too tight, the center seam may pull apart. If they are too loose, the screen may sag or bulge. Aim for smooth, relaxed tension. The goal is not to win a wrestling match with mesh. The goal is to let the magnets do their quiet little job.
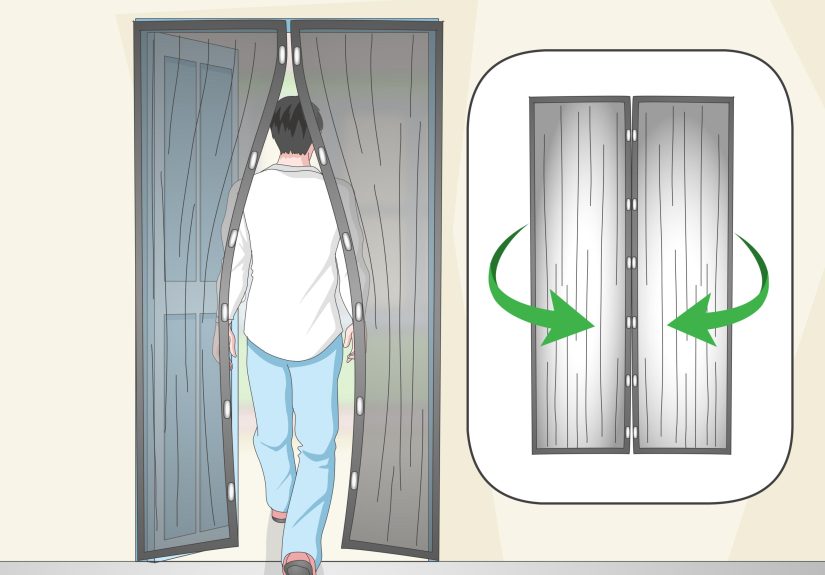
Step 9: Test the Magnetic Closure
Walk through the screen several times. Do it slowly first, then normally. Watch whether the magnets snap closed from top to bottom. Check for side gaps, bottom dragging, or a center seam that stays open.
If the magnets do not close, lift the top center slightly or loosen the sides. If the bottom drags, raise the screen a fraction of an inch. If the panels overlap too much or twist, reposition one side. Small adjustments make a big difference. A magnetic screen door is less like hanging a picture and more like tuning a guitarexcept the guitar keeps flies out of your potato salad.
Step 10: Reinforce the Screen if Needed
If your door frame is wood, you can use the included thumbtacks or push pins for extra support. Place them through the hook-and-loop area, especially along the top where the screen carries the most weight. Do not use tacks on glass, vinyl, aluminum, metal, or other non-wood surfaces unless the manufacturer specifically allows it. Tacks leave holes, and they are not designed for every frame material.
For metal or aluminum frames, rely on adhesive hook-and-loop strips, manufacturer-approved fasteners, or a no-drill mounting option. If you rent, test a small hidden area first and keep removal in mind. Some adhesive residue can be cleaned with rubbing alcohol, but delicate paint or old finishes may still be vulnerable.
Common Magnetic Screen Door Installation Mistakes
Mistake 1: Skipping the Cleaning Step
A dusty frame is the fastest route to a sagging screen. Clean first, install second, celebrate third.
Mistake 2: Pulling the Mesh Too Tight
Too much tension can stop the magnets from meeting. The screen should hang naturally, not look like it is preparing for a drum solo.
Mistake 3: Letting the Bottom Drag
If the bottom edge touches the floor too much, it can catch, wrinkle, and prevent automatic closing. Leave a small clearance above the threshold.
Mistake 4: Using Tacks on the Wrong Frame
Thumbtacks and push pins are for wood frames only unless your manufacturer says otherwise. They can damage vinyl, aluminum, glass-adjacent trim, and rental-property finishes.
Mistake 5: Ignoring Door Handles and Blinds
Handles, locks, blinds, curtain rods, and raised trim can interfere with the mesh. Before sticking anything permanently, hold the screen in place and open the main door fully.
How to Install a Magnetic Screen Door on a Sliding Glass Door
Sliding glass doors need extra attention because they are wider and often used more frequently. First, decide whether the screen should cover the active opening only or the full sliding-door frame. Many homeowners install the screen over the stationary side and the opening so the magnetic seam sits where people naturally walk through.
Clean the frame carefully, especially if the door opens to a patio where dust and pollen collect. Align the top center, then attach the sides without blocking the sliding track. If there is already a sliding screen door, you may need to remove it or mount the magnetic screen in a way that does not interfere with the track. Always test the glass door, lock, handle, and screen movement before pressing all adhesive strips permanently.
Maintenance Tips After Installation
Once installed, a magnetic screen door does not need much maintenance, but it does appreciate basic care. Wipe the mesh with a damp cloth when dust, pollen, or pet hair builds up. Spot clean stubborn dirt with mild soap and water, then let the screen air-dry. Avoid harsh abrasive cleaners, dryers, and rough scrubbing.
Check the adhesive strips every few weeks during hot or humid weather. If a section starts peeling, clean the frame again, press the strip back firmly, or replace the adhesive. For wood frames, adding tacks at stress points can help, especially on busy back doors where kids, dogs, and adults carrying laundry baskets use the screen all day.
When a Magnetic Screen Door Is a Great Choice
A magnetic screen door is ideal when you want airflow without a permanent installation. It works well for renters, seasonal use, patios, decks, RVs, garages, and homes where a hinged screen door is inconvenient. It is also helpful for pets that like going in and out, though energetic large dogs may require a sturdier model with reinforced edges and strong magnets.
It may not be the best choice if you want a high-end architectural look, need security, have extremely windy conditions, or want a screen that keeps determined pets inside. A magnetic mesh screen is for ventilation and insect control, not for locking, weatherproofing, or stopping a motivated golden retriever with weekend plans.
Real-World Experience: What Installing a Magnetic Screen Door Teaches You
After installing a few magnetic screen doors, one lesson becomes obvious: the product is simple, but the doorway is the boss. Every doorway has its own personality. Some frames are flat, clean, and cooperative. Others have decorative trim, uneven paint, a threshold that rises like a tiny mountain range, or a door handle placed exactly where the mesh wants to hang. That is why dry-fitting the screen before peeling the adhesive is so important. Hold it up, check the clearance, open and close the main door, and make sure the magnets line up naturally.
The second lesson is that the top center controls almost everything. When the top center is too low, the screen drags. When it is crooked, the magnets miss each other. When the side tension is uneven, one panel closes faster than the other and leaves a little bug-sized doorway. Starting from the center and working outward feels slow, but it prevents the classic “why is my screen diagonal?” problem.
Another experience-based tip: do not judge the installation after one walkthrough. Walk through five or six times. Let a family member try it. Carry a grocery bag through it. If you have a dog, let the dog inspect it like a suspicious customs officer. Magnetic screens often need tiny adjustments after real use because the mesh settles and the adhesive starts taking weight.
For homes with pets, the best setup is usually a slightly reinforced screen with strong center magnets and secure top attachment. Small pets often learn quickly. Larger pets may charge through with the enthusiasm of a furry bowling ball, so the top strip and upper side strips need the most support. On a wood frame, tacks can make a big difference. On metal or vinyl, use high-quality adhesive and give it time to bond before heavy use.
Weather matters too. Installing in mild, dry conditions usually works better than installing during rain, extreme heat, or direct blazing sun. Adhesive tape performs best when the frame is clean, dry, and not too hot. If the screen is going on a sunny back door, expect to check the adhesive occasionally. Heat can soften some tapes over time, especially if the screen is pulled tight or used heavily.
Finally, remember that a magnetic screen door is a practical comfort upgrade, not a luxury remodeling project. It will not make your doorway look like a designer showroom. But when installed well, it lets in fresh air, keeps out most flying insects, gives pets easier access, and saves you from constantly opening and closing the main door. For the price and effort, that is a pretty satisfying win. It is the kind of DIY project that makes you feel handy without requiring you to understand hinge mortises, door jambs, or why every screw in an old house appears to have been installed by a pirate.
Conclusion
Learning how to install a magnetic screen door is mostly about preparation and alignment. Measure the opening, clean the frame, find the center, attach the top first, and adjust the sides until the magnets close smoothly. Keep the bottom just above the threshold, avoid over-tightening the mesh, and only use tacks on wooden frames. Do those things, and your screen should open easily, close automatically, and keep your home breezy without inviting every mosquito in the neighborhood to move in.
Whether you are upgrading a patio door, back door, sliding glass door, RV entrance, or apartment balcony, a magnetic screen door is one of the easiest DIY improvements you can make. It is affordable, removable, pet-friendly, and wonderfully low-drama when installed correctly. And honestly, any home project that does not require a drill, a permit, or a second trip to the hardware store deserves a small round of applause.


