Table of Contents >> Show >> Hide
- Fertilizer Basics: What Your Plants Actually Need
- Simple Homemade Fertilizer Ingredients You Already Have
- Easy Homemade Fertilizer Recipes
- How to Choose the Right Homemade Fertilizer for Your Plants
- Safety Tips for DIY Fertilizer
- Common Mistakes to Avoid With Homemade Fertilizer
- Real-World Experiences: What Gardeners Learn Making Their Own Fertilizer
- Conclusion: Homemade Fertilizer That Works With Nature
Store-bought fertilizers can feel like mystery potions: lots of numbers on the bag, not a lot of clarity on what
you’re actually putting into your soil. The good news? You don’t have to rely on pricey products to keep your
garden thriving. With a few kitchen scraps, yard waste, and some basic know-how, you can make your own fertilizer
at home that feeds your plants, reduces household waste, and gives you much more control over what goes into your
garden.
In this guide, you’ll learn how homemade fertilizer works, what your plants really need, and several easy recipes
you can start using today. We’ll cover simple options like eggshell powder and coffee grounds, plus liquid
“teas,” compost-based blends, and smart safety tips so your DIY plant food is effective and safe.
Fertilizer Basics: What Your Plants Actually Need
Before you start tossing banana peels and coffee grounds into the soil, it helps to understand what fertilizer
does. Plants need a mix of nutrients, but three “primary macronutrients” are the big stars:
- Nitrogen (N) – fuels leafy green growth and overall vigor.
- Phosphorus (P) – supports strong roots, flowers, and fruit production.
- Potassium (K) – helps with overall plant health, disease resistance, and stress tolerance.
Most commercial fertilizers list these as an N–P–K ratio, like 10-10-10 or 5-10-5. Homemade fertilizers usually
don’t come with neat numbers on a label, but the same idea applies: you’re feeding plants a mix of nitrogen,
phosphorus, and potassium, along with helpful secondary nutrients like calcium and magnesium and tiny amounts of
micronutrients like iron, zinc, and manganese.
Why Organic, Homemade Fertilizer Works
Homemade fertilizer is usually “organic” in the gardening sense: it’s made from natural materials like compost,
manure, leaves, kitchen scraps, or minerals. The nutrients in these materials are released slowly as soil microbes
break them down. That means:
- Less risk of burning plant roots.
- Steadier, long-term feeding instead of big nutrient spikes.
- Improved soil structure and better water-holding capacity.
The trade-off? Organic fertilizers don’t usually act as fast as synthetic ones, and you’ll rely more on building
good soil over time than on quick fixes. But for home gardens, vegetable beds, and houseplants, that’s often a
huge advantage.
Start With a Soil Test (If You Can)
If you’re gardening outdoors, a simple soil test from a local cooperative extension or garden center can tell you
whether your soil is low in nitrogen, phosphorus, potassium, or organic matter. That helps you choose the right
DIY fertilizer recipes instead of guessing and over-loading your soil with one nutrient.
Even if you skip formal testing, you can watch your plants for clues:
- Pale, yellowing leaves and slow growth may signal low nitrogen.
- Poor root development or few flowers might indicate low phosphorus.
- Weak stems and reduced vigor can hint at low potassium.
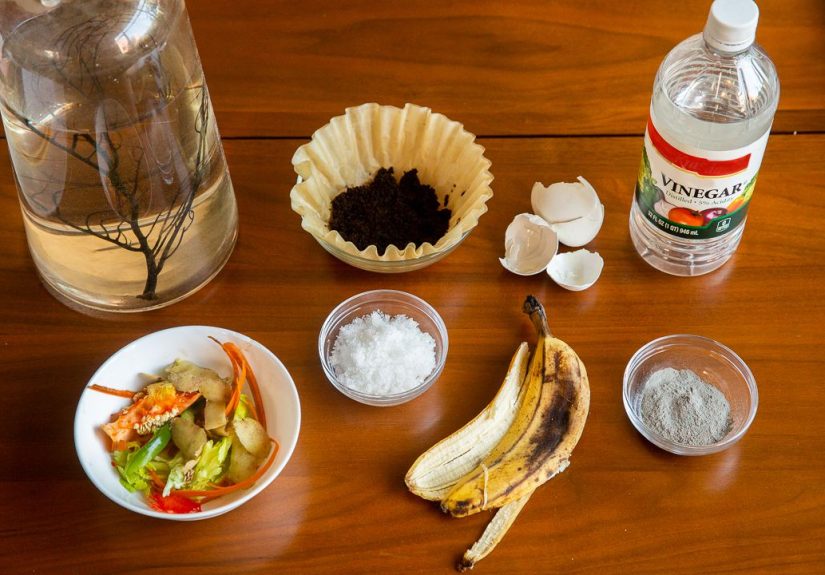
Simple Homemade Fertilizer Ingredients You Already Have
You don’t need exotic ingredients to make your own fertilizer. Many of the best DIY plant foods are things you
already throw away.
1. Eggshell Powder (Calcium Booster)
Eggshells are mostly calcium carbonate, which can help prevent blossom-end rot in tomatoes and peppers and support
strong cell walls in many plants.
How to make eggshell fertilizer:
- Rinse eggshells well and let them dry completely.
- Crush them into a fine powder using a mortar and pestle, rolling pin, or blender.
- Sprinkle the powder into planting holes or lightly work it into the top inch of soil around plants.
This is a slow-release fertilizer, so don’t expect overnight miracles. Think of it as a long-term calcium savings
account for your soil.
2. Coffee Grounds (Gentle Nitrogen Source)
Used coffee grounds are a popular DIY fertilizer ingredient. They contribute organic matter and a modest amount of
nitrogen. Despite their reputation, most used grounds are close to neutral in pH, so they usually won’t drastically
acidify your soil.
How to use coffee grounds:
- Spread a thin layer (no more than 1/4 inch) over the soil surface and lightly scratch it in.
- Mix coffee grounds into your compost pile toboost nitrogen and help it heat up.
- Avoid thick mats of groundsthey can compact and repel water.
Roses, azaleas, and many leafy plants appreciate the extra organic matter. Just remember that “a dusting” is good;
a “coffee blanket” is not.
3. Banana Peels (Potassium and a Bit of Phosphorus)
Bananas are well known for their potassium content, and their peels make a handy, low-effort homemade fertilizer
for container plants, roses, and flowering shrubs.
Options for using banana peels as fertilizer:
-
Direct burial: Chop peels into small pieces and bury them a few inches down near the plant,
away from the stem. They break down over time and feed the root zone. -
Banana peel “tea”: Soak chopped or whole peels in a jar of water for 2–3 days, then dilute that
water 1:4 with fresh water and use it to water plants. -
Dried peel powder: Dry peels in the sun or a low-temperature oven, then grind and sprinkle
around plants as a slow-release potassium source.
4. Compost: The Ultimate All-Purpose Fertilizer
Compost isn’t technically “fertilizer” in the strict N–P–K sense, but it’s the foundation of many homemade plant
foods. It improves soil structure, supports beneficial microbes, and contributes a low but steady level of nutrients.
Basic compost ingredients:
- “Greens” – nitrogen-rich materials like fruit and vegetable scraps, coffee grounds, and fresh grass clippings.
- “Browns” – carbon-rich materials like dry leaves, shredded paper, cardboard, and straw.
Layer greens and browns, keep the pile moist (like a wrung-out sponge), and turn it occasionally. When the material
is dark, crumbly, and earthy-smelling, it’s ready to use as a top dressing, soil amendment, or component in your
homemade fertilizer recipes.
5. Epsom Salt (Magnesium and Sulfur)
Epsom salt (magnesium sulfate) is not a complete fertilizer, but it can help correct magnesium deficiencies, which
sometimes show up as yellowing between the veins of older leaves on tomatoes, peppers, and roses.
How to use Epsom salt:
- Dissolve 1–2 tablespoons in a gallon of water.
- Apply as a soil drench around magnesium-loving plants once a month if deficiency is suspected.
- Don’t overdo ittoo much magnesium can interfere with other nutrients.
Easy Homemade Fertilizer Recipes
Now that you know the main ingredients, let’s turn them into simple DIY fertilizer recipes. These are flexible, so
you can adjust based on what you have on hand.
Recipe 1: Basic Compost Tea
Best for: Vegetable gardens, annual flowers, and container plants that need a gentle boost.
You’ll need:
- 1 part finished compost (by volume)
- 5–10 parts non-chlorinated water (rainwater is ideal)
- A bucket and a strainer or old cloth
How to make it:
- Fill a bucket with water and let it sit for a few hours if using tap water (this lets chlorine dissipate).
- Stir in the compost, roughly 1 part compost to 5–10 parts water.
- Let the mixture steep for 24 hours, stirring a few times.
- Strain out the solids and return them to your garden or compost pile.
- Use the liquid to water the soil around plants, avoiding direct contact with edible leaves.
Compost tea acts like a mild liquid fertilizer, adding soluble nutrients and beneficial microbes to the root zone.
Recipe 2: “Kitchen Scrap” Liquid Fertilizer
Best for: Established ornamentals, shrubs, and fruiting plants.
You’ll need:
- Chopped vegetable scraps (no meat or dairy)
- Banana peels, eggshell pieces, and coffee grounds (optional but helpful)
- A large jar or bucket with a lid
- Water
How to make it:
- Fill your container about one-third full with chopped scraps.
- Cover with water, leaving a little space at the top.
- Loosely cover the container and let it steep for 3–5 days, stirring daily.
- Strain the liquid and dilute it with an equal amount of fresh water.
- Pour around plants at the soil line, not on the leaves.
The smell can be… “enthusiastically organic,” so you may want to keep this outdoors. Use the solids in your compost
pile so nothing goes to waste.
Recipe 3: Dry All-Purpose Garden Sprinkle
Best for: Garden beds, perennials, and shrubs.
You’ll need (by volume):
- 4 parts sifted compost or worm castings
- 1 part finely crushed eggshells
- 1 part dried, crumbled banana peels
- 1 part dried coffee grounds
How to make it:
- Mix all ingredients thoroughly in a tub or bucket.
- Store in an airtight container until ready to use.
- Apply about 1–2 cups per 10 square feet of garden bed, lightly working it into the top inch of soil.
This DIY fertilizer won’t match the punch of a commercial 10-10-10, but it steadily feeds soil life and adds a
balanced mix of nutrients over time.
Recipe 4: Quick Houseplant Liquid Feed
Best for: Indoor plants that need a gentle, organic pick-me-up.
You’ll need:
- 1 tablespoon of well-finished compost or worm castings
- 1 liter of water
How to make it:
- Stir the compost into the water and let it sit for 12–24 hours.
- Strain the liquid through a coffee filter or cloth.
- Use the liquid to water houseplants once a month during active growth.
Avoid leaving any solids in the pot; they can grow mold in indoor conditions. When in doubt, dilute more rather
than lesshouseplants prefer a light, steady diet.
How to Choose the Right Homemade Fertilizer for Your Plants
Not all plants want the same buffet. Matching your DIY fertilizer to your plant’s needs makes a big difference.
Leafy Greens vs. Flowering and Fruiting Plants
-
Leafy crops (lettuce, spinach, kale, herbs) love nitrogen. Compost tea, coffee-ground blends,
and nitrogen-rich compost are great choices. -
Flowering and fruiting plants (tomatoes, peppers, roses, cucumbers) appreciate a mix that
emphasizes phosphorus and potassium. Banana peel fertilizer and balanced compost teas work well here.
Container Plants vs. In-Ground Gardens
Container soil loses nutrients faster because of frequent watering. For pots and planters:
- Use diluted liquid fertilizers more often (every 2–4 weeks during the growing season).
- Refresh the top inch of potting mix with compost once or twice a year.
- Make sure containers have good drainage to avoid soggy roots and nutrient imbalances.
Safety Tips for DIY Fertilizer
“Natural” doesn’t automatically mean “risk-free.” Use these guidelines to keep your homemade fertilizer safe for
people, pets, and plants.
-
Be careful with fresh manure. Always compost or age it well and avoid applying directly to
edible crops close to harvest. -
Limit strong ingredients. Wood ash, Epsom salt, and even coffee grounds can cause problems in
excess. A little goes a long way. -
Keep pets in mind. Coffee grounds, some manures, and certain kitchen scraps may not be safe if
a curious dog decides your fertilizer looks like a snack. -
Don’t rely on one ingredient. Eggshells alone won’t feed a tomato plant; banana peels alone
won’t fix a nitrogen deficiency. Variety is your friend.
Common Mistakes to Avoid With Homemade Fertilizer
If your DIY plant food isn’t working the way you hoped, one of these pitfalls might be to blame:
- Over-fertilizing. More is not better. Too many nutrients can burn roots or push leafy growth at the expense of flowers.
- Ignoring soil health. Fertilizer can’t fix compacted, waterlogged, or lifeless soil. Compost and good structure come first.
- Using smelly brews too long. If a liquid fertilizer smells truly foul and rotten, it may be going anaerobic. When in doubt, dump it in the compost and start fresh.
- Expecting instant results. Homemade, organic fertilizers are slow and steady. Give them weeks, not days, to show their full effect.
Real-World Experiences: What Gardeners Learn Making Their Own Fertilizer
Once you start making your own fertilizer, you quickly discover that it’s as much an art as a science. Most
gardeners go through a few predictable “chapters” in their DIY fertilizer journey.
The “Everything Goes in the Bucket” Phase
In the beginning, it’s tempting to throw every scrap into a bucket, top it with water, and assume you’ve created a
miracle growth potion. For a while, that might even seem truesome plants perk up, the soil looks darker, and
you’re thrilled you’re not wasting kitchen leftovers.
Then you learn a key lesson: oxygen matters. If your bucket sits too long without stirring or is packed with too
many scraps, it can go anaerobic. Instead of a healthy, earthy brew, you end up with something that smells like it
was brewed in a swamp… in August. Most gardeners only need to experience that smell once to become passionate
stirrers and strainers.
The “Oh, I Overdid It” Moment
Another common experience is over-loving your plants with fertilizer. You sprinkle too many coffee grounds around
a favorite rose bush, or you apply undiluted banana peel tea every few days to a tomato in a pot. At first, the
plant looks fine. Then the leaves curl, the soil stays soggy, and growth stalls.
This is when gardeners learn the “less but regularly” rule. Instead of one heavy dose, smaller, consistent
applications of homemade fertilizer tend to work better. It mimics how nutrients are naturally released in healthy
soilslowly and steadily rather than all at once.
Discovering Plant Preferences
Over time, you notice that your plants have personalities. Leafy greens seem happiest with a little extra compost
and a splash of compost tea every now and then. Tomatoes and peppers respond better when you go easy on nitrogen
and emphasize potassium and phosphorus with things like banana peel fertilizer and balanced compost.
You might find that certain perennials or shrubs don’t need much feeding at all once the soil is in good shape.
Houseplants, on the other hand, often perk up dramatically when they get a weak dose of compost-based liquid feed
once a month. This is where homemade fertilizer really shines: you can adapt it to what each plant actually likes.
Realizing Soil Is the Main Character
The biggest “aha” moment for many gardeners is that fertilizer is only part of the story. When they focus on
building rich, organic-matter-filled soil with compost, mulch, and gentle homemade fertilizers, plants become more
resilient. They handle heat waves better, bounce back faster from dry spells, and produce more flowers and fruit
with fewer problems.
In other words, making your own fertilizer slowly shifts your mindset from feeding the plant to feeding the soil.
Once that clicks, your gardening choices change: you start saving leaves for mulch, composting more, and paying
attention to what happens below the surface as much as what you see above it.
The Satisfaction of a Closed Loop
There’s also a real emotional payoff. Turning eggshells, coffee grounds, and banana peels into vibrant flowers and
baskets of tomatoes feels like magicexcept it’s just good biology. You reduce trash, spend less money, and gain
confidence in your ability to grow healthy plants without relying entirely on store-bought products.
Over time, you’ll develop your own favorite “house recipes,” tuned to your climate, soil, and plant mix. That’s the
beauty of DIY fertilizer: it’s not just about nutrients; it’s about learning to work with your garden instead of
just on it.
Conclusion: Homemade Fertilizer That Works With Nature
Learning how to make your own fertilizer is less about memorizing exact recipes and more about understanding what
your plants need and how natural materials can supply those nutrients. With simple ingredients like compost,
eggshells, coffee grounds, banana peels, and Epsom salt, you can create effective, gentle fertilizers that build
healthier soil and more resilient plants over time.
Start with one or two easy recipes, observe how your plants respond, and adjust as you go. As your confidence
grows, you’ll rely less on store-bought fertilizers and more on the steady, sustainable power of homemade, organic
plant foodmade right in your own kitchen and backyard.


