Table of Contents >> Show >> Hide
If you’ve ever walked through IKEA and thought, “This little stool has so much potential… it just doesn’t know it yet,” welcome to the club. IKEA hacks are the DIY world’s version of a glow-up low cost, high reward, and infinitely customizable. Today’s adventure? Turning a simple IKEA stool into a charming, rustic, farmhouse-style treasure worthy of a Fixer Upper cameo.
This guide brings together ideas inspired by popular DIY experts across the United States, from home-renovation bloggers to farmhouse-style enthusiasts, blending the best design tricks and woodworking tips into one super-practical (and hilariously down-to-earth) walkthrough. Get ready to transform your space without draining your wallet or your patience.
Why an IKEA Farmhouse Stool?
Because it’s the perfect mix of affordable, simple, and surprisingly versatile. IKEA’s classic stools especially the BEKVÄM or the FROSTA offer solid wood bases, smooth surfaces, and the design equivalent of a blank canvas. Add some farmhouse charm, and suddenly you’ve created a piece that looks like it came straight from a boutique home store rather than a flat-packed box.
Farmhouse style is defined by warmth, character, and natural textures. Think distressed finishes, neutral colors, matte surfaces, and wood that looks beautifully lived-in. A farmhouse-style stool fits right into kitchens, entryways, craft rooms, or anywhere you need a convenient seat or plant stand with personality.
What You Need for This IKEA Hack
You don’t need a full workshop or years of carpentry experience. This project stays friendly for beginners while offering enough customization to keep advanced DIYers satisfied.
Materials
- IKEA wooden stool (BEKVÄM or FROSTA recommended)
- Sandpaper (120, 220, and 320 grit)
- Wood stain (early American, weathered oak, or dark walnut for farmhouse tones)
- Chalk paint or matte furniture paint
- Polycrylic or furniture wax
- Wood glue (optional for added reinforcement)
- Decorative elements: jute rope, cross-bracing, wood appliques, farmhouse decals (optional)
Tools
- Paintbrushes or foam brushes
- Rag or staining cloth
- Screwdriver
- Drop cloth or old towel
Step-by-Step: From Plain IKEA to Farmhouse Fancy
1. Prep Like a Pro (Even if You’re a Total Beginner)
Start by assembling your IKEA stool. Yes, I know some people enjoy assembling IKEA items, and others… well, let’s just say the tiny Allen wrench has destroyed more friendships than Monopoly. But this stool is simple, we promise.
Once assembled, remove any stickers, wipe the surface clean, and lightly sand the entire stool using 120-grit sandpaper. This helps open the wood grain for staining or painting. Wipe down with a damp cloth afterward.
2. Choose Your Farmhouse Finish
Most farmhouse-style stools fall into one of three aesthetic categories:
● Classic Rustic Stained Finish
If you want warm, earthy tones, go with a wood stain. Early American and Weathered Oak are popular choices for farmhouse lovers. Apply with a cloth, let sit for a few minutes, wipe off excess, and allow to dry fully.
● Chalk-Painted Cottage Look
For a softer, cozy cottage vibe, chalk paint creates a velvety matte finish. White, cream, light gray, or sage green work beautifully. Chalk paint also distresses well, making it perfect for the “imperfectly perfect” farmhouse aesthetic.
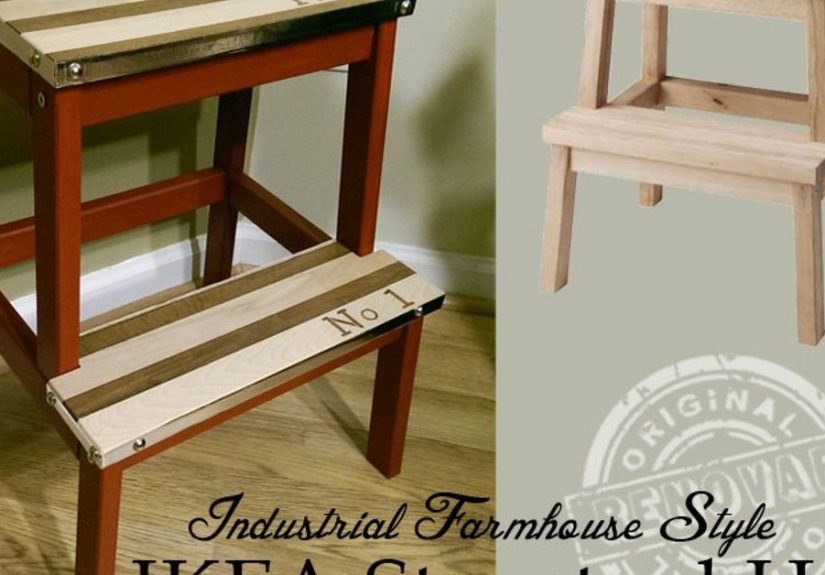
● Two-Tone Farmhouse Combination
Try a stained seat and painted legs for a high-end farmhouse piece that looks like it came from a farmhouse boutique.
This combo is both trendy and timeless and it gives your DIY hack that designer touch without the designer price tag.
3. Distress for Authentic Farmhouse Charm
Distressing adds character and a lived-in look. Using 220-grit sandpaper, gently sand along edges, corners, and areas where natural wear would occur. Don’t overdo it you’re aiming for subtly aged, not “salvaged from a shipwreck.”
4. Add Farmhouse Accents
Here’s where creativity meets personality:
- Jute Rope Wrap: Add rope around the legs or the bottom rung for rustic charm.
- Wooden Appliques: Glue on carved wood medallions or strips for added texture.
- Cross-Bracing: Add two wooden slats in an “X” shape between the stool legs the ultimate farmhouse detail.
- Number Stenciling: “01,” “02,” or “FARM FRESH” adorable and classic.
These are optional, but they elevate the stool from “cute DIY” to “Pinterest-worthy masterpiece.”
5. Seal the Deal
Finish by applying polycrylic (best for light colors) or furniture wax for a softer, hand-rubbed look. This protects your stool against scratches, moisture, and the occasional clumsy guest who uses it as a step ladder when they definitely shouldn’t.
Ways to Use Your Farmhouse Style Stool
- Kitchen helper: Reach high cabinets in style.
- Plant stand: Display your favorite greenery.
- Bedside table: Perfect for small bedrooms.
- Entryway seat: A place to tie shoes.
- Kids’ craft chair: They’ll love the mini farmhouse vibe.
Farmhouse stools bring a sense of warmth and charm to any room, and this DIY project lets you tailor the look to your exact style rustic, chic, modern farmhouse, vintage, or somewhere in between.
Extra Tips from DIY Experts
Test Colors Before Committing
Wood absorbs stain differently depending on the species and the original conditioning, so always test on the underside first.
Layer Stains for More Depth
Try weathered gray under dark walnut for a beautifully aged effect.
Use High-Quality Brushes
Cheap brushes can shed bristles into the paint nothing says “farmhouse fail” like stray hairs permanently sealed into your finish.
The Charm of DIY IKEA Hacks
IKEA hacking has grown into a full design movement because it gives people the ability to create custom pieces without breaking the bank. It encourages creativity, sustainability, and experimentation all while letting us pretend we’re starring in our own home makeover show.
Plus, there’s nothing quite like hearing someone say, “Wow, where did you get that?!” and replying, “Oh, this old thing? I made it.” The bragging rights are priceless.
500-Word Experience & Personal Notes on the Project
One of the best parts about completing a DIY IKEA hack especially one in farmhouse style is the learning curve that comes along with it. No matter how many tutorials you read or how many Pinterest boards you save, the real magic happens when you’re hands-on with the wood, paint, and materials.
During one early attempt at a farmhouse stool project, I learned a key lesson: always sand more than you think you need to. IKEA’s factory finish can be sneaky even when it looks raw and ready, it often has invisible sealants or subtle smoothness that repel stain or cause paint to streak. On that first attempt, I slapped stain onto a barely-sanded seat and watched it sit there like, “No thanks, I’m good.” After wiping it off, I realized sanding is not a step… it’s a commitment.
Another memorable moment came from experimenting with distressing techniques. I once tried the “chains and hammer” method recommended by a rustic woodworking forum (yes, this is a real thing). While it works beautifully on thick farmhouse tables, applying it to an IKEA stool is… slightly overkill. Let’s just say the stool looked less like a charming farmhouse piece and more like it survived an action movie explosion. Light sanding on edges turned out to be the better choice.
One of the most satisfying discoveries was how much personality small details add. Wrapping jute rope around the legs instantly changed the stool from “basic” to “boutique.” Adding a small number stencil in my case, “07,” the date I finished made the whole project feel meaningful. And don’t underestimate the power of polycrylic; it made the surface feel smooth, durable, and genuinely professional.
Friends and family often react with surprise when they learn the stool started as a budget IKEA purchase. The farmhouse transformation looks high-end, especially with two-tone finishes or weathered stain layers. It’s the perfect example of how DIY can elevate a space without needing expensive materials or complicated tools.
Perhaps the biggest takeaway is the confidence boost. Once you’ve hacked one IKEA piece, you start looking at your entire home differently. Suddenly, the nightstand could become a coffee bar. The shoe rack could be turned into a rolling craft station. That basic bookshelf? Oh, it definitely wants crown molding and shaker-style trim.
This farmhouse stool project teaches patience, creativity, and resourcefulness but more importantly, it proves that beautiful home design is within reach for anyone willing to try. So go ahead: grab that IKEA stool, grab your sandpaper, and start hacking.
Conclusion
A DIY IKEA farmhouse-style stool is proof that simple materials, a little creativity, and a dash of humor can transform a basic item into a charming, functional, and stylish home accent. It’s budget-friendly, beginner-friendly, and endlessly customizable perfect for anyone looking to bring a touch of rustic warmth into their space.


