Table of Contents >> Show >> Hide
- Step 1: Get the Basics Right – Tree, Stand, and Spot
- Step 2: Follow the Best Order for Decorating
- Step 3: Choose a Style and Color Palette Before You Decorate
- Step 4: Safety, Pets, and Kid-Proofing
- Step 5: Common Christmas Tree Decorating Mistakes to Avoid
- Step 6: Make Your Tree Personal, Not Just Pretty
- Real-Life Experience: What Years of Tree Decorating Teach You
There are two kinds of people in December: the ones who casually toss a few ornaments on the tree and call it a day, and the ones who treat Christmas tree decorating like an Olympic sport. The secret “best way” to decorate your Christmas tree sits somewhere in the middlepolished enough to look designer, relaxed enough that you still have fun (and maybe don’t argue over ribbon placement).
The good news: there is a tried-and-true order to decorating, plus a few pro strategies that make any treereal or faux, 4-foot or 9-footlook fuller, brighter, and more intentional. Designers and décor experts consistently agree on a few core ideas: prep the tree, decorate in layers, keep a tight color palette, and personalize it so it feels like your holiday, not a store window.
Step 1: Get the Basics Right – Tree, Stand, and Spot
Choose the right tree for your space
Before you even think about ornaments, pick the right tree. As a general rule, choose a tree that’s 6–12 inches shorter than your ceiling so you have room for a topper. A 7.5-foot tree is the sweet spot for most standard 8- or 9-foot ceilings.
Real tree? Look for fresh, flexible needles, a strong fragrance, and minimal needle drop when you run your hand along a branch. Varieties like Nordmann fir, Korean fir, or Blue spruce hold onto needles longer and look lush for weeks if you water them properly.
Artificial tree? Pay attention to tip count and branch densitymore tips usually means a fuller, more realistic look. Pre-lit trees save time, but make sure the lights are warm white or soft white for a cozy glow instead of harsh blue.
Prep your tree like a pro
For a real tree, think “spa day.” Saw a fresh 1-inch slice off the trunk, get it into water right away, and keep the stand filled. A dry tree is more flammable and drops needles faster, which is nobody’s idea of festive.
For an artificial tree, your number-one job is fluffing. Almost every expertfrom high-end décor brands to magazine stylistssays the same thing: if you don’t fluff, your tree will look sad and full of gaps. Separate each branch, bend tips up and out, and fill in empty spots. It’s the least glamorous step, but it makes the biggest visual difference.
Pick the perfect, safe location
Place your tree where it can shine but not cause trouble:
- Keep it at least 3–5 feet away from radiators, fireplaces, candles, and heat vents.
- Plug lights into a nearby outlet so cords aren’t stretched across walkways.
- Avoid blocking doors, stairs, or major traffic paths.
Fire-safety experts warn that dry trees, overloaded outlets, and old incandescent lights are top causes of holiday fires, so choose LED lights and unplug them when you’re asleep or away.
Step 2: Follow the Best Order for Decorating
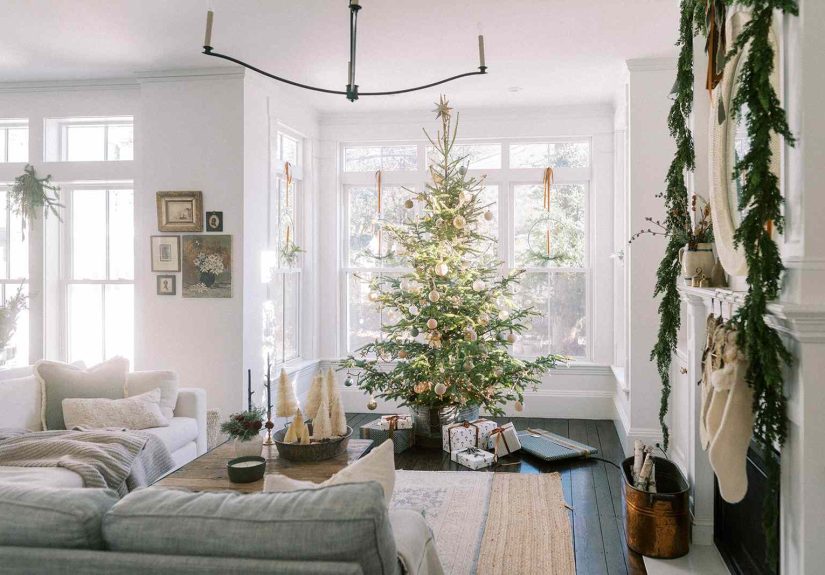
Here’s the truth: the “best way” to decorate a Christmas tree is less about theme and more about sequence. Designers treat tree decorating like building a layered outfitbase, mid-layer, accessories. Most pros follow some version of this order: fluff → lights → ribbon/garland → large ornaments → medium/small ornaments → picks → topper → tree skirt or collar.
1. Lights first (always)
If your tree is pre-lit, lucky youjust plug it in and make sure everything works. If you’re adding lights, start here before anything else.
A helpful rule of thumb: around 100 lights per foot of tree height. For example, a 6-foot tree often looks best with 600–700 lights, depending on how bright and “glowy” you like it.
Pro technique: instead of circling only the outer branches, weave the lights in and out toward the trunk. This creates depth and a warm inner glow instead of a “net” of lights just on the surface. Work from the bottom up, section by section, and test strands as you go.
2. Add ribbon or garland
Ribbon is the secret to making your tree look like it came from a magazine. Most tree designers prefer wired ribbon that’s 2–4 inches wide so it holds shape but still drapes nicely.
A few easy ribbon styles:
- Cascades: Cut long strips and tuck them in at the top, letting them fall in loose waves down the tree.
- Loops and poofs: Create soft loops by tucking the ribbon in and out, forming “bubbles” across the tree.
- Simple vertical drops: Drop ribbon in gentle vertical lines for a modern, calm look.
Secure ribbon by twisting two branch tips around it or using floral wire at hidden anchor points. Don’t fight it into neat perfectionslightly relaxed ribbon looks more high-end and less “overworked.”
3. Place large and statement ornaments
Now it’s time for the stars of the show: big ornaments, heirloom pieces, and anything with serious personality. Hang larger pieces first and spread them out in a rough triangle pattern around the tree to keep it visually balanced.
Pro tip: tuck some bigger ornaments inside the tree to create depth instead of hanging everything on the outer tips. This also helps hide any sparse spots.
4. Fill in with medium and small ornaments
Once the show-stoppers are placed, add medium ornaments, then smaller ones to fill gaps. Mix shapes (round, finial, star, drop), finishes (matte, shiny, glitter, natural), and materials (glass, wood, metal, fabric). Designers often warn against using all identical ornamentsit can make the tree look like it’s wearing polka dots instead of a curated collection.
The goal is cohesion, not clones: repeat colors and materials, but vary size and shape so your tree feels collected, not copied from a single box.
5. Add picks, sprays, and special extras
Picks and sprays (those branches of berries, pinecones, or faux eucalyptus) are like the jewelry of the tree. Tuck them near the top for height, along the sides to widen the silhouette, or in bare zones that need extra texture. They’re especially helpful on slimmer artificial trees.
Clip-on birds, flowers, icicles, and bells also work well at this stage. Use them sparingly so they feel intentional, not chaotic.
6. Finish with the topper and the base
Now crown your masterpiecestar, angel, bow, spray of branches, or even a cluster of oversized ornaments. Many designers actually recommend placing the topper once lights and ribbon are done but before smaller ornaments, so you aren’t knocking things off in the process.
Finally, dress the base with a tree skirt, faux fur throw, woven basket, or metal tree collar. This hides the stand or legs and frames your wrapped gifts in photos.
Step 3: Choose a Style and Color Palette Before You Decorate
Want your tree to look “designer” without losing its soul? Start by choosing 2–4 words that describe your stylemaybe cozy rustic, glam gold, Scandi minimal, or colorful nostalgic. Then choose a tight color palette (usually 3–4 hues) and stick to it.
A few style ideas:
- Classic red and gold: Red ornaments, gold ribbon, white lights, simple plaid accents.
- Nature-inspired: Wood beads, dried orange slices, wicker bells, paper snowflakes, linen ribbons.
- Soft neutrals: Champagne, ivory, soft metallics, lots of glass and satin finishes.
- Minimal “nearly naked” tree: Gorgeous real tree, warm lights, maybe a few neutral ornaments and that’s ita trend celebs have embraced for its calm, sculptural look.
Your tree doesn’t have to match your home perfectly, but it should feel like it belongs therenot like it teleported in from a completely different house.
Step 4: Safety, Pets, and Kid-Proofing
A beautiful tree is great. A beautiful tree that doesn’t set anything on fire or shatter every time a cat blinks at it is even better.
- Use LED lights: They stay cooler, use less energy, and reduce fire risk compared with older incandescent strands.
- Unplug lights when you’re not home or asleep. Smart plugs make this painless.
- Keep water in the stand: A dried-out tree can ignite fast.
- Put breakable ornaments up high: Place glass, heirloom, or sharp ornaments out of kid and pet reach.
- Secure the tree: In homes with climby toddlers or very ambitious cats, consider anchoring the tree to the wall with discreet fishing line.
Step 5: Common Christmas Tree Decorating Mistakes to Avoid
Even seasoned decorators fall into a few traps. Experts call out these repeat offenders:
- Not fluffing the tree: Sparse, collapsed branches are tree public enemy number one.
- Patchy lights: Bright spots and dark holes happen when lights are just draped on the outer branches instead of woven through.
- Overcrowding ornaments: If every branch is fighting for space, your tree looks noisy instead of rich.
- Ignoring scale: Tiny ornaments on a massive 9-foot tree look lost; giant ornaments on a 4-foot tree look like an art project gone wrong.
- Visible cords everywhere: Run cords along the back of the tree or base and bundle them so they don’t distract from the magic.
When in doubt, step back, look at the tree from across the room, and squint a little. You’ll see where it’s too heavy, too empty, or too bright.
Step 6: Make Your Tree Personal, Not Just Pretty
The “best” Christmas tree isn’t necessarily the most coordinatedit’s the one that makes you smile every time you walk into the room.
Mix in:
- Ornaments picked up on trips.
- Keepsakes from childhood or your kids’ school projects.
- Yearly photo ornaments or date-stamped baubles.
- Little nods to your hobbiestiny instruments, sports ornaments, or foodie icons.
You can corral the sentimental chaos by sticking to your color palette (for example, hanging the most colorful, mismatched memories on a separate “family tree” in another room, or clustering them in one charming section).
Real-Life Experience: What Years of Tree Decorating Teach You
After you’ve decorated enough trees, you start to collect opinionsstrong ones. You learn that buying “just one more box of ornaments” at 10 p.m. is almost always a bad idea. You learn that glitter is forever. And you definitely learn what shortcuts are worth it and which ones you regret halfway through December.
One common rookie move is underestimating lights. The first year you decorate, you think, “Two strands should be enough.” Half an hour later, you’re at the store in sweatpants, buying two more boxes because your tree looks like it’s in witness protection. After that, you become a lights maximalist. You test all strands before they go on the tree, and you keep one extra set just in case.
Another lesson: fluffing takes longer than you thinkand it’s absolutely worth it. The first time you actually spend 20–30 minutes separating every branch on a faux tree, it feels ridiculous. Then you step back and realize it suddenly looks like the gorgeous full tree from the online listing instead of the sad little compressed one from the box. After that, fluffing becomes non-negotiable. You put on a holiday playlist or a movie and accept that this is just part of the ritual.
You also learn your personal tolerance for “busy.” Some people love a packed tree where no branch is visible and every inch is sparkling. Others realize, after a few years of ornament overload, that they actually prefer a more edited look: fewer colors, more repetition, and the courage to put some ornaments back in the box instead of forcing them all onto the tree. That’s usually when ribbon, picks, and fewer but bigger ornaments start to feel more appealing than twenty tiny mismatched ones.
Pets and kids, of course, rewrite all the rules. After a cat manages to bat three glass ornaments off the lowest branches in one evening, you suddenly become a believer in shatterproof baubles and soft fabric ornaments near the bottom. After your toddler pulls on a dangling cord, you start hiding plugs behind the tree and securing the tree stand with almost professional paranoia. You realize that a “perfect” tree is one that survives the season with minimal casualties.
Over time, most people land on a comfortable rhythm: the same general color palette, a favorite ribbon style, and a rough layout that gets repeated each year with small tweaks. Maybe the theme shifts slightly (one year more natural, another year more glam), but the core processprep the tree, lights, ribbon, ornaments, detailsstays the same.
And perhaps the biggest discovery is this: the best Christmas tree isn’t the one that looks flawless on Instagram. It’s the one that fits your life. Sometimes that means a sleek, minimal tree in a small apartment. Sometimes it’s a slightly chaotic, memory-heavy tree that leans a little because the stand is older than you are. If decorating the tree feels like a happy tradition instead of a stressful performance, you’re doing it “the best way.”
So grab your lights, fluff those branches, choose a color scheme you love, and decorate your Christmas tree like it’s the coziest centerpiece of your winter. Because it is.


