Table of Contents >> Show >> Hide
- Before You Start: The 60-Second Reality Check
- Tools & Materials You’ll Want on Deck
- How to Size Your Door (Quick, Practical Math)
- Step 1: Pick the Look (Modern Farmhouse, Not “Old Shed Surprise”)
- Step 2: Measure the Opening, the Wall, and the “Stuff That Gets in the Way”
- Step 3: Build the Door Panel (The Easy, Straightforward Method)
- Step 4: Add the Trim Pattern (Instant “Modern Farmhouse” Points)
- Step 5: Sand, Fill, and Finish (Where “DIY” Becomes “Wow”)
- Step 6: Install a Header/Backer Board (So the Track Has Real Support)
- Step 7: Mount the Track and Hardware (Level Is Not Optional)
- Step 8: Hang the Door, Add the Floor Guide, and Fine-Tune
- Common Problems (and Fixes That Don’t Involve Panic)
- Modern Farmhouse Styling Tips (So It Looks Intentional)
- Conclusion: A Big Style Upgrade in a Very Small Number of Steps
- Real-World Experiences (The Stuff People Only Admit After It’s Done)
A modern farmhouse barn door is basically the mullet of home upgrades: business on the track, party in the grain.
It saves swing space, adds instant character, and makes your doorway feel like it has a Pinterest manager.
The best part? You can build a clean, modern version (not “salvage-yard splinters”) and hang it in a weekendwithout
owning a full-blown woodshop or a pet goat.
This guide is designed for a simple, easy DIY barn door that looks “custom” without requiring a
master carpenter’s résumé. We’ll focus on a straightforward slab-style door with crisp trim details (modern farmhouse),
plus the hardware setup that keeps it sliding smoothly and safely.
Before You Start: The 60-Second Reality Check
- Barn doors don’t seal like hinged doors. They’re better for closets, pantries, laundry rooms, offices, and room dividers than for “I need total silence” spaces.
- You need wall space to the side. The door has to slide fully open, so make sure furniture, switches, vents, and art aren’t in its travel lane.
- The track must be anchored to studs or solid blocking. Drywall is not structuralno matter how confident it looks.
Tools & Materials You’ll Want on Deck
Tools
- Measuring tape, pencil, level (a long level is your best friend here)
- Stud finder
- Drill/driver + drill bits (including a bit sized for pilot holes)
- Circular saw or miter saw (either works; both is a luxury)
- Clamps (optional but extremely helpful)
- Sander or sanding block
- Socket wrench (for lag bolts, depending on your hardware)
Materials (for one standard single door)
- Door panel: 3/4-inch plywood or edge-glued panel (common choice for a modern, flat face)
- Trim/battens: 1×3 or 1×4 boards to create a simple modern farmhouse pattern
- Wood glue + 1 1/4-inch brad nails or trim screws
- Wood filler, sandpaper (80/120/220 grit)
- Primer + paint (or stain + clear coat)
- Barn door hardware kit: track, rollers/hangers, stops, anti-jump blocks, floor guide
- Optional header/backer board: a straight 1×4, 1×6, or 2×6 (depends on your hardware and trim/baseboard situation)
How to Size Your Door (Quick, Practical Math)
For a single barn door, you generally want the door to cover the opening with some overlap for privacy and light control.
A common target is 2–3 inches of total overlap per side for typical interior uses. If you’re using it where privacy matters more (like a bathroom),
you may want even more overlap.
Example: If your framed opening is 32 inches wide, a 36-inch-wide door is usually a safe, popular choice.
Height typically lands around 80–84 inches depending on your opening and trim. The goal is coverage without dragging the floor.
Hardware note: many install guides recommend choosing a track length that’s about twice the door width so the door can slide completely open.
(A 36-inch door often pairs well with a 72-inch track.)
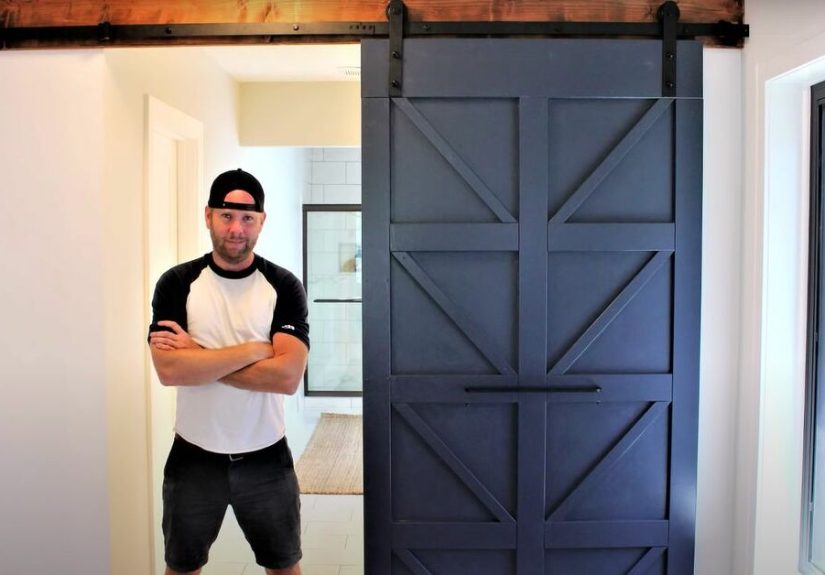
Step 1: Pick the Look (Modern Farmhouse, Not “Old Shed Surprise”)
Modern farmhouse barn doors are usually clean, flat, and intentional. Think simple lines, minimal grooves, and matte black hardware.
An easy win is a flat panel door with a few vertical battens (or a slim “picture frame” trim) that adds dimension without looking busy.
Two beginner-friendly styles
- Clean Frame: Trim boards around the perimeter, plus one center vertical strip.
- Modern Planks: Vertical battens spaced evenly across a flat panel.
Step 2: Measure the Opening, the Wall, and the “Stuff That Gets in the Way”
Measure the opening width and height, then measure how much clear wall you have on the side where the door will slide.
Also check for trim thickness, baseboards, light switches, outlets, vents, and door casing that could interfere with the hangers.
- Wall space: You need enough room for the door to slide open fully.
- Top clearance: Confirm space above the opening for the track + hangers.
- Baseboard conflict: Many barn doors sit off the wall; chunky baseboards can push the door out or cause rubbing without a spacer/header plan.
Step 3: Build the Door Panel (The Easy, Straightforward Method)
For the simplest modern farmhouse door, start with a flat 3/4-inch panel (plywood or similar) cut to size.
This creates a stable, clean base, then you add trim to make it look like a designer piece.
Simple cut list (example for a 36" x 84" door)
- 1 panel: 36" x 84" (3/4" thick)
- 2 vertical frame pieces: 1×3 at 84"
- 2 horizontal frame pieces: 1×3 at (36" minus 2 x trim width)
- 1 center vertical batten (optional): 1×3 at 84"
Dry fit everything before glue. If your boards are slightly bowed (hello, real wood),
arrange them so the best faces end up front.
Step 4: Add the Trim Pattern (Instant “Modern Farmhouse” Points)
Apply wood glue, clamp if you can, and nail or screw the trim into place.
If you’re using brad nails, keep them neat and consistent. If you’re using screws, pre-drill so the wood doesn’t split.
Pro-looking details (without pro-level stress)
- Keep reveals consistent: Use a spacer scrap (like a paint stir stick) to keep gaps even.
- Mind the hanger zone: Leave the top area clear where your hardware mounts (or confirm your hanger plate won’t clash with trim).
- Square matters: Check diagonals; if they match, your frame is square.
Step 5: Sand, Fill, and Finish (Where “DIY” Becomes “Wow”)
Fill nail holes and seams with wood filler. Once dry, sand smooth. Start around 80–120 grit for shaping,
then finish with 220 grit for a paint-ready surface.
Finish options that match modern farmhouse style
- Paint: Warm white, soft greige, or charcoal for a bold contrast.
- Stain + clear coat: Natural oak tones or a medium walnut look with matte hardware.
- Two-tone: Subtle contrasting trim for depth (keep it understated, not circus-themed).
Let your finish cure fully. Hanging a door with tacky paint is a fast track to fingerprints and regret.
Step 6: Install a Header/Backer Board (So the Track Has Real Support)
Most sliding barn door installations go smoother with a straight header/backer board fastened into studs.
This spreads the load and can help with trim/baseboard clearance.
- Find and mark studs with a stud finder.
- Mark a level line for your header height based on your hardware instructions (hanger + door height rules vary by kit).
- Pre-drill and fasten the header into studs using appropriate structural screws or lag bolts.
If your wall is slightly wavy (many are), the header also gives you a flatter, more consistent mounting surface.
Step 7: Mount the Track and Hardware (Level Is Not Optional)
With the header secure, mount the track according to your kit instructions. Use a level, mark holes, pre-drill,
then install bolts and spacers. Slide on the stops before fully tightening if your kit requires it.
Safety + function checklist
- Anchor into studs/blocking: This is the difference between “smooth sliding” and “gravity wins.”
- Use anti-jump parts: Many kits include small blocks that keep the door from lifting off the track.
- Consider soft-close: Optional add-ons reduce slamming and protect fingers (and family peace).
Step 8: Hang the Door, Add the Floor Guide, and Fine-Tune
Attach hangers/rollers to the door (following your kit’s hole layout), then lift the door onto the track.
This is usually easier with two peopleone to lift, one to guide. (Also, it’s safer and involves less dramatic grunting.)
Install the floor guide (the unsung hero)
The floor guide keeps the door from swinging into the wall or trim while you slide it. Some guides ride in a groove cut into the door bottom;
others clamp around the door edges. Follow your hardware style, then test the slide back and forth.
Final adjustments
- Set the door stops so the door centers over the opening when closed.
- Check for rubbing at baseboards/casing and add spacers if needed.
- Verify the door hangs plumb (vertical) and doesn’t drift open or shut.
Common Problems (and Fixes That Don’t Involve Panic)
The door scrapes the floor
- Confirm your hanger height settings.
- Check flooring transitions or rugs.
- If needed, trim the bottom slightly and reseal the edge.
The door swings away from the wall
- Recheck the floor guide alignment.
- Make sure the guide type matches your door thickness.
The track doesn’t feel solid
- Stop and verify every major fastener hits a stud or solid blocking.
- Upgrade fasteners if your kit hardware isn’t appropriate for your wall structure.
Modern Farmhouse Styling Tips (So It Looks Intentional)
- Hardware finish: Matte black is the classic modern farmhouse move, but brushed nickel can look more contemporary.
- Keep the pattern simple: One strong design reads cleaner than five competing shapes.
- Match nearby trim: If your home has simple baseboards and casing, a clean-frame barn door fits right in.
Conclusion: A Big Style Upgrade in a Very Small Number of Steps
If you can measure carefully, keep things level, and resist the urge to “eyeball it,” you can absolutely build and install
a modern farmhouse barn door that looks professionally done. The secret isn’t magicit’s solid mounting, smart sizing,
and a clean finish. Do those three things, and your door will slide smoothly, look sharp, and make your space feel instantly upgraded.
Real-World Experiences (The Stuff People Only Admit After It’s Done)
The first time I helped with a barn door install, the plan was “easy weekend project.” The reality was “easy weekend project
plus a bonus episode called Why Is This Wall Not Straight?” That’s not meant to scare youit’s meant to set you free.
Most barn door hiccups aren’t skill issues. They’re house issues.
One of the biggest lessons: your track can be perfectly level and your door can still look slightly off.
Why? Because trim, floors, and openings in real homes are often a little out of square. The trick is choosing what to “trust.”
For a barn door, you trust the level track first (for smooth rolling), then you adjust stops and guides so the door closes
where it looks best. If the casing is slightly crooked, you can add a bit more overlap on the “problem side” so the closed door
visually centers over the opening. Nobody will measure it with a tapepeople will just think, “Nice door.”
Another repeat scenario: baseboards. Many installs go fine until the door slides and you hear that subtle
skrrrrt of wood meeting trim. The fix can be surprisingly simple: a slightly thicker header/backer board (or spacers)
to push the track out a touch, giving the door room to clear the baseboard. Sometimes people remove a section of baseboard behind
the door travel path. That can look clean if you do it neatly, but pushing the door out is often faster and keeps the wall looking finished.
Finishing is another place experience matters. On paper, “paint the door” is one line. In real life, paint shows everything.
The smoother your sanding and filling, the more expensive your door looks. I’ve seen doors built from budget materials that looked
high-end because the builder took time on the filler, sanding, and primer. I’ve also seen gorgeous wood get visually ruined by rushed finishing.
If you want the modern farmhouse look, aim for calm, clean surfacesno lumpy filler, no fuzzy edges, no roller texture that screams “I panicked.”
Hardware is where people either feel like geniuses or feel personally attacked by physics. A good tip: lay everything out on the floor first.
Put the door down, place the hanger straps, confirm screw holes won’t hit trim, and check your measurements twice. It’s much easier to adjust
layout on the ground than on a ladder while holding a drill and questioning all your life choices.
Finally: soft-close is underrated. The first few times someone slides a new barn door, they do it with the enthusiasm
of a game-show contestant. Soft-close helps prevent slamming, protects fingers, and keeps the door from rattling like a shopping cart
with one dramatic wheel. If your door is going on a bedroom, office, or anywhere people might use it half-asleep, soft-close is a quality-of-life upgrade
you’ll appreciate every single day.


