Table of Contents >> Show >> Hide
- Why DIY Summer Soaps Is the Ultimate “Smart + Fun” Flex
- Pick Your Soapmaking Method (And Why Melt-and-Pour Wins for Most People)
- Shopping List: What You Actually Need (No Craft Hoarding Required)
- Scent Smarts: How to Make Summer Soaps That Smell Amazing (Without Irritating Skin)
- Summer Scent Profiles That Never Fail
- Step-by-Step: Make Melt-and-Pour Summer Scented Soaps
- Three Easy “Summer Soap” Designs You Can Copy Today
- Pro Troubleshooting: Fix the Stuff That Usually Goes Wrong
- Cost Breakdown: Where the Savings Actually Come From
- Packaging + Gifting: Make It Look Expensive (Without Spending Expensive)
- Important Reality Check: Claims and Labels (Especially If You Share or Sell)
- Conclusion: Your Summer Soap Era Starts Now
- Extra: of Real-World Soapmaking Experiences (So You Feel Seen)
Store-bought “summer” soaps are basically a vibe tax. You’re paying extra for a tropical label, a beachy name, and a fragrance that disappears faster than ice cream in July.
Meanwhile, you could make a stack of custom bars at home for a fraction of the costand smell like a citrus grove, a minty mocktail, or a coconut-y vacation without booking a flight.
This guide walks you through beginner-friendly, money-smart summer scented soap making using the safest, easiest method: melt-and-pour soap.
No chemistry degree required. No mysterious cauldron energy. Just simple steps, smart scent choices, and a few pro tricks so your soaps look (and smell) like you actually know what you’re doing.
Why DIY Summer Soaps Is the Ultimate “Smart + Fun” Flex
- You control the scent. Want “Watermelon Lemonade” instead of “Generic Pink Candy”? Done.
- You can keep it skin-friendly. Choose skin-safe fragrance options and avoid overdoing it.
- It’s gift gold. A couple of bars + a simple wrap looks like a boutique purchase.
- It saves money. One soap base block can make multiple barsespecially if you keep designs simple.
- It’s customizable. Colors, embeds, layers, exfoliants… you’re the creative director.
Pick Your Soapmaking Method (And Why Melt-and-Pour Wins for Most People)
Melt-and-Pour (Beginner-Friendly, Low Drama)
You melt a pre-made soap base, add color + scent, pour into a mold, and let it harden. That’s it. It’s the best choice if you want
cute bars fast, with fewer safety risks and fewer “why is this doing that?” surprises.
Cold Process (Advanced, More Safety Steps)
Cold process involves handling lye and requires strict safety practices and accurate measuring. If you’re newer (or making soaps with a younger helper),
stick with melt-and-pour. You can always “level up” later with proper training.
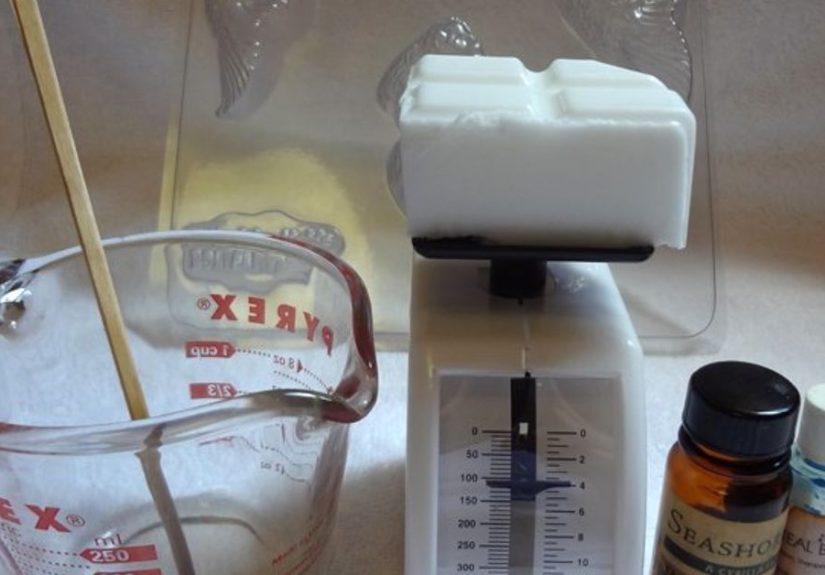
Shopping List: What You Actually Need (No Craft Hoarding Required)
Must-Haves
- Melt-and-pour soap base (clear glycerin, shea butter, goat milk, oatmeal, aloechoose your vibe)
- Heat-safe container (microwave-safe measuring cup is perfect)
- Soap mold (silicone makes unmolding easy)
- Skin-safe fragrance (fragrance oil or essential oil blend suitable for rinse-off products)
- Spatula or spoon for gentle stirring
Nice-to-Haves (That Make You Feel Like a Soap Wizard)
- 99% isopropyl alcohol in a spray bottle (bubble popper + layer “glue”)
- Infrared thermometer (helps prevent layer-melting mishaps)
- Colorants (soap-safe mica, liquid color, or pre-dispersed dyes)
- Disposable pipettes (for measuring scent cleanly)
- Plastic wrap/shrink wrap (prevents “sweaty” glycerin dew in humid weather)
Scent Smarts: How to Make Summer Soaps That Smell Amazing (Without Irritating Skin)
Fragrance Oil vs Essential Oil
Fragrance oils are designed for scent performance and often hold up better in soap. Essential oils can be lovely,
but they’re potent and can irritate skin if overused, especially in sensitive people.
Use “Goldilocks” Amounts
The goal is “mmm!” not “my nose is doing push-ups.” Many makers start in the low single-digit percentage range for scent.
If you’re using essential oils, lean conservative. For fragrance oils, follow supplier safety guidance for soap (often tied to IFRA-style use categories).
Patch Test Your Finished Soap If You’re Sensitive
Fragrance is a common trigger for skin reactions. If you or someone you’re gifting to has sensitive skin,
test a small amount of lather on a small area first and discontinue if irritation happens.
Summer Scent Profiles That Never Fail
Want your bathroom to smell like a happy vacation? Pick a “summer family” and build around it.
1) Citrus Splash (Fresh, Clean, Crowd-Pleaser)
- Lemon + lime
- Grapefruit + mint
- Orange + basil
2) Beach Day (Tropical, Creamy, Vacation Energy)
- Coconut + vanilla (note: vanilla can discolorplan colors accordingly)
- Pineapple + mango
- Sea salt + driftwood (spa vibe)
3) Garden Fresh (Herbal, Light, “I Have My Life Together”)
- Lavender + lemon
- Rosemary + citrus
- Cucumber + green tea
4) Mocktail Bar (Fun, Bright, Party Soap)
- Strawberry lemonade
- Watermelon lime
- Mojito mint
Step-by-Step: Make Melt-and-Pour Summer Scented Soaps
- Prep your station. Set out molds, color, scent, and tools. Soap cools fast once poured, so being ready matters.
- Cut your soap base into cubes. Smaller pieces melt faster and more evenly.
-
Melt gently. Microwave in short bursts, stirring between rounds, or use a double boiler. Avoid boiling the base.
Melted soap can be hothandle carefully. - Add color. Start with a little. You can always add more, but you can’t un-make neon.
- Add scent off direct heat. Stir gently to avoid bubbles. Think “folding batter,” not “whisking chaos.”
- Pour into molds. Pour slowly to reduce air bubbles.
- Spritz the top with alcohol. A light spray helps pop surface bubbles and improves clean finishes.
- Cool and unmold. Let soaps harden at room temperature. Avoid freezing solid; drastic temp changes can cause sweating later.
- Wrap for humidity protection. In summer humidity, wrap finished bars to reduce “glycerin dew” (the sweaty bead look).
Three Easy “Summer Soap” Designs You Can Copy Today
Recipe 1: Citrus Sunrise Swirl (Beginner-Friendly + Looks Fancy)
Look: Orange/yellow tones with a gentle swirl.
Scent direction: Lemon + orange + a tiny herbal note (like basil) for “fresh squeezed sophistication.”
- Use a clear or shea butter base for brightness.
- Color two small portions differently (yellow + orange).
- Pour one, then the other, then do a gentle swirl with a skewer.
- Top with a tiny pinch of cosmetic-grade mica (optional) for glow.
Recipe 2: Mojito Mint Bars (Spa-Cool + Heat-Wave Approved)
Look: Soft green, clean and minimal.
Scent direction: Mint + lime (fresh, not toothpaste).
- Choose a white base (goat milk or oatmeal base gives a creamy “cocktail foam” look).
- Keep color light; pale green reads “refreshing,” neon reads “alien smoothie.”
- Optional: add a very small amount of fine exfoliant for a “cooling scrub” feelgo easy so it’s not sandpaper.
Recipe 3: Beach-Trip Layers (Clear Ocean + Sandy Base)
Look: Two layers: a clear “ocean” top and a creamy “sand” bottom.
Scent direction: Coconut + clean linen, or sea salt + citrus.
- Pour the sand layer first (opaque base). Let it set until firm but slightly tacky.
- Spritz alcohol before adding the next layer to help layers stick.
- Keep the top layer cooler (warm, not scorching) so it doesn’t melt the bottom layer.
Pro Troubleshooting: Fix the Stuff That Usually Goes Wrong
Problem: “My soap is covered in tiny bubbles.”
Fix: Stir gently, pour slowly, and spritz the top with isopropyl alcohol.
Problem: “My layers separated like a bad group project.”
Fix: Spritz alcohol between layers and avoid pouring a too-hot top layer that melts the base layer.
Temperature control helps a lotwarm is good; scorching is sabotage.
Problem: “Why is my soap sweating?”
That’s glycerin dew. Melt-and-pour bases can attract moisture from humid air.
Fix: Let bars cool at room temp, avoid fully freezing them, and wrap them once unmolded if your climate is humid.
Problem: “My cute dried flowers turned brown.”
Botanicals can discolor or bleed in soap. If you want the “pressed flower” look, consider placing flowers on top where they stay drier,
or use soap embeds that mimic botanicals for a cleaner long-term look.
Problem: “The scent faded after a week.”
Use skin-safe scents intended for soap, measure carefully, and store finished bars wrapped. Some light, citrusy notes naturally smell softer over time,
so pairing them with a “base note” (like a gentle herbal or warm note) can help the scent feel more complete.
Cost Breakdown: Where the Savings Actually Come From
A single block of melt-and-pour base can produce multiple bars, and you only use small amounts of color and scent per batch.
The biggest “starter cost” is molds and a few toolsbut those are reusable. After that, your cost per bar usually drops dramatically compared with
boutique summer soaps.
Packaging + Gifting: Make It Look Expensive (Without Spending Expensive)
- Wrap tightly. Helps prevent glycerin dew and keeps scents fresher.
- Label simply. Name + scent profile (“Citrus Sunrise”) looks polished.
- Add a tiny story card. “Hand-poured summer soap inspired by fresh citrus + sunshine.”
- Bundle smart. Three mini bars in a kraft box = instant gift set.
Important Reality Check: Claims and Labels (Especially If You Share or Sell)
In the U.S., how you market and label a product matters. If you describe your bar as simply cleansing “soap,” it’s treated differently than if you
claim it moisturizes skin, makes you smell amazing, deodorizes, treats acne, kills germs, or heals anything.
Bottom line: keep claims simple unless you’ve done the homework on cosmetic/drug rules.
Conclusion: Your Summer Soap Era Starts Now
DIY summer scented soaps are the rare hobby that checks every box: it’s creative, practical, giftable, and genuinely money-saving.
Start with melt-and-pour, keep your scent choices skin-safe, wrap your bars for humidity, and lean into easy designs that look fancy with minimal effort.
Most importantly: have fun. If your first batch looks a little “rustic,” call it “artisan.” If it looks perfect, accept your new title as
Chief Summer Soap Officer.
Extra: of Real-World Soapmaking Experiences (So You Feel Seen)
Most first-time soap makers go through the same emotional journey: confidence, curiosity, mild chaos, and then sudden pride that borders on bragging.
It usually starts with someone saying, “How hard can it be?” (Famous last words in every craft aisle.) Then you melt your base, add scent, and realize
soap is a fast-moving creature. The minute you step away to answer a text, it starts forming a skin. Not a problemjust part of the rhythm. After one or
two batches, you learn to stage everything like a tiny cooking show: molds lined up, colors ready, fragrance measured, and a spray bottle of alcohol
sitting there like the MVP it is.
Summer brings its own plot twists. The first time you make soap in humid weather, you might wake up and think your bars are “leaking.”
They’re not. They’re sweatingbecause melt-and-pour bases can attract moisture from the air. Almost everyone has that moment of panic, followed by a quick
fix: wrap the bars. Then you feel like you unlocked a secret level of adulthood. The same thing happens with bubbles. You pour a gorgeous, clear “ocean”
layer, then notice tiny bubbles on top and wonder if your soap is carbonated. A quick spritz of alcohol andpoofsmooth finish. It’s oddly satisfying,
like erasing a mistake without consequences.
The funniest experience is scent confidence. At first, people tend to overdo it, thinking stronger is better. Then they make one batch that smells like
a perfume counter exploded, and suddenly the lesson sticks: “measured and skin-safe” is the goal. After that, your nose gets smarter. You start blending
like a casual perfumerbright citrus up front, a hint of herb or soft floral in the middle, and something mellow grounding it so it doesn’t vanish.
You’ll also learn that some designs feel like magic for almost no effort: two-tone layers, a tiny swirl, or a sprinkle of mica that catches the light.
People will ask where you bought it. You’ll say, “Oh, this? I made it,” and try to act normal while internally doing a victory lap.
Eventually, soapmaking becomes a seasonal ritual. Early summer: citrus and mint. Mid-summer: tropical blends and beachy spa scents. Late summer: lemonade,
berry, and “clean linen” for that fresh-out-of-the-shower feeling. You start making extras “just in case,” which is craft-person code for “I’m addicted.”
And honestly? There are worse habits. Your bathroom smells amazing, your gifts look thoughtful, and every time you wash your hands you get a tiny vacation.
That’s not just soap. That’s a lifestyle.


