Table of Contents >> Show >> Hide
- Why Woodworking Clamps Matter More Than You Think
- The Best Woodworking Clamps for Common Shop Tasks
- 1. Bar and F-Style Clamps: The Everyday Workhorses
- 2. Parallel-Jaw Clamps: For Perfectly Flat Glue-Ups
- 3. Pipe Clamps: Heavy-Duty Muscle on a Budget
- 4. Quick-Release and Trigger Clamps: One-Hand Heroes
- 5. C-Clamps and G-Clamps: Compact Power
- 6. Spring Clamps: The Clothespins of the Shop
- 7. Corner, Right-Angle, and Strap Clamps: Keeping Things Square
- 8. Wooden Hand-Screw and Specialty Clamps
- How to Choose the Right Woodworking Clamp
- How Many Clamps Do You Actually Need?
- Clamp Tips, Tricks, and Safety
- Real-World Experiences With Woodworking Clamps (Extra )
- Conclusion: Build a Clamp Collection That Works as Hard as You Do
Ask any woodworker what they wish they’d bought more of sooner, and you’ll hear the same answer:
clamps. Bar clamps, pipe clamps, spring clamps – they’re the quiet heroes that keep
boards aligned, joints tight, and fingers far away from spinning blades. As Bob Vila and other tool
pros love to remind us, the right woodworking clamps can literally make or break a glue-up.
In this guide, we’ll walk through the best woodworking clamps for common shop jobs, how to choose the
right style and size, how many you actually need, and some real-world lessons from the shop floor.
Think of this as your friendly, slightly glue-stained roadmap to building a clamp collection that
actually matches your projects.
Why Woodworking Clamps Matter More Than You Think
Wood glue is strongest when joints are tight, pressure is even, and parts don’t slide around while you
fumble for a rag. That’s where clamps come in. Tool experts routinely rank clamps alongside saws and
chisels as essential shop gear, not optional extras.
Different clamp styles shine in different roles:
- Bar and F-style clamps excel at panel glue-ups and general assembly.
- Parallel-jaw clamps keep doors, tabletops, and casework square and flat.
- Pipe clamps deliver big-time pressure for big projects.
- Spring and quick-release clamps work fast for jigs, small repairs, and “hold this for a second” jobs.
- Corner and strap clamps make frames, boxes, and odd shapes far less frustrating.
Pros also point out that good clamps protect your workpiece with padded jaws, deliver reliable pressure,
and don’t flex like noodles under load. Upgrading from bargain-bin clamps to reputable brands often
means straighter glue-ups and fewer “why is this out of square?” moments.
The Best Woodworking Clamps for Common Shop Tasks
1. Bar and F-Style Clamps: The Everyday Workhorses
If you’re just getting started, bar clamps and F-style clamps will do 60–70% of your
clamping work. They grip along a steel bar with one fixed jaw and one sliding jaw, giving you
adjustable reach and solid pressure. Reviews from woodworking magazines and tool sites consistently
highlight mid-size bar clamps as the best all-around choice for hobbyists.
A few things to look for:
- Stout bar with minimal flex, especially on longer clamps.
- Comfortable handle (many pros prefer ergonomic or soft-grip handles).
- Replaceable jaw pads to prevent dents and glue prints.
A widely praised example is the clutch-style bar clamp, such as the Bessey GSCC series, which mixes
durability, easy adjustment, and value – perfect for everyday glue-ups and workholding.
2. Parallel-Jaw Clamps: For Perfectly Flat Glue-Ups
When you’re gluing a table top, cabinet door, or panel that really needs to stay flat, parallel-jaw
clamps are the “best friend” you didn’t know you needed. Their jaws stay square to the bar, providing
even pressure across the face rather than just at the edges. Many cabinetmakers rely on them to keep
parts aligned and to reduce bowing in wide glue-ups.
They’re more expensive than basic F-clamps, but you don’t need dozens right away. Start with a couple
in medium lengths for doors and small panels, then expand as your projects grow in scale.
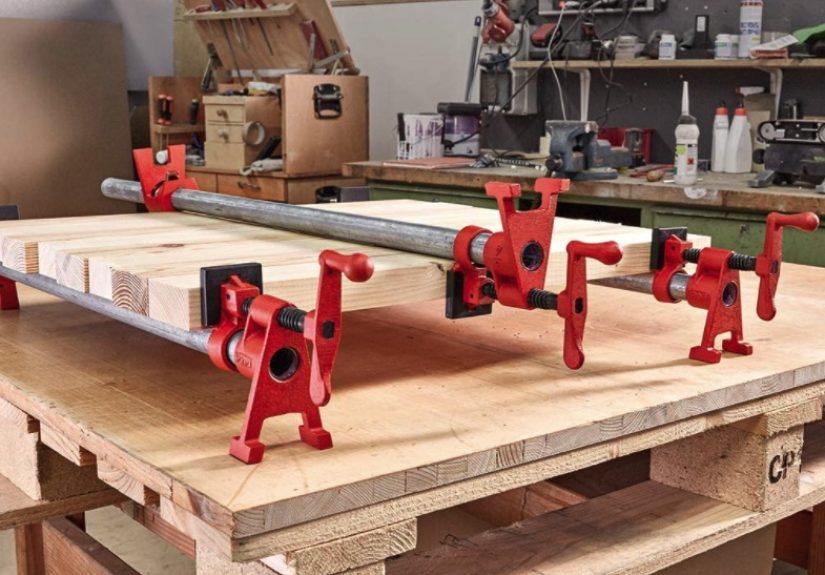
3. Pipe Clamps: Heavy-Duty Muscle on a Budget
Pipe clamps are the budget-friendly answer to “I need very long clamps, but my wallet
is crying.” The clamp heads slide onto standard pipe, so you can swap out lengths as needed. Tool
testers frequently call pipe clamps one of the best ways to get serious holding force without paying
parallel-jaw prices.
Use them when:
- You’re gluing a long tabletop or bench top.
- You need high clamping pressure for stubborn joints.
- You want flexibility to change clamp length using different pipes.
Just remember to protect your stock from the pipe with cauls or scrap – black pipe marks on maple are
… not a design feature.
4. Quick-Release and Trigger Clamps: One-Hand Heroes
Quick-release, trigger-style clamps act like an extra pair of hands. Squeeze the trigger with one hand
while the other holds the work – perfect for fast setups, jigs, and temporary holds. Family Handyman
and other DIY sites consistently recommend these for light- to medium-duty tasks, noting they’re
shorter and lower pressure than full bar clamps but faster to deploy.
High-quality trigger clamps from major brands often hit their advertised pressure ratings, while cheap
versions can fall far short in independent tests – sometimes delivering barely a fraction of their
claimed force. So if you want clamps that actually clamp, this is a category
worth upgrading in.
5. C-Clamps and G-Clamps: Compact Power
The classic C-clamp looks almost too simple, but it packs a punch. Tool guides
describe it as one of the most common clamp types, well-suited for metalworking and heavy localized
pressure. In a woodshop, C-clamps shine when:
- Mounting jigs or fences to a bench.
- Holding hardware in place during installation.
- Locking parts together at a single point of contact.
They’re not the first pick for long panel glue-ups, but having a handful in various throat depths makes
problem-solving much easier.
6. Spring Clamps: The Clothespins of the Shop
Spring clamps use a simple spring mechanism to snap shut – think “clothespins with
muscles.” Guides describe them as ideal for small projects that need minimal clamping pressure, such
as holding edging in place while glue tacks up or temporarily securing a stop block.
You won’t use them for a dining table top, but when you need a dozen tiny clamps right now, you’ll be
glad you stocked up.
7. Corner, Right-Angle, and Strap Clamps: Keeping Things Square
Picture frames, cabinet boxes, and mitered trim all share a common enemy: slightly-out-of-square
joints. Right-angle clamps and corner clamps hold pieces at 90 degrees while you glue
or screw them together. Testing from tool reviewers shows these specialty clamps are especially handy
for box and frame work, where alignment matters as much as pressure.
For awkward shapes like chair frames or big picture frames, strap or band clamps wrap
around the whole assembly and cinch everything tight. They don’t push as hard as a bar clamp, but they
apply pressure all the way around, which is perfect for complex glue-ups.
8. Wooden Hand-Screw and Specialty Clamps
Wooden hand-screw clamps look old-fashioned, but they’re favorites among furniture
makers. Their wooden jaws play nicely with delicate surfaces, and the twin screws let you grip angled
parts or tapered workpieces securely.
You’ll also see bench vises, cam clamps, and toggle clamps in many shops. While not “clamps” in the
classic sense, they serve the same mission: hold the work still so you can do your best work.
How to Choose the Right Woodworking Clamp
With so many clamp types (bar, pipe, spring, strap, corner, and more), it helps to map them to what
you actually build. Tool and DIY sites generally recommend choosing clamps based on three big factors:
Match Clamp Type to Task
- Panels and tabletops: Parallel-jaw or pipe clamps for high pressure and alignment.
- Cabinets and doors: Parallel-jaw or long bar clamps.
- Small boxes and frames: Corner clamps and strap clamps.
- Jigs and quick holds: Trigger clamps and spring clamps.
- Metal brackets and hardware: C-clamps and F-clamps.
Consider Pressure and Reach
Clamp pressure isn’t just marketing fluff. Independent tests show some high-quality clamps hit their
rated pressure, while bargain models can fall well short. For most woodworking
gluing, you don’t need extreme PSI; you need even pressure across the joint. Fine woodworking
sources even use formulas based on joint area and wood species to estimate the number of clamps
required, underscoring that more surface area usually means more clamps.
Also pay attention to:
- Jaw length: Must span the width of your workpiece.
- Throat depth: How far from the edge the clamp can apply pressure.
- Bar stiffness: Longer clamps need stiffer bars to prevent bowing.
Protect the Wood
Many modern clamps include plastic or rubber pads on their jaws – your best defense against dents and
clamp-shaped bruises. Guides emphasize using pads, cauls, or scrap blocks under jaws, especially when
you crank down hard or work with softwoods.
How Many Clamps Do You Actually Need?
Short answer: more than you think. Long-running woodworking forums joke that “if you can count your
clamps, you don’t have enough,” and that’s only half a joke.
A practical starting point, based on tool-magazine advice:
- At least four 6-inch and four 18-inch F- or bar clamps for general work.
- Two to four long parallel-jaw or pipe clamps for big glue-ups.
- A small army (say, 8–12) of spring and trigger clamps for quick holds.
- A few corner or strap clamps if you often build boxes or frames.
As your projects grow, you’ll naturally add more sizes and types. Most woodworkers slowly upgrade
over time – picking up premium clamps for critical glue-ups while still leaning on budget clamps for
light-duty tasks.
Clamp Tips, Tricks, and Safety
Having great clamps is only half the story; using them well is what keeps your projects square and your
fingers intact.
Don’t Over-Tighten
Yes, you can squeeze too hard. Excessive pressure can starve a joint of glue or bow thin
parts. Tool experts recommend snug, even pressure along the joint rather than “gorilla tight.” Pipe,
bar, and C-clamps can all exert serious force, so stop once squeeze-out appears and everything is
aligned.
Use Cauls for Flatter Glue-Ups
Cauls – straight boards wrapped in tape or waxed to resist glue – help spread pressure across wide
panels. A pair of cauls on top and bottom, clamped alternately, can keep a tabletop flatter and reduce
the number of clamps needed on the edges.
Keep Clamps Clean and Ready
Dried glue on bars and screws can cause slipping and make adjustments jerky. Many woodworkers wax the
bars and threads lightly so glue pops off easily. Regular cleaning also helps your clamps reach their
rated pressure more reliably over time.
Real-World Experiences With Woodworking Clamps (Extra )
The “First Big Glue-Up” Panic
Almost every woodworker has a story about their first serious glue-up. It usually goes like this:
confidence is high, boards are jointed, glue bottle is full. Then the clock starts. Glue hits the
first panel, boards twist, clamps feel too short, and suddenly you realize you own exactly three
usable clamps and none of them are the right length.
This is where the advice from experienced woodworkers rings in your ears: dry clamp everything
first. Run a full rehearsal with no glue. Lay out the clamps, adjust the jaws, add cauls, and
make sure you can reach everything without stepping over a pile of offcuts. The first time you do a
glue-up after a proper dry run, you’ll feel like you just leveled up in the shop.
Cheap vs. Premium: Where It Really Shows
Online discussions about favorite clamps are full of strong opinions. Many woodworkers rave about light
but stiff aluminum bar clamps or heavy-duty parallel-jaw systems, while still admitting they own a box
of cheap trigger clamps for quick, low-stress tasks.
The biggest difference people notice between bargain clamps and reputable brands:
- Holding power: Good clamps lock solidly with no creep as glue dries.
- Bar stiffness: Premium clamps flex less, so boards stay flatter across their width.
- Ergonomics: Handles that don’t wreck your hands by the third clamp.
In pressure tests, name-brand trigger clamps often meet their advertised ratings, while low-cost
versions sometimes deliver far less force than promised. That doesn’t mean you
can’t own budget clamps – just don’t ask them to hold together a 7-foot dining table all by
themselves.
The “You Can Never Have Too Many Clamps” Truth
Spend five minutes in a woodworking forum and you’ll see the same joke repeated: “If you can count your
clamps, you don’t have enough.” Under the humor, there’s a practical reality. Big glue-ups quickly eat
clamps. A tabletop might use eight or more long clamps across the width plus a few more across the
top with cauls.
Many folks start with a modest set, then realize every new project seems to require “just two more” of
some size. Over years, a collection grows: a couple parallel clamps here, some pipe clamps there, a
handful of small F-clamps picked up on sale. Before you know it, you have enough clamps to assemble a
small boat – and you still find one situation where you’re one clamp short.
Learning to Mix and Match Clamp Types
One of the more subtle skills you pick up over time is mixing clamp types intelligently. For example,
you might use parallel-jaw clamps along the edges of a panel for alignment, then add a few pipe clamps
underneath for brute-force pressure in the center. Corner clamps might square up a cabinet during dry
assembly, while bar clamps lock the joints once glue is applied.
This “mix and match” approach keeps you from relying on one clamp style for everything. Instead, you
treat your clamp rack like a toolbox: choose the right tool, in the right size, for each step.
Clamps as Problem Solvers, Not Just Glue Helpers
Once you have a good selection, you’ll find yourself reaching for clamps even when there’s no glue in
sight. Need to temporarily mount a fence to your workbench? Two F-clamps. Need a third hand to hold a
jig to a board while you drill? Trigger clamp. Want to straighten a slightly bowed board before ripping
it? A couple of bar clamps and some creative thinking can get you surprisingly close.
That’s the real magic of great woodworking clamps: they extend what you can safely do with only two
hands. When you invest in good clamps and learn how to use them well, glue-ups get calmer, projects
get squarer, and the odds of muttering at 2 a.m. over a twisted tabletop drop dramatically.
Conclusion: Build a Clamp Collection That Works as Hard as You Do
The “best” woodworking clamps aren’t just one model or brand; they’re a smart mix of
bar, parallel, pipe, spring, and specialty clamps that match the way you build. Start with reliable
mid-size bar clamps, add a few heavy hitters like pipe or parallel-jaw clamps for big glue-ups, then
sprinkle in trigger, spring, and corner clamps for all the odd jobs and tricky assemblies.
Follow the pros: dry clamp first, use cauls, protect your work with pads, and resist the urge to crank
everything to maximum pressure “just because.” Over time, you’ll learn which clamps you reach for most
and where premium upgrades pay off. And yes, you’ll probably join the club of woodworkers who quietly
collect “just a few more clamps” for every new project.


