Table of Contents >> Show >> Hide
- What an Insect Hotel Actually Does (and What It Doesn’t)
- Why an Old Drawer Is Perfect for This Project
- Before You Start: Safety, Sanity, and “Please Don’t Poison the Guests”
- Tools and Materials
- Step-by-Step: Turning a Drawer Into a Real Insect Hotel
- Step 1: Clean and prep the drawer
- Step 2: Add a roof with an overhang
- Step 3: Build in drainage and airflow
- Step 4: Create “rooms” (optional but recommended)
- Step 5: Make the bee-friendly nesting section (the VIP wing)
- Step 6: Add “beneficial bug” sections (optional, and keep expectations realistic)
- How to Fill the Drawer: Room Ideas That Make Sense
- Where to Place Your Drawer Hotel (Location Is Everything)
- Maintenance: The Part People Skip (and the Part That Matters)
- Troubleshooting: When Your Hotel Isn’t Getting Bookings
- Common Mistakes (So You Don’t Build a Five-Star Parasite Resort)
- Make It Even Better: Pair the Hotel With Real Habitat
- Final Thoughts
- Experiences and Real-World Lessons (500+ Words)
You know that lonely old drawer in the garagethe one that’s been “temporarily” sitting there since 2019?
Congratulations: it’s about to become the nicest affordable housing complex in your yard. We’re talking a
DIY insect hotel (also called a bug hotel) that can support solitary bees and other beneficial insects that
help pollinate plants and keep garden pests in check.
This guide walks you through turning an old drawer into a weather-smart, safer-for-insects hotel with
the right materials, the right “room sizes,” and the right placementbecause nobody wants to build a
luxury resort that turns into a damp, moldy studio apartment by May.
What an Insect Hotel Actually Does (and What It Doesn’t)
An insect hotel is a structure that provides sheltered nooks and nesting tunnels for certain beneficial
insectsespecially cavity-nesting solitary bees (like mason and leafcutter bees). These bees don’t live
in hives; each female builds her own nest in a tunnel, stocking it with pollen/nectar “lunches” for her
offspring and sealing it up like a tiny to-go order for the future.
Important reality check: most native bees don’t use hotels at all. A large percentage nest in the ground
or in natural cavities like stems and dead wood. So think of an insect hotel as one tool, not the whole
toolbox. You’ll get the best results by pairing it with pollinator-friendly plants and (this is huge)
avoiding pesticides.
Why an Old Drawer Is Perfect for This Project
A drawer is basically a pre-built shadow box: sturdy, shallow, easy to mount, and already shaped like a
“frame” with a back. It also has bonus points for upcycling. With a few tweaksmainly weather protection,
drainage, and removable nesting materialsyou can make a hotel that’s safer and easier to maintain than
many store-bought versions.
Before You Start: Safety, Sanity, and “Please Don’t Poison the Guests”
1) Check the drawer’s history
If the drawer is very old (especially pre-1978), assume paint might contain lead. If you suspect lead,
don’t sand it. Either seal it with an appropriate encapsulating primer/paint (following product directions)
or choose a different drawer. Also avoid drawers that smell like chemicals, were stored with pesticides,
or are made from pressure-treated wood (not a great idea for insect nesting materials).
2) Avoid treated/contaminated fillers
Skip anything that can leach chemicals: pressure-treated lumber, glossy printed paper, dryer lint, or
mystery “free wood” that used to be a deck in a past life.
3) Build for maintenance
The biggest mistake people make with bee hotels is thinking they’re “set it and forget it.” Without
periodic cleaning or replacement of nesting tubes, you can unintentionally concentrate parasites, mold,
and disease. The goal is a hotel where you can remove and replace nest materials easily.
Tools and Materials
Tools
- Drill + drill bits (for mounting holes and optional nesting block holes)
- Hand saw or utility knife (to cut bamboo/reeds to length)
- Sandpaper (medium + fine) or sanding block (only if paint is known safe)
- Screwdriver
- Staple gun or small nails (optional, for attaching mesh/backing)
- Level (optional, but your hotel will look less “haunted”)
Materials
- One old wooden drawer (ideally solid wood, not crumbling particleboard)
- Exterior screws (for mounting and/or roof attachment)
- Roof material: scrap board + shingles, cedar shake, or a small sheet of metal/plastic
- Waterproof wood glue or exterior caulk
- Optional: exterior paint/sealant (low-VOC; let it cure fully)
- Optional: 1/4-inch hardware cloth or sturdy mesh (to keep birds from pulling materials out)
- Fillers: bamboo canes, paper tube liners, hollow stems, untreated wood block, pinecones, bark, straw
- Spacers/dividers: thin scrap wood strips (optional, for “room” layout)
Step-by-Step: Turning a Drawer Into a Real Insect Hotel
Step 1: Clean and prep the drawer
-
Remove hardware (handles, metal runners) if they rattle or could rust and stain.
If you keep the handle, make sure it doesn’t create a gap where water pools. -
Wipe down with mild soap and water, then let it dry completely.
If you must sand, only do so if you’re confident the paint is not lead-based. - Seal cracks with exterior caulk or wood glue. Insect hotels should be dry, not drafty-and-damp.
Step 2: Add a roof with an overhang
Rain is the villain of this story. Add a simple slanted roof that overhangs the front by at least 1–2 inches.
That keeps the “rooms” drier and reduces mold risk.
- Cut a scrap board slightly wider than the drawer.
- Attach it so it slopes (even a small angle helps water run off).
- Cover with shingles, a strip of metal flashing, or any durable waterproof layer.
Step 3: Build in drainage and airflow
If the drawer has a solid base, drill a few small drainage holes along the bottom edge (the “floor” of the hotel).
Moisture management is non-negotiable.
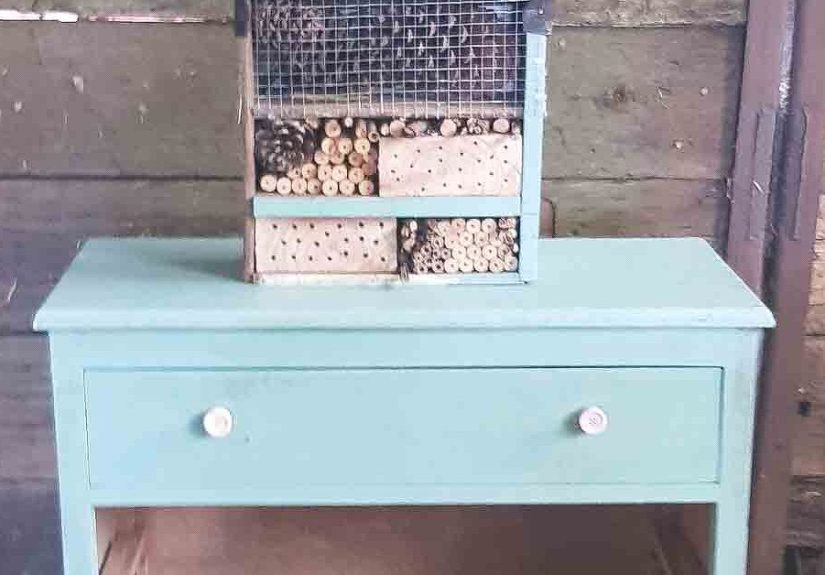
Step 4: Create “rooms” (optional but recommended)
Dividers help you organize materials and keep them snug so they don’t slump. You can create 3–6 compartments
using thin scrap wood strips. Think: studio apartments, not a chaotic open-plan warehouse.
Step 5: Make the bee-friendly nesting section (the VIP wing)
For solitary bees, you want smooth, cleanable tunnels with a closed back end. Two simple approaches:
-
Removable tubes: bundle bamboo/reed sections or use paper tube liners placed in a holder.
This is usually the easiest to maintain. -
Drilled wood block: use untreated wood and drill holes (not all the way through) with
smooth entrances. Blocks are durable but harder to sanitize unless designed for cleaning.
Tunnel sizing guideline: a mix of diameters attracts a mix of species. Many best-practice guides
recommend holes roughly in the range of about 3/32″ to 3/8″ diameter, and several inches deep (often around
3–6 inches or more). If you’re using tubes, aim for lengths around 6–8 inches when possible, with one end closed.
Smooth the edgessplinters are basically the hotel equivalent of a broken elevator.
Step 6: Add “beneficial bug” sections (optional, and keep expectations realistic)
You can include materials for lady beetles, lacewings, and other beneficial insects, but occupancy varies by region,
season, and what’s happening in your yard. Consider these sections a “nice-to-have,” not the main event.
How to Fill the Drawer: Room Ideas That Make Sense
Room A: The Solitary Bee Suites (most likely to be used)
- Bamboo/reed tubes: cut cleanly; pack tightly so they don’t wobble.
- Paper liners: great for easier annual replacement (and less parasite buildup).
- Drilled wood block: untreated wood only; smooth entrances; protect from rain.
Pro tip: keep the bee nesting materials toward the top half of the drawer where it stays drier. And don’t cram
random “soft stuff” into the bee areabees want tunnels, not mystery fluff.
Room B: “Overwintering Nooks” for Helpful Predators
- Pinecones + dry leaves: can create sheltered pockets.
- Bark and small branches: offer crevices.
- Straw in a mesh pocket: can provide dry shelter.
These materials can support a range of small garden allies. Just keep them dry and replace if they get moldy.
Room C: A Mud Bar Nearby (not inside the drawer)
Mason bees use mud to seal their nest chambers. Instead of stuffing mud into your hotel (please don’t),
provide a small mud patch nearby: a shallow dish of soil kept slightly damp, or a spot in the garden that
doesn’t get baked into concrete.
Room D: Stem Bundles (a natural-material option)
Hollow or pithy stems can function as nesting sites for some cavity nesters. Cut stems cleanly and keep them
protected from soaking rain. Many habitat guides also emphasize that leaving stems standing in the garden
(instead of over-cleaning) supports nesting naturallyso consider your hotel a supplement, not a replacement.
Where to Place Your Drawer Hotel (Location Is Everything)
Think like a tiny tenant: you want warmth, dryness, and stability. A good placement can be the difference between
“thriving pollinator hangout” and “soggy décor.”
Best placement checklist
- Sun: morning sun is especially helpful (often east or southeast facing).
- Shelter: protected from heavy wind and driving rain.
- Height: roughly 4–6 feet off the ground (easy for you to monitor and maintain).
- Stability: mounted firmly on a post, fence, wall, or sturdy structureno swaying.
- Clear flight path: keep the front unobstructed (don’t bury it in tall plants).
- Near food: flowering plants nearby from spring through fall.
Mounting tips
Screw through the back of the drawer into a fence or wall stud, or mount it to a post with a bracket.
If the drawer is heavy, use two mounting points and consider a French cleat for easy removal.
Maintenance: The Part People Skip (and the Part That Matters)
Here’s the deal: insect hotels can concentrate nest parasites and pathogens if they’re left unmanaged.
The “fix” is simpledesign for removability and commit to a basic yearly routine.
In-season quick checks (spring/summer)
- Make sure materials stay dry; fix roof leaks fast.
- Watch for ants, spiders, and birds disturbing the nesting area.
- Don’t spray pesticides anywhere near the hotel (including “just a little”).
End-of-season / annual routine
- Replace or clean tubes/liners: many guides recommend replacing paper liners, straws, and reeds after bees emerge.
- Swap out moldy materials: if it smells like a wet basement, it’s time.
- Rotate/refresh wooden blocks: solid blocks can be harder to sanitize; plan to replace periodically or use designs with removable inserts.
- Keep it dry over winter: you can leave it outdoors (bees overwinter naturally), but protect it from direct soaking rain and snow load.
Troubleshooting: When Your Hotel Isn’t Getting Bookings
Problem: “No one moved in.”
Totally normal in year one. It can take time for insects to discover new habitat. Improve your odds by:
(1) adding more native flowers, (2) ensuring morning sun, (3) keeping tunnels clean and dry, and
(4) placing the hotel near, but not hidden inside, dense vegetation.
Problem: “It’s full… of things I didn’t invite.”
Welcome to ecology. You may see spiders, wasps, earwigs, or other insects. Some are beneficial, some are just
taking shelter, and some may prey on others. That’s why monitoring and replaceable nesting materials matter.
If birds are pecking at tubes, add a layer of hardware cloth spaced a bit away from the openings.
Problem: “Mold.”
This is usually a roof/placement issue. Add more overhang, increase airflow, re-pack materials tightly, and relocate
to a spot with better morning sun and less wind-driven rain.
Common Mistakes (So You Don’t Build a Five-Star Parasite Resort)
- Using pressure-treated wood or mystery scrap: chemicals and insects don’t mix.
- No roof: the hotel becomes a sponge. A very tragic sponge.
- Holes/tubes too short: deeper tunnels better protect developing bees and improve success rates.
- Rough, splintery entrances: can damage wings; sand openings smooth.
- Never replacing tubes: this is the big oneplan for annual refresh of removable materials.
- Putting it in deep shade: cold, damp, and slow to warm up.
Make It Even Better: Pair the Hotel With Real Habitat
If you want to genuinely support pollinators, the hotel is only one piece. Many conservation groups emphasize
that natural nesting habitatlike leaving some hollow stems, dead wood, and bare soilcan help a wider variety
of native bees. Plant a range of nectar and pollen sources that bloom across seasons, and skip pesticides.
You’ll create a yard that’s not just cute, but useful.
Final Thoughts
A drawer insect hotel is a fun upcycle project, a conversation starter, andif you build it thoughtfullya real
support for cavity-nesting solitary bees and other beneficial insects. The secret sauce is simple: keep it dry,
give it morning sun, provide cleanable tunnels, and do basic annual maintenance. Do that, and you’ll have the
only hotel in town where “no vacancy” is actually a sign of success.
Experiences and Real-World Lessons (500+ Words)
Here’s what people often discover after they hang up a brand-new insect hotelespecially one made from a drawer.
First: the timeline is rarely Hollywood-fast. You might expect instant buzz (literally), but it’s common for the
first season to feel quiet. That doesn’t mean you failed. Insects find habitat the way you find a new restaurant:
sometimes by accident, sometimes because a friend (or, in this case, a nearby bee) “recommends” it by thriving.
Give it time, and keep the conditions rightdry, sunny, stable.
Second: the most satisfying moment is often subtle. One day you’ll walk by and notice a few tubes capped with
neat little mud plugs. They look like tiny sealed doors, like someone checked in and immediately said,
“Do not disturb.” That’s usually a sign a mason bee has stocked the tunnel with pollen, laid eggs, and sealed
each chamber. If you used a drawer, you’ll appreciate how easy it is to crouch down and inspect without
dismantling an entire structuredrawers are naturally “viewing friendly.”
Third: you’ll learn that “perfect” is the enemy of “good.” Many people start by trying to create a Pinterest-grade
mosaic of materialspinecones arranged like a charcuterie board, bark placed artistically, stems lined up with
military precision. The insects do not care about your interior design. They care about basics:
tunnel size, dryness, warmth, and safety. A drawer hotel that’s slightly messy but well-built (tight-packed tubes,
solid roof, morning sun) will usually outperform a gorgeous one that gets rained on.
Fourth: you may get surprise tenants. Sometimes a section you built for lacewings becomes a spider condo. Or the
pinecone corner becomes a seasonal hangout for earwigs. Try not to panic. A bug hotel is a tiny ecosystem, and
ecosystems are never RSVP-only. The key is to protect the primary nesting area (the bee tunnels) and keep it
maintainable. If you see birds tugging at tubes like they’re pulling a snack from a vending machine, add a
protective mesh layer. If you see ants setting up shop, check for moisture and consider relocating the hotel a
few feetsmall changes can make a big difference.
Fifth: maintenance becomes less intimidating once you’ve done it once. The first time people hear “replace tubes
annually,” it sounds like you’ve adopted a very tiny, very needy pet. In practice, it’s closer to seasonal yard
chores: a quick inspection, swapping out paper liners or reeds after the bees have emerged, and tossing anything
that looks damp or moldy. A drawer build makes this easier because you can design it like a removable “insert”
systembundles slide out, blocks lift out, dividers keep everything from collapsing. You’re not scraping grime out
of permanent holes with a toothpick while questioning your life choices.
Sixth: success often shows up in the garden, not just the hotel. People frequently report noticing better fruit
set on nearby plantsmore squash developing fully, more strawberries shaped like strawberries (instead of lumpy
abstract art), and more consistent blooms getting pollinated. You may also notice a shift in your own habits:
leaving a few stems standing through winter, letting a patch of bare soil remain for ground nesters, and being
more cautious with any sprays. That’s arguably the biggest “experience” of all: the drawer hotel is a gateway
project that nudges you toward a more pollinator-smart yard.
Finally, there’s the surprisingly fun part: the hotel becomes a teaching tool. Kids (and adults who are basically
kids with bills) love checking the “rooms.” You can point out capped tunnels, explain solitary bees vs. honey bees,
and talk about why we’re giving helpful insects a safe spot. And yes, you are absolutely allowed to name it
something ridiculous like “The Grand Drawer-mington.” The insects won’t mind. They’ll be too busy doing the
important work.


