Table of Contents >> Show >> Hide
- Why Succulents Make Shockingly Good Wall Art
- Materials Checklist (a.k.a. Your Shopping Cart’s Destiny)
- Pick the Right Frame (Because Gravity Is Petty)
- Step-by-Step: How to Build a Living Succulent Frame
- Step 1: Remove glass and clean the frame
- Step 2: Create depth (turn the frame into a shadow box)
- Step 3: Add the front mesh
- Step 4: Line the inside so soil stays put
- Step 5: Mix a frame-friendly succulent soil
- Step 6: Fill the frame (and compact gently)
- Step 7: Plan your design before you plant
- Step 8: Plant cuttings through the mesh
- Step 9: Let it root while flat
- Step 10: Hang safely (your wall deserves respect)
- Best Succulents for Frames (Beginner-Friendly Picks)
- Design Tips That Make It Look Like You Bought It From a Fancy Store
- Care & Maintenance (Keep It Alive Without Babysitting It)
- Troubleshooting: Fix the Usual Drama
- Easy Variations (Same Idea, Different Vibe)
- Conclusion: Your Wall, But Make It a Garden
- Real-World “Experience” Notes: What This Project Feels Like After the Fun Part
You know that lonely old picture frame in the closetthe one holding a photo of… absolutely nothing because the glass broke in 2019?
Congratulations. It’s about to get a second career as living wall art.
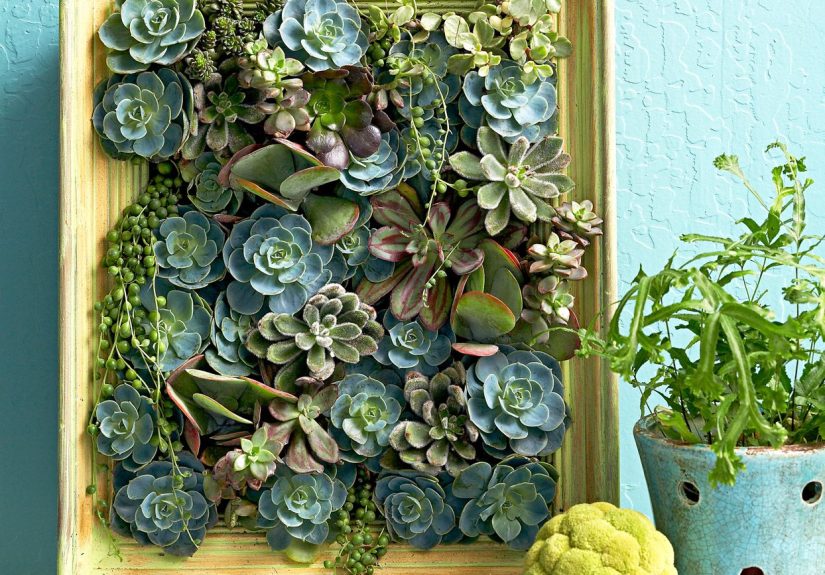
This project turns a thrifted (or forgotten) frame into a vertical succulent “painting” that looks fancy, feels calming, and makes guests say,
“Wow, you must be very responsible,” even if your laundry situation suggests otherwise.
Why Succulents Make Shockingly Good Wall Art
A vertical planter is basically gardening on hard modegravity is always trying to yeet your soil onto the floor.
Succulents, however, are the perfect teammates for this mission because they’re naturally slow-growing, drought-tolerant,
and available in an absurd variety of colors and textures (rosy rosettes, spiky stars, chubby leaves that look like candy… but please don’t eat them).
The key is building a frame that’s deep enough to hold a fast-draining mix and secure enough to hang safely.
After that, it’s basically floral designexcept your bouquet keeps living and judging your lighting choices.
Materials Checklist (a.k.a. Your Shopping Cart’s Destiny)
You can keep this super budget-friendly by upcycling and using scraps. The only “must” is stabilityboth for the frame and for the plants’ roots.
Frame + structure
- Old picture frame (ideally 8×10 to 16×20 for a first try)
- Wood strips (to create depth like a shadow box) or a deep shadow-box frame
- Plywood or thin board for a sturdy back
- Wood screws + drill (or a strong wood glue, if you’re brave)
- Hanging hardware rated for the finished weight
“Keep-the-soil-inside” layer
- Wire mesh (hardware cloth or chicken wire)
- Landscape fabric or burlap (acts like a filter)
- Dried sphagnum moss (optional but very helpful as a liner)
- Staple gun + staples (or small screws with washers)
Planting supplies
- Succulent/cactus soil mix (or DIY mix; see below)
- Extra pumice/perlite (optional but great for drainage)
- Succulent cuttings (20–60 depending on frame size and plant size)
- Chopstick or pencil (the official “poke a hole” tool)
- Garden snips or clean scissors
- Drop cloth/newspaper (unless you enjoy vacuuming grit)
Optional upgrades
- Activated charcoal (helps freshness in indoor builds)
- Wood sealer/paint (especially for outdoor frames)
- Grow light (for indoor success if sunlight is limited)
Pick the Right Frame (Because Gravity Is Petty)
The best succulent wall art starts with a frame that can act like a shallow planter.
If your frame is too thin, you’ll fight three enemies at once: falling soil, wobbly plants, and constant drying.
- Depth goal: aim for 2–3 inches of planting depth.
- Strength: hardwood frames or sturdy composites are easier to reinforce.
- Placement plan: indoor bright window? covered porch? outdoor wall? Your location affects plant choices.
Also: if the frame is precious, antique, or emotionally importantmaybe don’t turn it into a dirt box.
Or do. It’s your timeline.
Step-by-Step: How to Build a Living Succulent Frame
Read through once before starting. The order matters, mostly because it prevents the “Why is there soil in my sock?” moment.
Step 1: Remove glass and clean the frame
Take out the glass, photo, backingeverything. Wipe the frame down. If you’re painting or sealing, do it now and let it cure fully.
(Fresh paint + enclosed planter = weird smells and sad plants.)
Step 2: Create depth (turn the frame into a shadow box)
Attach wood strips to the back perimeter of the frame to create a “tray.” Then attach a plywood back to close it in.
You’re basically making a shallow box with a pretty front.
Tip: If you want a clean look, keep the added wood set slightly back from the frame edge so it’s less visible from the front.
Step 3: Add the front mesh
Stretch wire mesh across the front opening (where the glass used to be) and staple or screw it securely.
This mesh is what holds plants in place while roots establish.
- Hardware cloth = sturdier and more “grid-like”
- Chicken wire = easier to bend and cut, slightly less rigid
Step 4: Line the inside so soil stays put
Line the interior (behind the mesh) with landscape fabric. Add a layer of dampened sphagnum moss if you have it.
The fabric/moss combo helps prevent soil washout and gives cuttings a gentler surface to root into.
Don’t pack moss like a pillow. Think “light quilt,” not “memory foam mattress.”
Step 5: Mix a frame-friendly succulent soil
For wall art, drainage is everything. A frame can’t “breathe” like a terracotta pot, so a gritty mix reduces rot risk.
Easy option: use a bagged cactus/succulent mix and add extra perlite/pumice.
DIY option: combine potting soil with grit (perlite/pumice/coarse sand) so it drains fast and doesn’t stay soggy.
Step 6: Fill the frame (and compact gently)
Add soil behind the liner, tapping the sides as you go to settle air pockets.
Lightly pressdon’t compress it into a brick. Roots like oxygen.
Step 7: Plan your design before you plant
Place your succulents on top of the mesh (still unplanted) to plan your “living mosaic.”
This is where you decide whether you’re going for:
- Ombre: pale green to blue to purple
- Rosette focus: mostly echeveria-style shapes
- Texture mix: spiky + round + trailing accents
- Mini landscape: “desert meadow but make it art”
Take a photo of your layout. Future-you will forget the plan approximately 14 seconds after picking up a cutting.
Step 8: Plant cuttings through the mesh
Use a chopstick/pencil to make small holes in the soil behind the mesh. Insert cuttings so the stem contacts soil.
For rosettes, you may need to remove a few lower leaves to expose stem for planting.
Work from the center outward so you don’t crush your design with your forearm like an accidental wrecking ball.
Step 9: Let it root while flat
This part is non-negotiable if you want success: keep the frame lying flat for about 1–2 weeks (sometimes longer),
so cuttings can callus, settle, and begin rooting. Bright light is great; harsh, hot direct sun is not.
Water sparingly during this rooting phase. The goal is “encourage roots,” not “create a swamp.”
Step 10: Hang safely (your wall deserves respect)
Once plants feel secure, add strong hanging hardware. Use wall anchors rated for the weight, or mount into studs.
Remember: soil + wood + plants + water = heavier than it looks in cute Instagram photos.
Best Succulents for Frames (Beginner-Friendly Picks)
Choose varieties that stay compact, tolerate bright light, and root easily from cuttings or offsets.
Aim for plants with similar light needs so one section doesn’t thrive while another section stages a tiny protest.
Great frame performers
- Sedum (many types root fast and fill gaps beautifully)
- Echeveria (rosettes = instant “wow”)
- Graptopetalum / Graptoveria (colorful, forgiving hybrids)
- Crassula (some stay compact and handle indoor conditions well)
- Sempervivum (great outdoors; many prefer outdoor conditions and cool seasons)
Use with caution
- Very tall varieties (they’ll get top-heavy)
- Super-thirsty plants mixed with desert-dry plants (care conflict)
- Rare “collector” succulents if you’re still learning watering rhythm
Design Tips That Make It Look Like You Bought It From a Fancy Store
1) Pick a color story
Keep it cohesive by choosing one main palette:
dusty blues + mint greens, warm reds + bronzes, or classic monochrome greens with one “pop” plant.
2) Repeat shapes (like a pattern, not a pile)
Repeat rosettes every few inches. Repeat trailing sedums along an edge.
Repetition makes the design feel intentionaleven if you made half the decisions while holding dirt.
3) Leave tiny breathing room
Overpacking is tempting, but plants need space to grow. Fill gaps with smaller sedums or mini offsets instead of squeezing in a full rosette.
4) Think about viewing distance
A frame on a hallway wall is seen from 6–10 feet away, so bold blocks of texture read better than tiny complicated details.
Save micro-patterns for smaller frames you’ll view up close.
Care & Maintenance (Keep It Alive Without Babysitting It)
Succulents are low-maintenance, not no-maintenance. A living frame needs three things: light, smart watering,
and the occasional cleanup haircut.
Light: the #1 success factor
Indoors, aim for bright light near a sunny window or use a grow light.
Outdoors, many frames do best with morning sun and afternoon shadeespecially in hot climates.
Watering: remove, lay flat, water, drain
The easiest method is to take the frame down, lay it flat in a tub or outside, water thoroughly, then let it drain before rehanging.
Water again only when the mix is dry. If you keep it constantly damp, you’re basically inviting rot to move in.
Fertilizer: optional, light, and seasonal
If you fertilize, use a diluted, gentle succulent fertilizer during active growth seasons.
Over-fertilizing can make growth leggy and less attractive.
Grooming
- Remove dead leaves (they trap moisture and can attract pests)
- Trim and replant “stretchy” stems if light was low
- Pop in new cuttings to refresh thin spots
Troubleshooting: Fix the Usual Drama
Problem: Plants are falling out
- Cause: not enough rooting time, or mesh openings too large
- Fix: lay the frame flat longer; use smaller mesh; tuck extra moss around loose stems
Problem: Leaves look mushy or translucent
- Cause: too much water, poor drainage, or watering too often
- Fix: let the frame dry fully; reduce watering; increase grit (perlite/pumice) next rebuild
Problem: Plants stretch and lose color
- Cause: not enough light
- Fix: move to brighter light or add a grow light; trim and re-root leggy stems
Problem: Brown/white cottony spots
- Cause: common pests like mealybugs
- Fix: isolate the frame; remove visible pests; treat carefully and improve airflow
Easy Variations (Same Idea, Different Vibe)
1) “Faux but fabulous” frame
If your space has low light, consider using high-quality faux succulents. You still get the lookwithout the lighting negotiation.
2) Mini frame gallery wall
Instead of one big statement piece, build three smaller frames with different palettes (cool tones, warm tones, monochrome).
Hang them as a set for a curated “living gallery.”
3) Seasonal refresh frame
Keep the frame structure permanent, but swap cuttings seasonally: more cold-hardy varieties for outdoor spring/fall,
more heat-tolerant types for summer, and a “mostly indoor” set for winter.
Conclusion: Your Wall, But Make It a Garden
Creating succulent wall art with an old picture frame is part DIY carpentry, part floral design, and part learning how plants politely ask for better lighting.
Build a sturdy frame, use a fast-draining mix, let cuttings root while flat, and water like a succulentnot like a fern.
The best part? Even if your first attempt looks a little “modern abstract,” it will grow in, fill out, and become that one home detail everyone remembers.
You’re not just decoratingyou’re installing a tiny, living confidence boost.
: experiences related to the topic
Real-World “Experience” Notes: What This Project Feels Like After the Fun Part
Making a succulent frame is one of those DIYs that looks serene in photos and feels slightly chaotic in real lifein a good way.
The first experience most people have is the surprise of weight. An empty frame is nothing. A finished living frame is
“wow, this is basically a wooden burrito filled with rocks and plants.” That’s why the hanging step matters: the best experience is
admiring your art, not hearing a dramatic thud at 2 a.m. because a weak hook gave up on your dreams.
The second big “experience” is learning that succulents don’t want constant attention. If you’re the type who loves to hover,
this project gently retrains you. You’ll water, then you’ll wait, and then you’ll wait some more. At first, that waiting feels wrong
like you’re ignoring a responsibility. But once you see new growth and tighter rosettes, it clicks: the frame thrives on rhythm,
not fussing. People often describe the moment of confidence as the first time they take the frame down, water it thoroughly,
let it drain, and rehang it without panic. It feels like you’ve unlocked a grown-up skill.
Another common experience is “design brain.” In the planning phase, you start noticing details: leaf shape, color gradients, texture contrast.
You might begin with a simple mix and then suddenly decide you’re creating a full desert sunset ombré, with pale greens on one side,
blue-gray rosettes in the middle, and pinkish tones fading out like a horizon. The funny part? The plants aren’t frozen in place.
They grow. Your design evolves. That’s not a flawit’s the charm. It’s like hanging a painting that slowly repaints itself.
There’s also the learning curve of light. Many indoor DIYers experience a “why are you stretching?” moment when a section becomes leggy.
That’s usually the frame’s way of saying, “I love you, but I need brighter light.” The good news is that the fix becomes part of the hobby:
trimming, re-rooting, and replanting cuttings is basically free renovation. Over time, this turns into a satisfying routine
a quick monthly check where you remove a few dried leaves, tuck in a new cutting, and feel like you’ve maintained a tiny ecosystem.
Finally, the most underrated experience is how this piece changes the feel of a room. A succulent frame reads like art first and plant second,
which makes it perfect for people who want greenery without turning their home into a jungle. It becomes a conversation starter:
guests lean in, point out favorite textures, and ask how it works. And when you casually say, “Oh, it’s an old frame,” you get that
priceless reactionequal parts impressed and slightly suspicious that you might secretly be a professional.


